Page 89 of 266
Controls
87Reference
At a glance
Driving tips
Communications
Navigation
Entertainment
Mobility
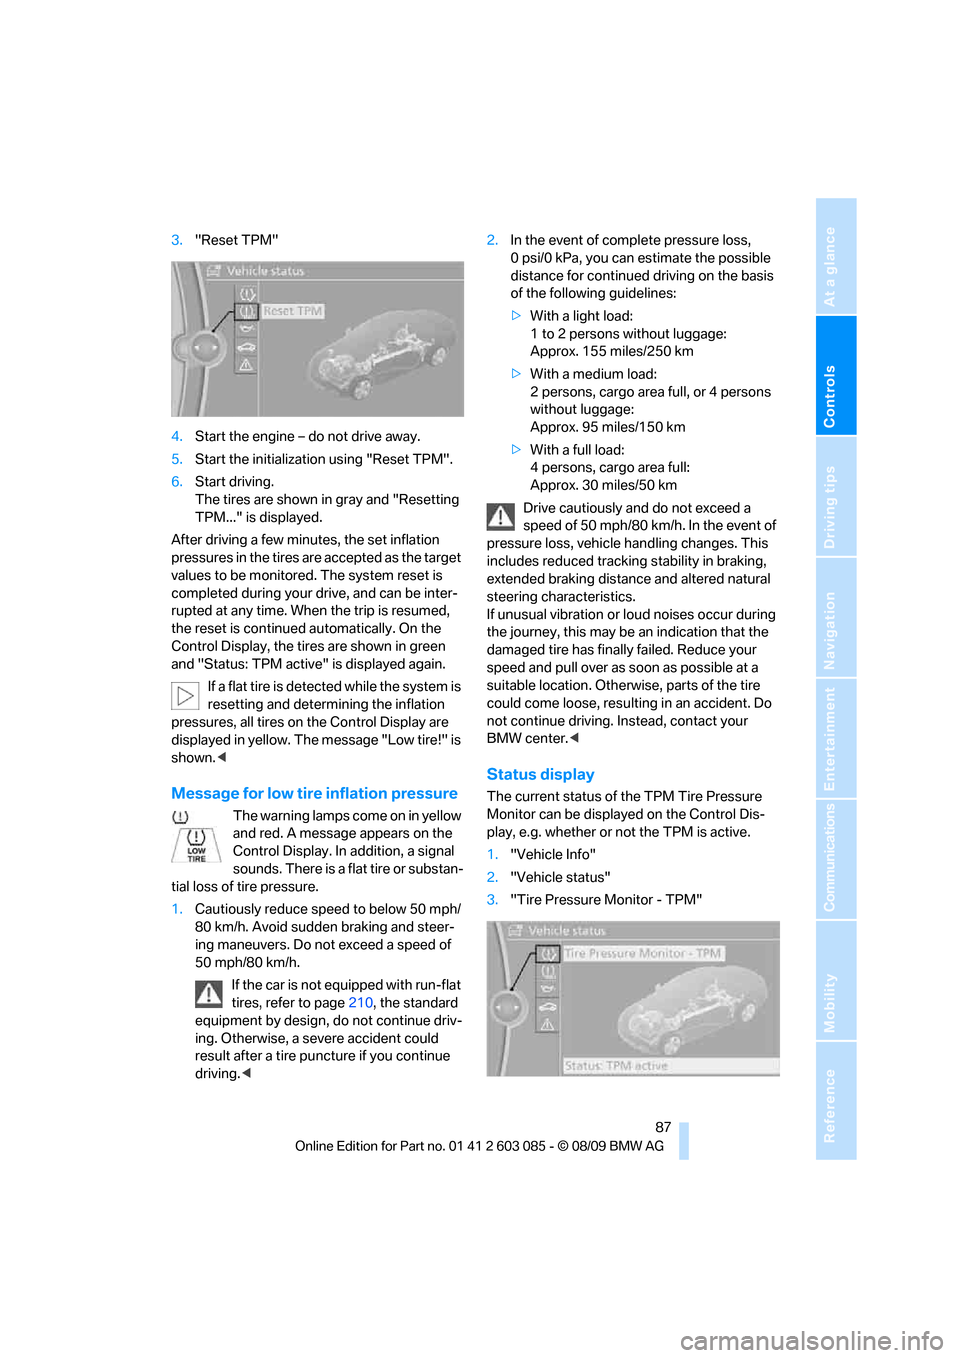
3."Reset TPM"
4.Start the engine – do not drive away.
5.Start the initialization using "Reset TPM".
6.Start driving.
The tires are shown in gray and "Resetting
TPM..." is displayed.
After driving a few minutes, the set inflation
pressures in the tires are accepted as the target
values to be monitored. The system reset is
completed during your drive, and can be inter-
rupted at any time. When the trip is resumed,
the reset is continued automatically. On the
Control Display, the tires are shown in green
and "Status: TPM active" is displayed again.
If a flat tire is detected while the system is
resetting and determining the inflation
pressures, all tires on the Control Display are
displayed in yellow. The message "Low tire!" is
shown.<
Message for low tire inflation pressure
The warning lamps come on in yellow
and red. A message appears on the
Control Display. In addition, a signal
sounds. There is a flat tire or substan-
tial loss of tire pressure.
1.Cautiously reduce speed to below 50 mph/
80 km/h. Avoid sudden braking and steer-
ing maneuvers. Do not exceed a speed of
50 mph/80 km/h.
If the car is not equipped with run-flat
tires, refer to page210, the standard
equipment by design, do not continue driv-
ing. Otherwise, a severe accident could
result after a tire puncture if you continue
driving.<2.In the event of complete pressure loss,
0 psi/0 kPa, you can estimate the possible
distance for continued driving on the basis
of the following guidelines:
>With a light load:
1 to 2 persons without luggage:
Approx. 155 miles/250 km
>With a medium load:
2 persons, cargo area full, or 4 persons
without luggage:
Approx. 95 miles/150 km
>With a full load:
4 persons, cargo area full:
Approx. 30 miles/50 km
Drive cautiously and do not exceed a
speed of 50 mph/80 km/h. In the event of
pressure loss, vehicle handling changes. This
includes reduced tracking stability in braking,
extended braking distance and altered natural
steering characteristics.
If unusual vibration or loud noises occur during
the journey, this may be an indication that the
damaged tire has finally failed. Reduce your
speed and pull over as soon as possible at a
suitable location. Otherwise, parts of the tire
could come loose, resulting in an accident. Do
not continue driving. Instead, contact your
BMW center.<
Status display
The current status of the TPM Tire Pressure
Monitor can be displayed on the Control Dis-
play, e.g. whether or not the TPM is active.
1."Vehicle Info"
2."Vehicle status"
3."Tire Pressure Monitor - TPM"
Page 90 of 266
Technology for driving comfort and safety
88 The status is displayed.
Malfunction
The small warning lamp flashes in
yellow and then lights up continu-
ously; the large warning lamp comes
on in yellow. On the Control Display,
the tires are shown in gray and a message
appears. No punctures can be detected.
This type of message is shown in the following
situations:
>If there is a malfunction
Have the system checked.
>If a wheel without TPM electronics has
been mounted
>If TPM is temporarily malfunctioning due to
other systems or devices using the same
radio frequency.
Message for unsuccessful system
reset
The warning lamp lights up yellow. A
message appears on the Control Dis-
play. The system is not reset, e.g.
after a wheel change.
Check the tire inflation pressure and reset the
system, refer to page86.
Declaration according to NHTSA/
FMVSS 138
Tire Pressure Monitoring Systems
Each tire should be checked monthly when cold
and inflated to the inflation pressure recom-
mended by the vehicle manufacturer on the
vehicle placard or tire inflation pressure label. If
your vehicle has tires of a different size than the
size indicated on the vehicle placard or tire infla-
tion pressure label, you should determine the
proper tire inflation pressure for those tires. As
an added safety feature, your vehicle has been
equipped with a tire pressure monitoring sys-
tem, TPMS, that illuminates a low tire pressure
telltale when one or more of your tires are signif-
icantly underinflated. Accordingly, when the
low tire pressure telltale illuminates, you should
stop and check your tires as soon as possible,
and inflate them to the proper pressure. Driving on a significantly underinflated tire causes the
tire to overheat and can lead to tire failure.
Underinflation also reduces fuel efficiency and
tire tread life, and may affect the vehicle’s han-
dling and stopping ability. Please note that the
TPMS is not a substitute for proper tire mainte-
nance, and it is the driver’s responsibility to
maintain correct tire pressure, even if underin-
flation has not reached the level at which the
TPMS low tire pressure telltale illuminates.
The TPMS malfunction indicator is combined
with the low tire pressure telltale. When the sys-
tem detects a malfunction, the telltale will flash
for approximately one minute and then remain
continuously lit. This sequence will continue
upon subsequent vehicle startups as long as
the malfunction exists. When the malfunction
indicator is illuminated, the system may not be
able to detect or signal low tire pressure as
intended. TPMS malfunctions may occur for a
variety of reasons, including the installation of
replacement or alternate tires or wheels on the
vehicle that prevent the TPMS from functioning
properly. Always check the TPMS malfunction
telltale after replacing one or more tires or
wheels on your vehicle to ensure that the
replacement or alternate tires and wheels allow
the TPMS to continue to function properly.
Active steering*
The concept
Active steering varies the turning angle of the
front wheels in relation to steering wheel move-
ments. It also varies the steering force required
to turn the wheels depending on the speed at
which you are driving.
When you are driving in the low road speed
range, e.g. in a town or when parking, the steer-
ing angle is increased, i.e. steering becomes
very direct and less effort is required to turn the
wheels. In the higher speed range, on the other
hand, the steering angle is reduced as the
speed increases. This improves the handling of
your BMW over the entire speed range.
Page 91 of 266
Controls
89Reference
At a glance
Driving tips
Communications
Navigation
Entertainment
Mobility
In critical situations, the system can make tar-
geted corrections to the steering angle pro-
vided by the driver and thus stabilize the vehicle
before the driver intervenes. This stabilizing
intervention is simultaneously deactivated
when DSC is switched off, refer to page82.
Malfunction
The warning lamps light up and a
message is displayed on the Control
Display. Active steering is malfunc-
tioning or is temporarily deactivated.
At low speeds, greater steering wheel move-
ments are required, whereas at higher speeds
the vehicle reacts more sensitively to steering
wheel movements. The stability-enhancing
feature may also be deactivated. Drive cau-
tiously and think well ahead.
Deactivation
Active steering is deactivated to perform an ini-
tialization. A message indicates that the feature
is deactivated. Initialization may take several
minutes.
If the message does not disappear during the
current trip, have the system checked.
Defect
If there is a defect, a corresponding text mes-
sage appears. Have the system checked.
Servotronic*
The concept
The Servotronic varies the steering force
required to turn the wheels relative to the vehi-
cle speed.
At low speeds, the steering force is strongly
assisted, i.e. less force is needed for steering.
As the vehicle speed increases, the steering
assisting power is reduced.
Malfunction
Malfunctions are displayed via Check Control,
refer to page77.
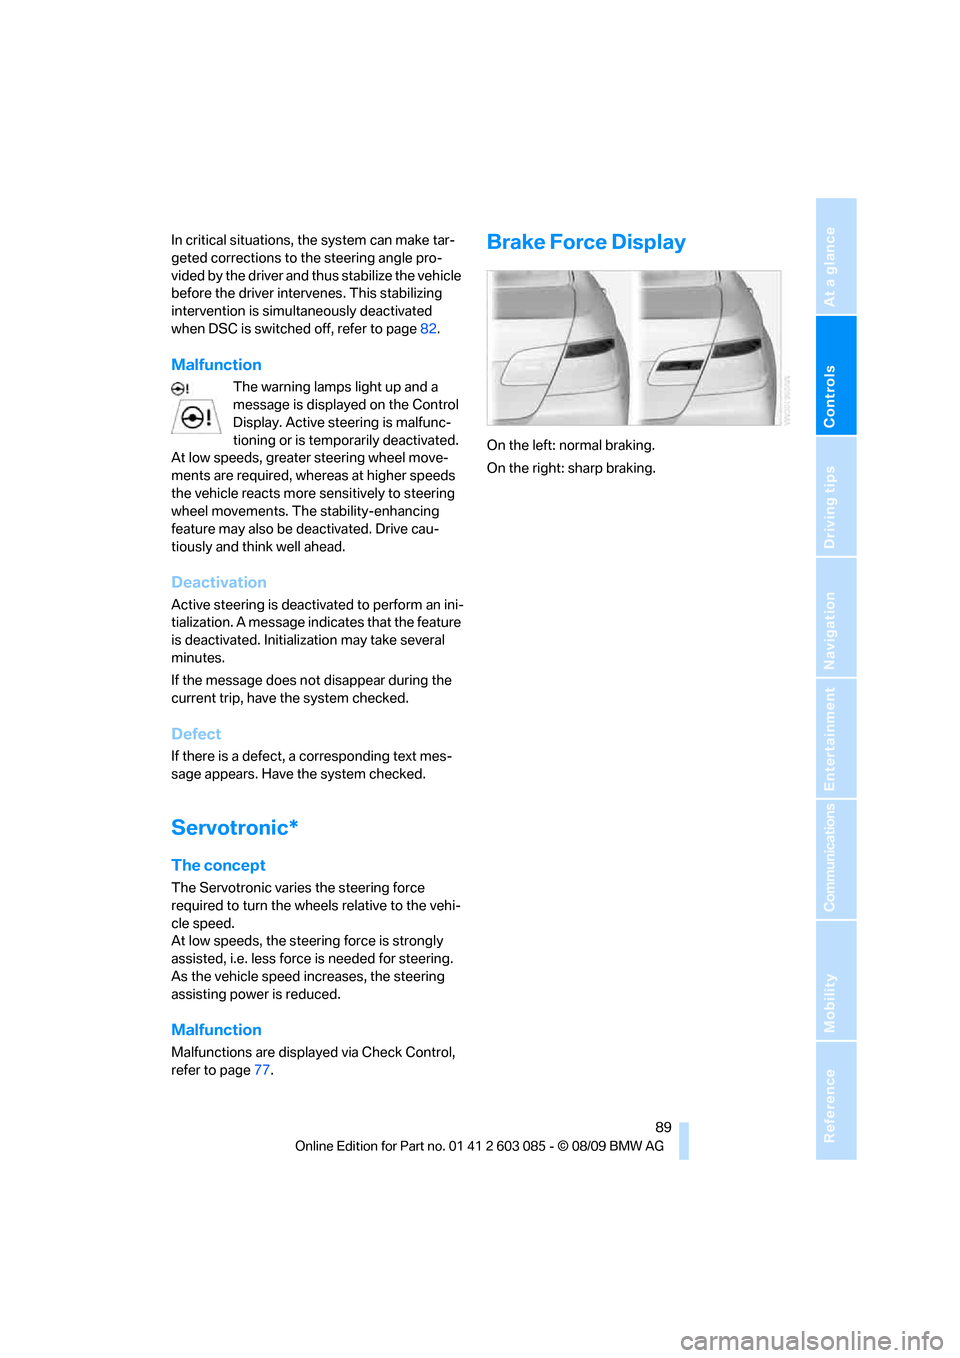
Brake Force Display
On the left: normal braking.
On the right: sharp braking.
Page 92 of 266
Technology for driving comfort and safety
90
Airbags
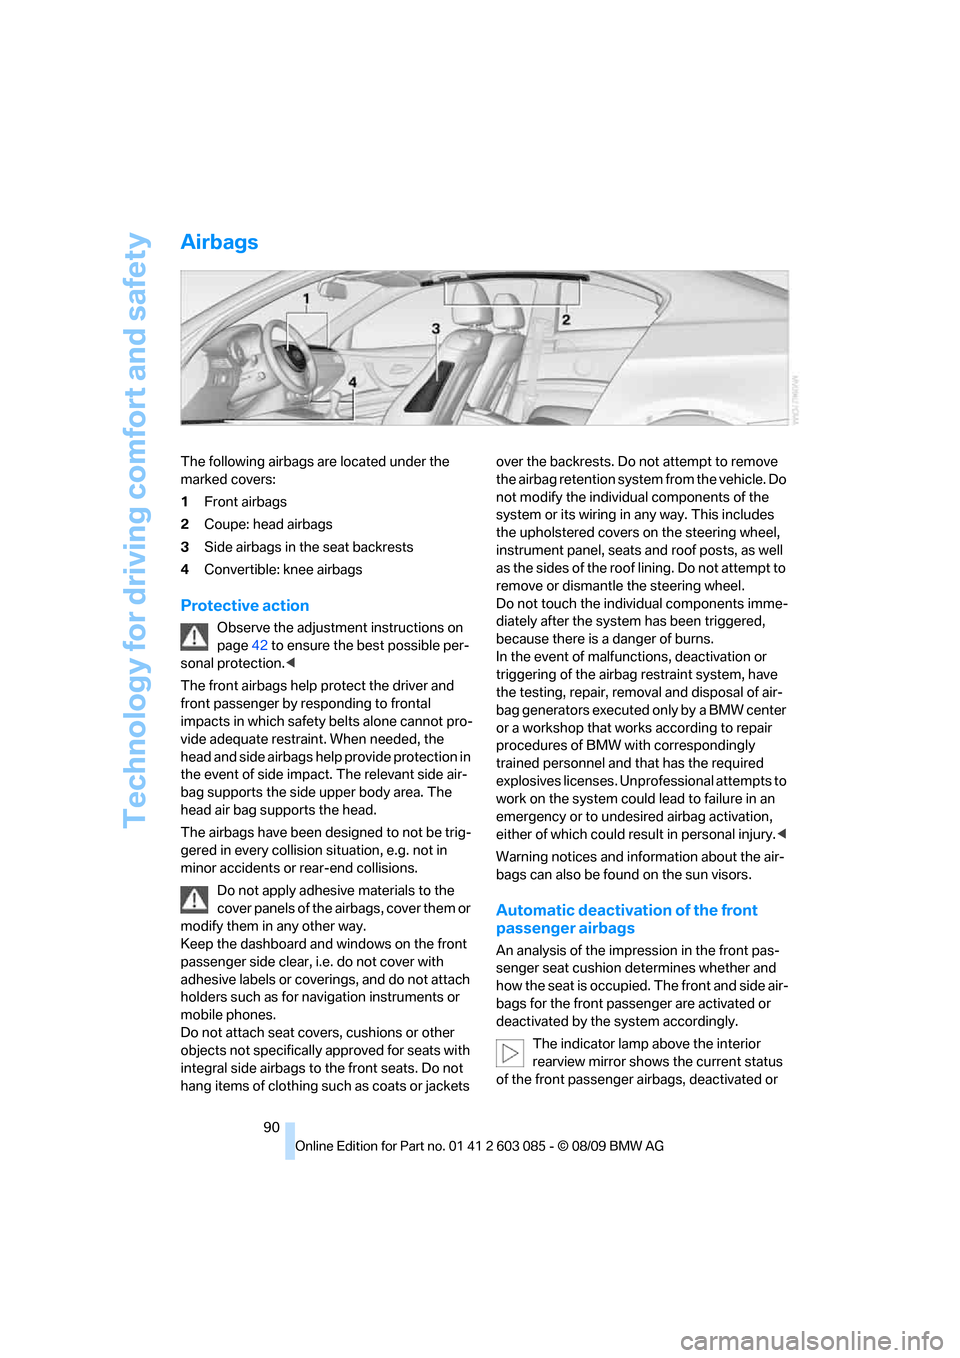
The following airbags are located under the
marked covers:
1Front airbags
2Coupe: head airbags
3Side airbags in the seat backrests
4Convertible: knee airbags
Protective action
Observe the adjustment instructions on
page42 to ensure the best possible per-
sonal protection.<
The front airbags help protect the driver and
front passenger by responding to frontal
impacts in which safety belts alone cannot pro-
vide adequate restraint. When needed, the
head and side airbags help provide protection in
the event of side impact. The relevant side air-
bag supports the side upper body area. The
head air bag supports the head.
The airbags have been designed to not be trig-
gered in every collision situation, e.g. not in
minor accidents or rear-end collisions.
Do not apply adhesive materials to the
cover panels of the airbags, cover them or
modify them in any other way.
Keep the dashboard and windows on the front
passenger side clear, i.e. do not cover with
adhesive labels or coverings, and do not attach
holders such as for navigation instruments or
mobile phones.
Do not attach seat covers, cushions or other
objects not specifically approved for seats with
integral side airbags to the front seats. Do not
hang items of clothing such as coats or jackets over the backrests. Do not attempt to remove
the airbag retention system from the vehicle. Do
not modify the individual components of the
system or its wiring in any way. This includes
the upholstered covers on the steering wheel,
instrument panel, seats and roof posts, as well
as the sides of the roof lining. Do not attempt to
remove or dismantle the steering wheel.
Do not touch the individual components imme-
diately after the system has been triggered,
because there is a danger of burns.
In the event of malfunctions, deactivation or
triggering of the airbag restraint system, have
the testing, repair, removal and disposal of air-
bag generators executed only by a BMW center
or a workshop that works according to repair
procedures of BMW with correspondingly
trained personnel and that has the required
explosives licenses. Unprofessional attempts to
work on the system could lead to failure in an
emergency or to undesired airbag activation,
either of which could result in personal injury.<
Warning notices and information about the air-
bags can also be found on the sun visors.
Automatic deactivation of the front
passenger airbags
An analysis of the impression in the front pas-
senger seat cushion determines whether and
how the seat is occupied. The front and side air-
bags for the front passenger are activated or
deactivated by the system accordingly.
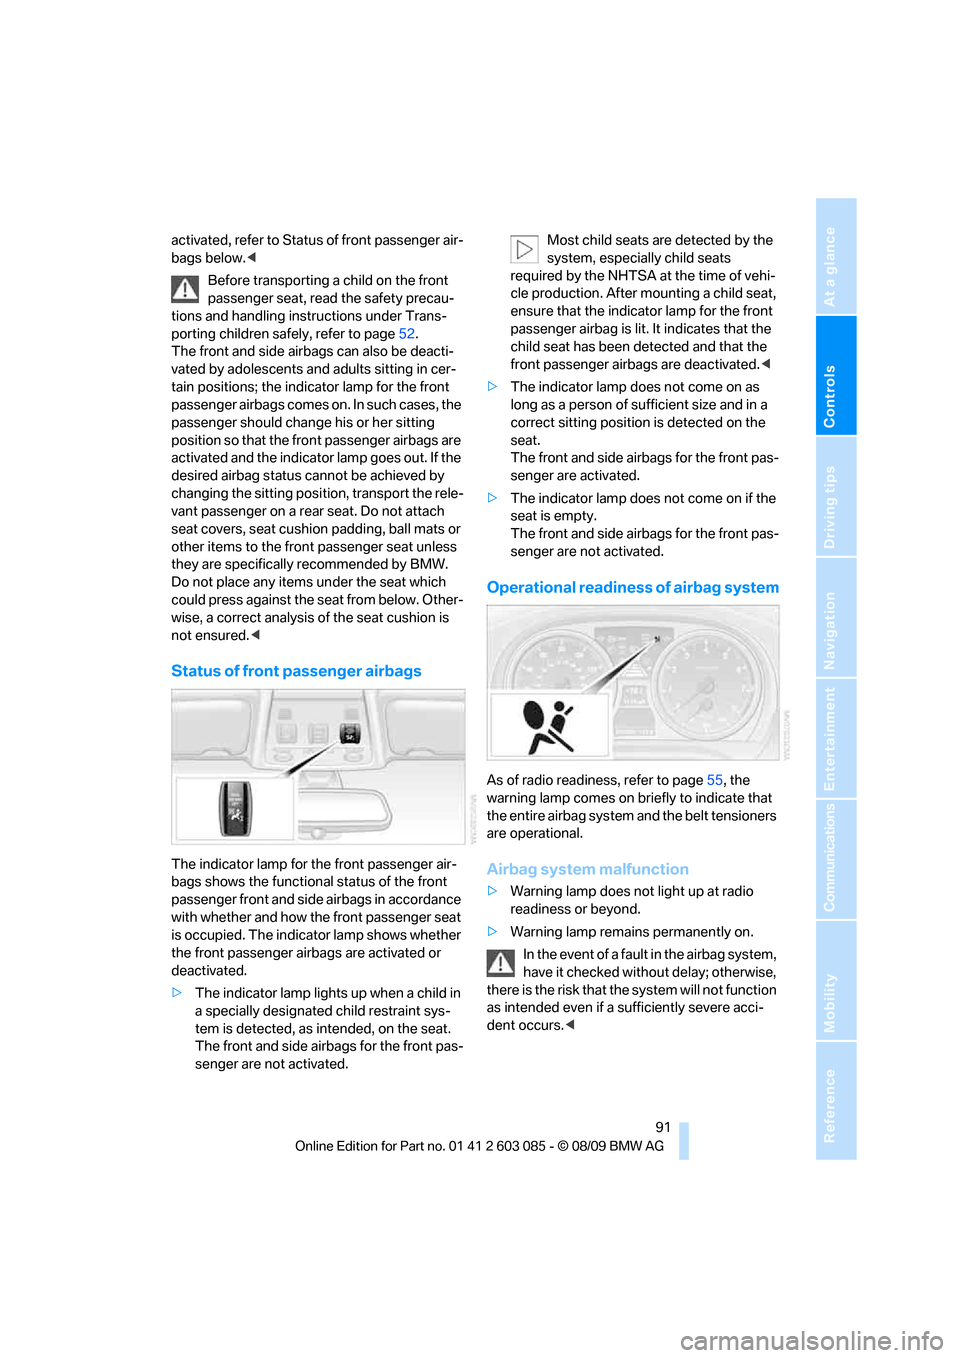
The indicator lamp above the interior
rearview mirror shows the current status
of the front passenger airbags, deactivated or
Page 93 of 266
Controls
91Reference
At a glance
Driving tips
Communications
Navigation
Entertainment
Mobility
activated, refer to Status of front passenger air-
bags below.<
Before transporting a child on the front
passenger seat, read the safety precau-
tions and handling instructions under Trans-
porting children safely, refer to page52.
The front and side airbags can also be deacti-
vated by adolescents and adults sitting in cer-
tain positions; the indicator lamp for the front
passenger airbags comes on. In such cases, the
passenger should change his or her sitting
position so that the front passenger airbags are
activated and the indicator lamp goes out. If the
desired airbag status cannot be achieved by
changing the sitting position, transport the rele-
vant passenger on a rear seat. Do not attach
seat covers, seat cushion padding, ball mats or
other items to the front passenger seat unless
they are specifically recommended by BMW.
Do not place any items under the seat which
could press against the seat from below. Other-
wise, a correct analysis of the seat cushion is
not ensured.<
Status of front passenger airbags
The indicator lamp for the front passenger air-
bags shows the functional status of the front
passenger front and side airbags in accordance
with whether and how the front passenger seat
is occupied. The indicator lamp shows whether
the front passenger airbags are activated or
deactivated.
>The indicator lamp lights up when a child in
a specially designated child restraint sys-
tem is detected, as intended, on the seat.
The front and side airbags for the front pas-
senger are not activated.Most child seats are detected by the
system, especially child seats
required by the NHTSA at the time of vehi-
cle production. After mounting a child seat,
ensure that the indicator lamp for the front
passenger airbag is lit. It indicates that the
child seat has been detected and that the
front passenger airbags are deactivated.<
>The indicator lamp does not come on as
long as a person of sufficient size and in a
correct sitting position is detected on the
seat.
The front and side airbags for the front pas-
senger are activated.
>The indicator lamp does not come on if the
seat is empty.
The front and side airbags for the front pas-
senger are not activated.
Operational readiness of airbag system
As of radio readiness, refer to page55, the
warning lamp comes on briefly to indicate that
the entire airbag system and the belt tensioners
are operational.
Airbag system malfunction
>Warning lamp does not light up at radio
readiness or beyond.
>Warning lamp remains permanently on.
In the event of a fault in the airbag system,
have it checked without delay; otherwise,
there is the risk that the system will not function
as intended even if a sufficiently severe acci-
dent occurs.<
Page 94 of 266
Technology for driving comfort and safety
92
Convertible: rollover
protection system
The rollover protection system is activated
automatically in the event of an accident, a crit-
ical driving situation, an extreme tilt in the car's
longitudinal axis or upon loss of ground contact.
The protection bars behind the rear head
restraints deploy within fractions of a second.
As a supplementary system to the reinforced
windshield frame, the rollover protection sys-
tem ensures that the necessary headroom is
maintained for all vehicle occupants.
Always keep the area of movement of the
rollover protection system clear.
In minor accidents, you are protected by the
fastened safety belt and, depending on acci-
dent severity, by the safety belt tensioner and
multi-phase airbag retention system.<
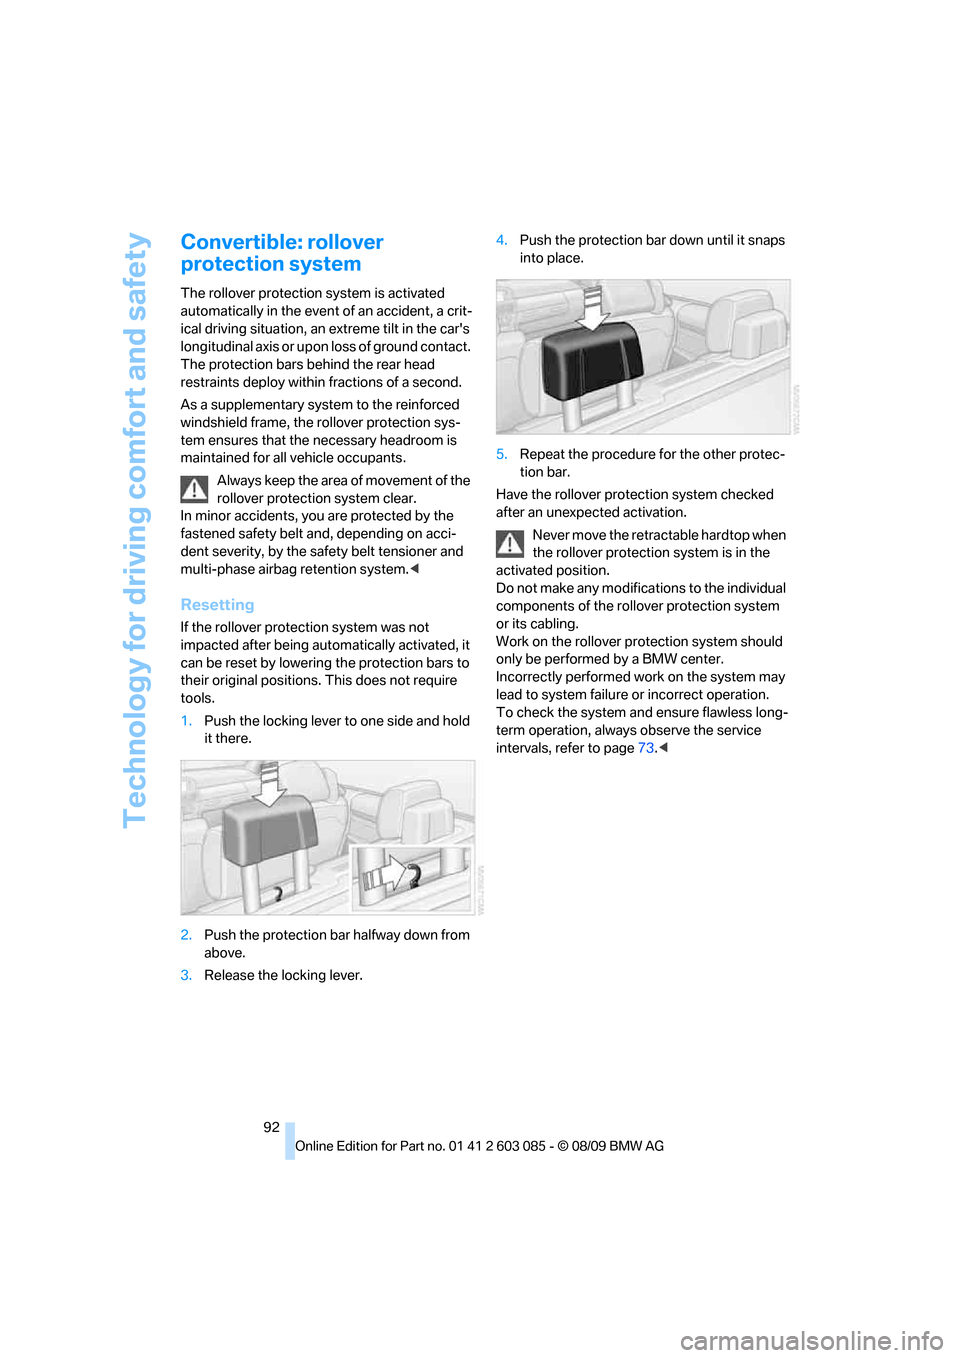
Resetting
If the rollover protection system was not
impacted after being automatically activated, it
can be reset by lowering the protection bars to
their original positions. This does not require
tools.
1.Push the locking lever to one side and hold
it there.
2.Push the protection bar halfway down from
above.
3.Release the locking lever.4.Push the protection bar down until it snaps
into place.
5.Repeat the procedure for the other protec-
tion bar.
Have the rollover protection system checked
after an unexpected activation.
Never move the retractable hardtop when
the rollover protection system is in the
activated position.
Do not make any modifications to the individual
components of the rollover protection system
or its cabling.
Work on the rollover protection system should
only be performed by a BMW center.
Incorrectly performed work on the system may
lead to system failure or incorrect operation.
To check the system and ensure flawless long-
term operation, always observe the service
intervals, refer to page73.<
Page 95 of 266
Controls
93Reference
At a glance
Driving tips
Communications
Navigation
Entertainment
Mobility
Lamps
Parking lamps/low beams
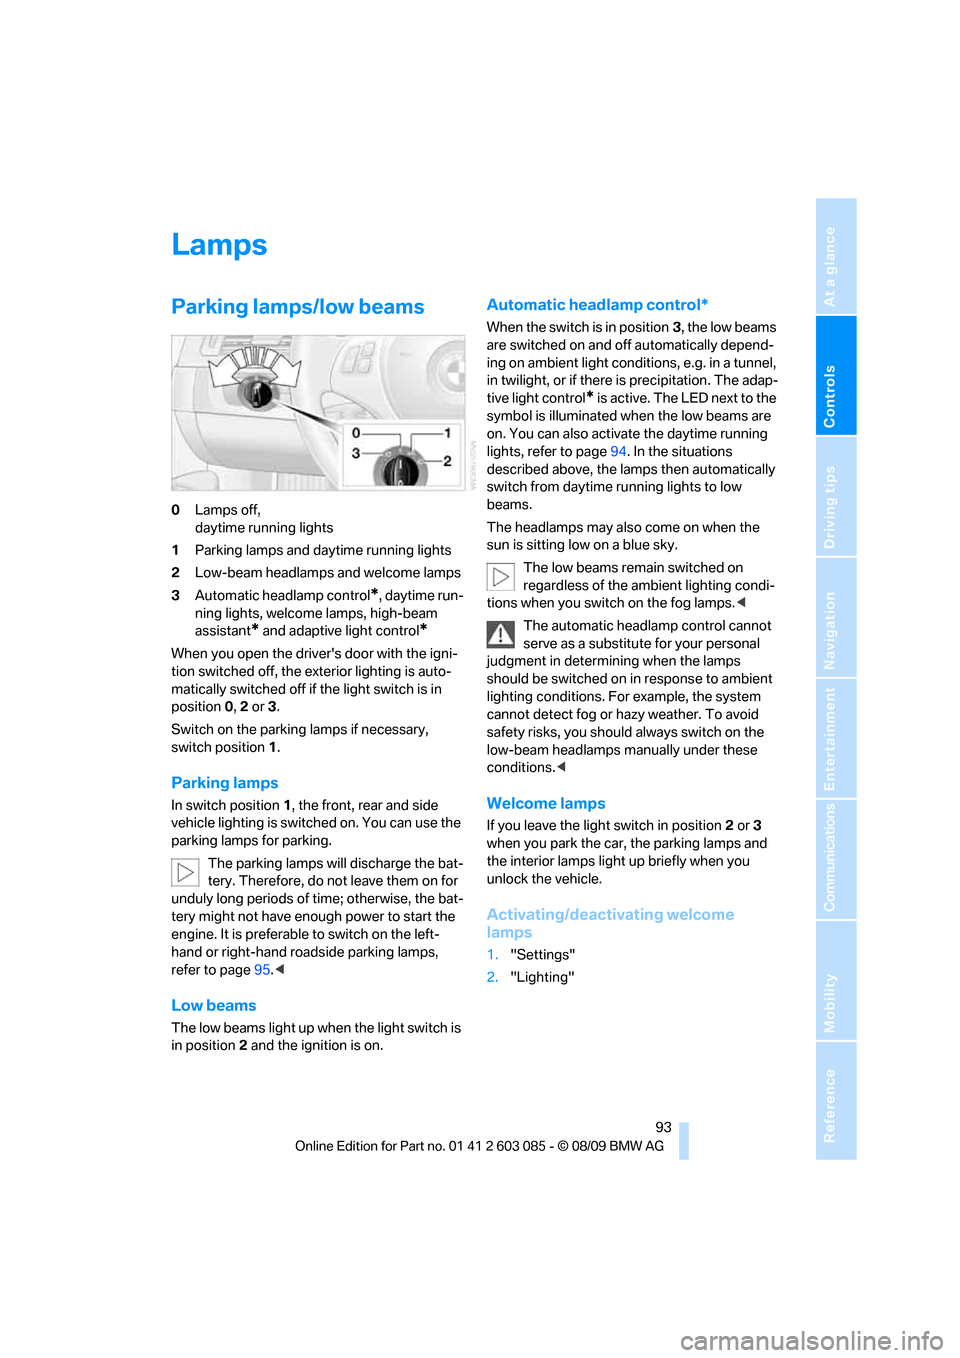
0Lamps off,
daytime running lights
1Parking lamps and daytime running lights
2Low-beam headlamps and welcome lamps
3Automatic headlamp control
*, daytime run-
ning lights, welcome lamps, high-beam
assistant
* and adaptive light control*
When you open the driver's door with the igni-
tion switched off, the exterior lighting is auto-
matically switched off if the light switch is in
position 0, 2 or 3.
Switch on the parking lamps if necessary,
switch position 1.
Parking lamps
In switch position1, the front, rear and side
vehicle lighting is switched on. You can use the
parking lamps for parking.
The parking lamps will discharge the bat-
tery. Therefore, do not leave them on for
unduly long periods of time; otherwise, the bat-
tery might not have enough power to start the
engine. It is preferable to switch on the left-
hand or right-hand roadside parking lamps,
refer to page95.<
Low beams
The low beams light up when the light switch is
in position 2 and the ignition is on.
Automatic headlamp control*
When the switch is in position3, the low beams
are switched on and off automatically depend-
ing on ambient light conditions, e.g. in a tunnel,
in twilight, or if there is precipitation. The adap-
tive light control
* is active. The LED next to the
symbol is illuminated when the low beams are
on. You can also activate the daytime running
lights, refer to page94. In the situations
described above, the lamps then automatically
switch from daytime running lights to low
beams.
The headlamps may also come on when the
sun is sitting low on a blue sky.
The low beams remain switched on
regardless of the ambient lighting condi-
tions when you switch on the fog lamps.<
The automatic headlamp control cannot
serve as a substitute for your personal
judgment in determining when the lamps
should be switched on in response to ambient
lighting conditions. For example, the system
cannot detect fog or hazy weather. To avoid
safety risks, you should always switch on the
low-beam headlamps manually under these
conditions.<
Welcome lamps
If you leave the light switch in position 2 or 3
when you park the car, the parking lamps and
the interior lamps light up briefly when you
unlock the vehicle.
Activating/deactivating welcome
lamps
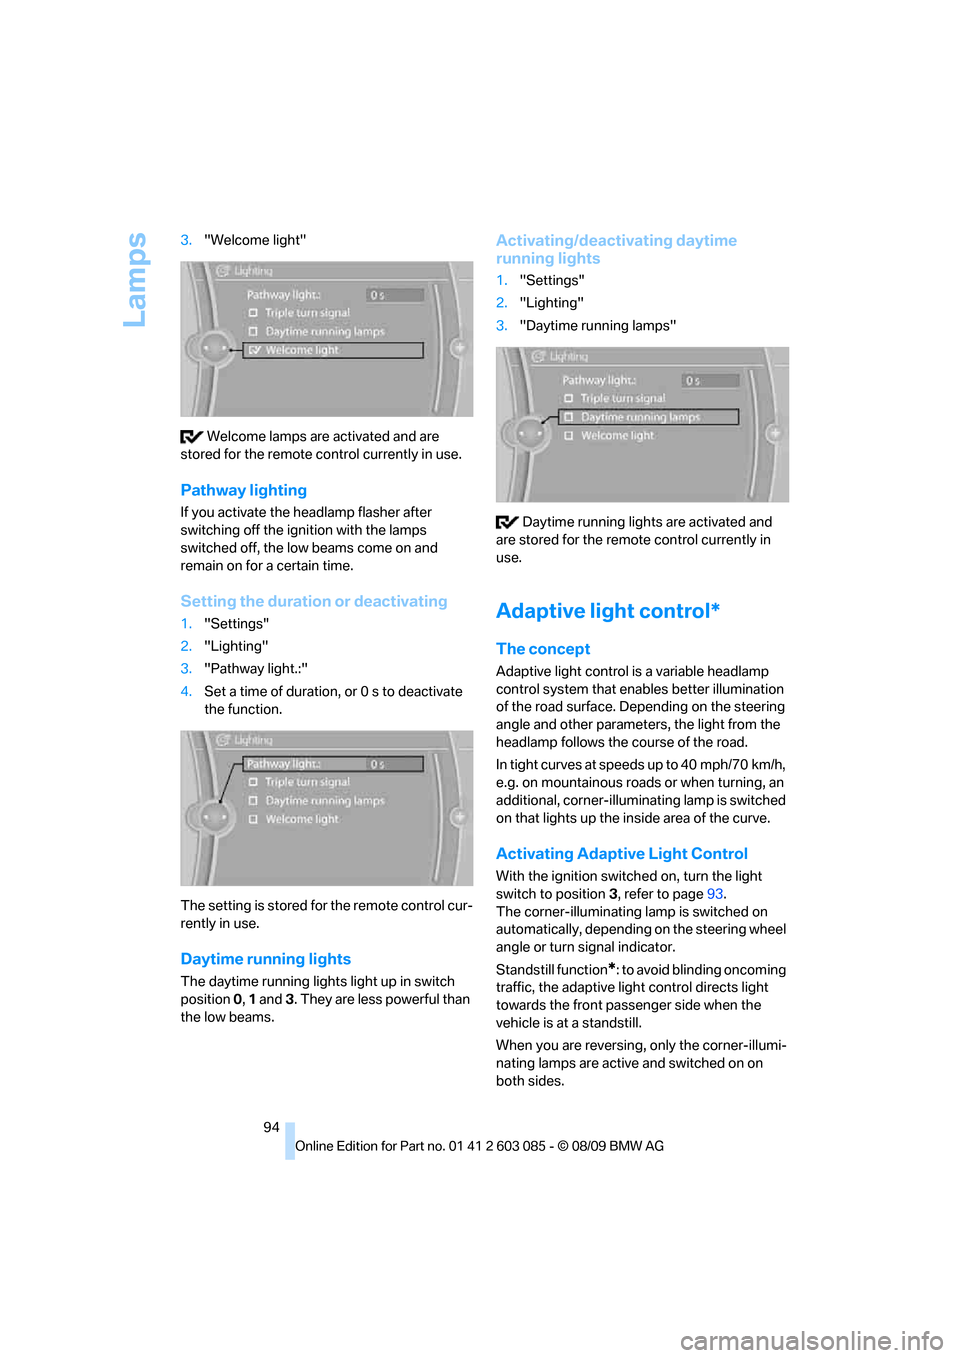
1."Settings"
2."Lighting"
Page 96 of 266
Lamps
94 3."Welcome light"
Welcome lamps are activated and are
stored for the remote control currently in use.
Pathway lighting
If you activate the headlamp flasher after
switching off the ignition with the lamps
switched off, the low beams come on and
remain on for a certain time.
Setting the duration or deactivating
1."Settings"
2."Lighting"
3."Pathway light.:"
4.Set a time of duration, or 0 s to deactivate
the function.
The setting is stored for the remote control cur-
rently in use.
Daytime running lights
The daytime running lights light up in switch
position 0, 1 and 3. They are less powerful than
the low beams.
Activating/deactivating daytime
running lights
1."Settings"
2."Lighting"
3."Daytime running lamps"
Daytime running lights are activated and
are stored for the remote control currently in
use.
Adaptive light control*
The concept
Adaptive light control is a variable headlamp
control system that enables better illumination
of the road surface. Depending on the steering
angle and other parameters, the light from the
headlamp follows the course of the road.
In tight curves at speeds up to 40 mph/70 km/h,
e.g. on mountainous roads or when turning, an
additional, corner-illuminating lamp is switched
on that lights up the inside area of the curve.
Activating Adaptive Light Control
With the ignition switched on, turn the light
switch to position 3, refer to page93.
The corner-illuminating lamp is switched on
automatically, depending on the steering wheel
angle or turn signal indicator.
Standstill function
*: to avoid blinding oncoming
traffic, the adaptive light control directs light
towards the front passenger side when the
vehicle is at a standstill.
When you are reversing, only the corner-illumi-
nating lamps are active and switched on on
both sides.
 1
1 2
2 3
3 4
4 5
5 6
6 7
7 8
8 9
9 10
10 11
11 12
12 13
13 14
14 15
15 16
16 17
17 18
18 19
19 20
20 21
21 22
22 23
23 24
24 25
25 26
26 27
27 28
28 29
29 30
30 31
31 32
32 33
33 34
34 35
35 36
36 37
37 38
38 39
39 40
40 41
41 42
42 43
43 44
44 45
45 46
46 47
47 48
48 49
49 50
50 51
51 52
52 53
53 54
54 55
55 56
56 57
57 58
58 59
59 60
60 61
61 62
62 63
63 64
64 65
65 66
66 67
67 68
68 69
69 70
70 71
71 72
72 73
73 74
74 75
75 76
76 77
77 78
78 79
79 80
80 81
81 82
82 83
83 84
84 85
85 86
86 87
87 88
88 89
89 90
90 91
91 92
92 93
93 94
94 95
95 96
96 97
97 98
98 99
99 100
100 101
101 102
102 103
103 104
104 105
105 106
106 107
107 108
108 109
109 110
110 111
111 112
112 113
113 114
114 115
115 116
116 117
117 118
118 119
119 120
120 121
121 122
122 123
123 124
124 125
125 126
126 127
127 128
128 129
129 130
130 131
131 132
132 133
133 134
134 135
135 136
136 137
137 138
138 139
139 140
140 141
141 142
142 143
143 144
144 145
145 146
146 147
147 148
148 149
149 150
150 151
151 152
152 153
153 154
154 155
155 156
156 157
157 158
158 159
159 160
160 161
161 162
162 163
163 164
164 165
165 166
166 167
167 168
168 169
169 170
170 171
171 172
172 173
173 174
174 175
175 176
176 177
177 178
178 179
179 180
180 181
181 182
182 183
183 184
184 185
185 186
186 187
187 188
188 189
189 190
190 191
191 192
192 193
193 194
194 195
195 196
196 197
197 198
198 199
199 200
200 201
201 202
202 203
203 204
204 205
205 206
206 207
207 208
208 209
209 210
210 211
211 212
212 213
213 214
214 215
215 216
216 217
217 218
218 219
219 220
220 221
221 222
222 223
223 224
224 225
225 226
226 227
227 228
228 229
229 230
230 231
231 232
232 233
233 234
234 235
235 236
236 237
237 238
238 239
239 240
240 241
241 242
242 243
243 244
244 245
245 246
246 247
247 248
248 249
249 250
250 251
251 252
252 253
253 254
254 255
255 256
256 257
257 258
258 259
259 260
260 261
261 262
262 263
263 264
264 265
265


