2010 AUDI S6 fuse
[x] Cancel search: fusePage 5 of 368

Table of contents
Monitoring the Advanced Airbag Vehicle care .............. 258 Emergency towing with
System ...................... 206 commercial tow truck ........ .
Side airbags ... ......... ...... 211
Cleaning and protection ...... 258 Lift
ing vehicle ............... . 334
336
Side curtain airbags . . . . . . . . . . . . 214
Child Safety .. .. .......... ..... 217
Important things to know . . . . . . 217
Child safety seats . . . . . . . . . . . . . 222
Installing a child safety seat .. .. 227
LATCH Lower anchorages and
tethers for children . . . . . . . . . . . . 230
Additional Information 237
Vehicle operation ...... 240
Intelligent technology ........ 240
Notice abou t data recorded by
vehicle control modules . . . . . . . . 240
E lectronic Stabilization Program
(ESP) ........................ 240
Braking ...................... 243
Servo tronic® -advanced power
steering system . . . . . . . . . . . . . . . 245
Driving with your quattro® . . . . . . 246
Energy management ........... 247
Driving and environment ...... 249
The first 1,000 miles (1,500 km)
and afterwards . . . . . . . . . . . . . . . 249
Avoid damaging the veh icle . . . . . 250
Driving through water on roads . 250
Catalytic converter . . . . . . . . . . . . 250
Operate your vehicle economically
and minimize pollution ......... 251
Trailer towing ................. 254
Driving with a trailer . . . . . . . . . . . 254
T railer towing tips . . . . . . . . . . . . . 256
Controls and equip
ment Safety first
General informa
tion . . . . . . . . . . . 258
Care of exterior . . . . . . . . . . . . . . . 258
Care of interior . . . . . . . . . . . . . . . 265
Fuel supply and filling your fuel
tank ..........................
271
Gasoline . . . . . . . . . . . . . . . . . . . . . 271
Fuel tank . . . . . . . . . . . . . . . . . . . . . 272
Checking and filling . . . . . . . . . . . 276
Technical data
General information
Explanation of technical data .. .
Vehicle ident ification ......... .
Weights ................... . .
Dimensions ............... .. . 338
338
338
338
339
339
Engine hood . . . . . . . . . . . . . . . . . . 276
Data . . . . . . . . . . . . . . . . . . . . . . . . . . 341
Engine oil . . . . . . . . . . . . . . . . . . . . 279 300 hp, 3.0 liter, 6-cylinder
Engine cooling system . . . . . . . . . 284
Brake fluid . . . . . . . . . . . . . . . . . . . 287
Ba ttery . . . . . . . . . . . . . . . . . . . . . . 288
Windshield/headlight washer container . . . . . . . . . . . . . . . . . . . . 292
Tires and wheels . . . . . . . . . . . . . . 293 engine ......................
.
265 hp, 3.2 liter , 6-cylinder
engine ......... ..... ........ .
350 hp, a-cylinder engine ..... .
Consumer Information ...... .
Warranty coverages .......... . 341
342
343
344
344
T ires ........................ 293 Operating your vehicle outside the
T ire pressure monitoring system 312
Do-it-yourself service . 316
What do I do now? ........... 316
Trunk escape handle ........... 316
Jack, tools and spare wheel ..... 316
Changing a wheel . . . . . . . . . . . . . 318
Fuses and bulbs . . . . . . . . . . . . . . 325
F u ses ........... ............. 325 U.S.A
. or Canada ............. .
Audi Service Repair Manuals and
Literature ................... .
Maintenance ................ .
Additional accessories, modifications and parts replacement ............... . .
Declaration of Compliance,
T elecommunications and
Electronic Systems .......... . .
Bulbs ........................ 329
Alphabetical index ....
Emergency situations ......... 331
General . . . . . . . . . . . . . . . . . . . . . . 331
Starting by pushing or towing 331
Starting with jumper cables .... 331
Use of jumper cables . . . . . . . . . . 332
Vehicle operation Vehicle care Do-it-yourself service
344
344
344
346
347
350
Technical data
Page 58 of 368
Open ing and closing
App lies to veh icles : w ith sliding/tilting power sunroof
Emergency closing by hand (Step 1)
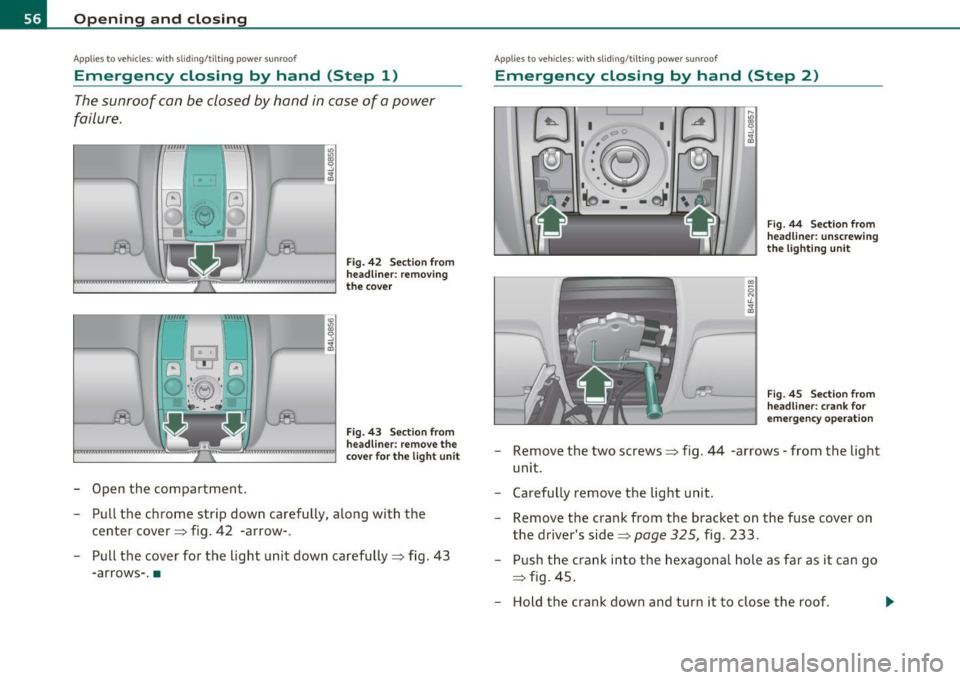
The sunroof can be closed by hand in case of a power
failure .
0
-Open the compartment.
Fig. 42 Sect ion from
head lin er: removing
the cover
Fig. 43 Section from
headli ner: remove the
cove r fo r th e light u nit
- Pull the chrome strip down carefully, along with the
center cover ::::, fig . 42 -arrow-.
- Pull the cover for the light unit down carefully::::, fig .
43
-arrows- .•
App lies to veh icles: w ith slid ing/t ilting power sunroof
Emergency closing by hand (Step 2)
I I C' C
•:~ I
I',.~ I
.• \o -·: -t)J ,_,,
J
F ig . 44 Sect ion from
head line r: unscrew ing
t h e lig hti ng u nit
Fi g. 45 Sect ion from
head line r: crank for
e m ergency ope ration
Remove the two screws::::, fig. 44 -arrows -from the light
unit .
Carefully remove the light unit .
Remove the crank from the b racket on the fuse cover on
the driver's side::::,
page 325, fig. 233.
Push the crank into the hexagonal hole as far as it can go
=> fig. 45 .
- Hold the crank down and turn it to close the roof . ...
Page 327 of 368
Fuses and bulbs -_______________ __.PfWII
Fuses and bulbs
Fuses
Replacing a fuse
A problem in the electrical system may be caused by a
blown fuse.
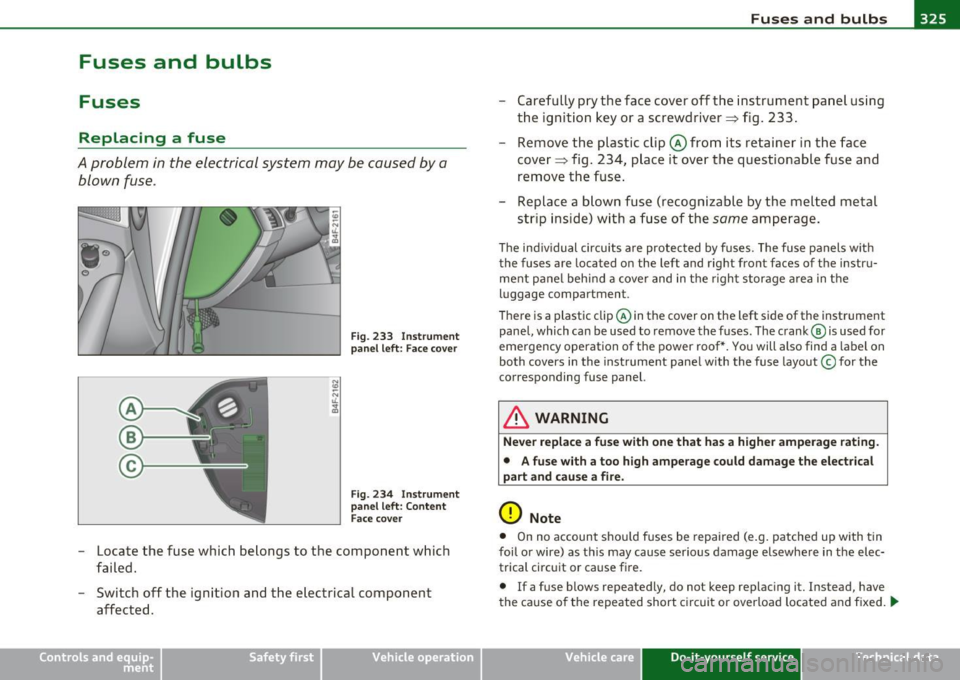
Fig. 233 Instrument
panel left: Face cover
Fig. 234 Instrument
panel left: Content
Face cover
-Locate the fuse which belongs to the component which
failed.
- Switch off the ignition and the electrical component
affected.
Vehicle OP-eration
- Carefully pry the face cover off the instrument panel using
the ignition key or a screwdriver::::::, fig. 233.
- Remove the plastic clip @from its retainer in the face
cover==> fig. 234, place it over the questionable fuse and
remove the fuse.
- Replace a blown fuse (recognizable by the melted metal
strip inside) with a fuse of the
same amperage.
The individual circuits are protected by fuses. The fuse panels with
the fuses are located on the left and right front faces of the instru
ment panel behind a cover and in the right storage area in the
luggage compartment.
Ther e is a plastic clip@ in the cover on the left side of the instrument
panel, which can be used to remove the fuses. The crank @ is used for
eme rgency operation of the power roof*. You will also find a label on
both covers in the instrument panel with the fuse layout © for the
corresponding fuse panel.
& WARNING
Never replace a fuse with one that has a higher amperage rating.
• A fuse with a too high amperage could damage the electrical
part and cause a fire.
0 Note
• On no account should fuses be repaired (e.g. patched up with tin
foil or wire) as this may cause serious damage elsewhere in the elec
trical circuit or cause fire.
• If a fuse blows repeatedly, do not keep replacing it. Instead, have
the cause of the repeated short circuit or overload located and fixed.
ti>
Vehicle care Do-it-yourself service iTechnical data
Page 328 of 368

m.___F_ u_ s_e _s _ a _ n_d_ b_ u_ lb_ s _____________________________________________ _
(I) Tips
You are well advised to keep a supply of spare fuses in your vehicle .
Fuses with the proper ampere ratings are available at your Audi
dealer. •
Fuse Location, Instrument Panel left
Fig. 23S Fuse pan el
layout
Some of the equipment items listed a re optiona l or only avai lable on
certain mode l configurat ions.
Note that the following t able i s accu rate at the time of going to
pre ss and is subject to change. In the event of discrepancies, the
label on the in side of the cover alwa ys takes precedence.
T he power seats are p rotected by circuit br eaker s, which a utomat i
cally reset after a few seconds after the overload has been remedied .
No. Equipment
1 Not use d
2 Not used
3 Eng ine management
4 Oil level sensor
Amps
s
5
..
No . Equipment
5
6
7
8
9
10
11
12
1 3
14
1 5
16
17
18
1 9
20
21
22
23
24
25
26
27
28
Climate control, tire pressure mon itoring sys
tem
Electronic Stabilization Program (ESP), clutch
sensor
Di agnost ic co nnector
Homelink control unit
A utom atic dimming in ter ior m irr or
Adaptive Cruise Control
Not used
Diagnostic connector
Sw itch module stee ring col umn
Not used
I ns trumen t cluste r, contro l modu le Gatew ay
Telephone, cell phone Elect ronic Stabilization Program (ESP)
Headlight electronics, left-side
Ra in s ensor
Heated washer nozzles
Se at adjus tment ( drive r)
MMI display
Electromec hanical park ing brake
Not used
N ot used
No t used
No t used
Not used
Amps
5
5
5
5
5
5
10
10
10
5
10
5
5
5
1 0
5
5
-
Page 329 of 368

______________________________________________ F _u_s _e_ s_ a_ n_ d _ b _u_l_b _ s _ ___.9I
No. Equipment
29 Not used
30 Not used
31 Back-up
light switch, transmission, engine com-
ponents
Intelligent power module driver (footwell light
32 and front headlights, horn, wiper system, elec-
trically adjustable steering wheel)
-
33 Intelligent power module dr
iver
(lights left-side)
34 Intelligent power module driver
(lights right-side)
35 Not used
36 Headlight
washer system
37 Electronic Stabilization Program (ESP)
38 Wiper system
39 Door control module
left-side
Horn
41 Heater fan
42 Control module electronic ignition lock/electri-
cally adjustable steering wheel
43 Rear
windshie ld wiper (Avant)
44 Power window opener (left-side)
Amps
15
30
25
25
30
25
30 15
25
40
30
15
-
-
35 •
Vehicle OP-eration
Fuse Location, Instrument Panel right
Fig. 236 Fuse panel
l ayou t
Some of the equipment items listed are optional or only available on
certain model configurations.
Note that the following table is accurate at the time of going to
press and is subject to change. In the event of discrepancies, the
label on the inside of the cover always takes precedence.
The power seats are protected by circuit breakers , which automati
cally reset afte r a few seconds after the overload has been remedied.
No. Equipment Amps
Fuse holder (black)
1 Control module Convenience
key
15
2 Cigarette lighter front 20
3 Tire pressure monitoring system
5
4 Electrical outlet front (center console)
20
-
5 Intelligent power module passenger
15
(glove box lock)
6 Door control module right-s ide
15
Sunroof 20
A/C controls 10
Vehicle care Do-it-yourself service iTechnical data
Page 330 of 368
.,.,___F_ u_ s_e _ s_ a_n_ d_ b_u _ l_ b_ s _______________________________________________ _
No. Equipment Amps
9 Heated seats, front 30
10 MMI
7,5
11 Seat adjustment (passenger) 10
12 Communication 5
Fuse holder (brown)
1 Electric fuel pump 20/30
2 Adaptive Air Suspension
15
3 Lane assist 10
4 Audi side assist
5
5 Adaptive Air Suspension 5
6 Shift gate automatic transmission/clutch switch 5
7 Parking System 5
8 Control module Gateway 5
9
Automatic headlight range control (auxiliary 5
driving lights), headlight electronics, right-side
10 Airbag 5
11 Heated rear seats 5
12 Telephone
5 •
Fuse Location, Luggage Compartment
right
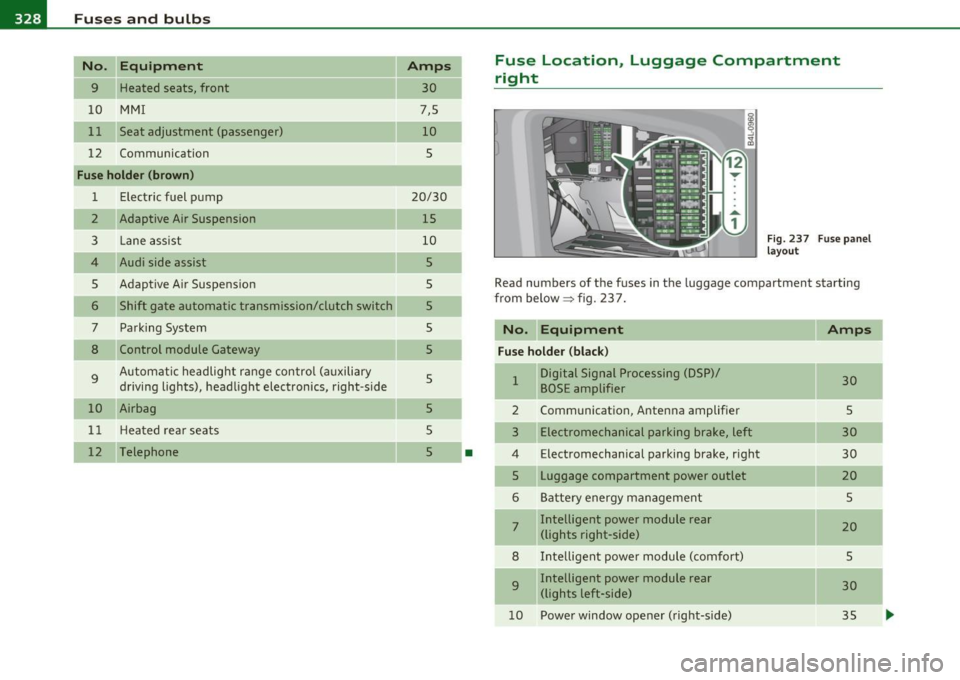
Fig. 237 Fuse panel
layout
Read numbers of the fuses in the luggage compartment starting
from below :::::> fig. 23 7.
No. Equipment
Amps
Fuse holder (black)
1 Digital Signal Processing (DSP)/ 30 BOSE amplifier
2 Communication, Antenna amplifier 5
3 Electromechanical parking brake, left 30
4 Electromechanical parking brake, right
30
5 Luggage compartment power outlet
20
6 Battery energy management 5
7 Intelligent power module rear
20 (lights right-side)
8 Intelligent power module (comfort)
5
9 Intelligent power module rear
30
(lights left-side)
10 Power window opener (right-side)
35
-
-
-
...
Page 331 of 368
_______________________________________________ F_u _s_ e_ s_ a_ n_ d_ b_u _ l_ b _ s __ _
No. Equipment
11 Pa rk in g System
12 Cigare tt e lig ht er r ea r
Fuse holder (brown)
1 Rear view
2 El ectr ic re ar lid (A va nt)
3 Electric rear lid (Avant)
4 Electric rear lid (Avant)
5 Co mmuni cation, An te n na amplifie r
6 Not used
7 M MI
8 Not used
9 Digital Tuner
10 Not used
11 Not used
12 No t used
Bulbs
Replacing Light bulbs
Amps
5
20
5
30
30
20
5
5
5
5
For your safety, we recommend that you have your autho
rized Audi dealer replace burned out bulbs for you.
It is becoming increas ingly more and mo re difficu lt to replace veh icle
light b ulbs since in many cases, other parts of t he car must first be
removed before yo u are able to get to the bu lb. This ap plies espe cially
to the light bu lbs in the front of your car which you can on ly reach
through the engi ne compa rtment.
Safety first
•
Sheet metal and bulb holders can have sharp edges that can cause
ser io us c uts, and parts mus t be cor re ct ly ta ken apar t and the n prop
erly put back together to he lp prevent breakage of parts and long
term damage from water t hat ca n enter housings that have not been
properly resealed .
For your safety, we recommend that you have your a uthorized Audi
dealer replace any bulbs fo r yo u, since yo ur dealer has t he pr oper
too ls, the correct bu lbs and t he expertise.
Gas discharge lamp s (Xenon lights) *:
Due to the high electr ica l voltage, have the bulbs replaced by a qual
ified technician. Headlights with Xenon light can be identified by the
high vol tage s ticker.
& WARNING
Contact with high-voltage components of the electrical system
and improper repla cement of g as discharge (Xenon ) headlight
bulb s can cause serious personal injury and dea th .
• Xenon bulbs are pres surized and can e xplode when being
c hanged.
• Changing Xenon lamp s requires the special training , instruc
tions and equipm ent .
• Only an authorized Audi dealer
or oth er qualified work shop
should change the bulbs in gas discharge lamps .
& WARNING
There are parts with sharp edge s on the opening s and on the bulb
holder s that can cau se serious cuts.
• If you are unce rtain about what to do, have the work
performed by an authorized Audi dealer or other qualified work
shop . Se rious personal injury m ay result from improperly
performed work. ..
Vehicle care Do-it-yourself service Technical data
Page 357 of 368
Alphabetical index -________________ fNi'II
Unleaded fuel .... .... ... .. .. . .. . 271
What should I do with an old battery? ...
292
EPC
See E lectronic power control ........ 14
ESP
See Electronic stabilizat ion program (ESP)
14
Event Data Recorder (EDR) ............ 240
Exhaust tail pipes
Cleaning ................ .... .... 264
Expansion tank ..................... 284
Ex terior lighting in the mirror housing ... 61
Eyeglass es compa rtment .............. 9S
F
Fan
Radiator ............... .. .. .. .. . 286
Fastening Booster seats .................... 225
Convertible child safety seats .. ..... 223
Infant seats .............. .... .. . 222
Fastening eyelets .................... 84
Flat tire Changing . .. ........... ...... .. . 318
Floor mats ......................... 180
Fog lights ................. ........ . 60
Folding master key with remote control .. 3 7
Foot pedals .. .. ... ........ .. .. .. .. . 180
For the sake of the environment
Gasoline fumes and the environment 273
Letting your engine warm up ...... . 109
Controls and equip
ment Safety first
Reducing engine noise
by early upshifting
8
Refueling . .. ..... .. .. .. ......... 273
Saving fuel by early upshifting ........ 8
Using the rear window defogger ..... 101
Front airbags Descript ion . ...... .. .. .. .. ....... 199
How they work ................. .. 204
Front ashtray ........................ 91
Front fog lights .. ................. .. . 60
Front seats ... .. ..... ...... ...... .. . 75
Adjusting .. .. .. ........ ......... 177
Chi ld restraints in the front seat . ... 197
Fro nta l collisions and the laws of physics 186
Fuel Additives .... .. .... .. .. ......... 271
Blended gasoline ................. 271
Consumption ............ .... .. .. . 34
Filler neck ....................... 272
Fuel gauge ...... ............. .... 10
Gasoline ..................... ... 271
Gasoline additives ................ 272
Low fuel leve l . . . . . . . . . . . . . . . . . 10, 30
Octane rating . .. ................. 271
Recommendation . ......... .... .. 271
Refuelling ....... .... .. .. ....... 273
Reserve .................. ... .. .. . 10
T ank capacity .................... 341
Unlocking the fuel filler flap by hand . 275
Fuse arrangement ................. .. 325
G
Garage door opener (Homelink ®) .. .. .. 169 Gas d
ischarge lamps .. ... .... ... .... . 329
Gauges Engine coolant temperature .......... 8
Fuel gauge ... ... .. ............... 10
Speedometer ..................... 10
Tachometer . .... .. ... ............. 9
Trip odometer ............ ...... .. 10
General illustration Instrum ents and contro ls ............ 7
Glossary of tire and loading terminology 294
Glove compartment . .. .... .... .. ..... 94
cd changer .. .... .. .... ........... 94
emergency unlocking .............. 94
Valet key function ................. 40
Gross Vehicle Weight Rating (GVWR) ... 339
H
Head restraints ..................... 179
Adjusting ............... ... ... .. 179
Front seats ........ ............... 81
Rear seats .. .. .. .. ............... 81
Headlight washer reservoir ... ........ 292
Headlights ......................... . 58
Adaptive Light .............. ...... 61
Defective . .. .. .. .. ... ............ 21
Front fog lights ................... 60
Headl ight range control defective .. .. 31
Switching off ............ ... .. .. .. 58
Switching on ............ ...... ... 58
Washer system ... ................ 67
Xenon headlights ... ... ... ......... 58
Heated outside mirrors ............... 71
Vehicle operation Vehicle care Do-it-yourself service Technical data