Page 125 of 551
�Û
�Ý
�Û
�Ý
�Û�Ý
�Û�Ý
AUTO DOOR LOCK
AUTO DOOR UNLOCK
There are five settings to choose
f rom in the door/window setup:
While CUSTOMIZE GROUP is
shown on the multi-inf ormation
display, select DOOR/WINDOW
SETUP by pressing the INFO ( /
) button, and then press the SEL/
RESET button.
Each time you press the INFO ( / ) button, the screen changes as
shown in the illustration. Press the
INFO ( / ) button, until you see
the setting you want to customize,
then press the SEL/RESET button
to enter your selection. SECURITY RELOCK TIMER DOOR LOCK MODE
KEYLESS LOCK
ACKNOWLEDGMENT
Door/Window Setup
Multi-Inf ormation Display
122
seepage123
seepage125
seepage127
seepage129
see page 131
Press the or button.
Press the SEL/RESET button.
�����—�����—�����y�
�������������y���
�(�����������y���
�����y
2010 RL
Page 126 of 551
�µ�µ
�µ �Û�Ý
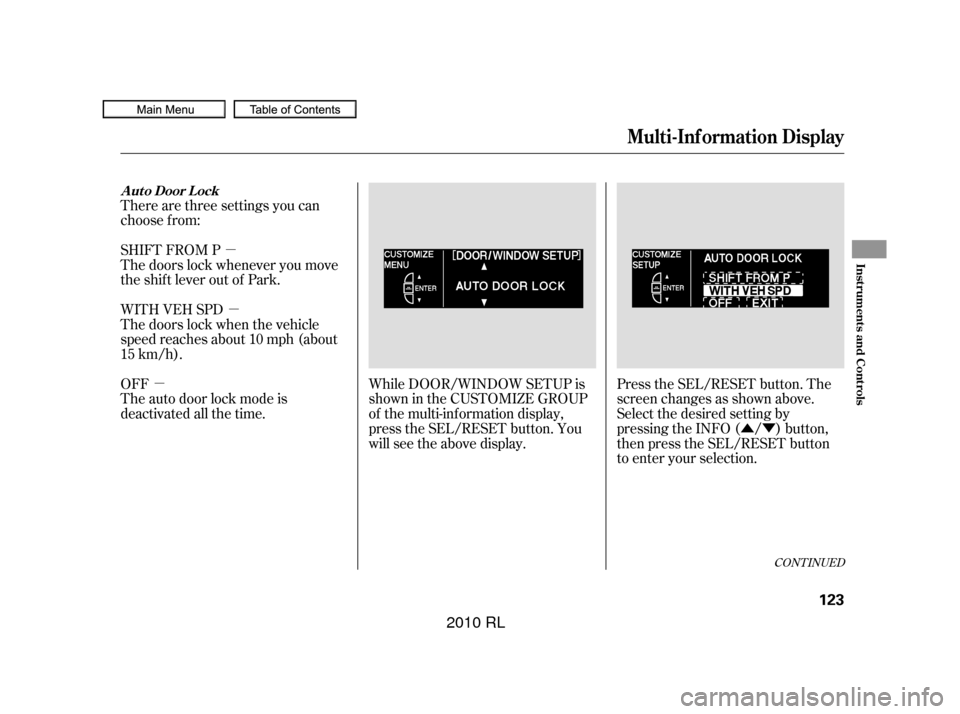
There are three settings you can
choose f rom:
SHIFT FROM P
The doors lock whenever you move
the shift lever out of Park.
WITH VEH SPD
The doors lock when the vehicle
speed reaches about 10 mph (about
15 km/h).
OFF
The auto door lock mode is
deactivated all the time.
While DOOR/WINDOW SETUP is
shownintheCUSTOMIZEGROUP
of the multi-information display,
press the SEL/RESET button. You
will see the above display.Press the SEL/RESET button. The
screen changes as shown above.
Select the desired setting by
pressing the INFO ( / ) button,
then press the SEL/RESET button
to enter your selection.
CONT INUED
A ut o Door L ock
Multi-Inf ormation Display
Inst rument s and Cont rols
123
�����—�����—�����y�
�������������y���
�(�����������y���
�����y
2010 RL
Page 128 of 551

�Û�Ý
�µ
�µ �Û�Ý
�µ
There are three settings you can
choose f rom:
While DOOR/WINDOW SETUP is
shownintheCUSTOMIZEGROUP
of the multi-information display,
press the SEL/RESET button. The
screen changes to CUSTOMIZE
MENU. Press the INFO ( / )
button until you see the above
display.
SHIFT TO P The driver’s door or
all the doors, depending on the door
lock mode setting (see page ),
unlock when you move the shif t
lever to Park.
IGN OFF The driver’s door or all
the doors, depending on the door
lock mode setting (see page ),
unlock when you turn the ignition
switch to the LOCK (0) position.
Press the SEL/RESET button. The
screen changes as shown above.
Select the desired setting by
pressing the INFO ( / ) button,
then press the SEL/RESET button
to enter your selection.
OFF The auto door unlock mode
is deactivated all the time. 127
127
CONT INUED
A ut o Door Unlock
Multi-Inf ormation Display
Inst rument s and Cont rols
125
�����—�����—�����y�
�������������y���
�(�����������y���
�����y
2010 RL
Page 132 of 551

�Û�Ý�Û�Ý
When you press the LOCK button
on the remote to lock the doors and
the trunk, and then press the button
again within 5 seconds, a beeper
sounds once and the exterior lights
blink once to verif y that the doors
arelockedandthesecuritysystemis
set.
While the multi-information display
is in the DOOR/WINDOW SETUP
screen of the CUSTOMIZE GROUP,
press the SEL/RESET button. The
screen changes to CUSTOMIZE
MENU. Press the INFO ( / )
button until you see the above
display.Press the SEL/RESET button. The
screen changes as shown above.
Select ON or OFF by pressing the
INFO ( / ) button, then press the
SEL/RESET button to enter your
selection.
When you press the UNLOCK
button on the remote to unlock the
doors, the exterior lights blink twice
to verify that the doors are unlocked
and the security system is turned of f .
To turn this feature on or off, follow
these instructions.
CONT INUED
K eyless L ock A cknowledgement
Multi-Inf ormation Display
Inst rument s and Cont rols
129
�����—�����—�����y�
�������������y���
�(�����������y���
�����y
2010 RL
Page 134 of 551
�Û�Ý�Û�Ý
When you unlock the doors by
pressing the UNLOCK button on the
remote, but do not open any door,
the doors relock and the security
system sets within 30 seconds. To
change the relock time, f ollow these
instructions.
While the multi-information display
is in the DOOR/WINDOW SETUP
screen of the CUSTOMIZE GROUP,
press the SEL/RESET button. The
screen changes to CUSTOMIZE
MENU. Press the INFO ( / )
button until you see the above
display.Press the SEL/RESET button. The
screen changes as shown above.
Select the relock time you want (90,
60, or 30 seconds) by pressing the
INFO ( / ) button, then press the
SEL/RESET button to enter your
selection.
CONT INUED
Securit y Relock T imer
Multi-Inf ormation Display
Inst rument s and Cont rols
131
�����—�����—�����y�
���������
���y���
�(�����������y���
�����y
2010 RL
Page 135 of 551
�Û�Ý
To exit SECURITY RELOCK
TIMER without changing the
current setting, select EXIT by
pressing the INFO ( / ) button,
then press the SEL/RESET button.
The screen goes back to
CUSTOMIZE MENU.
When your choice is set, you will see
the above display f or several seconds,
then the screen goes back to
CUSTOMIZE ENTRY.
If your choice is not set, you will see
the above display f or several seconds,
then the screen goes back to
CUSTOMIZE SETUP. If this
happens, you need to repeat the
security relock timer setup.
Multi-Inf ormation Display
132
�����—�����—�����y�
�������������y���
�(�����������y���
�����y
2010 RL
Page 162 of 551

The driver’s and f ront passenger’s
seats have active head restraints. If
the vehicle is struck severely f rom
the rear, the occupant properly
secured with the seat belt will be
pushed against the seat-back and the
head restraint will automatically
move forward.
This reduces the distance between
the restraint and the occupant’s head.
It also helps protect the occupantsagainst whiplash and injuries to the
neck and upper spine.
Af ter a collision, the activated
restraint should return to its normal
position.
For a head restraint system to work
properly:
Do not hang any items on the head
restraints, or f rom the restraint
legs.
Do not place any object between
an occupant and the seat-back.
Install each restraint in its proper
location.
If the restraints do not return to their
normal position, or in the event of a
severe collision, have the vehicle
inspected by an Acura dealer.
Only use genuine Acura
replacement head restraints.
A ct ive Head Rest raint s
Seats
Inst rument s and Cont rols
159
�����—�����—�����y�
�����������
�y���
�(�����������y���
�����y
2010 RL
Page 163 of 551
The rear seat armrest is in the
center of the rear seat. Pivot it down
to use it.To open the cover, pull down the
rear seat armrest. Pull on the tab at
the top of the inner partition, and
press on the button to f ully release
the cover. To close the cover, swing
it up, and push f irmly on the top.
Make sure it latches properly.Make sure all items in the trunk and
those extending through the pass-
through are secured.
For security, this cover can be
locked and unlocked only with the
built-in key. To lock the cover, insert
thekey,andturnitclockwise.
Never drive with this cover open and
the trunk lid open.
See
on
page . 56
Rear Seat Armrest
Trunk Pass-through Cover
Carbon Monoxide Hazard
Seats
160
COVER
KNOB
�����—�����—�����y�
�������������y���
�(�����������y���
�����y
2010 RL