Page 86 of 551

�Î
�Î
�Î
�Î
�Î
�Î �Î
�ΠDOOR UNLOCK MODE
KEYLESS ACCESS LIGHT
FLASH
KEYLESS ACCESS BEEP
INTERIOR LIGHT
DIMMING T IME
HEADLIGHT AUT O OFF
TIMER
AUTO LIGHT
SENSITIVITY
AUTO DOOR LOCK
CUST OMIZE MENU
KEYLESS ACCESS
SETUP
(see page 108)
LIGHTING SETUP
(see page 115)
DOOR/WINDOW
SETUP
(see page 122) Page
109
111
113
116
118
120
123
CHG SETTING
(see page
87) Description
Changes which doors unlock when
you use the remote or grab the
driver’s door handle.
Causes some exterior lights to
blinktwicewhenyouunlockthe
doors by grabbing the driver’s
door handle.
Cause the beeper to sound twice
when you unlock the doors by
grabbing the driver’s door handle.
Changes how long (in seconds)
the interior lights stay on after you
close the doors.
Changes how long (in seconds)
the exterior lights stay on after
you close the driver’s door.
Changes the light level that causes
theheadlightstocomeon.The
headlight switch needs to be in the
AUTO position.
Changes when the doors
automatically lock. DRIVER DOOR
ONLY
ALL DOORS
ON
OFF
ON
OFF
60 SEC
30 SEC
15 SEC
60 SEC
30 SEC
15 SEC
MAX
HIGH
MID
LOW
SHIFT FROM P
WITH VEH SPD
OFF
: Default setting 0SEC
MIN
CONT INUED
CUST OMIZE GROUP
CUSTOMIZE ENTRYCUSTOMIZE SET UP
Multi-Inf ormation Display
Inst rument s and Cont rols
83
�����—�����—�����y�
�������������y���
�(�����������y���������y
2010 RL
Page 87 of 551

WIPER SETUP
(see page 133) AUTO DOOR UNLOCK
DOOR LOCK MODE
KEYLESS LOCK
ACKNOWLEDGMENT
SECURITY RELOCK
TIMER
WIPER ACTION
SHIFT")
�Î�Î
�Î
�Î �Î
�ΠCUST OMIZE MENU
DOOR/WINDOW
SETUP
(see page 122)
WIPER SETUP
(see page 133) AUTO DOOR UNLOCK
DOOR LOCK MODE
KEYLESS LOCK
ACKNOWLEDGMENT
SECURITY RELOCK
TIMER
WIPER ACTION
SHIFT TO P
IGN OFF
OFF
DRIVER DOOR
ALL DOORS
ON
OFF
90 SEC
60 SEC
30 SEC
INTERMITTENT
WITH VEH SPD
SETPage
125
127
129
131
134
85
CHG SETTING
(see page 87)
DEFAULT ALL
(see page 85) Description
Changes when the doors
automatically unlock.
Changes which doors unlock with the
f irst push of the remote’s unlock
button.
The exterior lights flash each time
you press the LOCK or UNLOCK
button.
Changes how long it takes (in
seconds) f or the doors to relock and
the security system to set after you
unlock the driver’s door without
opening it.
Changes the wiper operation among
two settings when the wiper switch is
in the INT position.
Changes all settings to the default.
: Default setting
CUST OMIZE GROUP
CANCEL
CUSTOMIZE ENTRYCUSTOMIZE SET UP
Multi-Inf ormation Display
84
�����—�����—�����y�
���������
���y���
�(�����������y���������y
2010 RL
Page 90 of 551
�Û
�Ý
�Û�Ý
You can customize some of the
vehicle control settings to your
pref erence. Here are the settings
you can customize:
METER SETUP ADAPTIVE CRUISE CONTROL
SETUP
POSITION SETUP
WIPER SETUP DOOR/WINDOW SETUP
LIGHTING SETUP
KEYLESS ACCESS SETUPWhile CHG SETTING in the
CUSTOMIZE ENTRY is shown on
the multi-information display, press
the SEL/RESET button. The screen
changes to ACC SETUP in the
CUSTOMIZE GROUP.
Each time you press the INFO ( /
) button, the screen changes as
shownonthenextpage.Pressthe
INFO ( / ) button until you see
the setup you want to customize,
then press the SEL/RESET button
to enter your selection.
CONT INUED
Multi-Inf ormation Display
CHG SETTING
Inst rument s and Cont rols
87
�����—�����—�����y�
�������������y���
�(�����������y���������y
2010 RL
Page 92 of 551
�Û�Ý�Û
�Ý
�Û�Ý
�Û�Ý
If equipped
Here are the two custom settings for
adaptive cruise control (ACC):PRE-RUNNING CAR DETECT
BEEP
ACC DISPLAY SPEED UNIT
While the multi-information display
is in the CUSTOMIZE GROUP
screen, select ACC SETUP by
pressing the INFO ( / ) button,
then press the SEL/RESET button.
Each time you press the INFO ( / ) button, the display changes as
shown in the illustration. Press the
INFO ( / ) button until you see
the setting you want to customize,
then press the SEL/RESET button
to enter your selection.
CONT INUED
A daptive Cruise Control Setup
Multi-Inf ormation Display
Inst rument s and Cont rols
89
seepage90
seepage92
Press the SEL/RESET button. Press the or button.
�����—�����—�����y�
�������������y���
�(�����������y���������y
2010 RL
Page 97 of 551
�Û
�Ý
�Û�Ý
�Û�Ý
LANGUAGE SELECTION
ADJUST OUTSIDE TEMP.
DISPLAY
Here are the f our custom settings
forthemetersetup:
TRIP A RESET with REFUEL
ELAPSED TIME RESET
While METER SETUP is shown in
the CUSTOMIZE GROUP of the
multi-inf ormation display, press the
SEL/RESET button.
Each time you press the INFO ( / ) button, the screen changes as
shown in the illustration. Press the
INFO ( / ) button until you see
the setting you want to customize,
then press the SEL/RESET button
to enter your selection. Meter Setup
Multi-Inf ormation Display
94
seepage97
seepage99
seepage101 seepage95
Press the or button. Press the SEL/RESET button.
�����—�����—�����y�
���������
���y���
�(�����������y���������y
2010 RL
Page 100 of 551
�Û�Ý�Û
�Ý
While the multi-information display
is in the METER SETUP of the
CUSTOMIZE GROUP, press the
SEL/RESET button. The screen
changes to CUSTOMIZE MENU.
Press the INFO ( / ) button until
you see the above display. Press the SEL/RESET button. The
screen changes as shown above. The
highlighted number is the current
setting above or below the outside
temperature. Press the INFO ( /
) button repeatedly until the
number you want appears, then
press the SEL/RESET button to
enter your selection.
If you sometimes f ind that the
temperature reading is a f ew
degrees above or below the actual
temperature, you can adjust it by
f ollowing these instructions:
CONT INUED
A djust Outside T emp. Display
Multi-Inf ormation Display
Inst rument s and Cont rols
97
�����—�����—�����y�
�������������y���
�(�����������y���
�����y
2010 RL
Page 102 of 551
�Û�Ý�Û�Ý
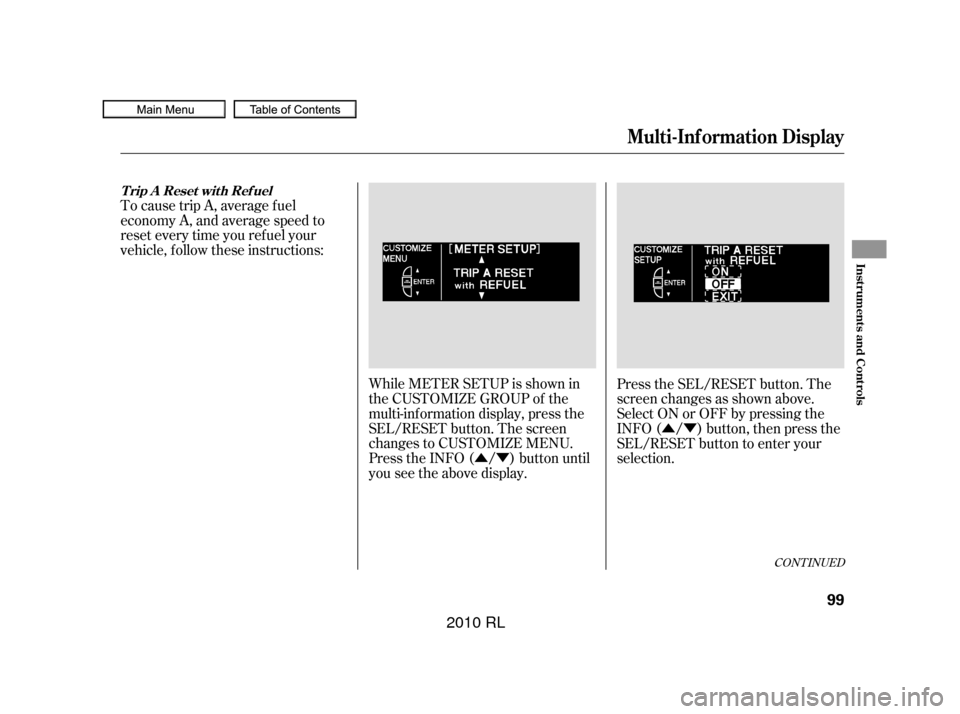
While METER SETUP is shown in
the CUSTOMIZE GROUP of the
multi-inf ormation display, press the
SEL/RESET button. The screen
changes to CUSTOMIZE MENU.
Press the INFO ( / ) button until
you see the above display. Press the SEL/RESET button. The
screen changes as shown above.
Select ON or OFF by pressing the
INFO ( / ) button, then press the
SEL/RESET button to enter your
selection.
To cause trip A, average f uel
economy A, and average speed to
reset every time you ref uel your
vehicle, f ollow these instructions:
CONT INUED
Multi-Inf ormation Display
T rip A Reset wit h Ref uel
Inst rument s and Cont rols
99
�����—�����—�����y�
�������������y���
�(�����������y���
�����y
2010 RL
Page 104 of 551
�Û�Ý
�µ
�µ
�µ
�Û�Ý
While METER SETUP is shown in
the CUSTOMIZE GROUP of the
multi-inf ormation display, press the
SEL/RESET button. The screen
changes to CUSTOMIZE MENU.
Press the INFO ( / ) button until
you see the above display.
IGN OFF The elapsed time is
reset when you turn the ignition
switch to the LOCK (0) position.
TRIP A The elapsed time is reset
when Trip A is reset.
TRIP B The elapsed time is reset
when Trip B is reset.
Press the SEL/RESET button. The
screen changes as shown above.
Select the desired setting by
pressing the INFO ( / ) button,
then press the SEL/RESET button
to enter your selection.
There are three elapsed time reset
choices you can make:
CONT INUED
Elapsed T ime Reset
Multi-Inf ormation Display
Inst rument s and Cont rols
101
�����—�����—�����y�
������
������y���
�(�����������y���
�����y
2010 RL