Page 359 of 514

Turn the engine off, and confirm the
fuel fill cap is installed. If it is, loosen
it, then retighten it until it clicks at
least once. When you can restart the
engine, the message appears again.
The message goes off after several
days of normal driving once you
tighten or replace the fuel fill cap. To
scroll to another message, press the
INFO (
/
) button.
If the system still detects a leak in
your vehicle's evaporative emissions
system, the malfunction indicator
lamp (MIL) comes on. If the fuel fill
cap was not already tightened, turn
the engine off, and check or
retighten the fuel fill cap until it
clicks at least once. The MIL should
go off after several days of normal
driving once the cap is tightened or
replaced. If the MIL does not go off,
have your vehicle inspected by a
dealer. For more information, see
page 466. Opening and Closing the Hood
1. Park the vehicle, and set the
parking brake. Pull the hood
release handle located under the
lower left corner of the dashboard.
The hood will pop up slightly.
2. Put your fingers under the frontedge of the hood near the center.
Slide your hand to the left until
you feel the hood latch handle.
Push this handle up to release it.
Lift up the hood.
If the hood latch handle moves stiffly,
or if you can open the hood without
lifting the handle, the mechanism
should be cleaned and lubricated.
HOOD RELEASE HANDLE
LATCHCONTINUED
Service Station Procedures
355
Before Driving
09/07/07 15:02:04 10 ACURA RDX MMC North America Owner's M 50 31STK630 enu
ProCarManuals.com
2010 RDX
Page 360 of 514
3. Holding the grip, pull the supportrod out of its clip. Insert the end
into the designated hole in the
hood. To close the hood, lift it up slightly to
remove the support rod from the
hole. Put the support rod back into
its holding clip. Lower the hood to
about a foot (30 cm) above the
fender, then let it drop. Make sure it
is securely latched.
Oil Check
Park the vehicle on a level surface.
Wait a few minutes after turning the
engine off before you check the oil.
1. Remove the dipstick (orange loop).
2. Wipe off the dipstick with a clean
cloth or paper towel.
3. Hold the dipstick with a clean cloth or paper towel, and then
insert it all the way back in its
hole.
GRIP
SUPPORT ROD CLIP
DIPSTICK
Service Station Procedures35609/07/07 15:02:04 10 ACURA RDX MMC North America Owner's M 50 31STK630 enu
ProCarManuals.com
2010 RDX
Page 362 of 514

Actual Mileage and EPA Fuel
Economy Estimates Comparison.
Fuel economy is not a fixed number.
It varies based on driving conditions,
driving habits and vehicle condition.
Therefore, it is not possible for one
set of estimates to predict fuel
economy precisely for all drivers in
all environments.
The EPA fuel economy estimates
shown in the example to the right are
a useful tool for comparison when
buying a vehicle. EPA estimates
include:
City MPG-Represents urban
driving in a vehicle in light traffic. A
range of miles per gallon achieved is
also provided.
Highway MPG -Represents a
mixture of rural and interstate
driving, in a warmed-up vehicle,
typical of longer trips in free-flowing
traffic. A range of miles per gallon
achieved is also provided.
Combined Fuel Economy -
Represents a combination of city and
highway driving. The scale
represents the range of combined
fuel economy for other vehicles in
the class. Estimated Annual Fuel Cost
-
Provides an estimated annual fuel
cost, based on 15,000 miles (20,000
km) per year multiplied by the cost
per gallon (based on EPA fuel cost
data) divided by the combined fuel
economy.
For more information on fuel
economy ratings and factors that
affect fuel economy, visit
www.
fueleconomy.gov
(Canada: Visit
www.
vehicles.gc.ca
)
(Sample U.S. EPA label shown)
City MPG
Combined Fuel
Economy Highway MPG
Estimated Annual
Fuel Cost
Fuel Economy35809/07/07 15:02:04 10 ACURA RDX MMC North America Owner's M 50 31STK630 enu
ProCarManuals.com
2010 RDX
Page 366 of 514

Modifying your vehicle, or installing
some non-Acura accessories, can
make your vehicle unsafe. Before
you make any modifications or add
any accessories, be sure to read the
following information.
Accessories
Your dealer has Acura accessories
that allow you to personalize your
vehicle. These accessories have been
designed and approved for your
vehicle, and are covered by warranty.
Although non-Acura accessories may
fit on your vehicle, they may not
meet factory specifications, and could
adversely affect your vehicle's
handling and stability.
Improper accessories or
modifications can affect your
vehicle's handling, stability, and
performance, and cause a
crash in which you can be hurt
or killed.
Follow all instructions in this
owner's manual regarding
accessories and modifications.
When properly installed, cellular
phones, alarms, two-way radios, and
low-powered audio systems should
not interfere with your vehicle's
computer controlled systems, such
as your airbags, anti-lock brakes, and
tire pressure monitoring system. Before installing any accessory:
●Make sure the accessory does not
obscure any lights, or interfere
with proper vehicle operation or
performance.●Be sure electronic accessories do
not overload electrical circuits (see
page
469) or interfere with proper
operation of your vehicle.●Before installing any electronic
accessory, have the installer
contact your dealer for assistance.
If possible, have your dealer
inspect the final installation.●Do not install accessories on the
side pillars or across the rear
windows. Accessories installed in
these areas may interfere with
proper operation of the side
curtain airbags.
Accessories and Modifications36209/07/07 15:02:04 10 ACURA RDX MMC North America Owner's M 50 31STK630 enu
ProCarManuals.com
2010 RDX
Page 372 of 514

●If you carry large items that
prevent you from closing the
tailgate, exhaust gas can enter the
passenger area. To avoid the
possibility ofcarbon monoxide
poisoning, follow the instructions
on page 57.●●If you carry any items on a roof
rack, be sure the total weight of
the rack and the items does not
exceed 110 lbs (50 kg).
If you use an accessory roof rack, the
roof rack weight limit may be lower.
Refer to the information that came
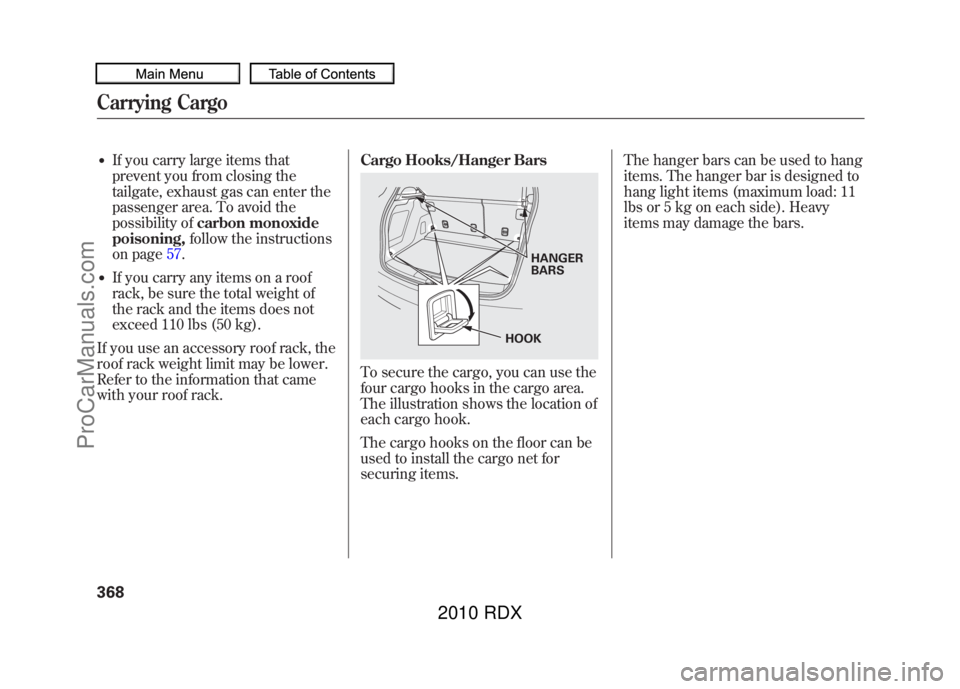
with your roof rack. Cargo Hooks/Hanger Bars
To secure the cargo, you can use the
four cargo hooks in the cargo area.
The illustration shows the location of
each cargo hook.
The cargo hooks on the floor can be
used to install the cargo net for
securing items.The hanger bars can be used to hang
items. The hanger bar is designed to
hang light items (maximum load: 11
lbs or 5 kg on each side). Heavy
items may damage the bars.
HANGER
BARS
HOOK
Carrying Cargo36809/07/07 15:02:04 10 ACURA RDX MMC North America Owner's M 50 31STK630 enu
ProCarManuals.com
2010 RDX
Page 373 of 514
Optional Cargo Net
The cargo net can be used to help
hold down light items in the cargo
area. The cargo net may not prevent
heavy items from being thrown
forward in a crash or a sudden stop.
Heavy items should be secured to
the cargo area floor with the hooks
or cinch straps attached to the cargo
hooks.
Carrying Cargo
369
Before Driving
09/07/07 15:02:04 10 ACURA RDX MMC North America Owner's M 50 31STK630 enu
ProCarManuals.com
2010 RDX
Page 377 of 514

You should do these checks and
adjustments before you drive your
vehicle:1. Make sure all windows, mirrors, and outside lights are clean and
unobstructed. Remove frost, snow,
or ice.
2. Check that the hood is fully closed.
3. Visually check the tires. If a tire looks low, use a gauge to check its
pressure.
4. Check that any items you may be carrying are stored properly or
fastened down securely. 5. Check the seat adjustment (see
page 134).
6. Check the adjustment of the inside and outside mirrors (see page
146).
7. Check the steering wheel adjustment (see page 122).
8. Make sure the doors and the tailgate are securely closed and
locked.
9. Fasten your seat belt. Check that your passengers have fastened
their seat belts (see page 15).10. When you start the engine, check
the gauges and indicators in the
instrument panel, and the
messages on the multi-information
display (see pages 63,73and 74).
Preparing to Drive
373
Driving
09/07/07 15:02:04 10 ACURA RDX MMC North America Owner's M 50 31STK630 enu
ProCarManuals.com
2010 RDX
Page 389 of 514

Each torque indicator is displayed as
a bar graph divided into 5 segments.
The number of segments represents
the amount of torque distributed to
each wheel.
When there is only a slight change in
torque distribution while driving,
such as cruising on level roads at the
same speed, the torque distribution
monitor may stop displaying the
amount of torque. This is not a
system problem. The monitor will
show the amount if the system
senses any change in torque
distribution.
If the SH-AWD indicator blinks while
driving, it indicates the differential
temperature is too high. You will also
see an‘‘SH-AWD DIFF TEMP
HIGH ’’message on the multi-
information display. If this happens,
pull to the side of the road when it is
safe, shift to Park, and let the engine
idle until the indicator goes out. If
the indicator does not go out, take
your vehicle to a dealer to have it
checked.
If the SH-AWD indicator on the
instrument panel stays on, and the
‘‘ CHECK SH-AWD SYSTEM ’’
message also appears on the multi-
information display, there is a
problem with the SH-AWD system.
Your vehicle still has normal front-
wheel drive with vehicle stability
assist (VSA), but does not have the
advantages of SH-AWD. Have your
vehicle checked by a dealer as soon
as possible.
Super Handling-All Wheel Drive ™(SH-AWD
®) System
385
Driving
09/07/07 15:02:04 10 ACURA RDX MMC North America Owner's M 50 31STK630 enu
ProCarManuals.com
2010 RDX