Page 34 of 190

2-12
TIGHTENING TORQUES
*1: Tighten the cylinder head bolts to 30 Nm (3.0 m•kg, 22 ft•lb) in the proper tightening sequence, remove and retighten
the cylinder head bolts to 20 Nm (2.0 m•kg, 14 ft•lb) in the proper tightening sequence, and then tighten the cylinder head
bolts further to reach the specified angle 180° in the proper tightening sequence.
CHASSIS
△- marked portion shall be checked for torque tightening after break-in or before each race.
Screw (kickstarter crank) M6 × 1.0 1 7 0.7 5.1
Primary drive gear M20 × 1.0 1 110 11.0 80
Clutch boss M20 × 1.0 1 75 7.5 54
Clutch cable adjust bolt and locknut M6 × 0.75 1 4 0.4 2.9
Clutch spring M6 × 1.0 6 10 1.0 7.2
Balancer M10 × 1.0 1 45 4.5 32
Balancer shaft driven gear M14 × 1.0 1 50 5.0 36
Balancer weight M6 × 1.0 3 10 1.0 7.2
Drive sprocket M20 × 1.0 1 75 7.5 54
Drive chain sprocket cover M6 × 1.0 2 8 0.8 5.8
Shift pedal M6 × 1.0 1 12 1.2 8.7
Shift guide M6 × 1.0 2 10 1.0 7.2
Stopper lever M6 × 1.0 1 10 1.0 7.2
Segment M8 × 1.25 1 30 3.0 22Part to be tightened Thread size Q'tyTightening torque
Nm m•kg ft•lb
Part to be tightened Thread size Q'tyTightening torque
Nm m•kg ft•lb
△Upper bracket and outer tube M8 × 1.25 4 21 2.1 15
△Lower bracket and outer tube M8 × 1.25 4 21 2.1 15
△Upper bracket and steering stem M24 × 1.0 1 145 14.5 105
△Handlebar upper holder M8 × 1.25 4 28 2.8 20
△Handlebar lower holder M10 × 1.25 2 34 3.4 24
△Steering ring nut M28 × 1.0 1 Refer to TIP.
Front fork and damper assembly M51 × 1.5 2 30 3.0 22
Front fork and adjuster M22 × 1.25 2 55 5.5 40
Damper assembly and base valve M42 × 1.5 2 29 2.9 21
Adjuster and damper assembly M12 × 1.25 2 29 2.9 21
Bleed screw (front fork) and base valve M5 × 0.8 2 1 0.1 0.7
△Front fork and front fork protector M6 × 1.0 6 5 0.5 3.6
△Front fork protector and brake hose holder M6 × 1.0 2 8 0.8 5.8
Throttle grip cap M5 × 0.8 2 4 0.4 2.9
Clutch lever holder M6 × 1.0 2 5 0.5 3.6
Clutch lever mounting nut M6 × 1.0 1 4 0.4 2.9
Clutch lever position lock nut M5 × 0.8 1 5 0.5 3.6
Hot starter lever holder M5 × 0.8 2 4 0.4 2.9
△Front brake master cylinder and bracket M6 × 1.0 2 9 0.9 6.5
Front brake master cylinder cap M4 × 0.7 2 2 0.2 1.4
Brake lever mounting bolt M6 × 1.0 1 6 0.6 4.3
Page 40 of 190
2-18
CABLE ROUTING DIAGRAM
CABLE ROUTING DIAGRAM
1. Fuel tank breather hose
2. Radiator hose 1
3. Cylinder head breather hose
4. Hose holder
5. Radiator hose 4
6. Clutch cable
7. Connector cover
8. Fuel hose
9. Throttle position sensor lead10. Hot starter cable
11. Carburetor breather hose
12. Carburetor overflow hose
A. Insert the end of the fuel tank
breather hose into the hole in
the steering stem.B. Pass the cylinder head breather
hose on the outside of the radia-
tor hose 1 and between the radi-
ator hose 4 and frame.
C. Align the paint on the cylinder
head breather hose with the
front edge of the hose holder.
D. Pass the clutch cable through
the cable guide.
Page 41 of 190
2-19
CABLE ROUTING DIAGRAM
E. Pass the clutch cable in front of
the radiator mounting boss.
F. Install the connector cover so
that it does not come in between
the radiator hose 1 and radiator.
G. Pass the fuel hose on the out-
side of throttle position sensor
lead.
H. Pass the carburetor breather
hoses and overflow hose so that
all there hoses do not contact
the rear shock absorber.
Page 42 of 190
2-20
CABLE ROUTING DIAGRAM
1. Hot starter cable
2. Clamp
3. Throttle position sensor lead
4. Hump (frame)
5. Neutral switch lead
6. Engine bracket
7. Lower engine guard stay
8. CDI magneto lead
9. Clutch cable
10. Radiator breather hose
11. Radiator hose 212. Engine stop switch lead
13. Sub-wire harness
14. Ground lead
15. CDI unit bracket
16. CDI unit
17. Cable guide
18. Ignition coil lead
19. Throttle cable
20. Hot starter cable protector
21. Rubber capA. Fasten the hot starter cable and
throttle cables onto the frame.
B. Fasten the hot starter cable,
throttle cables, throttle position
sensor lead and ignition coil lead
to the frame.
C. Pass the throttle position sensor
lead over the hot starter cable.
D. Pass the neutral switch lead on
the inside of the engine bracket.
Page 43 of 190
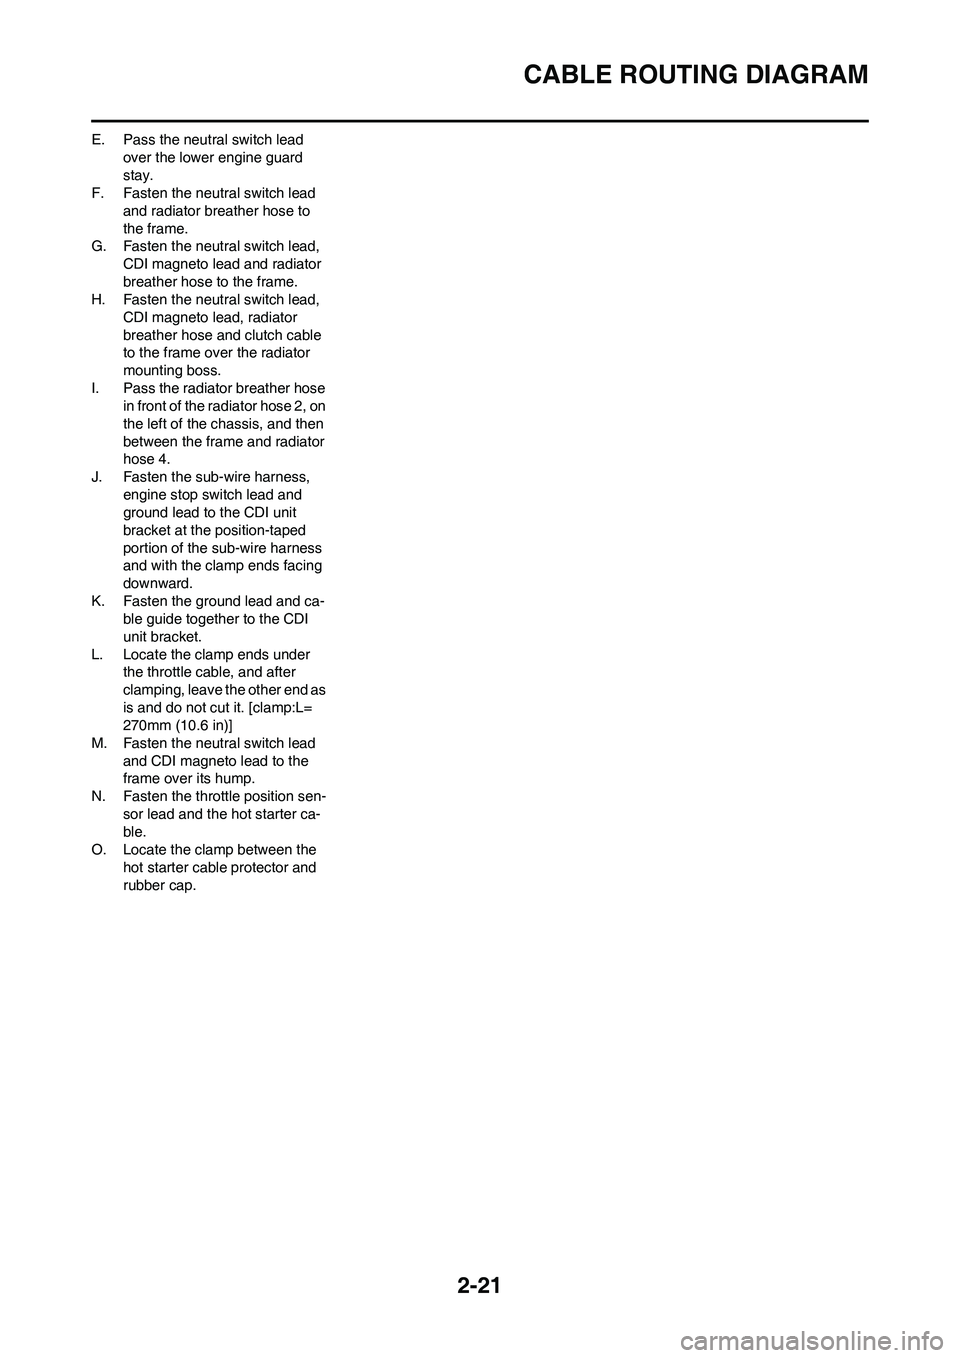
2-21
CABLE ROUTING DIAGRAM
E. Pass the neutral switch lead
over the lower engine guard
stay.
F. Fasten the neutral switch lead
and radiator breather hose to
the frame.
G. Fasten the neutral switch lead,
CDI magneto lead and radiator
breather hose to the frame.
H. Fasten the neutral switch lead,
CDI magneto lead, radiator
breather hose and clutch cable
to the frame over the radiator
mounting boss.
I. Pass the radiator breather hose
in front of the radiator hose 2, on
the left of the chassis, and then
between the frame and radiator
hose 4.
J. Fasten the sub-wire harness,
engine stop switch lead and
ground lead to the CDI unit
bracket at the position-taped
portion of the sub-wire harness
and with the clamp ends facing
downward.
K. Fasten the ground lead and ca-
ble guide together to the CDI
unit bracket.
L. Locate the clamp ends under
the throttle cable, and after
clamping, leave the other end as
is and do not cut it. [clamp:L=
270mm (10.6 in)]
M. Fasten the neutral switch lead
and CDI magneto lead to the
frame over its hump.
N. Fasten the throttle position sen-
sor lead and the hot starter ca-
ble.
O. Locate the clamp between the
hot starter cable protector and
rubber cap.
Page 46 of 190
2-24
CABLE ROUTING DIAGRAM
1. Throttle cable
2. Clamp
3. Hot starter cable
4. Clutch cable
5. Engine stop switch lead
6. Cable guide
7. Brake hose
8. Hose guide
A. Fasten the engine stop switch
lead to the handlebar.B. Pass the clutch cable and hot
starter cable through the cable
guide.
C. Pass the brake hose in front of
the number plate.
D. Pass the throttle cables through
the cable guide.
E. Pass the clutch cable and hot
starter cable through the cable
guide on the number plate.
Page 48 of 190
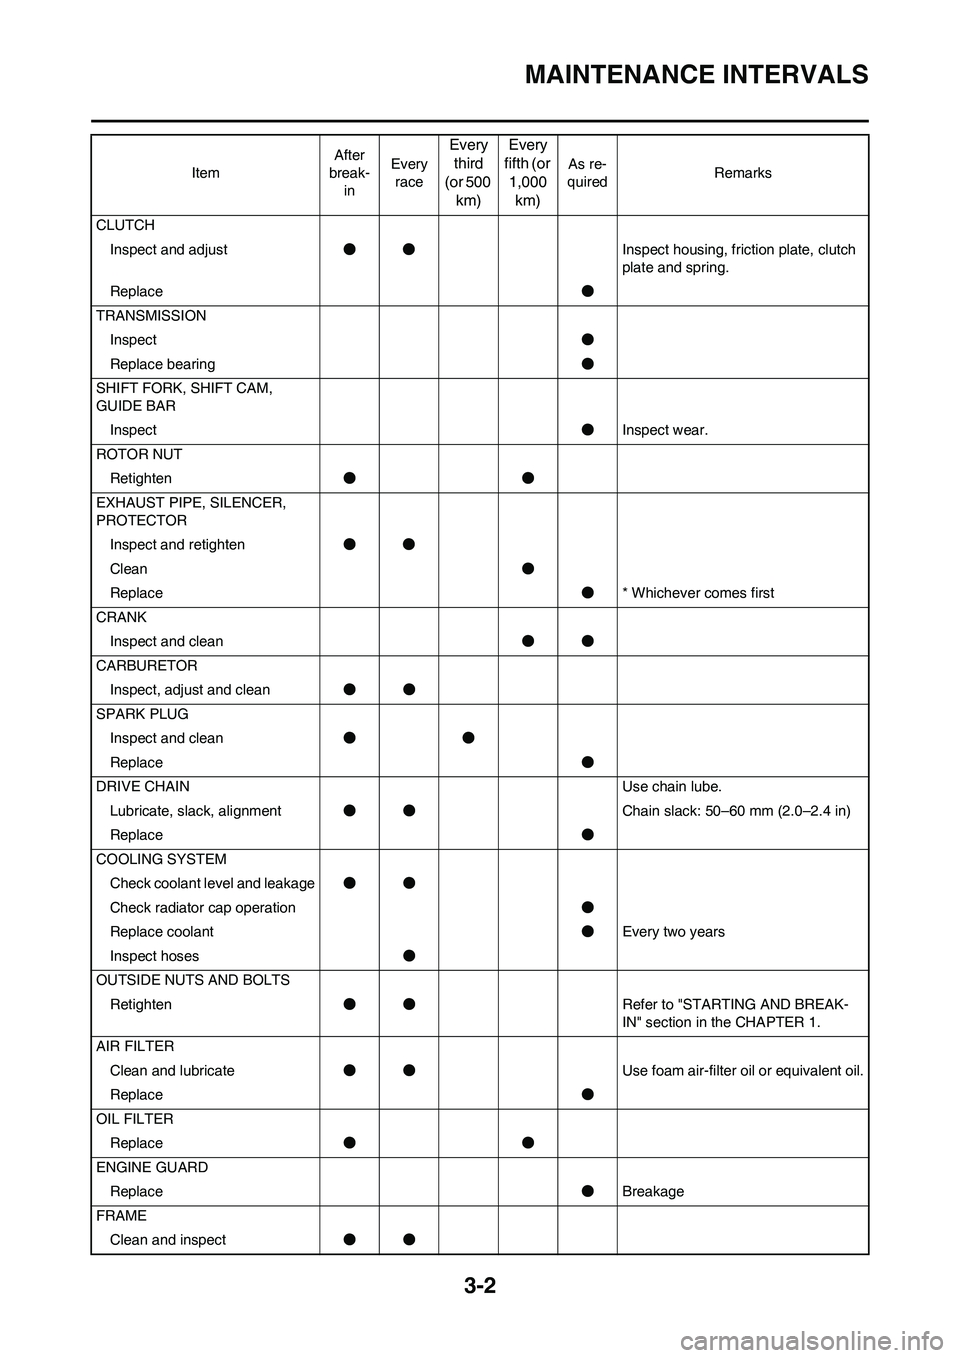
3-2
MAINTENANCE INTERVALS
CLUTCH
Inspect and adjust●●Inspect housing, friction plate, clutch
plate and spring.
Replace●
TRANSMISSION
Inspect●
Replace bearing●
SHIFT FORK, SHIFT CAM,
GUIDE BAR
Inspect●Inspect wear.
ROTOR NUT
Retighten●●
EXHAUST PIPE, SILENCER,
PROTECTOR
Inspect and retighten●●
Clean●
Replace●* Whichever comes first
CRANK
Inspect and clean●●
CARBURETOR
Inspect, adjust and clean●●
SPARK PLUG
Inspect and clean●●
Replace●
DRIVE CHAIN Use chain lube.
Lubricate, slack, alignment●●Chain slack: 50–60 mm (2.0–2.4 in)
Replace●
COOLING SYSTEM
Check coolant level and leakage●●
Check radiator cap operation●
Replace coolant●Every two years
Inspect hoses●
OUTSIDE NUTS AND BOLTS
Retighten●●Refer to "STARTING AND BREAK-
IN" section in the CHAPTER 1.
AIR FILTER
Clean and lubricate●●Use foam air-filter oil or equivalent oil.
Replace●
OIL FILTER
Replace●●
ENGINE GUARD
Replace●Breakage
FRAME
Clean and inspect●● ItemAfter
break-
inEvery
race
Every
third
(or 500
km)Every
fifth (or
1,000
km)
As re-
quiredRemarks
Page 50 of 190
3-4
MAINTENANCE INTERVALS
TIRE, WHEELS
Inspect air pressure, wheel run-
out, tire wear and spoke loose-
ness●●
Retighten sprocket bolt●●
Inspect bearings●
Replace bearings●
Lubricate●Lithium base grease
THROTTLE, CONTROL CABLE
Check routing and connection●●Yamaha cable lube or SAE 10W-30
motor oil
Lubricate●●
HOT STARTER, CLUTCH LEVER
Inspect free play● ItemAfter
break-
inEvery
race
Every
third
(or 500
km)Every
fifth (or
1,000
km)
As re-
quiredRemarks


