Page 98 of 150

8-15
1
2
3
4
5
6
78
9
10
11
and maximum level marks.
5. If the engine oil is at or below the minimum
level mark, add sufficient oil of the recom-
mended type through the engine oil tank filler
hole to raise it to the correct level.
TIP
When adding oil, be careful not to overfill the en-
gine oil tank; the oil level rises faster starting from
the half-level-portion on the dipstick.
6. Insert the dipstick into the engine oil tank filler
hole, and then tighten the engine oil tank filler
cap.
NOTICE
ECB00361
Make sure that the engine oil tank filler cap is
securely tightened; otherwise, oil may seep
out when the engine is running.
To change the engine oil (with or without oil
filter element replacement)
1. Place the ATV on a level surface.
2. Remove the engine guard by removing the
bolts.3. Start the engine, warm it up for several min-
utes, and then turn it off.
4. Place an oil pan under the engine to collect
the used oil.
5. Remove the crankcase engine oil drain bolt.
1. Engine guard
2. Bolt
221
Page 99 of 150
8-16
1
2
3
4
5
6
78
9
10
11
6. Remove the engine oil tank filler cap and the
engine oil tank drain bolt.7. Check the washers for damage, and replace if
necessary.
TIP
Skip steps 8–11 if the oil filter element is not being
replaced.
8. Remove the oil filter element cover by remov-
ing the bolts, and then remove the oil filter el-
ement.
1. Crankcase engine oil drain bolt
1
1. Engine oil tank drain bolt
1
Page 101 of 150

8-18
1
2
3
4
5
6
78
9
10
11
12. Install the crankcase engine oil drain bolt and
the engine oil tank drain bolt, and then tighten
them to their specified torques.
13. Pour the specified amount of the recommend-
ed engine oil through the engine oil tank filler
hole, and then install and tighten the engine oil
tank filler cap.
TIP
Be sure to wipe off spilled oil on any parts after the
engine and exhaust system have cooled down.
NOTICE
ECB00300
�
In order to prevent clutch slippage (since the
engine oil also lubricates the clutch), do not
mix any chemical additives. Do not use oils
with a diesel specification of “CD” or oils of
a higher quality than specified. In addition,
do not use oils labeled “ENERGY CONSERV-
ING II” or higher.
�
Make sure that no foreign material enters the
crankcase.
14. Start the engine, and then let it idle for several Tightening torques:
Crankcase engine oil drain bolt:
20 Nm (2.0 m·kgf, 14 ft·lbf)
Engine oil tank drain bolt:
20 Nm (2.0 m·kgf, 14 ft·lbf)
Recommended oil:
See page 10-1.
Oil quantity:
Without oil filter element replacement:
1.40 L (1.48 US qt, 1.23 Imp.qt)
With oil filter element replacement:
1.45 L (1.53 US qt, 1.28 Imp.qt)
1. “CD” specification
2. “ENERGY CONSERVING II”
1
2
Page 102 of 150

8-19
1
2
3
4
5
6
78
9
10
11
minutes while checking it for oil leakage. If oil
is leaking, immediately turn the engine off and
check for the cause.
15. Turn the engine off, and then check the oil lev-
el and correct it if necessary.
16. Install the engine guard by installing the bolts,
and then tighten them to the specified torque.
NOTICE
ECB00370
Be sure to apply LOCTITE® to the engine
guard bolts before installing them.
EBU23470
Coolant
The coolant level should be checked before each
ride. In addition, the coolant must be changed at
the intervals specified in the periodic maintenance
and lubrication chart.
EBU23482
To check the coolant level
1. Place the ATV on a level surface.TIP
The coolant level must be checked on a cold en-
gine since the level varies with engine tempera-
ture.
2. Check the coolant level in the coolant reser-
voir.
TIP
The coolant should be between the minimum and
maximum level marks.
3. If the coolant is at or below the minimum level
mark, remove the reservoir cap, add coolant
or distilled water to the maximum level mark,
and then install the reservoir cap. Tightening torque:
Engine guard bolt:
7 Nm (0.7 m·kgf, 5 ft·lbf)
Page 108 of 150
8-25
1
2
3
4
5
6
78
9
10
11
8. Wash the sponge material gently but thor-
oughly in solvent.
WARNING
EWB01940
Always use parts cleaning solvent to clean the
sponge material. Never use low-flash-point
solvents or gasoline to clean the sponge mate-
rial because the engine could catch fire or ex-
plode.
9. Squeeze the excess solvent out of the sponge
material and let it dry.
NOTICE
ECB00440
Do not twist the sponge material when squeez-
ing it.
10. Check the sponge material and replace it if
damaged.
11. Apply a quality foam air filter oil to the sponge
material.TIP
The sponge material should be wet but not drip-
ping.
12. Pull the sponge material over the air filter ele-
ment frame.
1. Sponge material
2. Air filter element frame
1 2
Page 123 of 150

8-40
1
2
3
4
5
6
78
9
10
11
NOTICE
ECB00570
To prevent damaging the O-rings, do not clean
the drive chain with steam cleaners, high-pres-
sure washers or inappropriate solvents.
2. Wipe the drive chain dry.
3. Thoroughly lubricate the drive chain with a
special O-ring chain lubricant.
NOTICE
ECB00580
Do not use engine oil or any other lubricants
for the drive chain, as they may contain sub-
stances that could damage the O-rings.
EBU24900
Checking and lubricating the cables
The operation and the condition of all control ca-
bles should be checked before each ride, and the
cables and cable ends should be lubricated if nec-
essary. If a cable is damaged or does not move
smoothly, have a Yamaha dealer check or replace
it.
WARNING
EWB02130
Inspect cables frequently and replace if dam-
aged. Corrosion can result when the cable
sheaths become damaged, and cables can
also become frayed or kinked, which could re-
strict the operation of controls and lead to an
accident or injury.
EBU24922
Checking and lubricating the brake and
clutch levers
The operation of the brake and clutch levers
should be checked before each ride, and the lever
pivots should be lubricated if necessary.
Recommended lubricant:
Engine oil
Recommended lubricants:
Brake lever:
Silicone grease
Clutch lever:
Lithium-soap-based grease
Page 138 of 150

9-2
1
2
3
4
5
6
7
89
10
11
increasing the chance of an accident. Test the
brakes after washing. Apply the brakes several
times at slow speeds to let friction dry out the
linings.
EBU27260
Storage
Short-term
Always store your ATV in a cool, dry place and, if
necessary, protect it against dust with a porous
cover.
NOTICE
ECB00720
�
Storing the ATV in a poorly ventilated room
or covering it with a tarp while it is still wet,
will allow water and humidity to seep in and
cause rust.
�
To prevent corrosion, avoid damp cellars,
stables (because of the presence of ammo-
nia) and areas where strong chemicals are
stored.
Long-term
Before storing your ATV for several months:
1. Follow all the instructions in the “Cleaning”section of this chapter.
2. Fill up the fuel tank and add fuel stabilizer (if
available) to prevent the fuel from deteriorat-
ing.
3. Perform the following steps to protect the cyl-
inder, piston rings, etc. from corrosion.
a. Remove the spark plug cap and spark
plug.
b. Pour a teaspoonful of engine oil into the
spark plug bore.
c. Install the spark plug cap onto the spark
plug, and then place the spark plug on the
cylinder head so that the electrodes are
grounded. (This will limit sparking during
the next step.)
d. Turn the engine over several times with
the starter. (This will coat the cylinder wall
with oil.)
e. Remove the spark plug cap from the spark
plug, and then install the spark plug and
the spark plug cap.
4. Lubricate all control cables and the pivotingSpecified amount:
7.5 ml of stabilizer to each liter of fuel (or 1 oz
of stabilizer to each gallon of fuel)
Page 140 of 150
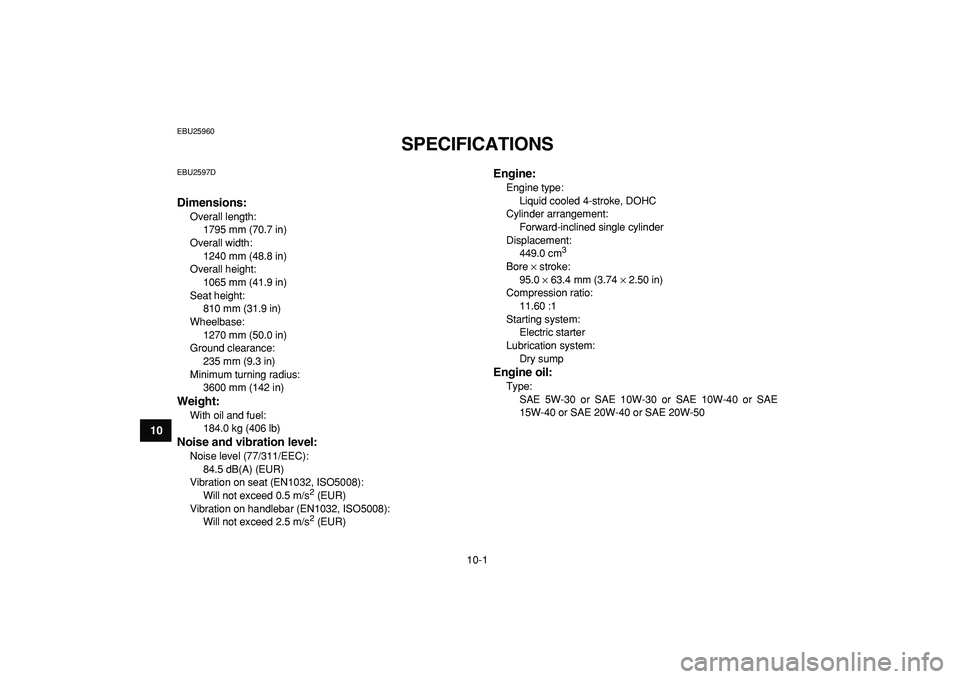
10-1
1
2
3
4
5
6
7
8
910
11
EBU25960
SPECIFICATIONS
EBU2597D
Dimensions:
Overall length:
1795 mm (70.7 in)
Overall width:
1240 mm (48.8 in)
Overall height:
1065 mm (41.9 in)
Seat height:
810 mm (31.9 in)
Wheelbase:
1270 mm (50.0 in)
Ground clearance:
235 mm (9.3 in)
Minimum turning radius:
3600 mm (142 in)
Weight:
With oil and fuel:
184.0 kg (406 lb)
Noise and vibration level:
Noise level (77/311/EEC):
84.5 dB(A) (EUR)
Vibration on seat (EN1032, ISO5008):
Will not exceed 0.5 m/s
2
(EUR)
Vibration on handlebar (EN1032, ISO5008):
Will not exceed 2.5 m/s
2
(EUR)
Engine:
Engine type:
Liquid cooled 4-stroke, DOHC
Cylinder arrangement:
Forward-inclined single cylinder
Displacement:
449.0 cm
3
Bore
×
stroke:
95.0
×
63.4 mm (3.74
×
2.50 in)
Compression ratio:
11.60 :1
Starting system:
Electric starter
Lubrication system:
Dry sump
Engine oil:
Type:
SAE 5W-30 or SAE 10W-30 or SAE 10W-40 or SAE
15W-40 or SAE 20W-40 or SAE 20W-50