Page 10 of 150
Battery ..................................................... 8-47
Replacing the fuse .................................. 8-49
Replacing a headlight bulb ...................... 8-50
Adjusting a headlight beam ..................... 8-52
Replacing the tail/brake light bulb ........... 8-53
Removing a wheel ................................... 8-53
Installing a wheel ..................................... 8-53
Troubleshooting ...................................... 8-54
Troubleshooting charts ............................ 8-55
CLEANING AND STORAGE .......................... 9-1
Cleaning .................................................... 9-1
Storage ...................................................... 9-2
SPECIFICATIONS ...................................... 10-1
CONSUMER INFORMATION ...................... 11-1
Identification numbers ............................. 11-1
Page 23 of 150

4-3
1
2
34
5
6
7
8
9
10
11
EBU18100
Start switch “”
Push this switch to crank the engine with the start-
er.
NOTICE
ECB00050
See the starting instructions on page 6-1 prior
to starting the engine.
EBU18151
Light switch “/ /OFF”
Set this switch to “” to turn on the low beams
and the taillight. Set the switch to “” to turn on
the high beams and the taillight. Set the switch to
“OFF” to turn off all the lights.
NOTICE
ECB00040
Do not use the headlights with the engine
turned off for an extended period of time, oth-
erwise the battery may discharge to the point
that the starter motor will not operate properly.
If this should happen, remove the battery and
recharge it.
EBU18280
Throttle lever
Once the engine is running, movement of the throt-tle lever will increase the engine speed.
Regulate the speed of the ATV by varying the
throttle position. Because the throttle is spring-
loaded, the ATV will decelerate, and the engine will
return to an idle any time the hand is removed from
the throttle lever.
Before starting the engine, check the throttle to be
sure it is operating smoothly. Make sure it returns
to the idle position as soon as the lever is released.
WARNING
EWB00250
Malfunction of the throttle could make it diffi-
cult to speed up or slow down when you need
1. Throttle lever
Page 52 of 150
6-2
1
2
3
4
56
7
8
9
10
11
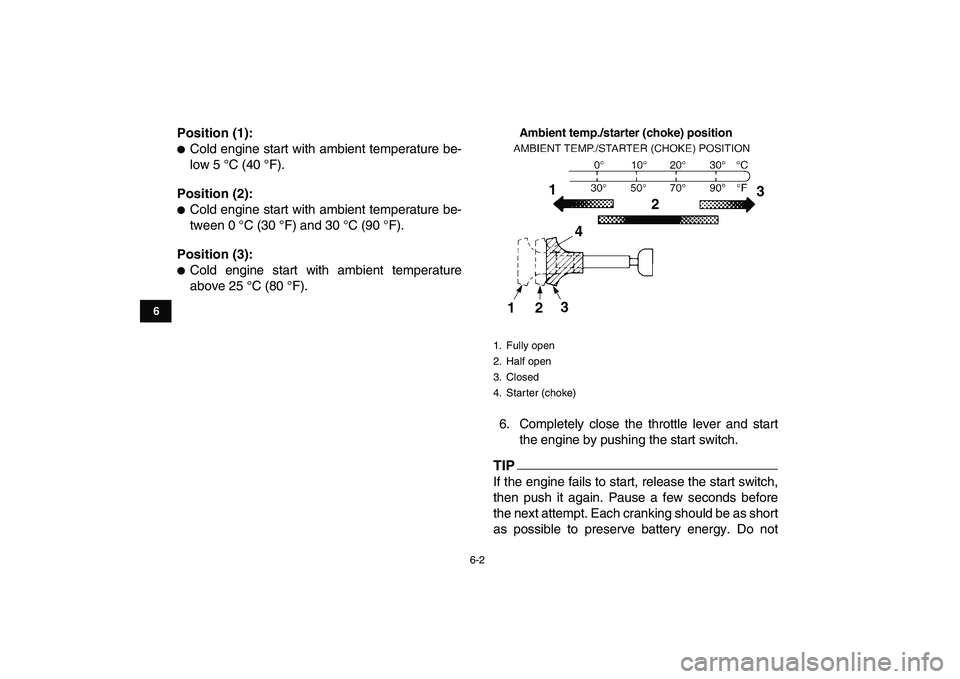
Position (1):
�
Cold engine start with ambient temperature be-
low 5 °C (40 °F).
Position (2):
�
Cold engine start with ambient temperature be-
tween 0 °C (30 °F) and 30 °C (90 °F).
Position (3):
�
Cold engine start with ambient temperature
above 25 °C (80 °F).
Ambient temp./starter (choke) position
6. Completely close the throttle lever and start
the engine by pushing the start switch.
TIP
If the engine fails to start, release the start switch,
then push it again. Pause a few seconds before
the next attempt. Each cranking should be as short
as possible to preserve battery energy. Do not
1. Fully open
2. Half open
3. Closed
4. Starter (choke)1
23
123
4
Page 127 of 150
 battery. There is no need to check
the electrolyte or to add distilled")
8-47
1
2
3
4
5
6
78
9
10
11
Right side
EBU25224
Battery
This model is equipped with a VRLA (Valve Regu-
lated Lead Acid) battery. There is no need to check
the electrolyte or to add distilled water. However,
the battery lead connections need to be checked
and, if necessary, tightened.
NOTICE
ECB00620
Never attempt to remove the battery cell seals,
as this would permanently damage the battery.WARNING
EWB02160
Battery electrolyte is poisonous and danger-
ous, as it contains sulfuric acid, which can
cause severe burns. Avoid contact with skin,
eyes or clothing. Always shield your eyes
when working near batteries.
Antidote:
EXTERNAL: Flush with water.
INTERNAL: Drink large quantities of water or
milk. Follow with milk of magnesia, beaten egg
or vegetable oil. Call a physician immediately.
EYES: Flush with water for 15 minutes and get
prompt medical attention.
Batteries produce explosive gases. Keep
sparks, flame, cigarettes or other sources of ig-
nition away. Ventilate when charging or using
in an enclosed space.
KEEP OUT OF REACH OF CHILDREN.
To remove the battery
1. Remove the seat. (See page 4-11.)
2. Unhook the band securing the owner’s tool kit,
and then remove the battery holding plate by
removing the bolts.
3. Disconnect the negative battery lead first,
1. Upper grease nipple
2. Lower grease nipple
2 1
Page 128 of 150

8-48
1
2
3
4
5
6
78
9
10
11
then the positive battery lead by removing
their bolt.
4. Pull the battery out of its compartment.
To charge the battery
Have a Yamaha dealer charge the battery as soon
as possible if it seems to have discharged. Keep in
mind that the battery tends to discharge more
quickly if the ATV is equipped with optional electri-cal accessories.
To store the battery
�
If the ATV will not be used for more than one
month, remove the battery, fully charge it, and
then place it in a cool, dry place.
�
If the battery will be stored for more than two
months, check it at least once a month and fully
charge it if necessary.
To install the battery
TIP
Be sure the battery is fully charged.
1. Place the battery in its compartment.
2. Connect the positive battery lead first, then
connect the negative battery lead by installing
their bolt.
3. Install the battery holding plate by installing
the bolts, and then hook the band to secure
the owner’s tool kit.
4. Install the seat. (See page 4-11.)
1. Bolt
2. Negative battery lead (black)
3. Positive battery lead (red)
4. Battery
1
1
2 3
4
Page 129 of 150
8-49
1
2
3
4
5
6
78
9
10
11
NOTICE
ECB00631
�
Always keep the battery charged. Storing a
discharged battery can cause permanent
battery damage.
�
To charge a VRLA (Valve Regulated Lead Ac-
id) battery, a special constant-voltage bat-
tery charger is required. Using a
conventional battery charger will damage
the battery. If you do not have access to a
constant-voltage battery charger, have a
Yamaha dealer charge your battery.
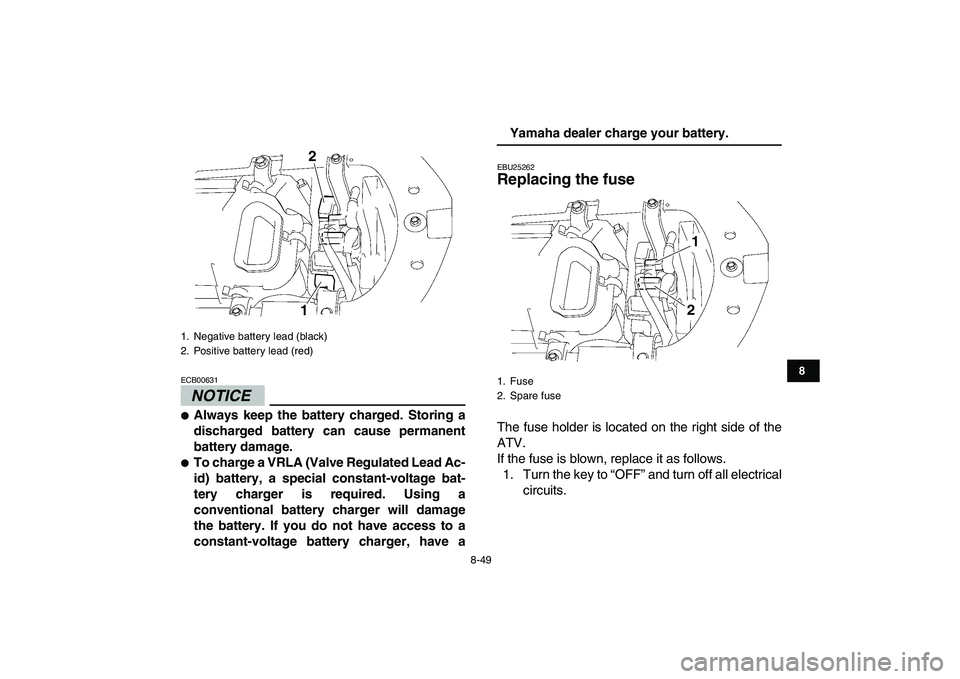
EBU25262
Replacing the fuse
The fuse holder is located on the right side of the
ATV.
If the fuse is blown, replace it as follows.
1. Turn the key to “OFF” and turn off all electrical
circuits.
1. Negative battery lead (black)
2. Positive battery lead (red)
2
1
1. Fuse
2. Spare fuse
1
2
Page 135 of 150
8-55
1
2
3
4
5
6
78
9
10
11
EBU25781
Troubleshooting charts
Starting problems or poor engine performance
Check the fuel level in
the fuel tank.1. Fuel
There is enough fuel.
There is no fuel.
Check the compression.
Supply fuel.
The engine does not start.
Check the compression.
Operate the electric starter.2. Compression
There is compression.
There is no compression.
Check the ignition.
Have a Yamaha dealer
check the ATV.
Remove the spark plug
and check the electrodes.3. Ignition
Wipe off with a dry cloth and correct the
spark plug gap, or replace the spark plug.
Have a Yamaha dealer check the ATV.
The engine does not start.
Have a Yamaha dealer
check the ATV.
The engine does not start.
Check the battery.
Operate the electric starter.4. Battery
The engine turns over
quickly.
The engine turns over
slowly.
The battery is good.Check the battery lead connections,
and charge the battery if necessary.
DryWet
Open the throttle halfway and operate
the electric starter.
Page 139 of 150
9-3
1
2
3
4
5
6
7
89
10
11
with oil.)
e. Remove the spark plug cap from the spark
plug, and then install the spark plug and
the spark plug cap.
6. Lubricate all control cables and the pivoting
points of all levers and pedals.
7. Check and, if necessary, correct the tire air
pressure, and then block up the ATV so that
all of its wheels are off the ground. Alternative-
ly, turn the wheels a little every month in order
to prevent the tires from becoming degraded
in one spot.
8. Cover the muffler outlet with a plastic bag to
prevent moisture from entering it.
9. Remove the battery and fully charge it. Store
it in a cool, dry place and charge it once a
month. Do not store the battery in an exces-
sively cold or warm place [less than 0 °C (30
°F) or more than 30 °C (90 °F)]. For more in-
formation on storing the battery, see page
8-47.
TIP
Make any necessary repairs before storing the
ATV.


e. Remove the spark plug cap from the spark
plug, and then install the spark plug and
the spark plug cap.
6. Lubricate all control cables and the pivoting
po")