2009 YAMAHA XMAX 125 oil
[x] Cancel search: oilPage 51 of 92

Instead, have a Yamaha dealer check
the vehicle.
2. Check the spark plug for electro-
de erosion and excessive carbon
or other deposits, and replace it if
necessary.
To install the spark plug
1. Measure the spark plug gap with
a wire thickness gauge and, if
necessary, adjust the gap to spe-
cification.
1. Spark plug gap
2. Clean the surface of the spark
plug gasket and its mating surfa-
ce, and then wipe off any grime
from the spark plug threads.
3. Install the spark plug with the
spark plug wrench, and then
tighten it to the specified torque.
TIP
If a torque wrench is not available
when installing a spark plug, a good
estimate of the correct torque is
1/4–1/2 turn past finger tight. Howe-
ver, the spark plug should be tighte-
ned to the specified torque as soon
as possible.
4. Install the spark plug cap.
5. Install the cowling.
EAUM2271
Engine oil
The engine oil level should be chec-
ked before each ride. In addition, the
oil must be changed at the intervals
specified in the periodic maintenance
and lubrication chart and when the
service indicator light comes on.
To check the engine oil level
1. Place the scooter on the centers-
tand. A slight tilt to the side can
result in a false reading.
2. Start the engine, warm it up for
several minutes, and then turn it
off.
3. Wait a few minutes until the oil
settles, remove the oil filler cap,
wipe the dipstick clean, insert it
back into the oil filler hole (wit-
hout screwing it in), and then
remove it again to check the oil
level.
TIP
The engine oil should be between the
minimum and maximum level marks.
Tightening torque:
Spark plug:
17.5 Nm (1.75 m·kgf, 12.5 ft·lbf)
Spark plug gap:
0.8–0.9 mm (0.031–0.035 in)
1
ZAUM0037
Specified spark plug:
NGK/ CPR 9EA-9
PERIODIC MAINTENANCE AND ADJUSTMENT
6-9
6
1B9-F8199-E3.QXD 21/10/08 13:42 Página 51
Page 52 of 92

1. Engine oil filler cap
4. If the engine oil is below the mini-
mum level mark, add sufficient oil
of the recommended type to rai-
se it to the correct level.
5. Insert the dipstick into the oil filler
hole, and then tighten the oil filler
cap.
To change the engine oil (with or
without oil filter element
replacement)
1. Start the engine, warm it up for
several minutes, and then turn it off.
2. Place an oil pan under the engine
to collect the used oil.3. Remove the engine oil filler cap
and the engine oil drain bolt to
drain the oil from the crankcase.1. Engine oil drain bolt
4. Check the drain bolt washer for
damage and replace it if neces-
sary.
1. Engine oil drain bolt
2. Washer
TIP
Skip steps 5–9 if the oil filter element
is not being replaced.
5. Remove the oil filter element
cover by removing the bolts.
1. Oil filter element cover
6. Remove the oil filter element and
O-ring.
ZAUM07111
ZAUM07021
ZAUM07011
PERIODIC MAINTENANCE AND ADJUSTMENT
6-10
6
1B9-F8199-E3.QXD 21/10/08 13:42 Página 52
Page 53 of 92

1. Oil filter element
2. O-ring
3. Oil filter element cover
7. Check the O-ring for damage and
replace it if necessary.
8. Install the new oil filter element
and an O-ring.
9. Install the oil filter element cover
by installing the bolts, then tigh-
tening them to the specified tor-
que.
TIP
Make sure that the O-ring is properly
seated.
10. Install the washer and the engine
oil drain bolt, and then tighten the
drain bolt to the specified torque.
TIP
Make sure that the washer is properly
seated.
11. Refill with the specified amount
of the recommended engine oil,
and then install and tighten the oil
filler cap.
TIP
Be sure to wipe off spilled oil on any
parts after the engine and exhaust
system have cooled down.
ECA11670
NOTICE
●Do not use oils with a diesel
specification of “CD” or oils of
a higher quality than specified.
In addition, do not use oils
labeled “ENERGY CONSER-
VING II” or higher.
●Be sure no foreign material
enters the crankcase.
12. Start the engine, and then let it
idle for several minutes while
checking it for oil leakage. If oil is
leaking, immediately turn the
engine off and check for the cau-
se.
13. Turn the engine off, and then
check the oil level and correct it if
necessary.
14. Reset the oil change indicator.
(See page 3-6).
Recommended engine oil:
See page 8-1
Oil change quantity:
Without oil filter element
replacement:
1.40 L (1.48 US qt, 1.23 Imp.qt)
With oil filter element
replacement:
1.50 L (1.59 US qt, 1.32 Imp.qt)
Tightening torque:
Engine oil drain bolt:
20 Nm (2.0 m·kgf, 14 ft·lbf)
Tightening torque:
Oil filter cover bolt:
10 Nm (1.0 m·kgf, 7.2 ft·lbf)
1
2
3
ZAUM0712
PERIODIC MAINTENANCE AND ADJUSTMENT
6-11
6
1B9-F8199-E3.QXD 21/10/08 13:42 Página 53
Page 54 of 92

EAU20064
Final transmission oil
The final transmission case must be
checked for oil leakage before each
ride. If any leakage is found, have a
Yamaha dealer check and repair the
scooter. In addition, the final trans-
mission oil must be changed as
follows at the intervals specified in the
periodic maintenance and lubrication
chart.
1. Start the engine, warm up the
final transmission oil by riding the
scooter for several minutes, and
then stop the engine.
2. Place the scooter on the centers-
tand.
3. Place an oil pan under the final
transmission case to collect the
used oil.
4. Remove the final transmission oil
filler cap and final transmission
drain bolt to drain the oil from the
final transmission case.
1. Final transmission oil filler cap
5. Install the final transmission oil
drain bolt, and then tighten it to
the specified torque.
1. Final transmission oil drain bolt
6. Refill with the specified amount
of the recommended final trans-
mission oil, and then install and
tighten the oil filler cap. WAR-
NING! Make sure that no
foreign material enters the final
transmission case. Make sure
that no oil gets on the tire or
wheel.
[EWA11311]
7. Check the final transmission case
for oil leakage. If oil is leaking,
check for the cause.
Recommended final transmission
oil:
See page 8-1
Oil quantity:
0.21 L (0.22 US qt, 0.18 Imp.qt)
Tightening torque:
Final transmission oil drain bolt:
20 Nm (2.0 m·kgf, 14 ft·lbf)
PERIODIC MAINTENANCE AND ADJUSTMENT
6-12
6
1B9-F8199-E3.QXD 21/10/08 13:42 Página 54
Page 63 of 92

when refilling. Water will signifi-
cantly lower the boiling point of
the fluid and may result in vapor
lock.
●Brake fluid may deteriorate pain-
ted surfaces or plastic parts.
Always clean up spilled fluid
immediately.
●As the brake pads wear, it is nor-
mal for the brake fluid level to
gradually go down. However, if
the brake fluid level goes down
suddenly, have a Yamaha dealer
check the cause.
EAU22721
Changing the brake fluid
Have a Yamaha dealer change the
brake fluid at the intervals specified in
the TIP after the periodic maintenan-
ce and lubrication chart. In addition,
have the oil seals of the brake master
cylinder and caliper as well as the
brake hose replaced at the intervals
listed below or whenever they are
damaged or leaking.
●Oil seals: Replace every two
years.
●Brake hose: Replace every four
years.
EAU23101
Checking and lubricating the
cables
The operation of all control cables
and the condition of the cables
should be checked before each ride,
and the cables and cable ends should
be lubricated if necessary. If a cable is
damaged or does not move smoothly,
have a Yamaha dealer check or repla-
ce it. WARNING! Damage to the
outer sheath may interfere with
proper cable operation and will
cause the inner cable to rust.
Replace a damaged cable as soon
as possible to prevent unsafe con-
ditions.
[EWA10721]
Recommended lubricant:
Engine oil
PERIODIC MAINTENANCE AND ADJUSTMENT
6-21
6
1B9-F8199-E3.QXD 21/10/08 13:43 Página 63
Page 65 of 92

The operation of the centerstand and
sidestand should be checked before
each ride, and the pivots and metal-
to-metal contact surfaces should be
lubricated if necessary.
EWA10741
s s
WARNING
If the centerstand or sidestand
does not move up and down smo-
othly, have a Yamaha dealer check
or repair it. Otherwise, the centers-
tand or sidestand could contact the
ground and distract the operator,
resulting in a possible loss of con-
trol.
EAU23272
Checking the front fork
The condition and operation of the
front fork must be checked as follows
at the intervals specified in the perio-
dic maintenance and lubrication
chart.
To check the condition
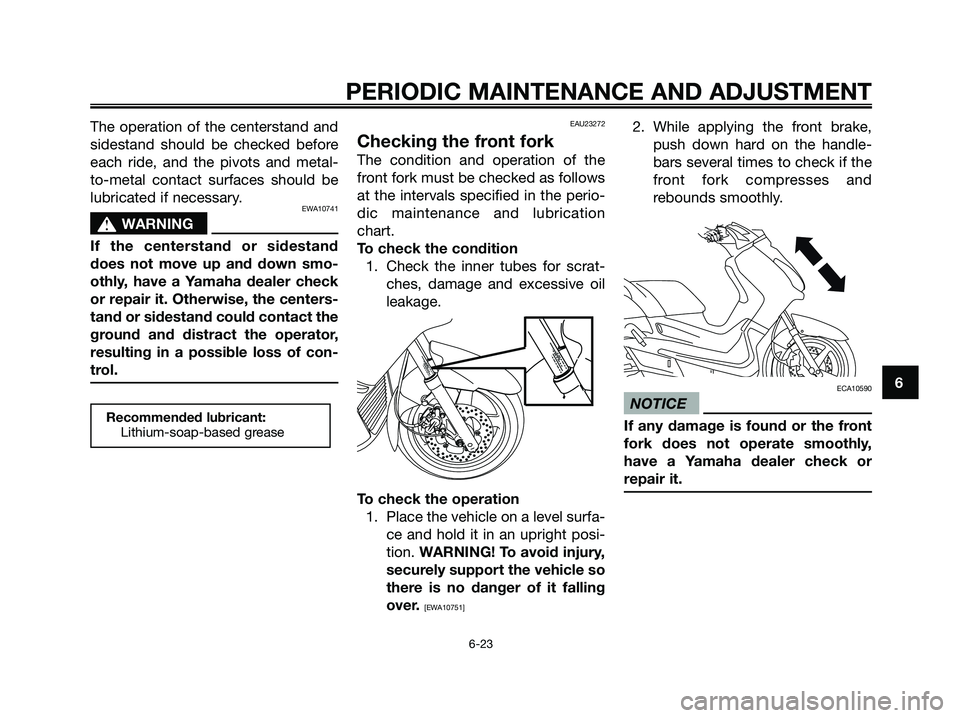
1. Check the inner tubes for scrat-
ches, damage and excessive oil
leakage.
To check the operation
1. Place the vehicle on a level surfa-
ce and hold it in an upright posi-
tion. WARNING! To avoid injury,
securely support the vehicle so
there is no danger of it falling
over.
[EWA10751]
2. While applying the front brake,
push down hard on the handle-
bars several times to check if the
front fork compresses and
rebounds smoothly.
ECA10590
NOTICE
If any damage is found or the front
fork does not operate smoothly,
have a Yamaha dealer check or
repair it.Recommended lubricant:
Lithium-soap-based grease
PERIODIC MAINTENANCE AND ADJUSTMENT
6-23
6
1B9-F8199-E3.QXD 21/10/08 13:43 Página 65
Page 70 of 92

EAU23911
Replacing a headlight bulb
This model is equipped with quartz
bulb headlights. If a headlight bulb
burns out, replace it as follows.
ECA10660
NOTICE
Do not touch the glass part of the
headlight bulb to keep it free from
oil, otherwise the transparency of
the glass, the luminosity of the
bulb, and the bulb life will be adver-
sely affected. Thoroughly clean off
any dirt and fingerprints on the
headlight bulb using a cloth mois-
tened with alcohol or thinner.
1. Do not touch the glass part of the bulb.
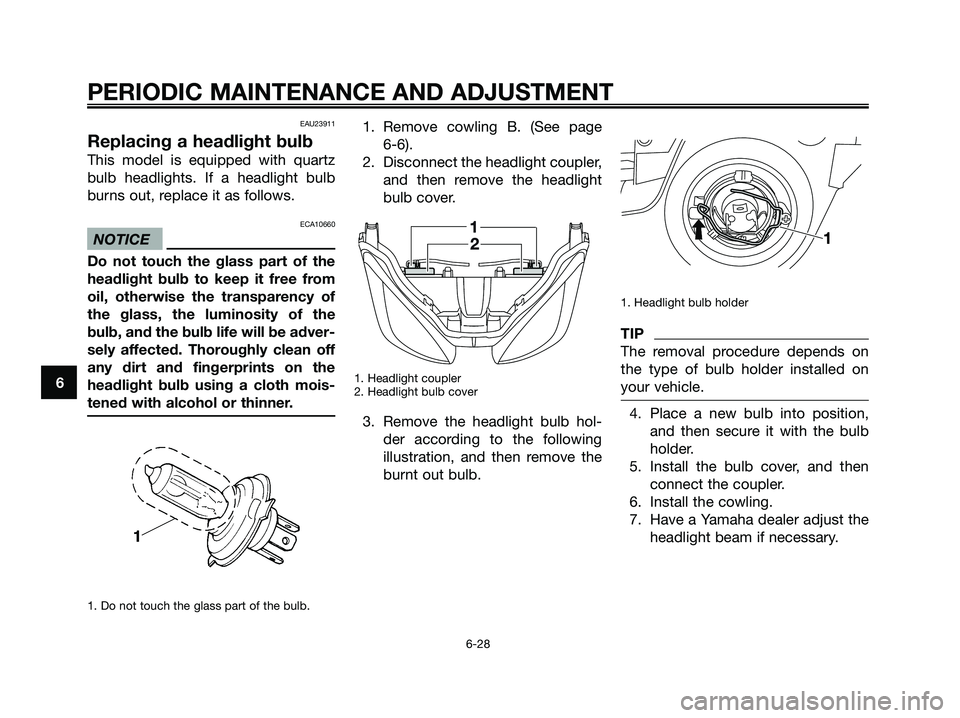
1. Remove cowling B. (See page
6-6).
2. Disconnect the headlight coupler,
and then remove the headlight
bulb cover.
1. Headlight coupler
2. Headlight bulb cover
3. Remove the headlight bulb hol-
der according to the following
illustration, and then remove the
burnt out bulb.
1. Headlight bulb holder
TIP
The removal procedure depends on
the type of bulb holder installed on
your vehicle.
4. Place a new bulb into position,
and then secure it with the bulb
holder.
5. Install the bulb cover, and then
connect the coupler.
6. Install the cowling.
7. Have a Yamaha dealer adjust the
headlight beam if necessary.
PERIODIC MAINTENANCE AND ADJUSTMENT
6-28
6
1B9-F8199-E3.QXD 21/10/08 13:43 Página 70
Page 77 of 92

EAU37833
Matte color cautionECA15192
NOTICE
Some models are equipped with
matte colored finished parts. Be
sure to consult a Yamaha dealer for
advice on what products to use
before cleaning the vehicle.
Using a brush, harsh chemical pro-
ducts or cleaning compounds
when cleaning these parts will
scratch or damage their surface.
Wax also should not be applied to
any matte colored finished parts.
EAU26093
Care
While the open design of a scooter
reveals the attractiveness of the tech-
nology, it also makes it more vulnera-
ble. Rust and corrosion can develop
even if high-quality components are
used. A rusty exhaust pipe may go
unnoticed on a car, however, it
detracts from the overall appearance
of a scooter. Frequent and proper
care does not only comply with the
terms of the warranty, but it will also
keep your scooter looking good,
extend its life and optimize its perfor-
mance.
Before cleaning
1. Cover the muffler outlet with a
plastic bag after the engine has
cooled down.
2. Make sure that all caps and
covers as well as all electrical
couplers and connectors, inclu-
ding the spark plug cap, are
tightly installed.
3. Remove extremely stubborn dirt,
like oil burnt onto the crankcase,
with a degreasing agent and abrush, but never apply such pro-
ducts onto seals, gaskets and
wheel axles. Always rinse the dirt
and degreaser off with water.
Cleaning
ECA10782
NOTICE
●Avoid using strong acidic whe-
el cleaners, especially on spo-
ked wheels. If such products
are used on hard-to-remove
dirt, do not leave the cleaner on
the affected area any longer
than instructed. Also, tho-
roughly rinse the area off with
water, immediately dry it, and
then apply a corrosion protec-
tion spray.
●Improper cleaning can damage
plastic parts (such as cowlings,
panels, windshields, headlight
lenses, meter lenses, etc.) and
the mufflers. Use only a soft,
clean cloth or sponge with
water to clean plastic. Howe-
ver, if the plastic parts cannot
be thoroughly cleaned with
water, diluted mild detergent
SCOOTER CARE AND STORAGE
7-1
7
1B9-F8199-E3.QXD 21/10/08 13:43 Página 77