Page 45 of 82
PERIODIC MAINTENANCE AND ADJUSTMENT
6-6
6
EAU18712
Removing and installing cowl-
ings and panels The cowlings and panels shown need
to be removed to perform some of the
maintenance jobs described in this
chapter. Refer to this section each time
a cowling or panel needs to be re-
moved and installed.
EAUM2221
Cowling A
To remove the cowling1. Remove the cowling screws.2. Disconnect the headlight coupler
and the turn signal couplers.
3. Pull the cowling off.
1. Cowling AZAUM0652
1
1. Panel A
1. Panel BZAUM0653
1
ZAUM0654
1
1. Cowling A
2. Screw
1. Turn signal light lead coupler
2. Headlight couplerZAUM0655
2
1
12
ZAUM0428
U16PE1E0.book Page 6 Monday, July 28, 2008 9:57 AM
Page 46 of 82

PERIODIC MAINTENANCE AND ADJUSTMENT
6-7
6To install the cowling
1. Connect the headlight coupler and
the turn signal couplers.
2. Place the cowling in the original
position, and then install the
screws.
EAU19481
Panel A
To remove the panel1. Open the seat. (See page 3-12.)
2. Remove the screws, and then pull
the panel off as shown.
To install the panelPlace the panel in the original position,
and then install the screws.
EAU19210
Panel B
To remove the panelRemove the screws, and then take the
panel off.
To install the panelPlace the panel in the original position,
and then install the screws.
EAU19622
Checking the spark plug The spark plug is an important engine
component, which should be checked
periodically, preferably by a Yamaha
dealer. Since heat and deposits will
cause any spark plug to slowly erode, it
should be removed and checked in ac-
cordance with the periodic mainte-
nance and lubrication chart. In addition,
the condition of the spark plug can re-
veal the condition of the engine.
The porcelain insulator around the cen-
ter electrode of the spark plug should
be a medium-to-light tan (the ideal color
when the vehicle is ridden normally). If
the spark plug shows a distinctly differ-
ent color, the engine could be operating
improperly. Do not attempt to diagnose
such problems yourself. Instead, have
a Yamaha dealer check the vehicle.
If the spark plug shows signs of elec-
trode erosion and excessive carbon or
other deposits, it should be replaced.
1. Screw
2. Panel AZAUM0656
1
2
1. ScrewZAUM0657
1
Specified spark plug:
NGK/CPR9EA-9
U16PE1E0.book Page 7 Monday, July 28, 2008 9:57 AM
Page 47 of 82

PERIODIC MAINTENANCE AND ADJUSTMENT
6-8
6 Before installing a spark plug, the spark
plug gap should be measured with a
wire thickness gauge and, if necessary,
adjusted to specification.
Clean the surface of the spark plug
gasket and its mating surface, and then
wipe off any grime from the spark plug
threads.
TIPIf a torque wrench is not available when
installing a spark plug, a good estimate
of the correct torque is 1/4–1/2 turn
past finger tight. However, the spark
plug should be tightened to the speci-fied torque as soon as possible.
EAUM2271
Engine oil The engine oil level should be checked
before each ride. In addition, the oil
must be changed at the intervals spec-
ified in the periodic maintenance and
lubrication chart and when the service
indicator light comes on.
To check the engine oil level
1. Place the scooter on the center-
stand. A slight tilt to the side can
result in a false reading.
2. Start the engine, warm it up for
several minutes, and then turn it
off.
3. Wait a few minutes until the oil set-
tles, remove the oil filler cap, wipe
the dipstick clean, insert it back
into the oil filler hole (without
screwing it in), and then remove it
again to check the oil level.TIPThe engine oil should be between theminimum and maximum level marks.
1. Spark plug gapSpark plug gap:
0.8–0.9 mm (0.031–0.035 in)
Tightening torque:
Spark plug:
12.5 Nm (1.25 m·kgf, 9.0 ft·lbf)
1
ZAUM0037
U16PE1E0.book Page 8 Monday, July 28, 2008 9:57 AM
Page 51 of 82
PERIODIC MAINTENANCE AND ADJUSTMENT
6-12
6
EAU20070
Coolant The coolant level should be checked
before each ride. In addition, the cool-
ant must be changed at the intervals
specified in the periodic maintenance
and lubrication chart.
EAUM2102
To check the coolant level
1. Place the vehicle on a level sur-
face and hold it in an upright posi-
tion.TIP�
The coolant level must be checked
on a cold engine since the level
varies with engine temperature.
�
Make sure that the vehicle is posi-
tioned straight up when checking
the coolant level. A slight tilt to theside can result in a false reading.
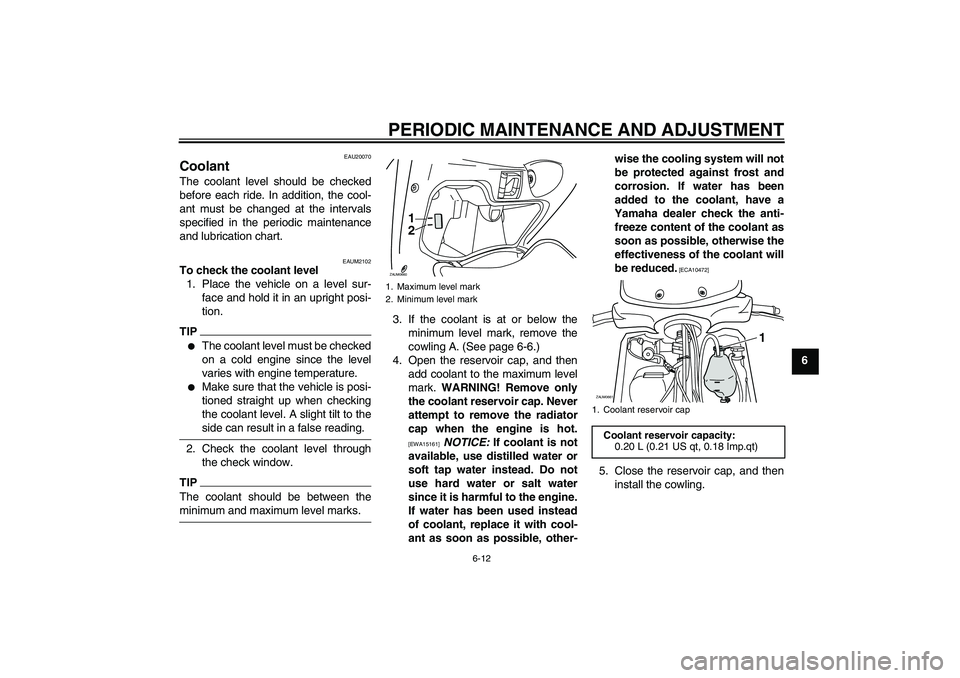
2. Check the coolant level through
the check window.
TIPThe coolant should be between theminimum and maximum level marks.3. If the coolant is at or below the
minimum level mark, remove the
cowling A. (See page 6-6.)
4. Open the reservoir cap, and then
add coolant to the maximum level
mark. WARNING! Remove only
the coolant reservoir cap. Never
attempt to remove the radiator
cap when the engine is hot.
[EWA15161]
NOTICE: If coolant is not
available, use distilled water or
soft tap water instead. Do not
use hard water or salt water
since it is harmful to the engine.
If water has been used instead
of coolant, replace it with cool-
ant as soon as possible, other-wise the cooling system will not
be protected against frost and
corrosion. If water has been
added to the coolant, have a
Yamaha dealer check the anti-
freeze content of the coolant as
soon as possible, otherwise the
effectiveness of the coolant will
be reduced.
[ECA10472]
5. Close the reservoir cap, and then
install the cowling.
1. Maximum level mark
2. Minimum level mark
1
2
ZAUM0660
1. Coolant reservoir cap
Coolant reservoir capacity:
0.20 L (0.21 US qt, 0.18 Imp.qt)
1
ZAUM0661
U16PE1E0.book Page 12 Monday, July 28, 2008 9:57 AM
Page 63 of 82
PERIODIC MAINTENANCE AND ADJUSTMENT
6-24
6 3. Fully charge the battery before in-
stallation.
NOTICE
ECA16530
Always keep the battery charged.
Storing a discharged battery cancause permanent battery damage.
EAU23526
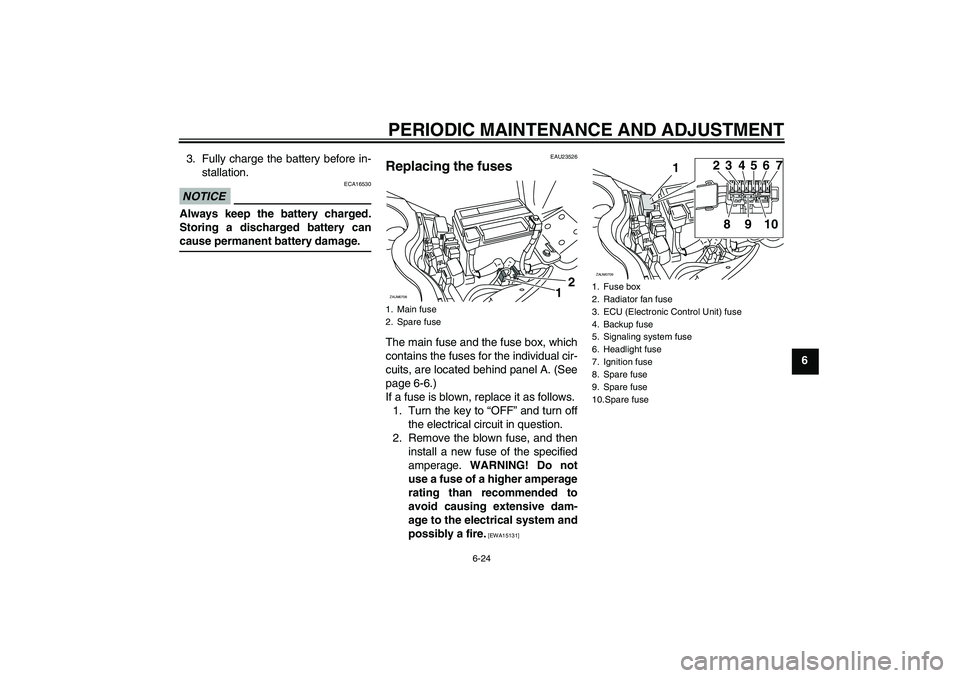
Replacing the fuses The main fuse and the fuse box, which
contains the fuses for the individual cir-
cuits, are located behind panel A. (See
page 6-6.)
If a fuse is blown, replace it as follows.
1. Turn the key to “OFF” and turn off
the electrical circuit in question.
2. Remove the blown fuse, and then
install a new fuse of the specified
amperage. WARNING! Do not
use a fuse of a higher amperage
rating than recommended to
avoid causing extensive dam-
age to the electrical system and
possibly a fire.
[EWA15131]
1. Main fuse
2. Spare fuse
12
ZAUM0708
1. Fuse box
2. Radiator fan fuse
3. ECU (Electronic Control Unit) fuse
4. Backup fuse
5. Signaling system fuse
6. Headlight fuse
7. Ignition fuse
8. Spare fuse
9. Spare fuse
10.Spare fuse
1
ZAUM0709
23
8910456 7
U16PE1E0.book Page 24 Monday, July 28, 2008 9:57 AM
Page 64 of 82
PERIODIC MAINTENANCE AND ADJUSTMENT
6-25
63. Turn the key to “ON” and turn on
the electrical circuit in question to
check if the device operates.
4. If the fuse immediately blows
again, have a Yamaha dealer
check the electrical system.
EAUM2181
Replacing a headlight bulb This model is equipped with quartz bulb
headlights. If a headlight bulb burns
out, replace it as follows.NOTICE
ECA10650
Take care not to damage the follow-
ing parts:�
Headlight bulb
Do not touch the glass part of
the headlight bulb to keep it free
from oil, otherwise the transpar-
ency of the glass, the luminosity
of the bulb, and the bulb life will
be adversely affected. Thor-
oughly clean off any dirt and fin-
gerprints on the headlight bulb
using a cloth moistened with al-
cohol or thinner.
�
Headlight lens
Do not affix any type of tinted
film or stickers to the headlight
lens.
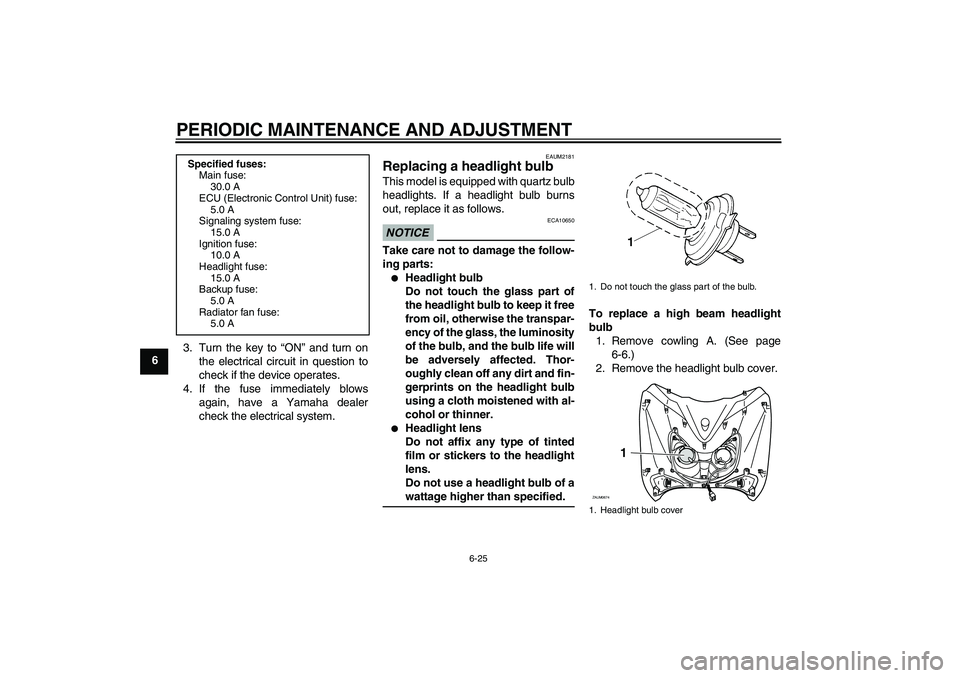
Do not use a headlight bulb of awattage higher than specified.To replace a high beam headlight
bulb
1. Remove cowling A. (See page
6-6.)
2. Remove the headlight bulb cover.
Specified fuses:
Main fuse:
30.0 A
ECU (Electronic Control Unit) fuse:
5.0 A
Signaling system fuse:
15.0 A
Ignition fuse:
10.0 A
Headlight fuse:
15.0 A
Backup fuse:
5.0 A
Radiator fan fuse:
5.0 A
1. Do not touch the glass part of the bulb.
1. Headlight bulb cover
1
ZAUM0674
U16PE1E0.book Page 25 Monday, July 28, 2008 9:57 AM
Page 65 of 82
PERIODIC MAINTENANCE AND ADJUSTMENT
6-26
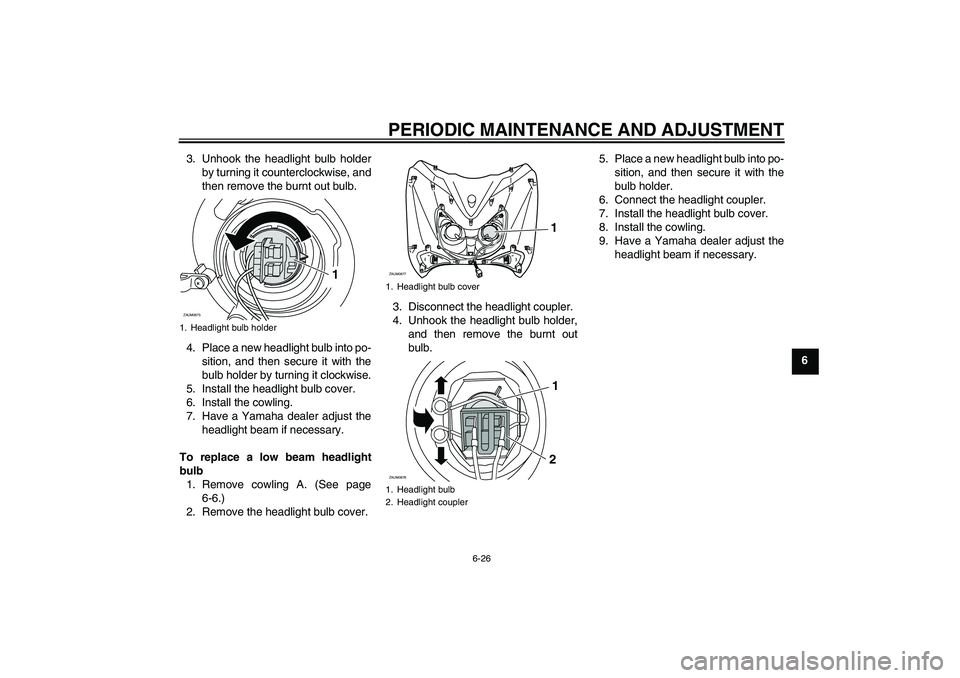
6 3. Unhook the headlight bulb holder
by turning it counterclockwise, and
then remove the burnt out bulb.
4. Place a new headlight bulb into po-
sition, and then secure it with the
bulb holder by turning it clockwise.
5. Install the headlight bulb cover.
6. Install the cowling.
7. Have a Yamaha dealer adjust the
headlight beam if necessary.
To replace a low beam headlight
bulb
1. Remove cowling A. (See page
6-6.)
2. Remove the headlight bulb cover.3. Disconnect the headlight coupler.
4. Unhook the headlight bulb holder,
and then remove the burnt out
bulb.5. Place a new headlight bulb into po-
sition, and then secure it with the
bulb holder.
6. Connect the headlight coupler.
7. Install the headlight bulb cover.
8. Install the cowling.
9. Have a Yamaha dealer adjust the
headlight beam if necessary.
1. Headlight bulb holderZAUM0675
1
1. Headlight bulb cover
1. Headlight bulb
2. Headlight coupler
1
ZAUM0677 ZAUM0678
1
2
U16PE1E0.book Page 26 Monday, July 28, 2008 9:57 AM
Page 66 of 82
PERIODIC MAINTENANCE AND ADJUSTMENT
6-27
6
EAUT1261
Replacing a front turn signal
light bulb NOTICE
ECA10670
It is advisable to have a Yamahadealer perform this job.
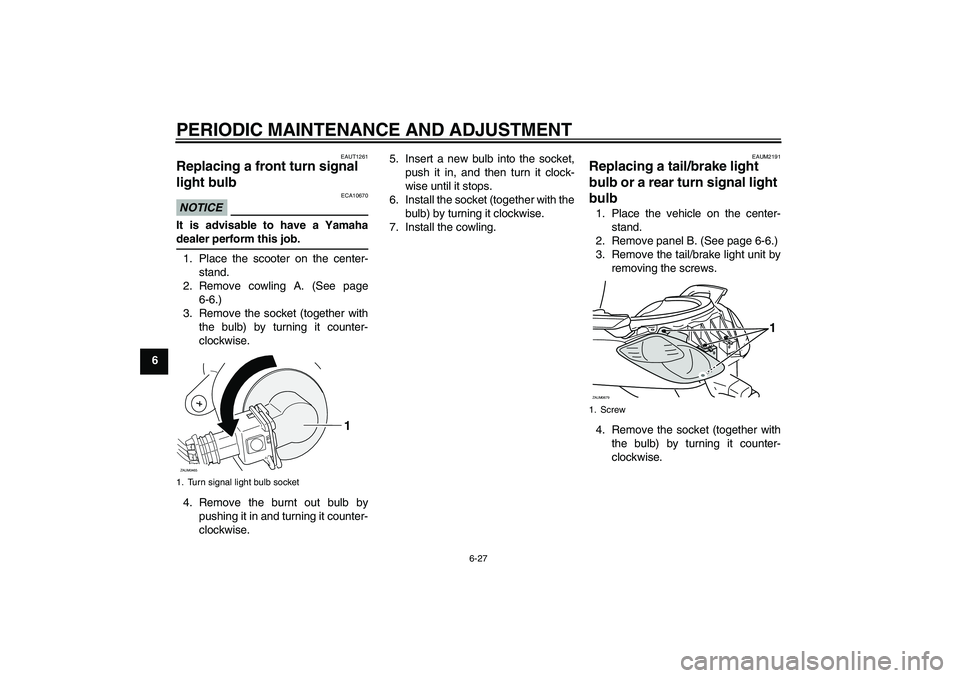
1. Place the scooter on the center-
stand.
2. Remove cowling A. (See page
6-6.)
3. Remove the socket (together with
the bulb) by turning it counter-
clockwise.
4. Remove the burnt out bulb by
pushing it in and turning it counter-
clockwise.5. Insert a new bulb into the socket,
push it in, and then turn it clock-
wise until it stops.
6. Install the socket (together with the
bulb) by turning it clockwise.
7. Install the cowling.
EAUM2191
Replacing a tail/brake light
bulb or a rear turn signal light
bulb 1. Place the vehicle on the center-
stand.
2. Remove panel B. (See page 6-6.)
3. Remove the tail/brake light unit by
removing the screws.
4. Remove the socket (together with
the bulb) by turning it counter-
clockwise.
1. Turn signal light bulb socket
1
ZAUM0465
1. ScrewZAUM0679
1
U16PE1E0.book Page 27 Monday, July 28, 2008 9:57 AM