2009 YAMAHA SUPERJET ECU
[x] Cancel search: ECUPage 24 of 76

Features and functions
17
EJU31021
Operation of controls and other
functions
EJU31053Hood
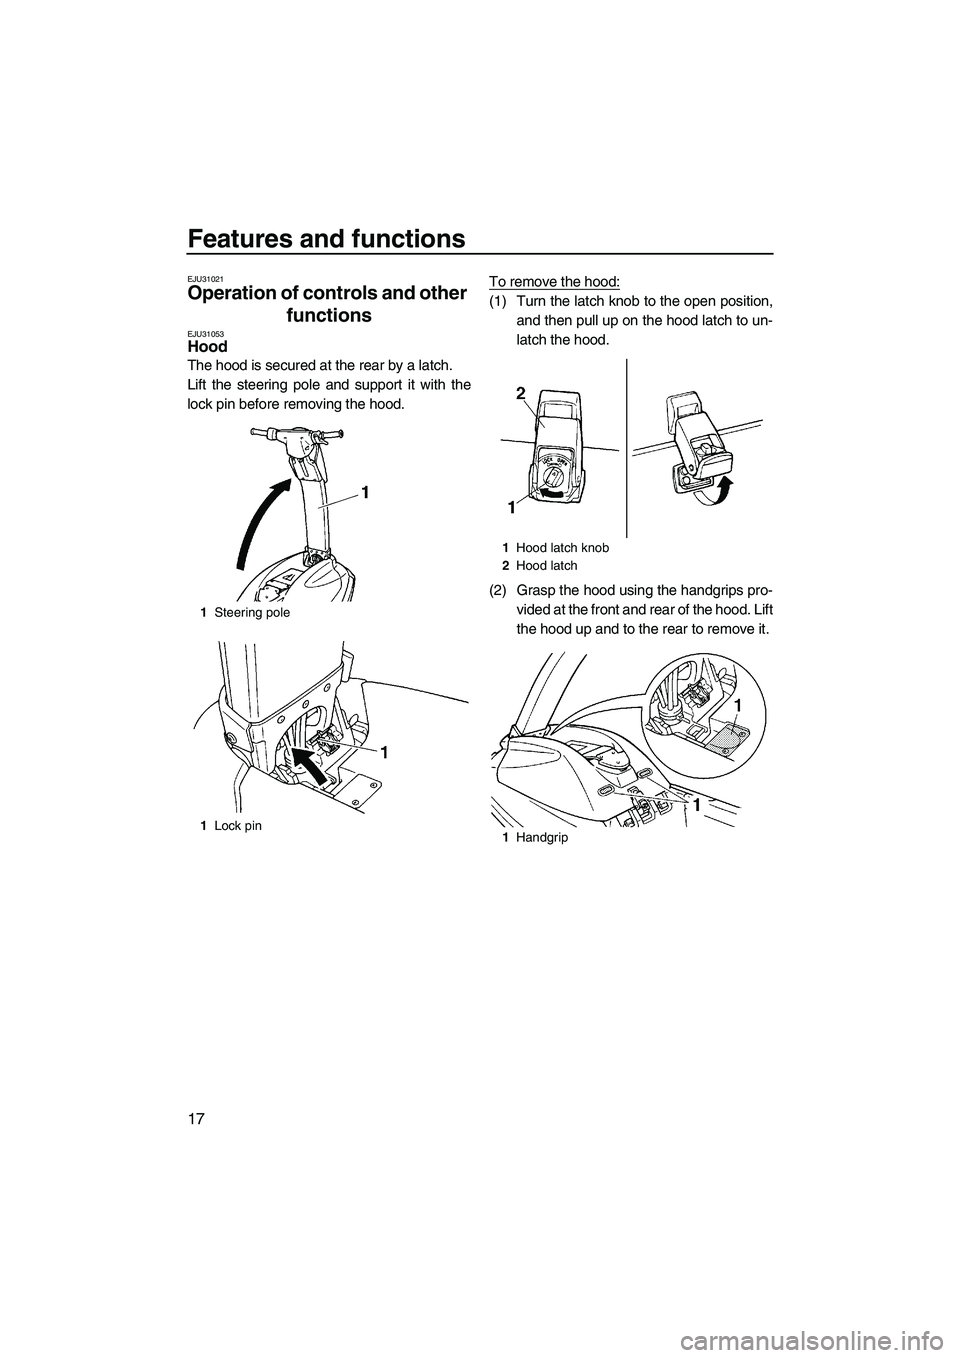
The hood is secured at the rear by a latch.
Lift the steering pole and support it with the
lock pin before removing the hood.To remove the hood:
(1) Turn the latch knob to the open position,
and then pull up on the hood latch to un-
latch the hood.
(2) Grasp the hood using the handgrips pro-
vided at the front and rear of the hood. Lift
the hood up and to the rear to remove it.
1Steering pole
1Lock pin
1Hood latch knob
2Hood latch
1Handgrip
UF2F71E0.book Page 17 Thursday, April 10, 2008 11:47 AM
Page 25 of 76

Features and functions
18
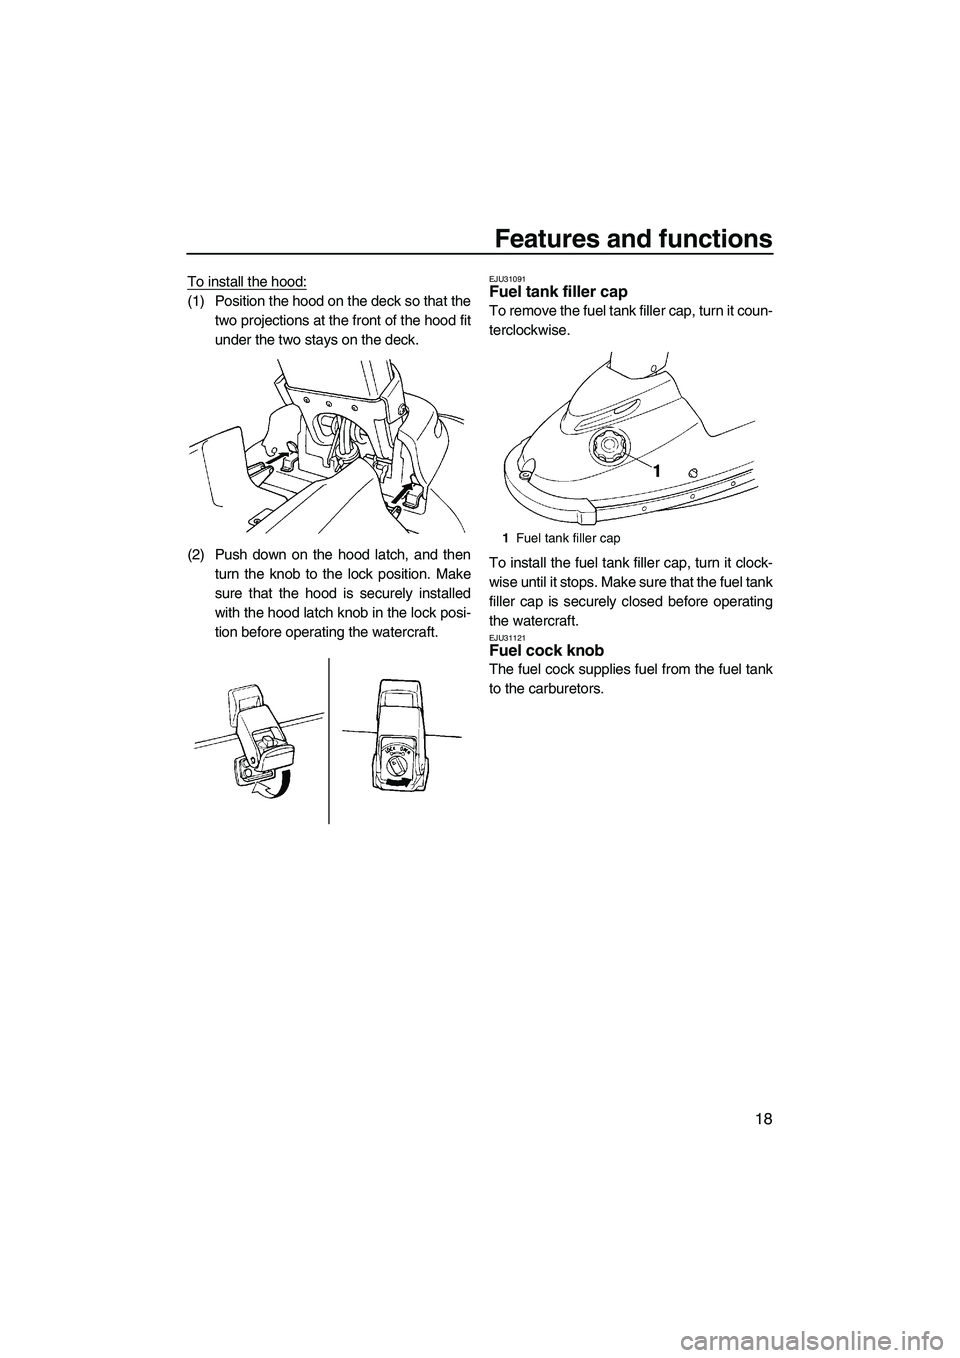
To install the hood:
(1) Position the hood on the deck so that the
two projections at the front of the hood fit
under the two stays on the deck.
(2) Push down on the hood latch, and then
turn the knob to the lock position. Make
sure that the hood is securely installed
with the hood latch knob in the lock posi-
tion before operating the watercraft.
EJU31091Fuel tank filler cap
To remove the fuel tank filler cap, turn it coun-
terclockwise.
To install the fuel tank filler cap, turn it clock-
wise until it stops. Make sure that the fuel tank
filler cap is securely closed before operating
the watercraft.
EJU31121Fuel cock knob
The fuel cock supplies fuel from the fuel tank
to the carburetors.
1Fuel tank filler cap
UF2F71E0.book Page 18 Thursday, April 10, 2008 11:47 AM
Page 30 of 76

Features and functions
23
impeller. (See page 63 for checking proce-
dures.) NOTICE: If you cannot locate and
correct the cause of the overheating, con-
sult a Yamaha dealer. Continuing to oper-
ate at higher speeds could result in severe
engine damage.
[ECJ00041]
EJU31672
Storage pouch
A storage pouch is provided on the underside
of the hood for the owner’s/operator’s manual,
tool kit, and other small items.
Bend the owner’s/operator’s manual slightly
to insert it into the storage pouch, and then
add the tool kit and any other small items.
Fold the pouch, and then wrap the strap
around it. Install the storage pouch on the
hood and secure it with the bands.The storage pouch is not waterproof. If you
carry objects that must be kept dry, such as
the manual, put them in a waterproof bag.
1Storage pouch
1Band
UF2F71E0.book Page 23 Thursday, April 10, 2008 11:47 AM
Page 32 of 76

Operation
25
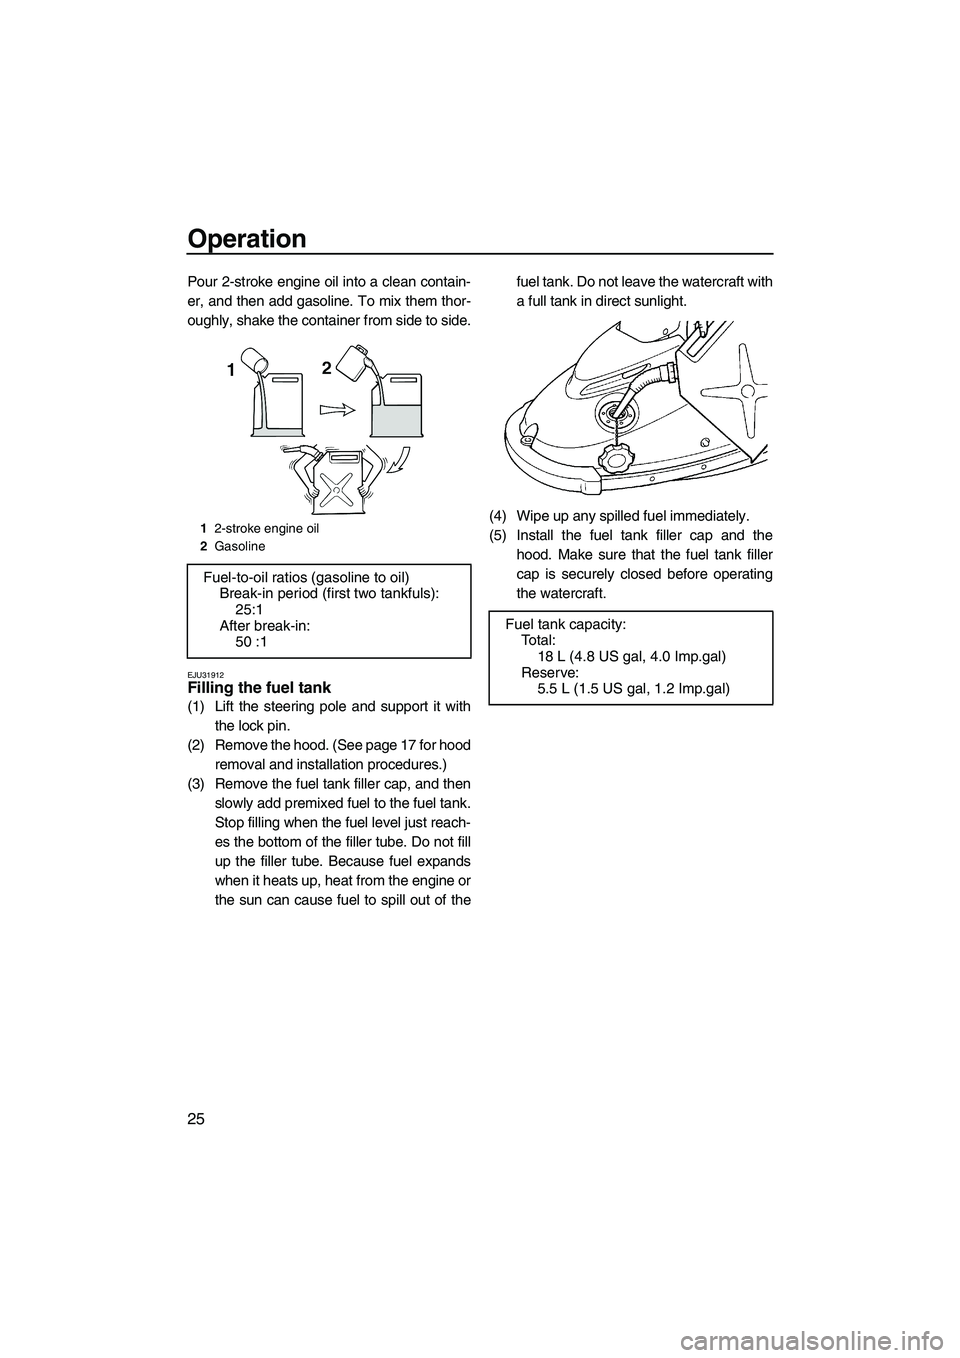
Pour 2-stroke engine oil into a clean contain-
er, and then add gasoline. To mix them thor-
oughly, shake the container from side to side.
EJU31912Filling the fuel tank
(1) Lift the steering pole and support it with
the lock pin.
(2) Remove the hood. (See page 17 for hood
removal and installation procedures.)
(3) Remove the fuel tank filler cap, and then
slowly add premixed fuel to the fuel tank.
Stop filling when the fuel level just reach-
es the bottom of the filler tube. Do not fill
up the filler tube. Because fuel expands
when it heats up, heat from the engine or
the sun can cause fuel to spill out of thefuel tank. Do not leave the watercraft with
a full tank in direct sunlight.
(4) Wipe up any spilled fuel immediately.
(5) Install the fuel tank filler cap and the
hood. Make sure that the fuel tank filler
cap is securely closed before operating
the watercraft.
12-stroke engine oil
2Gasoline
Fuel-to-oil ratios (gasoline to oil)
Break-in period (first two tankfuls):
25:1
After break-in:
50 :1
Fuel tank capacity:
To t a l :
18 L (4.8 US gal, 4.0 Imp.gal)
Reserve:
5.5 L (1.5 US gal, 1.2 Imp.gal)
UF2F71E0.book Page 25 Thursday, April 10, 2008 11:47 AM
Page 33 of 76

Operation
26
EJU31980
Pre-operation checks EJU31991Pre-operation check list
Before operating this watercraft, perform the checks in the following check list.
WARNING
EWJ00411
Failure to inspect or maintain the watercraft properly increases the possibility of an ac-
cident or damage to the watercraft. Do not operate the watercraft if you find any prob-
lem. If a problem cannot be corrected by the procedures provided in this manual, have
the watercraft inspected by a Yamaha dealer.
TIP:
Pre-operation checks should be made each time the watercraft is used. These checks can be
completed in a short time. It is worth the time spent to ensure safety and reliability.
ITEM ROUTINE PAGE
BEFORE LAUNCH OR OPERATION
Engine compartmentRemove the hood to ventilate the engine compart-
ment. Check for fuel vapors and loose electrical con-
nections.27
BilgeCheck for water and fuel and drain if necessary. 28
Throttle leverCheck that the throttle lever springs back smoothly. 29
Steering systemCheck for proper operation. 29
FuelCheck the fuel level and replenish if necessary.
Check the hoses and tank for leakage.27
Water separatorCheck for water and drain if necessary. 27
BatteryCheck the electrolyte level and battery condition. 28
HoodCheck that the hood is securely closed. 17
Hull and deckCheck the hull and deck for cracks and other dam-
age.27
Jet intakeCheck for debris and remove if necessary. 30
Fire extinguisherCheck the condition and replace if necessary. 28
Engine shut-off cord (lan-
yard)Check the condition and replace if frayed or broken. 30
SwitchesCheck the start switch, engine stop switch, and en-
gine shut-off switch for proper operation.30
AFTER LAUNCH
Cooling water pilot outletCheck that water is discharged while the engine is
running and the watercraft is in the water.31
UF2F71E0.book Page 26 Thursday, April 10, 2008 11:47 AM
Page 35 of 76

Operation
28
draining water or use a dry cloth to soak up
any water that could spill into the watercraft. If
any water spills into the watercraft, be sure to
wipe it up with a dry cloth. Also, be sure to in-
stall the drain screw after draining the water
separator.
EJU32432Bilge
Check the bilge. Wipe up any remaining mois-
ture or fuel residue with a dry rag. NOTICE:
Excessive water in the engine compart-
ment can splash into the engine, which
can result in severe damage.
[ECJ00341]
EJU32482
Battery
Check the battery electrolyte level and check
that the battery has sufficient power to start
the engine easily. WARNING! Never operate
the watercraft if the battery does not have
sufficient power to start the engine or if it
shows any other signs of decreased pow-
er. Loss of battery power may leave you
stranded.
[EWJ01240]
Recharge the battery or replace it if it is not in
good condition. (See page 57 for battery re-
charging procedures.)
Also, check that the battery leads are tight-
ened securely and that there is no corrosion
on the battery terminals. Check that the
breather hose is securely connected to the
battery and that it is not pinched. WARNING!
Fire or explosion could result if the breath-er hose is damaged, obstructed, or not
connected properly.
[EWJ00451]
Make sure that the battery is securely held in
place.
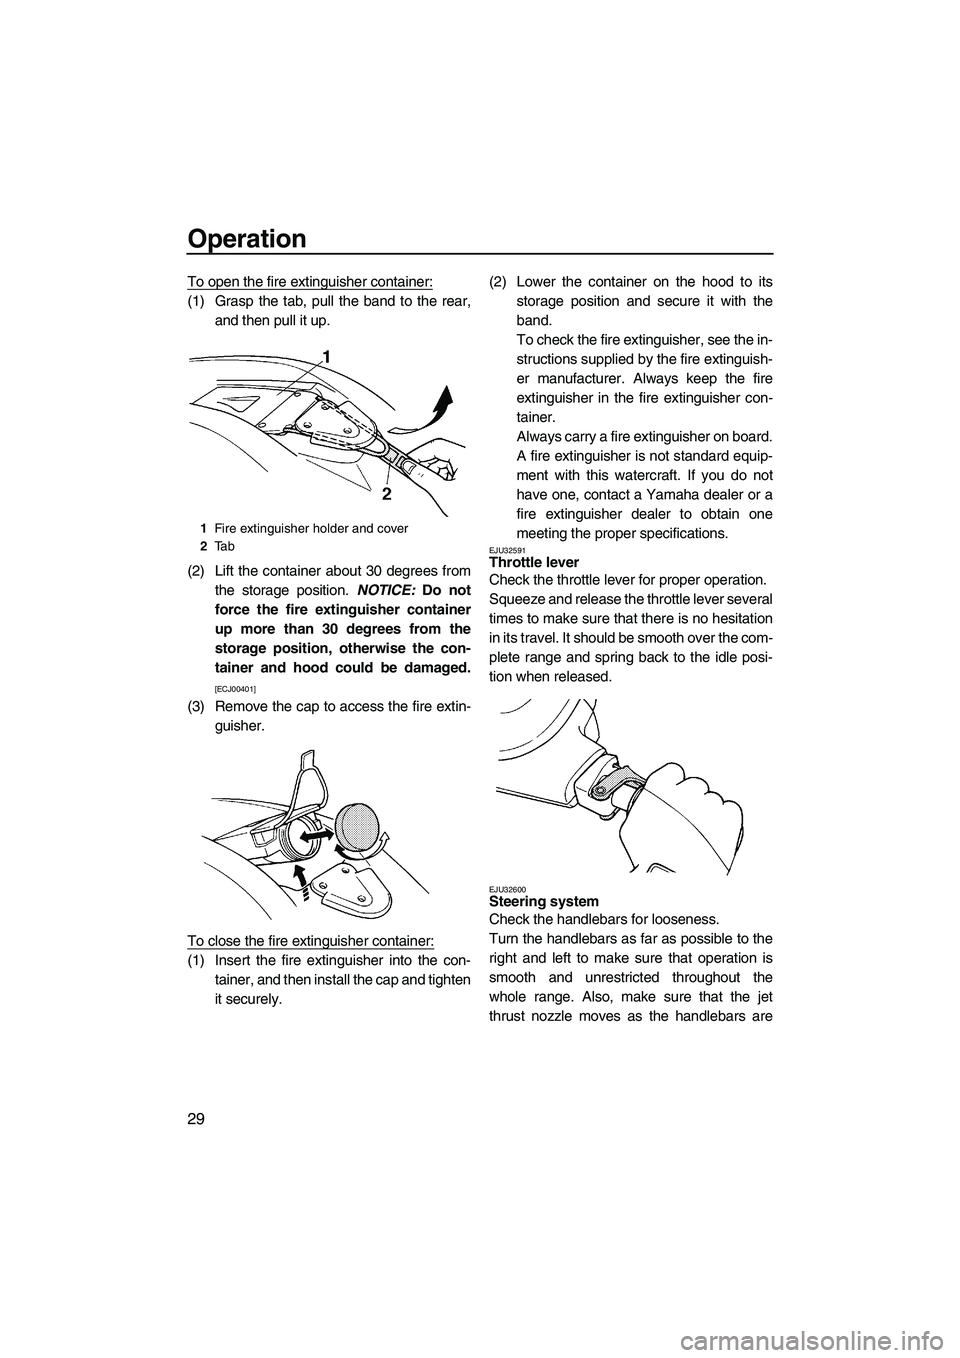
EJU32501Fire extinguisher
Check that there is a full fire extinguisher on
board.
The fire extinguisher container is located on
the hood under the steering pole.
1Positive (+) battery terminal: Red lead
2Negative (–) battery terminal: Black lead
3Breather hose
UF2F71E0.book Page 28 Thursday, April 10, 2008 11:47 AM
Page 36 of 76

Operation
29
To open the fire extinguisher container:
(1) Grasp the tab, pull the band to the rear,
and then pull it up.
(2) Lift the container about 30 degrees from
the storage position. NOTICE: Do not
force the fire extinguisher container
up more than 30 degrees from the
storage position, otherwise the con-
tainer and hood could be damaged.
[ECJ00401]
(3) Remove the cap to access the fire extin-
guisher.
To close the fire extinguisher container:
(1) Insert the fire extinguisher into the con-
tainer, and then install the cap and tighten
it securely.(2) Lower the container on the hood to its
storage position and secure it with the
band.
To check the fire extinguisher, see the in-
structions supplied by the fire extinguish-
er manufacturer. Always keep the fire
extinguisher in the fire extinguisher con-
tainer.
Always carry a fire extinguisher on board.
A fire extinguisher is not standard equip-
ment with this watercraft. If you do not
have one, contact a Yamaha dealer or a
fire extinguisher dealer to obtain one
meeting the proper specifications.
EJU32591Throttle lever
Check the throttle lever for proper operation.
Squeeze and release the throttle lever several
times to make sure that there is no hesitation
in its travel. It should be smooth over the com-
plete range and spring back to the idle posi-
tion when released.
EJU32600Steering system
Check the handlebars for looseness.
Turn the handlebars as far as possible to the
right and left to make sure that operation is
smooth and unrestricted throughout the
whole range. Also, make sure that the jet
thrust nozzle moves as the handlebars are
1Fire extinguisher holder and cover
2Ta b
UF2F71E0.book Page 29 Thursday, April 10, 2008 11:47 AM
Page 49 of 76

Operation
42
steer away from a boat or other obstacle
that comes into your path.
EJU33301Beaching the watercraft
(1) Make sure that there are no boats, swim-
mers, or obstacles near the beach. Re-
lease the throttle lever about 90 m (300 ft)
before you reach the intended beaching
area.
(2) Approach the beach slowly and stop the
engine before reaching land.
Remember, you need throttle to steer.
(3) Get off the watercraft and pull it up on the
beach. NOTICE: Small pebbles, sand,
seaweed, and other debris can be
sucked into the jet intake and impair
or damage the impeller. Always stop
the engine and get off the watercraft
before beaching it.
[ECJ00491]
EJU37190
Operating in weeded areas
Always avoid operating your watercraft in ar-
eas where weed growth is thick. If traveling in
weeded areas is unavoidable, operate the en-
gine alternately at partial throttle and full throt-
tle. Weeds tend to accumulate more at a
steady speed and at trolling speed. If weeds
clog the intake area and cause cavitation,
clean the jet intake and impeller. (See page
63 for cleaning procedures.)
EJU33362
Post-operation care
To keep your watercraft in top shape, always
take it out of the water after using it and per-
form the following procedures. Leaving the
watercraft in the water for extended periods
will accelerate the rate of normal deterioration
of the jet unit components and hull finish. Ma-
rine organisms and corrosion are some of the
conditions that can adversely affect the life of
many watercraft components.
(1) Remove the watercraft from the water.
(2) Wash down the hull, steering pole, han-
dlebars, and jet unit with fresh water.
(3) Remove the hood and check the engine
compartment for water. To drain excess
water, turn the watercraft onto its port
(left) side. If necessary, turn the water-
craft upside down to drain the water com-
pletely. Place a suitable clean cloth or
carpeting underneath the watercraft to
protect it from abrasions and scratches.
NOTICE: Always turn the watercraft
over onto its port (left) side, otherwise
the water could flow back through the
muffler into the engine. When turning
the watercraft onto its side or invert-
ing it, support the bow and secure the
steering pole, otherwise the steering
pole and handlebars could be bent or
damaged.
[ECJ00581]
TIP:
This watercraft is equipped with an automatic
bilge draining system that removes water
from the engine compartment while you are
underway. However, some residual water will
remain, therefore, wipe it up with a clean
cloth.
(4) Place the watercraft in a horizontal posi-
tion.
UF2F71E0.book Page 42 Thursday, April 10, 2008 11:47 AM