Page 73 of 130
320
(200)1300
(800)2")
8-5
1
2
3
4
5
6
78
9
10
11
EBU21864
General maintenance and lubrication chart
NO. ITEMCHECK OR MAINTENANCE
JOBINITIAL EVERY
Whichev-
er comes
firstmonth136612
km
(mi)320
(200)1300
(800)2500
(1600)2500
(1600)5000
(3200)
hours 20 80 160 160 3201Engine and V-belt
case air filter ele-
ment
�
Clean and replace if necessary.Every 20–40 hours (more often in wet or
dusty areas)
2
*
Front brake
�
Check operation and correct if necessary.
�
Check brake lever free play and adjust if neces-
sary.
√√√√√
�
Replace brake shoes. Whenever worn to the limit
3
*
Rear brake
�
Check operation and correct if necessary.
�
Check brake lever free play and adjust if neces-
sary.
√√√√√
�
Replace brake shoes. Whenever worn to the limit
4
*
Wheels
�
Check runout and for damage, and replace if nec-
essary.
√ √√√
5
*
Tires
�
Check tread depth and for damage, and replace if
necessary.
�
Check air pressure and balance, and correct if
necessary.
√ √√√
6
*
Wheel hub bearings
�
Check for looseness or damage, and replace if
necessary.
√ √√√
7
*
Upper and lower
arm pivots
�
Lubricate with lithium-soap-based grease.
√√√
Page 74 of 130

8-6
1
2
3
4
5
6
78
9
10
11
8 Drive chain
�
Check chain slack and adjust if necessary.
�
Check rear wheel alignment and correct if necess-
sary.
�
Clean and lubricate.
√√√√√
9
*
V-belt
�
Check for wear, cracks or other damage, and
replace if necessary.
√√
10
*
Chassis fasteners
�
Make sure that all nuts, bolts, and screws are
properly tightened.
√√√√√
11
*
Shock absorber
assemblies
�
Check operation and correct if necessary.
�
Check for oil leakage and replace if necessary.
√√√
12
*
Front knuckle piv-
ots
�
Lubricate with lithium-soap-based grease.
√√√
13
*
Steering shaft
�
Lubricate with lithium-soap-based grease.
√√√
14
*
Steering system
�
Check operation and repair or replace if damaged.
�
Check toe-in and adjust if necessary.
√√√√√
15 Engine oil
�
Change.
�
Check ATV for oil leakage, and correct if neces-
sary.
√ √√√
16 Engine oil strainer
�
Clean.
√√√
17 Transmission oil
�
Change.
�
Check ATV for oil leakage, and correct if neces-
sary.
√√
NO. ITEMCHECK OR MAINTENANCE
JOBINITIAL EVERY
Whichev-
er comes
firstmonth 1 3 6 6 12
km
(mi)320
(200)1300
(800)2500
(1600)2500
(1600)5000
(3200)
hours 20 80 160 160 320
Page 75 of 130
8-7
1
2
3
4
5
6
78
9
10
11
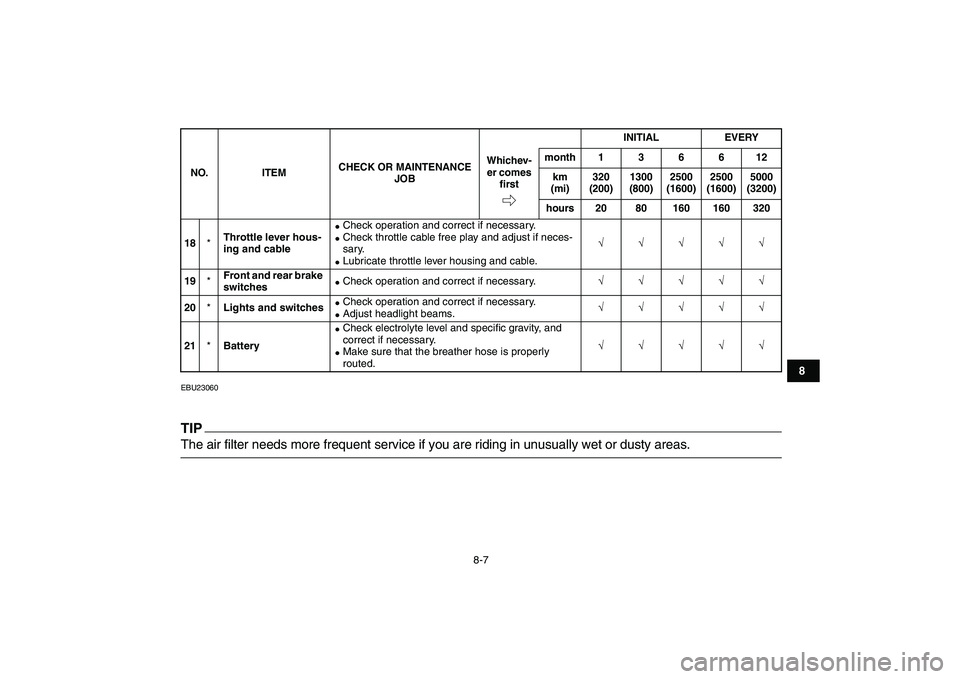
EBU23060
TIP
The air filter needs more frequent service if you are riding in unusually wet or dusty areas.
18
*
Throttle lever hous-
ing and cable
�
Check operation and correct if necessary.
�
Check throttle cable free play and adjust if neces-
sary.
�
Lubricate throttle lever housing and cable.
√√√√√
19
*
Front and rear brake
switches
�
Check operation and correct if necessary.
√√√√√
20
*
Lights and switches
�
Check operation and correct if necessary.
�
Adjust headlight beams.
√√√√√
21
*
Battery
�
Check electrolyte level and specific gravity, and
correct if necessary.
�
Make sure that the breather hose is properly
routed.
√√√√√
NO. ITEMCHECK OR MAINTENANCE
JOBINITIAL EVERY
Whichev-
er comes
firstmonth136612
km
(mi)320
(200)1300
(800)2500
(1600)2500
(1600)5000
(3200)
hours 20 80 160 160 320
Page 76 of 130
8-8
1
2
3
4
5
6
78
9
10
11
EBU23211
Checking the spark plug
The spark plug is an important engine component,
which is easy to check. Since heat and deposits
will cause any spark plug to slowly erode, the spark
plug should be removed and checked in accor-
dance with the periodic maintenance and lubrica-
tion chart. In addition, the condition of the spark
plug can reveal the condition of the engine.
To remove the spark plug
1. Remove the spark plug cap.
2. Remove the spark plug as shown, with thespark plug wrench included in the owner’s tool
kit.
To check the spark plug
1. Check that the porcelain insulator around the
center electrode of the spark plug is a medi-
um-to-light tan (the ideal color when the ATV
is ridden normally).TIP
If the spark plug shows a distinctly different color,
the engine could be operating improperly. Do not
attempt to diagnose such problems yourself. In-
stead, have a Yamaha dealer check the ATV.
1. Spark plug cap
1
1. Spark plug wrench
1
Page 77 of 130

8-9
1
2
3
4
5
6
78
9
10
11
2. Check the spark plug for electrode erosion
and excessive carbon or other deposits, and
replace it if necessary.
To install the spark plug
1. Measure the spark plug gap with a wire thick-
ness gauge and, if necessary, adjust the gap
to specification.2. Clean the surface of the spark plug gasket
and its mating surface, and then wipe off any
grime from the spark plug threads.
3. Install the spark plug with the spark plug
wrench, and then tighten it to the specified
torque.
TIP
If a torque wrench is not available when installing
a spark plug, a good estimate of the correct torque
is 1/4–1/2 turn past finger tight. However, the spark
plug should be tightened to the specified torque as
soon as possible.
4. Install the spark plug cap.
EBU23265
Engine oil
The engine oil level should be checked before
each ride. In addition, the oil must be changed at
the intervals specified in the periodic maintenance
and lubrication chart. Specified spark plug:
NGK/CR7HSA
Spark plug gap:
0.6–0.7 mm (0.024–0.028 in)
1. Spark plug gap
Tightening torque:
Spark plug:
12.5 Nm (1.3 m·kgf, 9.0 ft·lbf)
Page 81 of 130
8-13
1
2
3
4
5
6
78
9
10
11
periodic maintenance and lubrication chart.
To check the transmission oil level
1. Place the ATV on a level surface.
2. Start the engine, warm it up for several min-
utes, and then turn it off.
3. Wait a few minutes until the oil settles, and
then remove the screw located at the right
side of the crankcase.
4. Check the transmission oil level.
TIP
The transmission oil should be at the brim of the
hole.
5. If the transmission oil level is below the brim of
the hole, remove the oil filler bolt, add suffi-
cient oil of the recommended type to raise it to
the correct level, and then install and tighten
the screw and the oil filler bolt.
1. Screw
2. Transmission oil level check window
3. Correct oil level
1 32
1. Transmission oil filler bolt
1
Page 83 of 130
8-15
1
2
3
4
5
6
78
9
10
11
minutes while checking the transmission for
oil leakage. If oil is leaking, immediately turn
off the engine and check for the cause.
8. Turn the engine off, and then check the oil lev-
el and correct it if necessary.
EBU23841
Cleaning the engine and V-belt case air
filter elements
Both air filter elements should be cleaned at the
specified intervals in the periodic maintenance
chart.
Engine air filter element
TIP
There is a check hose at the bottom of the air filter
case. If dust or water collects in this hose, empty
the hose and clean the air filter element and air fil-
ter case.1. Remove the seat. (See page 4-9.)
2. Remove the breather hose, and then loosen
the clamp screw.
1. Check hose
1
Page 86 of 130

8-18
1
2
3
4
5
6
78
9
10
11
ment frame.
11. Install the washer and bolt.
NOTICE
ECB00450
Be sure to install the washer with the bent edge
facing upward as shown.
12. Install the air filter element into the air filter
case.
13. Install the air filter case cover by installing the
screws.
14. Install the breather hose and then tighten the
clamp screw.15. Install the seat.TIP
The air filter element should be cleaned every 20–
40 hours. It should be cleaned and lubricated more
often if the ATV is operated in extremely dusty ar-
eas. Each time the air filter element maintenance
is performed, check the air inlet of the air filter case
for obstructions. Check the air filter case rubber
joint to the carburetor fittings and the rubber joint
manifold fittings for an air-tight seal. Tighten all fit-
tings securely to avoid the possibility of unfiltered
air entering the engine.NOTICE
ECB00460
�
Make sure that the air filter element is prop-
erly seated in the air filter case.
�
Never operate the engine with the air filter el-
ement removed. This will allow unfiltered air
to enter the engine, causing rapid engine
wear and possible engine damage. Addition-
ally, operation without the air filter element
will affect carburetor jetting with subsequent
poor performance and possible engine over-
heating.
1. Washer
1