Page 38 of 130
5-6
1
2
3
45
6
7
8
9
10
11
EBU19830
Tire wear limit
Replace the tire when the tire groove decreases to
3 mm (0.12 in).
EBU19840
Chassis fasteners
Make sure that all nuts, bolts and screws are prop-
erly tightened.
EBU19850
Instruments, lights and switches
Check that all instruments, lights and switches are
working properly. Correct if necessary.
EBU19860
Battery
Check the fluid level in the battery. Fill with distilled
water if necessary. (See page 8-38.) Recommended pressure:
Front
20.0 kPa (0.200 kgf/cm
2
, 2.9 psi)
Rear
25.0 kPa (0.250 kgf/cm
2
, 3.6 psi)
Minimum:
Front
17.0 kPa (0.170 kgf/cm
2
, 2.5 psi)
Rear
22.0 kPa (0.220 kgf/cm
2
, 3.2 psi)
1. Tire wear limit
Page 39 of 130

6-1
1
2
3
4
56
7
8
9
10
11
EBU19880
OPERATION
EBU19900
Read the Owner’s Manual carefully before riding
the ATV.
WARNING
EWB00630
Read the Owner’s Manual carefully to become
familiar with all controls in order to help pre-
vent any loss of control, which could cause an
accident or injury. If there is a control or func-
tion you do not understand, ask your Yamaha
dealer.
EBU20071
Starting a cold engine
WARNING
EWB00640
Always make sure all control cables work
smoothly before you begin riding in cold
weather. If the control cables are frozen or do
not work smoothly, you could be unable to
control the ATV, which could lead to an acci-
dent or collision.NOTICE
ECB00150
See the “Engine break-in” section on page 6-4
prior to operating the engine for the first time.
1. Set the parking brake.
2. Turn the fuel cock to “ON”.
3. Turn the main switch to “ON” and the engine
stop switch to “RUN”.
4. Shift the drive select lever into the neutral po-
sition. The neutral indicator light should come
on. If the indicator light does not come on,
have a Yamaha dealer check the electrical cir-
cuit.
TIP
The engine can be started only when the drive se-
lect lever is in the neutral position.
5. Use the starter (choke) in reference to the fig-
ure:
Position (1):
�
Cold engine start with ambient temperature be-
low 5 °C (40 °F).
Page 41 of 130

is not required when the engine")
6-3
1
2
3
4
56
7
8
9
10
11
EBU20291
Starting a warm engine
Follow the same procedure as for starting a cold
engine, with the exception that the starter (choke)
is not required when the engine is warm. Instead,
start the engine with the throttle slightly open.
EBU20360
Operating the drive select lever and
driving in reverse
NOTICE
ECB00170
Before shifting, stop the ATV, otherwise the
transmission may be damaged.
Shifting: Forward
1. Bring the ATV to a complete stop.
2. Shift from neutral to forward and vice versa by
moving the drive select lever along the shift
guide.
TIP
Make sure that the drive select lever is completely
shifted into position.3. Open the throttle lever gradually.
Shifting: Reverse
1. Bring the ATV to a complete stop.
2. Apply the parking brake.
3. Shift from neutral to reverse and vice versa by
moving the drive select lever along the shift
guide.
TIP
When in reverse, the reverse indicator light should
1. Neutral “N”
2. Forward “F”
3. Reverse “R”
4. Drive select lever
1
2
3
4
Page 42 of 130

6-4
1
2
3
4
56
7
8
9
10
11
come on. If the indicator light does not come on,
have a Yamaha dealer check the electrical circuit.
4. Check behind for people or obstacles, and
then release the parking brake.
5. Open the throttle lever gradually and continue
to watch to the rear while backing.
TIP
If the drive select lever is shifted into reverse while
the engine is running, the engine will stop unless
the rear brake lever or parking brake is applied.
WARNING
EWB00720
Improper operation in reverse could make you
hit an obstacle or even a person behind you,
resulting in serious injury. When you shift into
reverse, make sure there are no people or ob-
stacles behind you. When it is safe to proceed,
go slowly.
EBU20682
Engine break-in
TIP
�
For ATVs equipped with an odometer or an hour
meter, follow the figures given in km (mi) or thefigures given in hours.
�
For ATVs not equipped with an odometer or
hour meter, follow the figures given in hours.
There is never a more important period in the life of
your engine than the first 320 km (200 mi) or 20
hours of riding. For this reason, you should read
the following material carefully.
Since the engine is brand new, do not put an ex-
cessive load on it for the first 320 km (200 mi) or 20
hours. The various parts in the engine wear and
polish themselves to the correct operating clear-
ances. During this period, prolonged full-throttle
operation or any condition that might result in en-
gine overheating must be avoided.
0–160 km (0–100 mi) or 0–10 hours
Avoid prolonged operation above 1/2 throttle. Vary
the speed of the ATV regularly. Do not operate it at
one set throttle position.
160–320 km (100–200 mi) or 10–20 hours
Avoid prolonged operation above 3/4 throttle. Rev
the engine freely, but do not use full throttle at any
time.
Page 58 of 130

7-13
1
2
3
4
5
67
8
9
10
11
With the engine idling, return the starter knob to the
closed position and shift the drive select lever into
the forward position. Then release the parking
brake. Apply the throttle slowly and smoothly. The
centrifugal clutch will engage and you will start to
accelerate. If the throttle is applied too abruptly, the
front wheels may lift off the ground, resulting in a
loss of directional control. Avoid higher speeds un-
til you are thoroughly familiar with the operation of
your ATV.
When slowing down or stopping, release the throt-
tle and apply the brakes smoothly and evenly. Im-
proper use of the brakes can cause the tires to lose
traction, reducing control and increasing the possi-
bility of an accident.
TURNING YOUR ATV
To achieve maximum traction on unpaved surfac-
es, the two rear wheels are mounted solidly on one
axle and turn together at the same speed. There-
fore, unless the wheel on the inside of the turn is al-
lowed to slip or lose some traction, the ATV will
resist turning. A special turning technique must be
used to allow the ATV to make turns quickly and
easily. It is essential that this skill be learned first at
low speed.
WARNING
EWB01570
Always follow proper procedures for turning
as described in this Owner’s Manual. Practice
turning at low speeds before attempting to turn
at faster speeds. Do not turn at speeds too fast
for your skills or the conditions.
As you approach a curve, slow down and begin to
turn the handlebars in the desired direction. As you
do so, put your weight on the footboard to the out-
side of the turn (opposite your desired direction)
and lean your upper body into the turn. Use the
throttle to maintain an even speed through the
turn. This maneuver will let the wheel on the inside
of the turn slip slightly, allowing the ATV to make
the turn properly.
Page 63 of 130

7-18
1
2
3
4
5
67
8
9
10
11
CROSSING A SLOPE
Traversing a sloping surface on your ATV requires
you to properly position your weight to maintain
proper balance. Be sure that you have learned the
basic riding skills on flat ground before attempting
to cross a sloping surface. Avoid slopes with slip-
pery surfaces or rough terrain that may upset your
balance.
As you travel across a slope, lean your body in the
uphill direction. It may be necessary to correct the
steering when riding on loose surfaces by pointingthe front wheels slightly uphill. When riding on
slopes, be sure not to make sharp turns either up
or down hill.
If your ATV does begin to tip over, gradually steer
in the downhill direction if there are no obstacles in
your path. As you regain proper balance, gradually
steer again in the direction you wish to travel.
WARNING
EWB01631
Never attempt to turn the ATV around on any
hill until you have mastered the turning tech-
nique as described in the Owner’s Manual on
level ground. Be very careful when turning on
any hill. Avoid crossing the side of a steep hill
if possible.
When crossing the side of a hill:
�
Always follow proper procedures as de-
scribed in the Owner’s Manual.
�
Avoid hills with excessively slippery or loose
surfaces.
�
Shift your weight to the uphill side of the
ATV.
Page 75 of 130
8-7
1
2
3
4
5
6
78
9
10
11
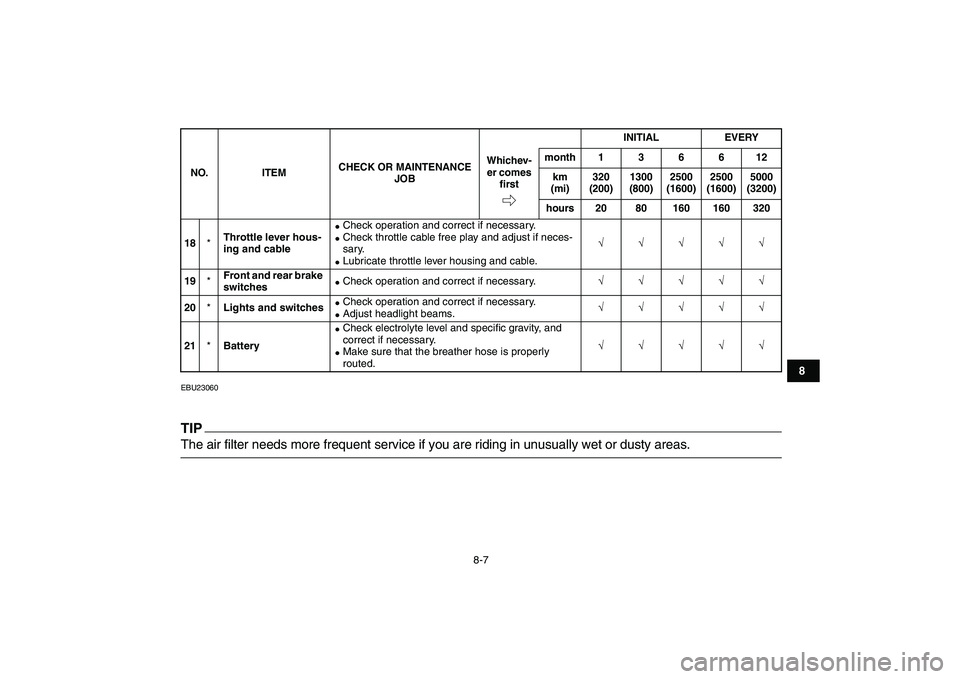
EBU23060
TIP
The air filter needs more frequent service if you are riding in unusually wet or dusty areas.
18
*
Throttle lever hous-
ing and cable
�
Check operation and correct if necessary.
�
Check throttle cable free play and adjust if neces-
sary.
�
Lubricate throttle lever housing and cable.
√√√√√
19
*
Front and rear brake
switches
�
Check operation and correct if necessary.
√√√√√
20
*
Lights and switches
�
Check operation and correct if necessary.
�
Adjust headlight beams.
√√√√√
21
*
Battery
�
Check electrolyte level and specific gravity, and
correct if necessary.
�
Make sure that the breather hose is properly
routed.
√√√√√
NO. ITEMCHECK OR MAINTENANCE
JOBINITIAL EVERY
Whichev-
er comes
firstmonth136612
km
(mi)320
(200)1300
(800)2500
(1600)2500
(1600)5000
(3200)
hours 20 80 160 160 320
Page 76 of 130
8-8
1
2
3
4
5
6
78
9
10
11
EBU23211
Checking the spark plug
The spark plug is an important engine component,
which is easy to check. Since heat and deposits
will cause any spark plug to slowly erode, the spark
plug should be removed and checked in accor-
dance with the periodic maintenance and lubrica-
tion chart. In addition, the condition of the spark
plug can reveal the condition of the engine.
To remove the spark plug
1. Remove the spark plug cap.
2. Remove the spark plug as shown, with thespark plug wrench included in the owner’s tool
kit.
To check the spark plug
1. Check that the porcelain insulator around the
center electrode of the spark plug is a medi-
um-to-light tan (the ideal color when the ATV
is ridden normally).TIP
If the spark plug shows a distinctly different color,
the engine could be operating improperly. Do not
attempt to diagnose such problems yourself. In-
stead, have a Yamaha dealer check the ATV.
1. Spark plug cap
1
1. Spark plug wrench
1
.
EBU19840
Chassis fasteners
Make sure that all nuts, bolts and screws")