Page 41 of 104
INSTRUMENT AND CONTROL FUNCTIONS
3-27
3 below and have a Yamaha dealer re-
pair it if it does not function proper-
ly.
EAU44891
Ignition circuit cut-off system The ignition circuit cut-off system (com-
prising the sidestand switch, clutch
switch and neutral switch) has the fol-
lowing functions.�
It prevents starting when the trans-
mission is in gear and the side-
stand is up, but the clutch lever is
not pulled.
�
It prevents starting when the trans-
mission is in gear and the clutch le-
ver is pulled, but the sidestand is
still down.
�
It cuts the running engine when the
transmission is in gear and the sid-
estand is moved down.
Periodically check the operation of the
ignition circuit cut-off system according
to the following procedure.
U2D1E3E0.book Page 27 Monday, July 14, 2008 3:08 PM
Page 42 of 104

INSTRUMENT AND CONTROL FUNCTIONS
3-28
3
With the engine turned off:
1. Move the sidestand down.
2. Make sure that the engine stop switch is turned on.
3. Turn the key on.
4. Shift the transmission into the neutral position.
5. Push the start switch.
Does the engine start?
With the engine still running:
6. Move the sidestand up.
7. Keep the clutch lever pulled.
8. Shift the transmission into gear.
9. Move the sidestand down.
Does the engine stall?
After the engine has stalled:
10. Move the sidestand up.
11. Keep the clutch lever pulled.
12. Push the start switch.
Does the engine start?
The system is OK. The motorcycle can be ridden.The neutral switch may not be working correctly.
The motorcycle should not be ridden until
checked by a Yamaha dealer.
The sidestand switch may not be working correctly.
The motorcycle should not be ridden until
checked by a Yamaha dealer.
The clutch switch may not be working correctly.
The motorcycle should not be ridden until
checked by a Yamaha dealer.
YES NO YES NO YES NO
If a malfunction is noted, have a Yamaha
dealer check the system before riding.
WARNING
U2D1E3E0.book Page 28 Monday, July 14, 2008 3:08 PM
Page 43 of 104

FOR YOUR SAFETY – PRE-OPERATION CHECKS
4-1
4
EAU15596
Inspect your vehicle each time you use it to make sure the vehicle is in safe operating condition. Always follow the inspection
and maintenance procedures and schedules described in the Owner’s Manual.
WARNING
EWA11151
Failure to inspect or maintain the vehicle properly increases the possibility of an accident or equipment damage.
Do not operate the vehicle if you find any problem. If a problem cannot be corrected by the procedures provided inthis manual, have the vehicle inspected by a Yamaha dealer.
Before using this vehicle, check the following points:
ITEM CHECKS PAGE
FuelCheck fuel level in fuel tank.
Refuel if necessary.
Check fuel line for leakage.3-17
Engine oilCheck oil level in engine.
If necessary, add recommended oil to specified level.
Check vehicle for oil leakage.6-9
CoolantCheck coolant level in reservoir.
If necessary, add recommended coolant to specified level.
Check cooling system for leakage.6-12
Front brakeCheck operation.
If soft or spongy, have Yamaha dealer bleed hydraulic system.
Check brake pads for wear.
Replace if necessary.
Check fluid level in reservoir.
If necessary, add recommended brake fluid to specified level.
Check hydraulic system for leakage.6-20, 6-21
U2D1E3E0.book Page 1 Monday, July 14, 2008 3:08 PM
Page 44 of 104

FOR YOUR SAFETY – PRE-OPERATION CHECKS
4-2
4
Rear brakeCheck operation.
If soft or spongy, have Yamaha dealer bleed hydraulic system.
Check brake pads for wear.
Replace if necessary.
Check fluid level in reservoir.
If necessary, add recommended brake fluid to specified level.
Check hydraulic system for leakage.6-20, 6-21
ClutchCheck operation.
Lubricate cable if necessary.
Check lever free play.
Adjust if necessary.6-19
Throttle gripMake sure that operation is smooth.
Check cable free play.
If necessary, have Yamaha dealer adjust cable free play and lubricate cable and
grip housing.6-16, 6-25
Control cablesMake sure that operation is smooth.
Lubricate if necessary.6-25
Drive chainCheck chain slack.
Adjust if necessary.
Check chain condition.
Lubricate if necessary.6-23, 6-24
Wheels and tiresCheck for damage.
Check tire condition and tread depth.
Check air pressure.
Correct if necessary.6-16, 6-19
Brake and shift pedalsMake sure that operation is smooth.
Lubricate pedal pivoting points if necessary.6-25
Brake and clutch leversMake sure that operation is smooth.
Lubricate lever pivoting points if necessary.6-26
SidestandMake sure that operation is smooth.
Lubricate pivot if necessary.6-27 ITEM CHECKS PAGE
U2D1E3E0.book Page 2 Monday, July 14, 2008 3:08 PM
Page 45 of 104
FOR YOUR SAFETY – PRE-OPERATION CHECKS
4-3
4
Chassis fastenersMake sure that all nuts, bolts and screws are properly tightened.
Tighten if necessary.—
Instruments, lights, signals
and switchesCheck operation.
Correct if necessary.—
Sidestand switch Check operation of ignition circuit cut-off system.
If system is not working correctly, have Yamaha dealer check vehicle.3-26 ITEM CHECKS PAGE
U2D1E3E0.book Page 3 Monday, July 14, 2008 3:08 PM
Page 46 of 104

OPERATION AND IMPORTANT RIDING POINTS
5-1
5
EAU15951
Read the Owner’s Manual carefully to
become familiar with all controls. If
there is a control or function you do not
understand, ask your Yamaha dealer.
WARNING
EWA10271
Failure to familiarize yourself with
the controls can lead to loss of con-
trol, which could cause an accidentor injury.
EAU45310
TIPThis model is equipped with a lean an-
gle sensor to stop the engine in case of
a turnover. To start the engine after a
turnover, be sure to turn the main
switch to “OFF” and then to “ON”. Fail-
ing to do so will prevent the engine from
starting even though the engine willcrank when pushing the start switch.
EAU44724
Starting the engine In order for the ignition circuit cut-off
system to enable starting, one of the
following conditions must be met.�
The transmission is in the neutral
position.
�
The transmission is in gear with
the clutch lever pulled and the sid-
estand up.
See page 3-27 for more informa-
tion.
1. Turn the key to “ON” and make
sure that the engine stop switch is
set to“”.
The following warning lights and
indicator light should come on for a
few seconds, then go off.�
Oil level warning light
�
Coolant temperature warning
light
�
Engine trouble warning light
�
ABS warning light (for ABS
models)
�
Immobilizer system indicator
light
U2D1E3E0.book Page 1 Monday, July 14, 2008 3:08 PM
Page 47 of 104

OPERATION AND IMPORTANT RIDING POINTS
5-2
5
NOTICE
ECA11831
If a warning or indicator light does
not go off, see page 3-4 for the corre-
sponding warning and indicatorlight circuit check.
2. Shift the transmission into the neu-
tral position. (See page 5-3.) The
neutral indicator light should come
on. If not, ask a Yamaha dealer to
check the electrical circuit.
3. Start the engine by pushing the
start switch. NOTICE: For maxi-
mum engine life, never acceler-
ate hard when the engine is
cold!
[ECA11041]
If the engine fails to start, release
the start switch, wait a few sec-
onds, and then try again. Each
starting attempt should be as short
as possible to preserve the bat-
tery. Do not crank the engine more
than 10 seconds on any one at-
tempt.
NOTICE
ECA16042
�
If the oil level warning light flick-
ers or remains on after starting,
immediately stop the engine,
and then check the engine oil
level and the vehicle for oil leak-
age. If necessary, add engine
oil, and then check the warning
light again.
�
If the coolant temperature warn-
ing light flickers or remains on
after starting, immediately stop
the engine, and then check the
coolant level and the vehicle for
coolant leakage. If necessary,
add coolant, and then check the
warning light again.
�
If the engine trouble warning
light flashes or remains on after
starting, immediately stop the
engine, and have a Yamaha
dealer check the cause.
�
For ABS models
If the ABS warning light flashes
or remains on after starting, the
ABS may not be working cor-
rectly, and the brake system re-
verts to conventional braking.If this occurs, have a Yamaha
dealer check the system as
soon as possible.
�
The immobilizer system indica-
tor light should come on when
the key is turned to “ON”, and
then go off after a few seconds.
If the indicator light does not
come on, or does not go off, or
if it flashes and the display indi-
cates a two-digit error code,
have a Yamaha dealer check theelectrical circuit.
U2D1E3E0.book Page 2 Monday, July 14, 2008 3:08 PM
Page 48 of 104

OPERATION AND IMPORTANT RIDING POINTS
5-3
5
EAU16671
Shifting Shifting gears lets you control the
amount of engine power available for
starting off, accelerating, climbing hills,
etc.
The gear positions are shown in the il-
lustration.TIPTo shift the transmission into the neu-
tral position, press the shift pedal down
repeatedly until it reaches the end of itstravel, and then slightly raise it.
NOTICE
ECA10260
�
Even with the transmission in
the neutral position, do not
coast for long periods of time
with the engine off, and do not
tow the motorcycle for long dis-
tances. The transmission is
properly lubricated only when
the engine is running. Inade-
quate lubrication may damage
the transmission.
�
Always use the clutch while
changing gears to avoid damag-
ing the engine, transmission,
and drive train, which are not
designed to withstand theshock of forced shifting.
EAU16810
Tips for reducing fuel con-
sumption Fuel consumption depends largely on
your riding style. Consider the following
tips to reduce fuel consumption:�
Shift up swiftly, and avoid high en-
gine speeds during acceleration.
�
Do not rev the engine while shifting
down, and avoid high engine
speeds with no load on the engine.
�
Turn the engine off instead of let-
ting it idle for an extended length of
time (e.g., in traffic jams, at traffic
lights or at railroad crossings).
1. Shift pedal
2. Neutral positionU2D1E3E0.book Page 3 Monday, July 14, 2008 3:08 PM
 1
1 2
2 3
3 4
4 5
5 6
6 7
7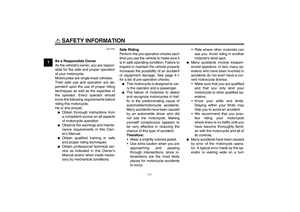 8
8 9
9 10
10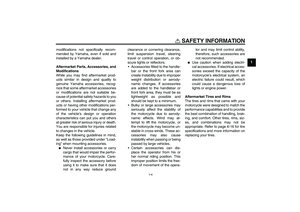 11
11 12
12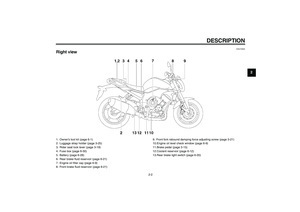 13
13 14
14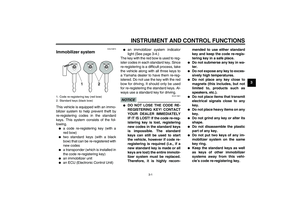 15
15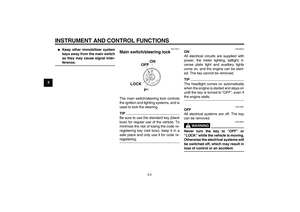 16
16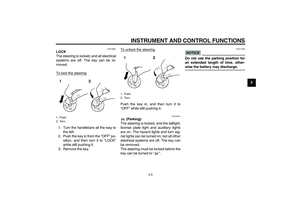 17
17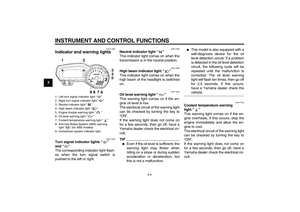 18
18 19
19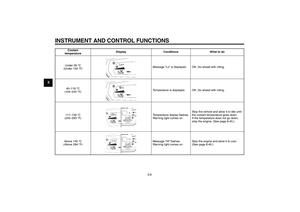 20
20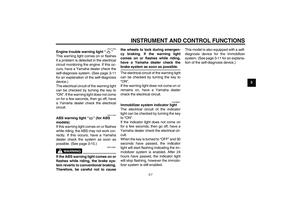 21
21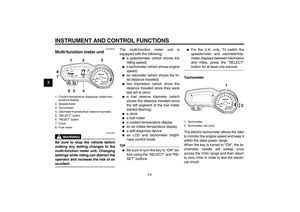 22
22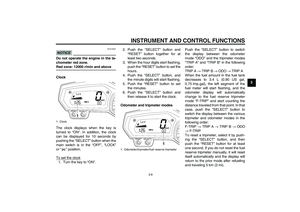 23
23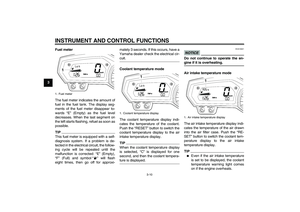 24
24 25
25 26
26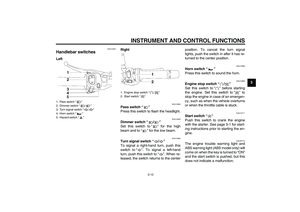 27
27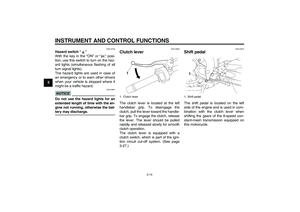 28
28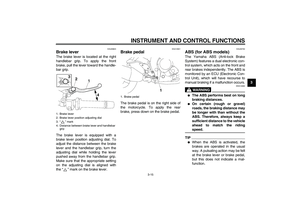 29
29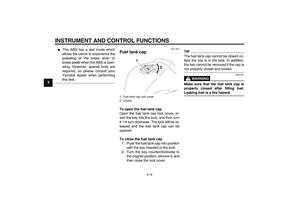 30
30 31
31 32
32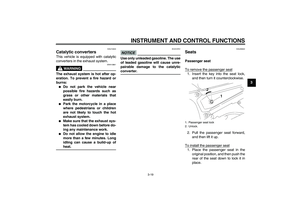 33
33 34
34 35
35 36
36 37
37 38
38 39
39 40
40 41
41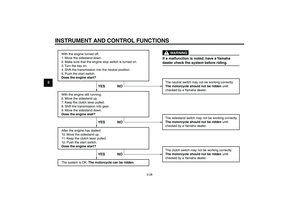 42
42 43
43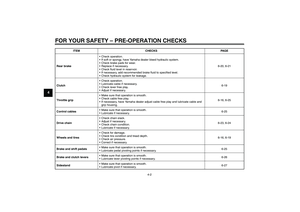 44
44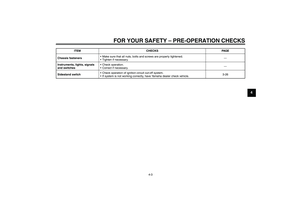 45
45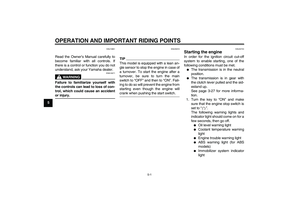 46
46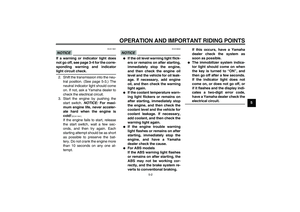 47
47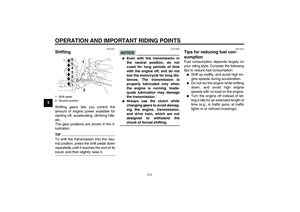 48
48 49
49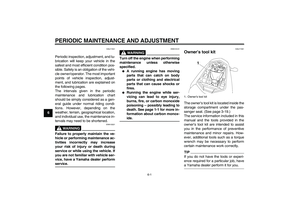 50
50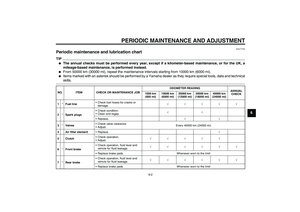 51
51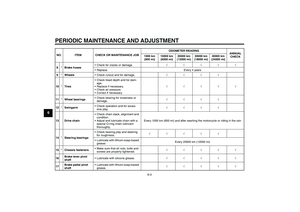 52
52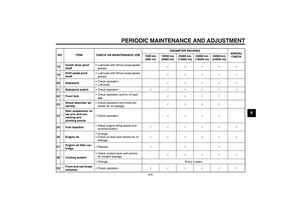 53
53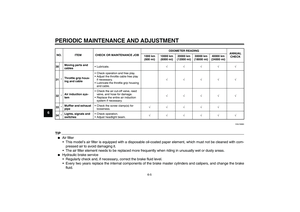 54
54 55
55 56
56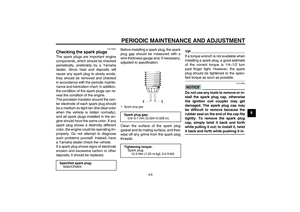 57
57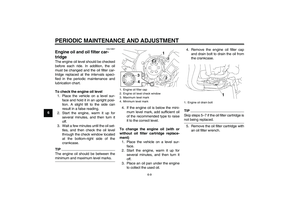 58
58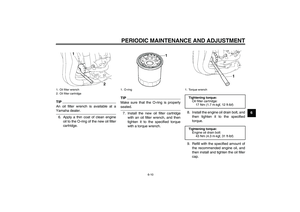 59
59 60
60 61
61 62
62 63
63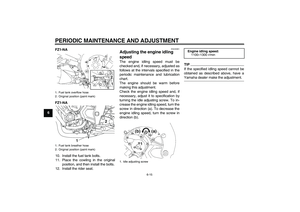 64
64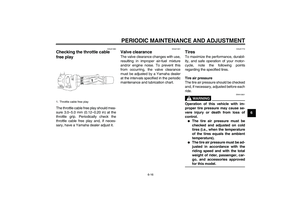 65
65 66
66 67
67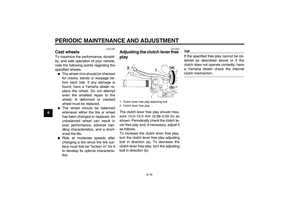 68
68 69
69 70
70 71
71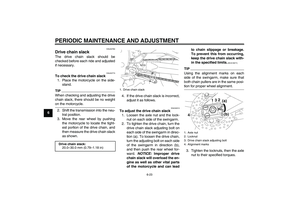 72
72 73
73 74
74 75
75 76
76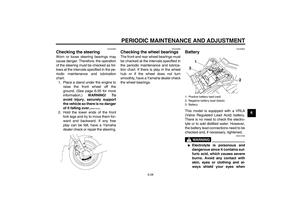 77
77 78
78 79
79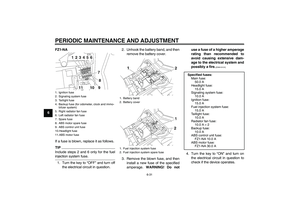 80
80 81
81 82
82 83
83 84
84 85
85 86
86 87
87 88
88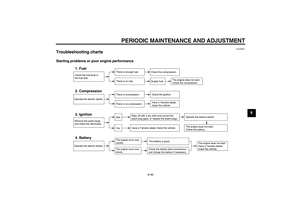 89
89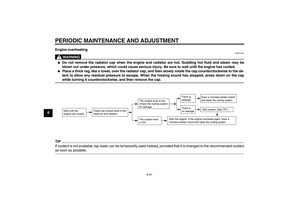 90
90 91
91 92
92 93
93 94
94 95
95 96
96 97
97 98
98 99
99 100
100 101
101 102
102 103
103
