2009 VOLVO XC60 water pump
[x] Cancel search: water pumpPage 114 of 297

03 Your driving environmentBrakes 03
112 Brake system
The brake system is a hydraulic system con-
sisting of two separate brake circuits. If a prob-
lem should occur in one of these circuits, it is
still possible to stop the vehicle with the other
brake circuit.
If the brake pedal must be depressed farther
than normal and requires greater foot pressure,
the stopping distance will be longer.
A warning light in the instrument panel will light
up to warn the driver that a fault has occurred.
If this light comes on while driving or braking,
stop immediately and check the brake fluid
level in the reservoir.
NOTE
Press the brake pedal hard and maintain
pressure on the pedal – do not pump the
brakes.
WARNING
If the fluid level is below the MIN mark in the
reservoir or if a brake system message is
shown in the information display:
DO NOT
DRIVE. Have the vehicle towed to a trained
and qualified Volvo service technician and
have the brake system inspected.
Power brakes function only when the
engine is running
The power brakes utilize vacuum pressure
which is only created when the engine is run-
ning. Never let the vehicle roll to a stop with the
engine switched off.
If the power brakes are not working, the brake
pedal must be pressed approximately five
times harder than usual to make up for the lack
of power assistance. This can happen for
example when towing your vehicle or if the
engine is switched off when the vehicle is roll-
ing. The brake pedal feels harder than usual.
Water on brake discs and brake pads
affects braking
Driving in rain and slush or passing through an
automatic car wash can cause water to collect
on the brake discs and pads. This will cause a
delay in braking effect when the pedal is
depressed. To avoid such a delay when the
brakes are needed, depress the pedal occa-
sionally when driving through rain, slush, etc.
This will remove the water from the brakes.
Check that brake application feels normal. This
should also be done after washing or starting
in very damp or cold weather.
Severe strain on the brake systemThe brakes will be subject to severe strain
when driving in mountains or hilly areas, or
when towing a trailer. Vehicle speed is usually slower, which means that the cooling of the
brakes is less efficient than when driving on
level roads. To reduce the strain on the brakes,
shift into a lower gear and let the engine help
with the braking. Do not forget that if you are
towing a trailer, the brakes will be subjected to
a greater than normal load.
Anti-lock braking systemThe Anti-lock Braking System (ABS) helps to
improve vehicle control (stopping and steering)
during severe braking conditions by limiting
brake lockup. When the system "senses"
impending lockup, braking pressure is auto-
matically modulated in order to help prevent
lockup that could lead to a skid.
The system performs a brief self-diagnostic
test when the engine has been started and
driver releases the brake pedal. Another auto-
matic test may be performed when the vehicle
first reaches a speed of approximately 25 mph
(40 km/h
). The brake pedal will pulsate several
times and a sound may be audible from the
ABS control module. This is normal.
Cleaning the brake discsCoatings of dirt and water on the brake discs
may result in delayed brake function. This delay
is minimized by cleaning the brake linings.
Cleaning the brake pads is advisable in wet
weather, prior to long-term parking, and after
the vehicle has been washed. Do this by brak-
Page 270 of 297

06 Maintenance and specificationsWheels and tires 06
268
WARNING Please keep the following points in mind
when using the tire sealing system:
\b
The sealing compound bottle (no. 8 in
the illustration) contains 1.2-Ethanol
and natural rubber-latex. These sub-
stances are harmful if swallowed.
\b The contents of this bottle may cause
allergic skin reactions or otherwise be
potentially harmful to the skin, the cen-
tral nervous system, and the eyes.
Precautions:
\b Keep out of reach of children.
\b Do not ingest the contents.
\b Avoid prolonged or repeated contact
with the skin.
\b Hands should be washed thoroughly
after handling.
First aid:
\b Skin: Wash affected areas of skin with
soap and water. Get medical attention
if symptoms occur.
\b Eyes: Flush with plenty of water for least
15 minutes, occasionally lifting the
upper and lower eyelids. Get medical
attention if symptoms occur. \b
Inhalation: Move the person to fresh air.
If irritation persists, get medical atten-
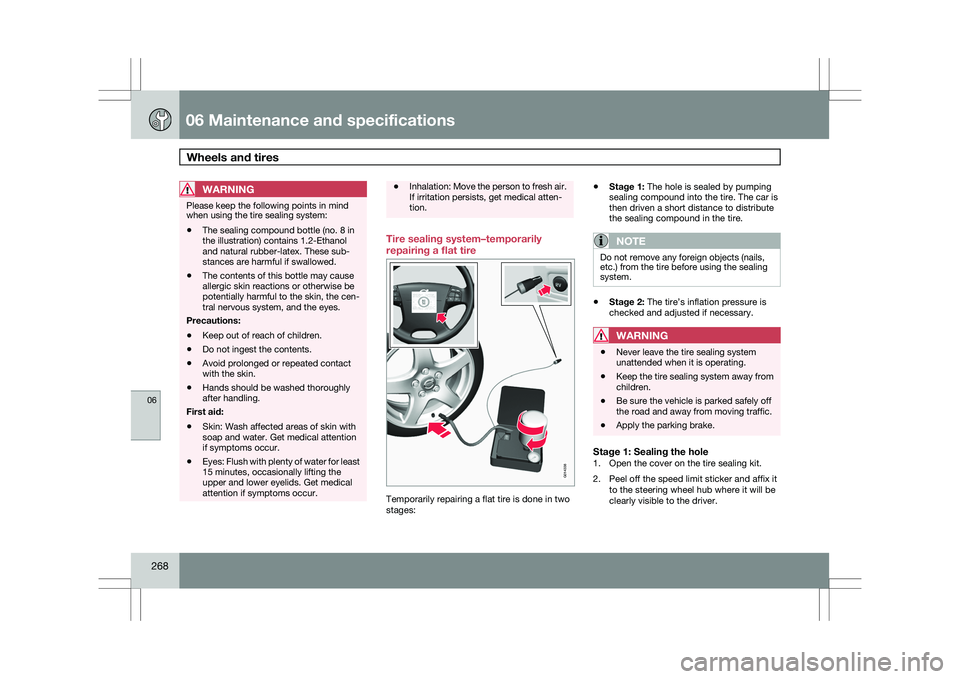
tion. Tire sealing system–temporarily
repairing a flat tire
Temporarily repairing a flat tire is done in two
stages:\b
Stage 1: The hole is sealed by pumping
sealing compound into the tire. The car is
then driven a short distance to distribute
the sealing compound in the tire.
NOTE Do not remove any foreign objects (nails,
etc.) from the tire before using the sealing
system.
\b
Stage 2: The tire’s inflation pressure is
checked and adjusted if necessary.
WARNING \b
Never leave the tire sealing system
unattended when it is operating.
\b Keep the tire sealing system away from
children.
\b Be sure the vehicle is parked safely off
the road and away from moving traffic.
\b Apply the parking brake.
Stage 1: Sealing the hole1. Open the cover on the tire sealing kit.
2. Peel off the speed limit sticker and affix it
to the steering wheel hub where it will be
clearly visible to the driver. G01433
8
Page 271 of 297

06 Maintenance and specifications
Wheels and tires06
}}
269
3. Ensure that the on/off switch is in posi-
tion 0 (the 0 side of the switch should be
pressed down).
WARNING Contact with the sealing compound may
cause skin irritation. If contact occurs, wash
the affected area immediately with soap and
water.
4. Unscrew the orange cover over the bottle
holder and unscrew the cap on the bottle
of sealing compound.
NOTE Do not break the seal on the bottle. This
occurs automatically when the bottle is
screwed into the holder.
5. Screw the bottle into the bottle holder.
WARNING
The bottle is equipped with a catch to keep
it securely in place and help prevent sealing
compound leakage. Once in place, the bot-
tle cannot be unscrewed. This must be done
by a trained and qualified Volvo service
technician. 6.
Remove the valve cap from the tire’s infla-
tion valve and screw the tire sealing sys-
tem’s hose connector onto the valve as
tightly as possible by hand.
7. Connect the electrical wire to the nearest 12-volt socket in the vehicle.
8. Start the vehicle’s engine.
WARNING The vehicle´s engine should be running
when the tire sealing system is used to avoid
battery drain. Therefore, be sure the vehicle
is parked in a well ventilated place, or out-
doors, before using the system.
9.
Start the tire sealing system’s compressor
by pressing the on/off switch to position I.
WARNING \b
Never stand next to the tire being inflated
when the compressor is in operation.
\b If cracks, bubbles, etc. form on the tire,
switch off the compressor immediately.
\b If there is visible damage to the sidewall
or the rim, the tire cannot be repaired.
The vehicle should not be driven if this
occurs. Contact a towing service or
Volvo On Call Roadside Assistance if
applicable.
NOTE The air pressure gauge will temporarily
show an increase in pressure to approxi-
mately 88 psi (6 bar) while the sealing com-
pound is being pumped into the tire. The
pressure should return to a normal level
after approximately 30 seconds.
10. Within seven minutes, inflate the tire to
between
22—44 psi (1.8—3.0 bar). Switch
off the compressor briefly to get a clear
reading from the pressure gauge. The
compressor should not be used for more
than 10 minutes at a time to avoid over-
heating.