2009 VOLVO XC60 tire size
[x] Cancel search: tire sizePage 255 of 297
06 Maintenance and specifications
Wheels and tires06
}}
253
Introduction
Your vehicle is equipped with tires according
to the vehicle\fs tire information placard on the
B-pillar (the structural member at the side of
the vehicle, at the rear of the driver\fs door
opening), or on the inside of the fuel filler door
on Canadian models.
CAUTION
Some Volvo models are equipped with an
Ultra High Performance tire and wheel com-
bination designed to provide maximum dry
pavement performance with consideration
for hydroplaning resistance. As such, they
may be more susceptible to road hazard
damage and, depending on driving condi-
tions, may achieve a tread life of less than
20,000 miles (30,000 km). Even if this vehi-
cle is equipped with Volvo’s advanced AWD
or DSTC system, these tires are not
designed for winter driving, and should be
replaced with winter tires when weather
conditions dictate.
The tires have good road holding characteris-
tics and offer good handling on dry and wet
surfaces. It should be noted however that the
tires have been developed to give these fea-
tures on snow/ice-free surfaces.
Certain models are equipped with "all-season"
tires, which provide a somewhat higher degree of road holding on slippery surfaces than tires
without the "all-season" rating. However, for
optimum road holding on icy or snow-covered
roads, we recommend suitable winter tires on
all four wheels.
When replacing tires, be sure that the new tires
are the same size designation, type (radial) and
preferably from the same manufacturer, on all
four wheels. Otherwise there is a risk of altering
the car\fs roadholding and handling characte-
ristics.
New Tires
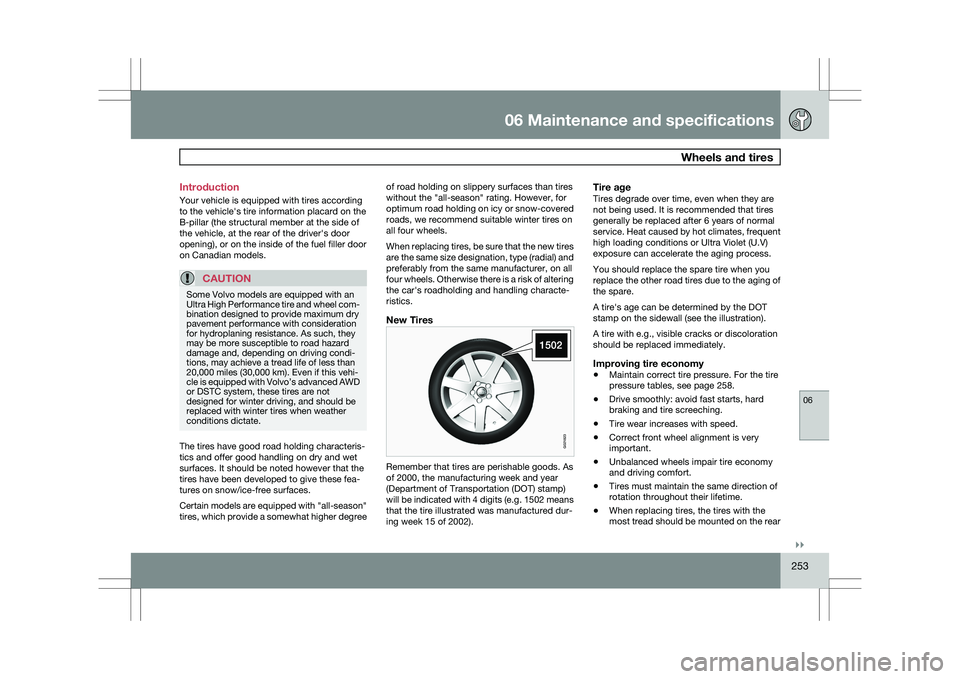
Remember that tires are perishable goods. As
of 2000, the manufacturing week and year
(Department of Transportation (DOT) stamp)
will be indicated with 4 digits (e.g. 1502 means
that the tire illustrated was manufactured dur-
ing week 15 of 2002).
Tire ageTires degrade over time, even when they are
not being used. It is recommended that tires
generally be replaced after 6 years of normal
service. Heat caused by hot climates, frequent
high loading conditions or Ultra Violet (U.V)
exposure can accelerate the aging process.
You should replace the spare tire when you
replace the other road tires due to the aging of
the spare.
A tire\fs age can be determined by the DOT
stamp on the sidewall (see the illustration).
A tire with e.g., visible cracks or discoloration
should be replaced immediately.
Improving tire economy
\b
Maintain correct tire pressure. For the tire
pressure tables, see page 258.
\b Drive smoothly: avoid fast starts, hard
braking and tire screeching.
\b Tire wear increases with speed.
\b Correct front wheel alignment is very
important.
\b Unbalanced wheels impair tire economy
and driving comfort.
\b Tires must maintain the same direction of
rotation throughout their lifetime.
\b When replacing tires, the tires with the
most tread should be mounted on the rear G021823
Page 256 of 297
06 Maintenance and specificationsWheels and tires 06
254 wheels to reduce the chance of oversteer
during hard braking.
\b Hitting curbs or potholes can damage the
tires and/or wheels permanently.
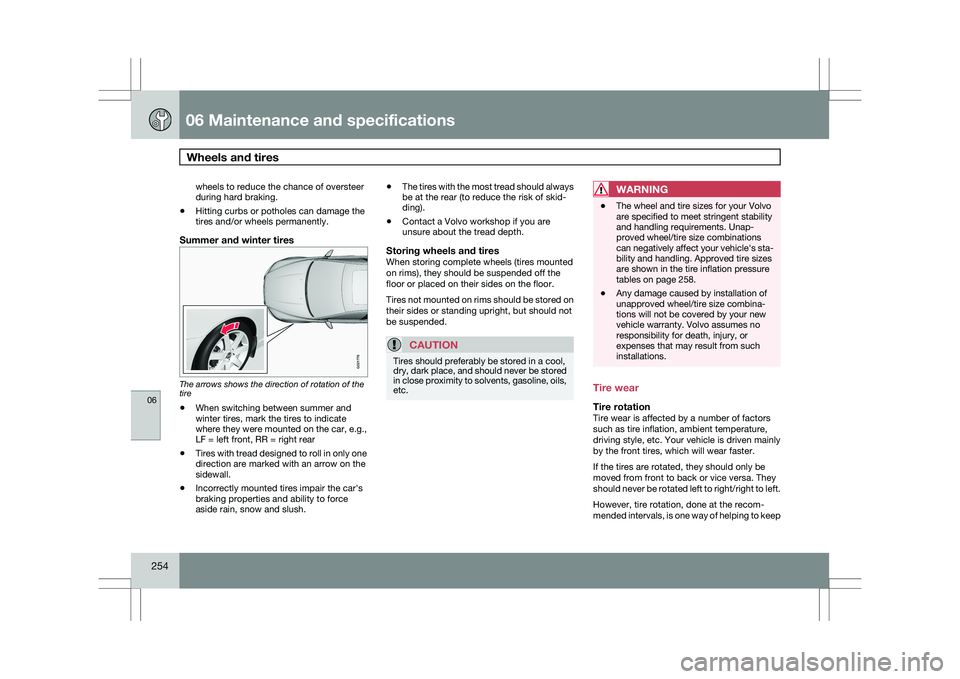
Summer and winter tires The arrows shows the direction of rotation of the
tire
\b
When switching between summer and
winter tires, mark the tires to indicate
where they were mounted on the car, e.g.,
LF = left front, RR = right rear
\b Tires with tread designed to roll in only one
direction are marked with an arrow on the
sidewall.
\b Incorrectly mounted tires impair the car\fs
braking properties and ability to force
aside rain, snow and slush. \b
The tires with the most tread should always
be at the rear (to reduce the risk of skid-
ding).
\b Contact a Volvo workshop if you are
unsure about the tread depth.Storing wheels and tiresWhen storing complete wheels (tires mounted
on rims), they should be suspended off the
floor or placed on their sides on the floor.
Tires not mounted on rims should be stored on
their sides or standing upright, but should not
be suspended.
CAUTION Tires should preferably be stored in a cool,
dry, dark place, and should never be stored
in close proximity to solvents, gasoline, oils,
etc.
WARNING \b
The wheel and tire sizes for your Volvo
are specified to meet stringent stability
and handling requirements. Unap-
proved wheel/tire size combinations
can negatively affect your vehicle\fs sta-
bility and handling. Approved tire sizes
are shown in the tire inflation pressure
tables on page 258.
\b Any damage caused by installation of
unapproved wheel/tire size combina-
tions will not be covered by your new
vehicle warranty. Volvo assumes no
responsibility for death, injury, or
expenses that may result from such
installations. Tire wear
Tire rotationTire wear is affected by a number of factors
such as tire inflation, ambient temperature,
driving style, etc. Your vehicle is driven mainly
by the front tires, which will wear faster.
If the tires are rotated, they should only be
moved from front to back or vice versa. They
should never be rotated left to right/right to left.
However, tire rotation, done at the recom-
mended intervals, is one way of helping to keep G021778
Page 257 of 297
06 Maintenance and specifications
Wheels and tires06
}}
255
tread wear as even as possible and will help
you get maximum mileage from your tires.
Ideally, tire rotation should be done the first
time after approximately 3,000 miles
(5, 000 km) and thereafter at 6,000 mile
(10,000 km) intervals.
Tire rotation should only be performed if front/
rear tire wear is fairly even and tread height is
above 1/16" (1.6 mm).
NOTE
Tire rotation is not included in regularly
scheduled maintenance and is performed
only at customer request, at additional
charge.
Your Volvo retailer can also provide guidance
based on your particular driving circumstan-
ces.
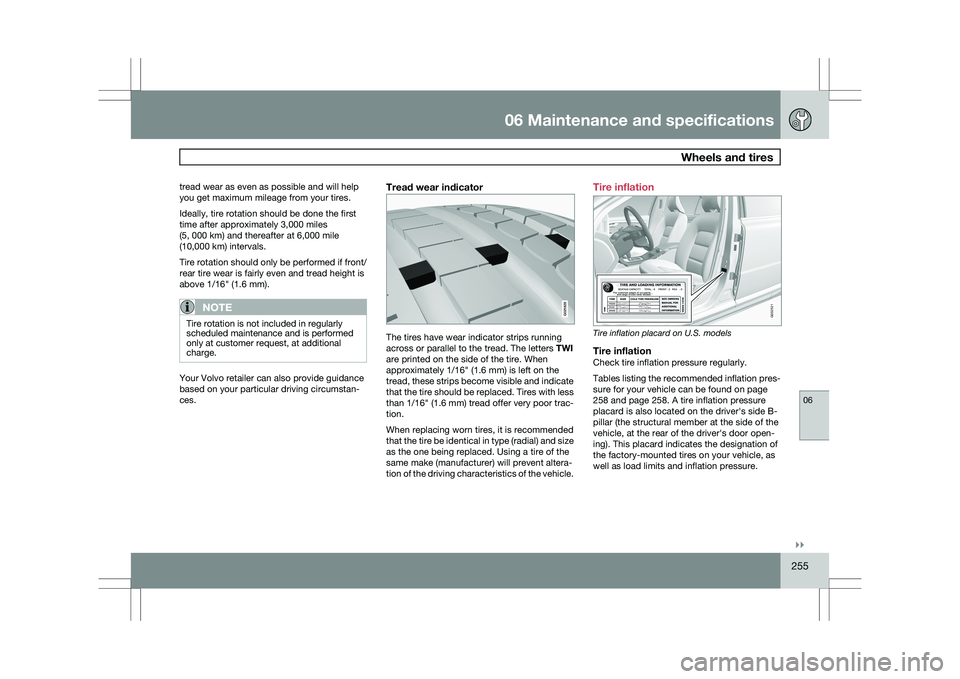
Tread wear indicator The tires have wear indicator strips running
across or parallel to the tread. The letters
TWI
are printed on the side of the tire. When
approximately 1/16" (1.6 mm) is left on the
tread, these strips become visible and indicate
that the tire should be replaced. Tires with less
than 1/16" (1.6 mm) tread offer very poor trac-
tion.
When replacing worn tires, it is recommended
that the tire be identical in type (radial) and size
as the one being replaced. Using a tire of the
same make (manufacturer) will prevent altera-
tion of the driving characteristics of the vehicle. Tire inflation
Tire inflation placard on U.S. models
Tire inflationCheck tire inflation pressure regularly.
Tables listing the recommended inflation pres-
sure for your vehicle can be found on page
258 and page 258. A tire inflation pressure
placard is also located on the driver\fs side B-
pillar (the structural member at the side of the
vehicle, at the rear of the driver\fs door open-
ing). This placard indicates the designation of
the factory-mounted tires on your vehicle, as
well as load limits and inflation pressure. G021829 G032521
Page 260 of 297
06 Maintenance and specificationsWheels and tires 06
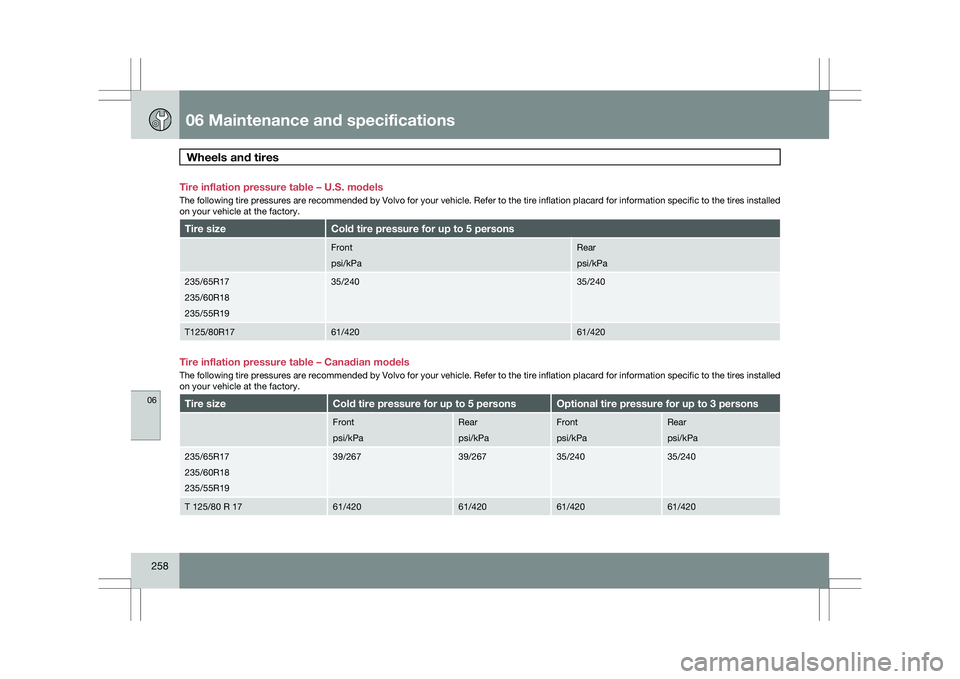
258 Tire inflation pressure table – U.S. models
The following tire pressures are recommended by Volvo for your vehicle. \
Refer to the tire inflation placard for information specific to the tire\
s installed
on your vehicle at the factory.
Tire size Cold tire pressure for up to 5 persons
Front
psi/kPa Rear
psi/kPa
235/65R17
235/60R18
235/55R19 35/240 35/240
T125/80R17 61/420 61/420
Tire inflation pressure table – Canadian models
The following tire pressures are recommended by Volvo for your vehicle. \
Refer to the tire inflation placard for information specific to the tire\
s installed
on your vehicle at the factory.
Tire size Cold tire pressure for up to 5 persons Optional tire pressure for up to 3 persons
Front
psi/kPa Rear
psi/kPa Front
psi/kPa Rear
psi/kPa
235/65R17
235/60R18
235/55R19 39/267 39/267 35/240 35/240
T 125/80 R 17 61/420 61/420 61/420 61/420
Page 261 of 297
06 Maintenance and specifications
Wheels and tires06
}}
259
Tire designations
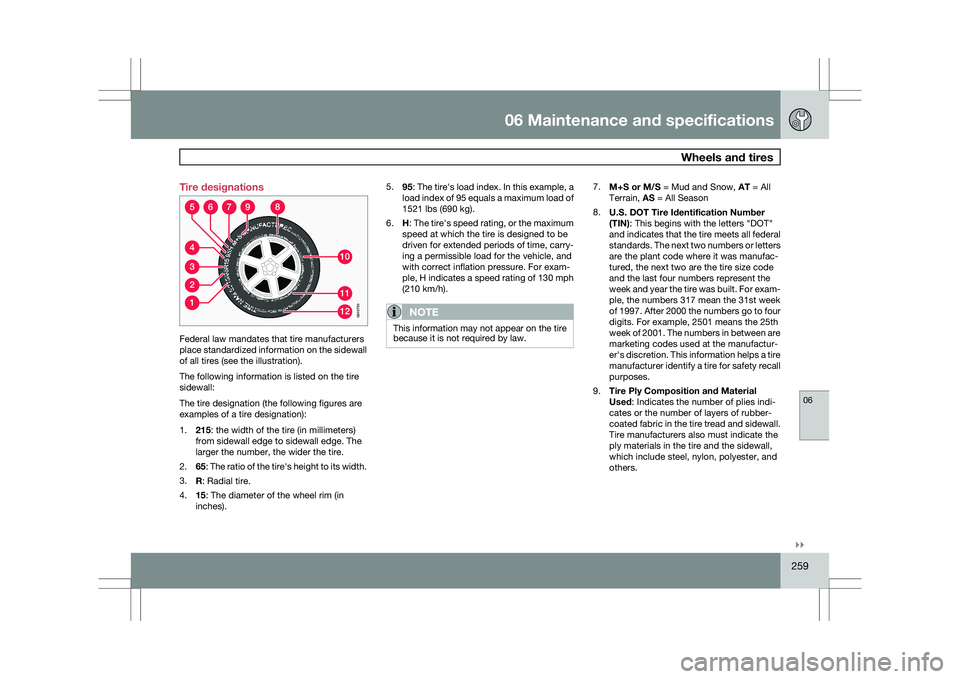
Federal law mandates that tire manufacturers
place standardized information on the sidewall
of all tires (see the illustration).
The following information is listed on the tire
sidewall:
The tire designation (the following figures are
examples of a tire designation):
1.
215: the width of the tire (in millimeters)
from sidewall edge to sidewall edge. The
larger the number, the wider the tire.
2. 65: The ratio of the tire\fs height to its width.
3. R: Radial tire.
4. 15: The diameter of the wheel rim (in
inches). 5.
95: The tire\fs load index. In this example, a
load index of 95 equals a maximum load of
1521 lbs (690 kg).
6. H: The tire\fs speed rating, or the maximum
speed at which the tire is designed to be
driven for extended periods of time, carry-
ing a permissible load for the vehicle, and
with correct inflation pressure. For exam-
ple, H indicates a speed rating of 130 mph
(210 km/h).
NOTE This information may not appear on the tire
because it is not required by law. 7.
M+S or M/S = Mud and Snow, AT = All
Terrain, AS = All Season
8. U.S. DOT Tire Identification Number
(TIN): This begins with the letters "DOT"
and indicates that the tire meets all federal
standards. The next two numbers or letters
are the plant code where it was manufac-
tured, the next two are the tire size code
and the last four numbers represent the
week and year the tire was built. For exam-
ple, the numbers 317 mean the 31st week
of 1997. After 2000 the numbers go to four
digits. For example, 2501 means the 25th
week of 2001. The numbers in between are
marketing codes used at the manufactur-
er\fs discretion. This information helps a tire
manufacturer identify a tire for safety recall
purposes.
9. Tire Ply Composition and Material
Used: Indicates the number of plies indi-
cates or the number of layers of rubber-
coated fabric in the tire tread and sidewall.
Tire manufacturers also must indicate the
ply materials in the tire and the sidewall,
which include steel, nylon, polyester, and
others.
310
11
12
4
56789
2
1
G010753
Page 262 of 297
06 Maintenance and specificationsWheels and tires 06
260 10.
Maximum Load: Indicates the maximum
load in pounds and kilograms that can be
carried by the tire. Refer to the vehicle\fs tire
information placard or the safety certifica-
tion label, located on the B-Pillar or the
driver\fs door or on the inside of the fuel filler
door on Canadian models, for the correct
tire pressure for your vehicle.
11. Treadwear, Traction, and Temperature
grades: see page 262 for more informa-
tion.
12. Maximum permissible inflation pressure: the greatest amount of air pressure that
should ever be put in the tire. This limit is
set by the tire manufacturer.
Glossary of tire terminology
The tire suppliers may have additional mark-
ings, notes or warnings such as standard load,
radial tubeless, etc.
\b Tire information placard: A placard
showing the OE (Original Equipment) tire
sizes, recommended inflation pressure,
and the maximum weight the vehicle can
carry.
\b Tire Identification Number (TIN)
: A num-
ber on the sidewall of each tire providing
information about the tire brand and man-
ufacturing plant, tire size and date of man-
ufacturer. \b
Inflation pressure: A measure of the
amount of air in a tire.
\b Standard load: A class of P-metric or Met-
ric tires designed to carry a maximum load
at 35 psi [37 psi (2.5 bar) for Metric tires].
Increasing the inflation pressure beyond
this pressure will not increase the tires load
carrying capability.
\b Extra load: A class of P-metric or Metric
tires designed to carry a heavier maximum
load at 41 psi [43 psi (2.9 bar) for Metric
tires]. Increasing the inflation pressure
beyond this pressure will not increase the
tire\fs load carrying capability.
\b kPa: Kilopascal, a metric unit of air pres-
sure.
\b PSI: Pounds per square inch, a standard
unit of air pressure.
\b B-pillar: The structural member at the side
of the vehicle behind the front door.
\b Bead area of the tire: Area of the tire next
to the rim.
\b Sidewall of the tire: Area between the
bead area and the tread.
\b Tread area of the tire: Area of the perim-
eter of the tire that contacts the road when
mounted on the vehicle.
\b Rim: The metal support (wheel) for a tire or
a tire and tube assembly upon which the
tire beads are seated. \b
Maximum load rating: a figure indicating
the maximum load in pounds and kilo-
grams that can be carried by the tire. This
rating is established by the tire manufac-
turer.
\b Maximum permissible inflation
pressure: the greatest amount of air pres-
sure that should ever be put in the tire. This
limit is set by the tire manufacturer.
\b Recommended tire inflation pressure:
inflation pressure, established by Volvo,
which is based on the type of tires that are
mounted on a vehicle at the factory. This
inflation pressure is affected by the number
of occupants in the vehicle, the amount of
cargo, and the speed at which the vehicle
will be driven for a prolonged period. This
information can be found on the tire infla-
tion placard(s) located on the driver\fs side
B-pillar or on the inside of the fuel filler door
on Canadian models, and in the tire infla-
tion table in this chapter.
\b Cold tires: The tires are considered to be
cold when they have the same temperature
as the surrounding (ambient) air. This tem-
perature is normally reached after the vehi-
cle has been parked for at least 3 hours.
Page 264 of 297
06 Maintenance and specificationsWheels and tires 06
262
WARNING \b
Exceeding the permissible axle weight,
gross vehicle weight, or any other
weight rating limits can cause tire over-
heating resulting in permanent defor-
mation or catastrophic failure.
\b Do not use replacement tires with lower
load carrying capacities than the tires
that were original equipment on the
vehicle because this will lower the vehi-
cle\fs GVW rating. Replacement tires
with a higher limit than the originals do
not increase the vehicle\fs GVW rating
limitations. Uniform Tire Quality Grading
ALL PASSENGER VEHICLE TIRES MUST
CONFORM TO FEDERAL SAFETY
REQUIREMENTS IN ADDITION TO THESE
GRADES
Quality grades can be found, where appli-
cable, on the tire sidewall between the tread
shoulder and maximum section width. For
example:
Treadwear 200 Traction AA Temperature A
TREADWEARThe treadwear grade is a comparative rating
based on the wear rate of the tire when tested
under controlled conditions on a specified gov- ernment test course. For example, a tire gra-
ded 150 would wear one and one half (1 1/2)
times as well on the government course as a
tire graded 100. The relative performance of
tires depends upon the actual conditions of
their use, however, and many depart signifi-
cantly from the norm due to variation in driving
habits, maintenance practices and differences
in road characteristics and climate.
TRACTIONThe traction grades, from highest to lowest, are
AA, A, B, and C, as measured under controlled
conditions on specified government test sur-
faces of asphalt and concrete. A tire marked C
may have poor traction performance. The trac-
tion grade assigned to this tire is based on
braking (straight-ahead) traction tests and is
not a measure of cornering (turning) traction.
WARNING
The traction grade assigned to this tire is
based on braking (straight-ahead) traction
tests and is not a measure of cornering
(turning) traction.
TEMPERATUREThe temperature grades are AA (the highest),
A, B, and C, representing the tire\fs resistance
to the generation of heat and its ability to dis-
sipate heat when tested under controlled con-ditions on a specified indoor laboratory test
wheel. Sustained high temperature can cause
the material of the tire to degenerate and
reduce tire life, and excessive temperature can
lead to sudden tire failure. The grade C corre-
sponds to a minimum level of performance that
all passenger vehicle tires must meet under the
Federal Motor Safety Standard No. 109.
Grades B and A represent higher levels of per-
formance on the laboratory test wheel than the
minimum required by law.
WARNING
The temperature grade for this tire is estab-
lished for a tire that is properly inflated and
not overloaded. Excessive speed, under-
inflation, or excessive loading, either sepa-
rately or in combination, can cause heat
buildup and tire failure.
Snow chains, snow tires, studded tires
Snow chainsSnow chains can be used on your Volvo with
the following restrictions:
\b
Snow chains should be installed on front
wheels only. Use only Volvo approved
snow chains.
\b If accessory, aftermarket or "custom" tires
and wheels are installed and are of a size
different than the original tires and wheels,
Page 266 of 297

06 Maintenance and specificationsWheels and tires 06
264 Temporary Spare
The spare tire in your vehicle is called a "Tem-
porary Spare".
Recommended tire pressure (see the placard
on the B-pillar or on the fuel filler door) should
be maintained irrespective of which position on
the vehicle the temporary spare tire is used on.
In the event of damage to this tire, a new one
can be purchased from your Volvo retailer.
WARNING
Current legislation prohibits the use of the
"Temporary Spare" tire other than as a tem-
porary replacement for a punctured tire. It
must be replaced as soon as possible by a
standard tire. Road holding and handling
may be affected with the "Temporary
Spare" in use. Do not exceed 50 mph
(80 km/h).
CAUTION
The vehicle must not be driven with wheels
of different dimensions or with a spare tire
other than the one that came with the vehi-
cle. The use of different size wheels can
seriously damage your car\fs transmission. Changing a wheel
Location of jack and tools
Spare wheelThe spare wheel (Temporary spare) is only
intended for temporary use. Replace the spare
wheel with a normal wheel as soon as possible.
The car\fs handling may be altered by the use
of the spare wheel. The correct tire pressure for
the spare wheel is stated in the tire pressure
tables beginning on page 258.
WARNING Current legislation prohibits the use of the
“Temporary Spare” tire other than as a tem-
porary replacement for a punctured tire. It
must be replaced as soon as possible by a
standard tire. Road holding and handling
may be affected with the “Temporary
Spare” in use.
CAUTION
The vehicle must never be driven with more
than one temporary spare wheel.
The spare wheel is located in the spare wheel
well with the rim side down. There are two foam
blocks, one under the spare wheel and one
over/inside. The upper one contains all tools.
The same bolt runs through to secure the spare
wheel and the foam blocks.
Taking out the spare wheel1.
Fold the rear edge of the floor mat forward.
2. Open the floor hatch.
3. Undo the retaining bolt.
4. Lift out the foam block with tools.
5. Lift out the spare wheel.
The other two blocks can remain in the wheel
well. G031900