2009 VOLKSWAGEN SCIROCCO length
[x] Cancel search: lengthPage 32 of 138

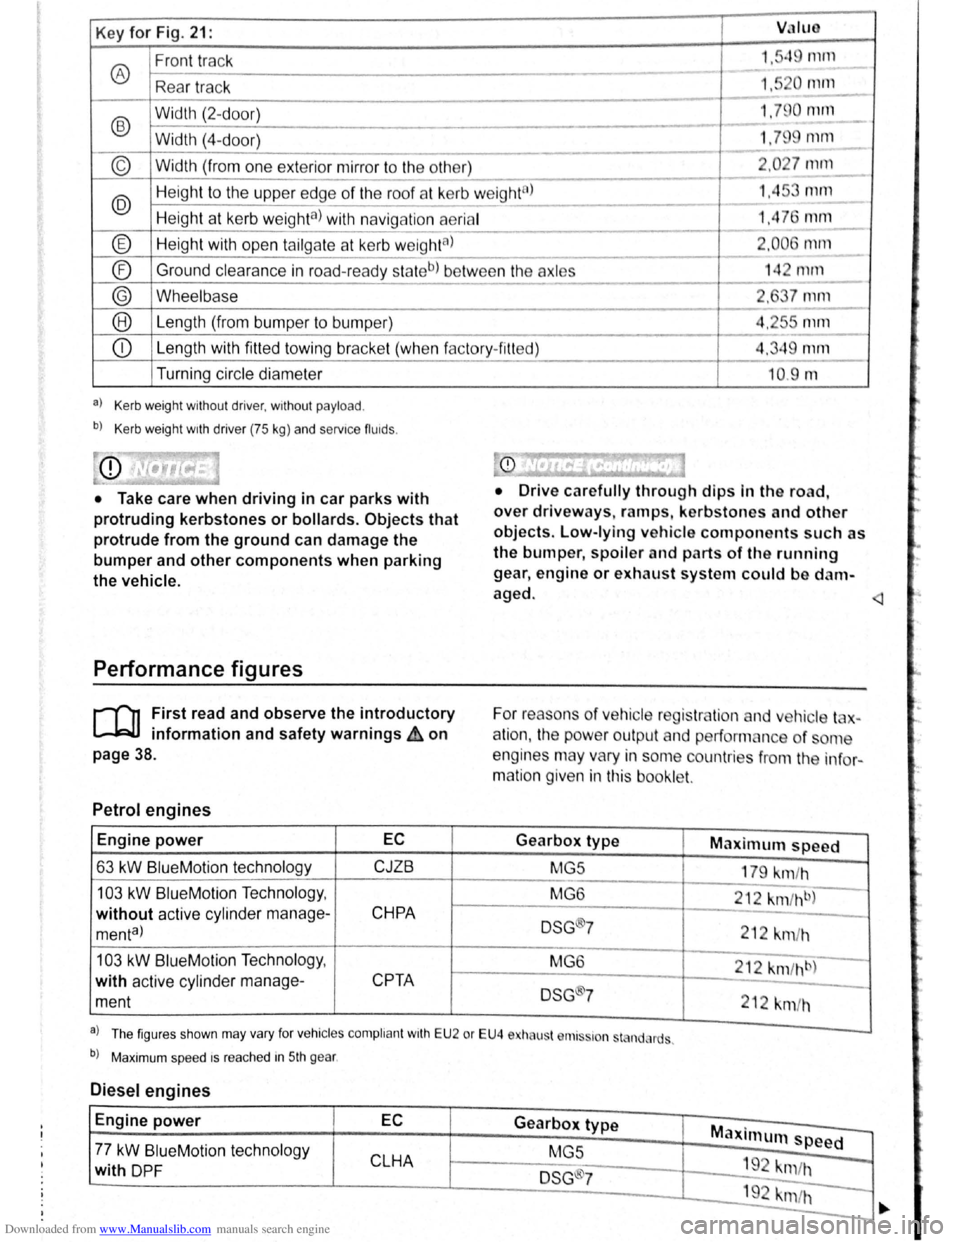
Downloaded from www.Manualslib.com manuals search engine Key for Fig. 21: VJIUO
Front track 1."q rnrn
® ---
Rea r tr ac k 1,5 0 111112.._
-
®
Width (2-d oor) 1.79 0 null
- -Width (4-
door) 1.79 mm
----
© Width (from one exterior mirror to the other) 2 .0 27 mm
---
@ Heig ht to the uppe r edge of the roof at kerb w eight8l 1.45 mm ---
Height at kerb weighta) with navig ation aerial 1,4 76 mm ---
® Height with open tailga te a t kerb w eightal 2.006 1111ll
- --
® Ground
clearance in road-read y sta teb) be tw ee n the axles 14 2 mrn ------
® Wheelbase 2, 7 mm
--® Le ngth (from bumper to bump er) 4.2r-s mm
---
CD Length with fitted towing bracke t (whe n f actory- fitt ed) 4.349 mm
Turning circle diameter
a) Kerb weight without driver, without payload .
b) Kerb weight wrth driver (75 kg) and servrce fluids .
• Take care when driving in car parks with
protruding kerbstones or bollards. Objects that
protrude from the ground can damage the
bumper and other components when parking
the vehicle.
Performance figures
r-('n First read and observe the introductory
L-1=JJ information and safety warnings ih on
page 38.
Petrol engines
Engine power EC
63 kW BlueM otio n technology CJZB
103 kW BlueMotion Techno logy ,
without active cylind er manage-CHPA
menta)
103 kW Blue Motio n Technolog y,
with active cylinder manage-
CPTA
ment
--10.9 m
• Drive c arefully through dips In the road,
over driveways, ramps , kerbstones and other
objects. Low-lying vehicle components such as
the bumper, spoiler and parts of th e running
gear , engine or exhaust system could be d am
aged.
For reaso ns
of ve hicle reg is tr lio n and v hic le t -
a
tio n, the pow er outpu t an d performan ce of ome
engines may vary in some countries f
rom the in fo r
matio n given in this booklet.
Gearbox type Maximum speed
MG5
179 km/h
MG 6
212
km fh b)
DSG ®7 212 km /h
M G6
212 km /hb)
DSG 7
212 km/h
a . . l Th e figur es sh o wn may va ry fo r vehrc les compli ant wrth E U 2 or EU4 e ha ust r111s~ron st nd, rds .
b) Maxim um spee d rs rea ched in 5th gear .
Diesel engines
Engine power EC Gearbox type Maxi mum speed -77 kW BlueM otio n tec hnol ogy
MGS
CLHA 1 9 -with DP F DSG ®7 "m /h
192 krn/h -
-
·.
Page 64 of 138

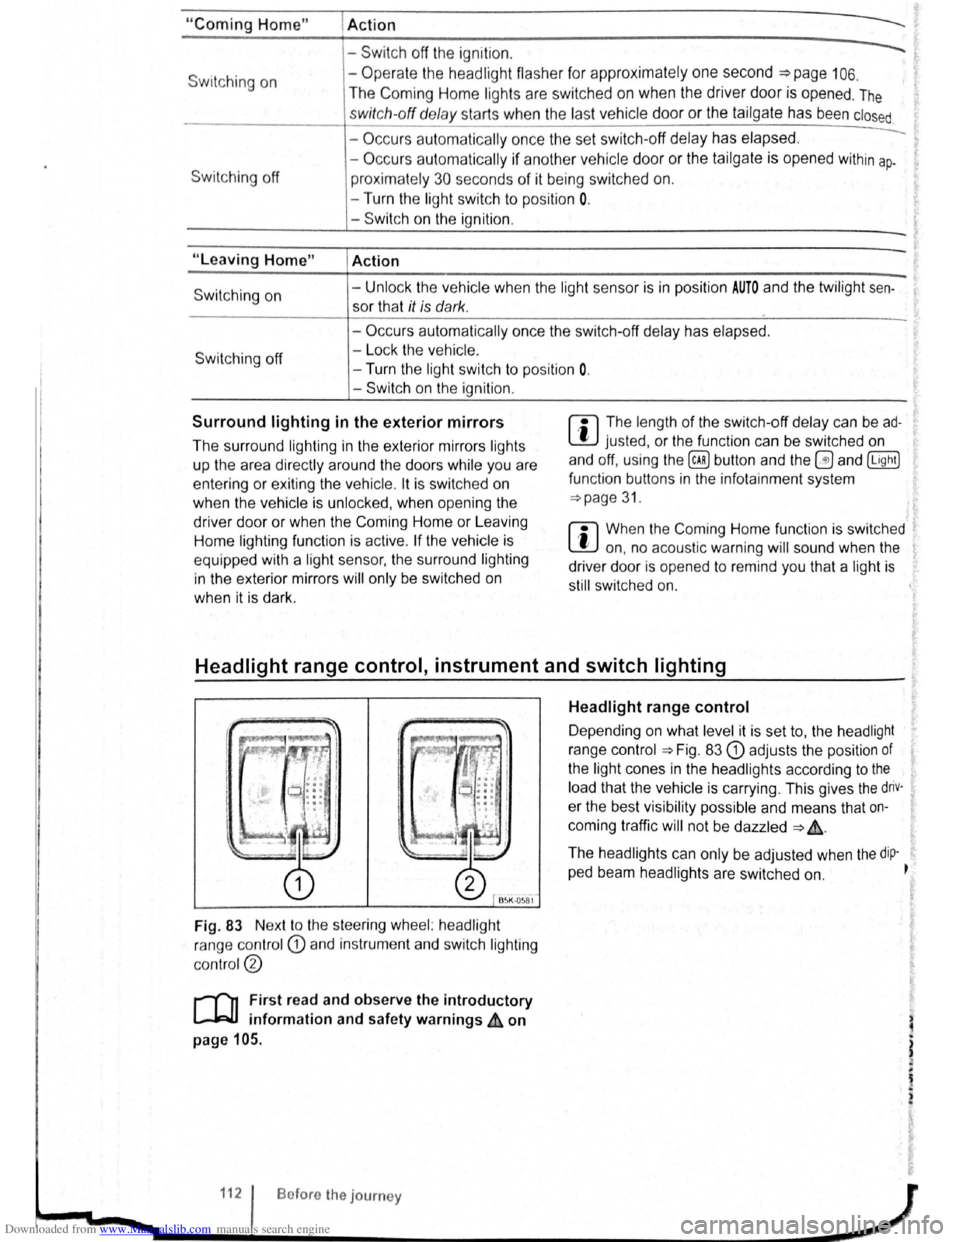
Downloaded from www.Manualslib.com manuals search engine "Coming Home"
Switching on
Switching off
"Leaving Home"
Switch ing on
Switc h ing off
I Action
------Swit c h off the ignit io n .
- Operate the headlight flashe r for approximately one second ~page 106.
The Coming Home lights are switched on when the driver door is opened . The
swi tc h-off de lay starts when the last vehicle door or the tailgate has been closed
-Occurs automatica lly once the set switch-off delay has elapsed .
-Occurs automatica lly if another ve h icle door or the tailgate is opened within ap-
proximately 30 seco nds of it being swit ched on.
- Turn the
ligh t switc h to positio n 0.
- Swit ch o n the ignition .
Action
-Unl ock the vehicle when the ligh t senso r is in position AUTO and the twilight sen
sor that it is d ar k.
- Occ urs autom atically once the switch-off delay has elapsed .
- Lo ck
the vehicle.
-Turn the light switc h to positi on 0.
-Switch on the ignition .
Surround lighting in the exterior mirrors m The length of the switch-off delay can be ad
L!:J justed , o r the function can be switched on
and off, u sing the
(ill) button and the~ and (Light)
functio n buttons in the infota inment system
=:.page 31.
Th e surround lighting in the exterior mirrors ligh ts
up the area directly around
the doors while you are
ente ring or ex iting the vehicle . lt is sw itc h ed on
when th e ve hi cle is unlo cked, when opening the
driver door or wh en
the Coming Home or Leav ing
Hom e lighting function is ac tiv e .
If the veh icle is
eq uipp ed with a ligh t sensor , the surround lighting
i n th e exterior mirrors
will only be switched on
wh en it is dark.
m When the Com ing Home function is switched .
L!:J on, no acoustic warning will sound when the t
driver d oor is opened to remind you that a light is
still switched on.
Headlight range control, instrument and switch lighting
Fig. 83 Nex t to the stee ring wheel: head light
ra nge contr ol
CD and in strum ent and swit ch lighting
co ntr ol@
r-('n First read and observe the introductory
~ information and safety warnings ~ on
page 105.
112 Bofore the journey
Headlight range control
D epending on what level it is se t to, the head light
rang e co ntrol
:::.Fig . 83 CD adjusts the position of
the light cones in the head lights according to the
load that the vehi cle is carrying. This gives the driv·
er the best visibilit y possible and means that on
coming traffic
will not be dazzle d :::. &.
The hea dlights ca n on ly be adjust ed when the dip-
ped beam headlights are switched on. ~
t
Page 68 of 138

Downloaded from www.Manualslib.com manuals search engine Windscreen wiper lever
@
c©
c@
C@
~®
B5K ~18
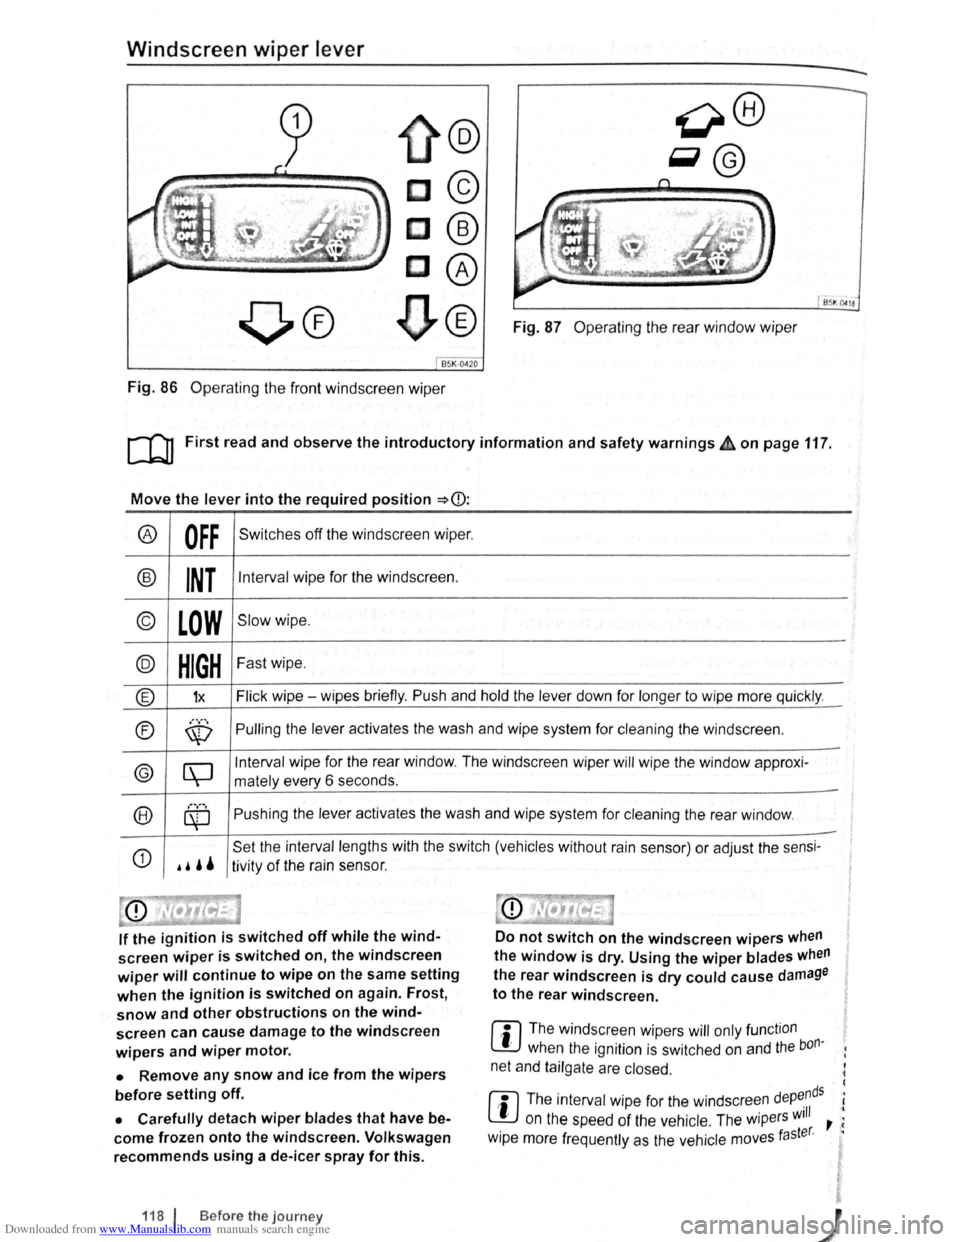
Fig. 87 Operating the rear window wiper
Fig. 86 Operating the front windscreen wiper
[Q] First read and observe the introductory information and safety warnings£ on page 117.
Move the lever into the required position ~CD:
® OFF Switches off the windscreen wiper.
® INT Interval wipe for the windscreen.
© LOW Slow wipe .
@ HIGH Fast wipe.
® 1x Flick wipe - wipes briefly. Push and hold the lever down for longer to wipe more quickly .
®
............. Pulling the lever activates the wash and wipe system for cleaning the windscreen . \V
© [\J
Interval wipe for the rear window. The windscreen wiper will wipe the window approxi-
mately every 6 seconds .
®
............
Pushing the lever activates the wash and wipe system for cleaning the rear window . ~ -
G)
.. ''
Set the interval lengths with the switch (vehicles without rain sensor) or adjust the sensi-
tivity of the rain sensor.
If the ignition is switched off while the wind
screen wiper is switched on, the windscreen
wiper will continue to wipe on the same setting
when the ignition is switched on again. Frost,
snow and other obstructions on the wind
screen can cause damage to the windscreen
wipers and wiper motor.
• Remove any snow and ice from the wipers
before setting off.
• Carefully detach wiper blades that have be
come frozen onto the windscreen. Volkswagen
recommends using a de-icer spray for this.
118 f Before the journey
Do not switch on the windscreen wipers when
the window is dry. Using the wiper blades when
the rear windscreen is dry could cause damage
to the rear windscreen .
r:l The windscreen wipers will only function
lJJ when the ignition is switched on and the bon·
net and tailgate are closed.
r:l The interval wipe for the windscreen depe.nds
l!:J on the speed of the vehicle . The wipers will , ;
· taster. · w1pe more frequently as the vehicle moves
i I
Page 70 of 138

Downloaded from www.Manualslib.com manuals search engine Place the windscreen wiper arms back onto the
winds creen before driving away. With the ignition
swit ched on, briefly press the windscreen wiper
lever
down to bring the windscreen wiper arms
ba ck
to the original position.
Lifting the windscreen wiper blades
• Move the wiper arms to the service position be
fore lifting ~CD.
• When lifting a wiper arm hold it only by the wip
er blade mounting .
Rain sensor
1}®
c®
85K ·0419
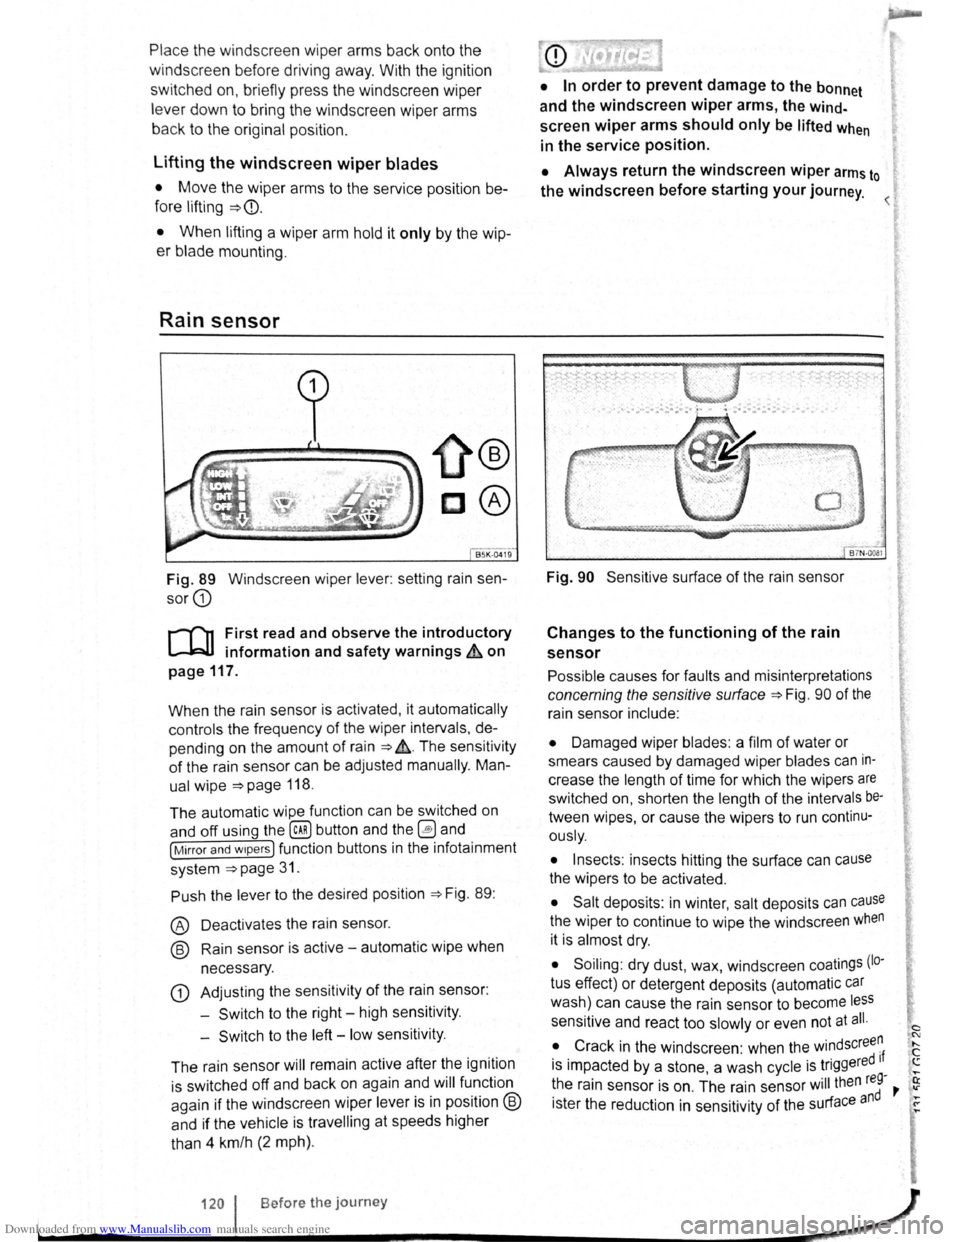
Fig. 89 Windscreen wiper lever: setting rain sen
sor G)
r-('n First read and observe the introductory
L-J,::JJ information and safety warnings & on
page
117.
When the rain sensor is activated , it automatically
controls the frequency
of the wiper intervals, de
pending on the amount of rain ~ ,&. The sensitivity
of the rain sensor can be adjusted manually. Man
ual
wipe ~page 118 .
The automatic wipe function can be switched on
and off using the
(ill) button and the 0 and
[Mirror and wipers ] function buttons in the infotainment
system
~page 31.
Push the lever to the desired position ~Fig. 89:
® Deactivat es the rain sensor.
@ Rain sensor is active -automatic wipe when
necessary .
G) Adjusting the sensitivity of the rain sensor :
-
Switch to the right -high sensitivity.
-
Switch to the left -low sensitivity .
The rain sensor
will remain active after the ignition
is switched off and back on again and
will function
again
if the windscreen wiper lever is in position @
and if the vehicle is travelling at speeds higher
than 4 km/h
(2 mph).
• In order to prevent damage to the bonnet
and the windscreen
wiper arms, the wind
screen wiper arms should only be lifted when
in the service position.
• Always return the windscreen wiper arms to
the windscreen before starting your journey.
Fig. 90 Sensitive surface of the rain sensor
Changes to the functioning of the rain
sensor
Possible causes for faults and misinterpretations
concerning the sensitive surface~ Fig. 90 of the
rain sensor include:
• Damaged wiper blades: a film of water or
smears caused by damaged wiper blades
can in
crease the length of time for which the wipers are
switched on, shorten the length of the intervals be
tween wipes, or cause the wipers to run continu
ously.
• Insects: insects hitting the surface can cause
the wipers to be activated.
• Salt deposits : in winter, salt deposits can cause
the wiper to continue to wipe the windscreen when
it is almost dry.
• Soiling : dry dust, wax, windscreen coatings (lo·
tus effect) or detergent deposits (automatic car
wash) can cause the rain sensor to become less
sensitive and react too slowly or even not at all.
• Crack
in the windscreen : when the windscree~
is impacted by a stone, a wash cycle is triggered If ....
~he rain sensor is on . The rain sensor will then reg-,. ~
1ster the reduction in sensitivity of the surface and ~
120 I Before the journey _,}
~----~------------------~~