2009 VOLKSWAGEN JETTA light
[x] Cancel search: lightPage 255 of 477
Booklet 3 .1 Control s and Equipment
Rear inter ior light
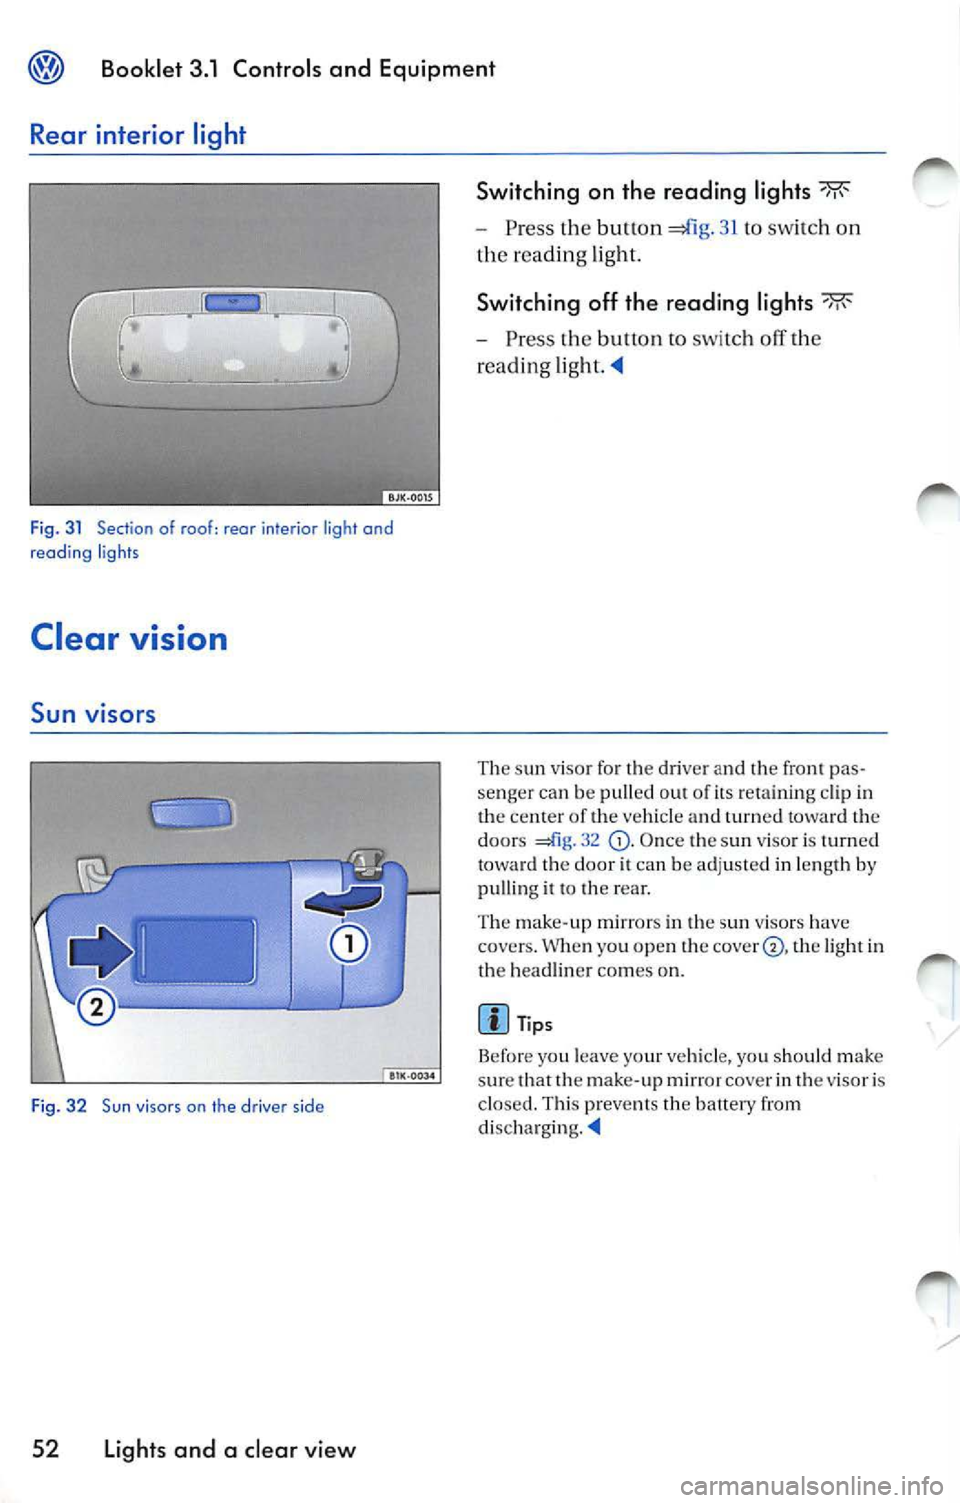
Fig. 3 1 Section of roof: rear interior light and
reading ligh ts
Clear vision
Sun viso rs
Fig. 32 Sun viso rs on the driver side
52 Light s and a cl ear v iew Switching on the reading light
s
Press the button 41g. 31 to sw itch on
th e re adin g light.
Switching off th e reading light s
Press the button to switc h off th e
reading
The sun visor fo r the driver and the fron t pas
senger can be pulled out of its re taini ng cl ip in
the center o f the ve hicle and turn ed towa rd the
doors
32 O nce the sun viso r is turned
to ward th e door it ca n be adj usted in len gth by
pulling it to the rea r.
Th e mak e-up m irr ors in the sun viso rs have
covers. W hen yo u open t he
th e lig ht in
th e headlin er co mes on.
Page 256 of 477
Booklet 3.1 Controls and Equipment @j)
Windshield wipers
Windshield wiper s
s hi eld washin g syste ms.
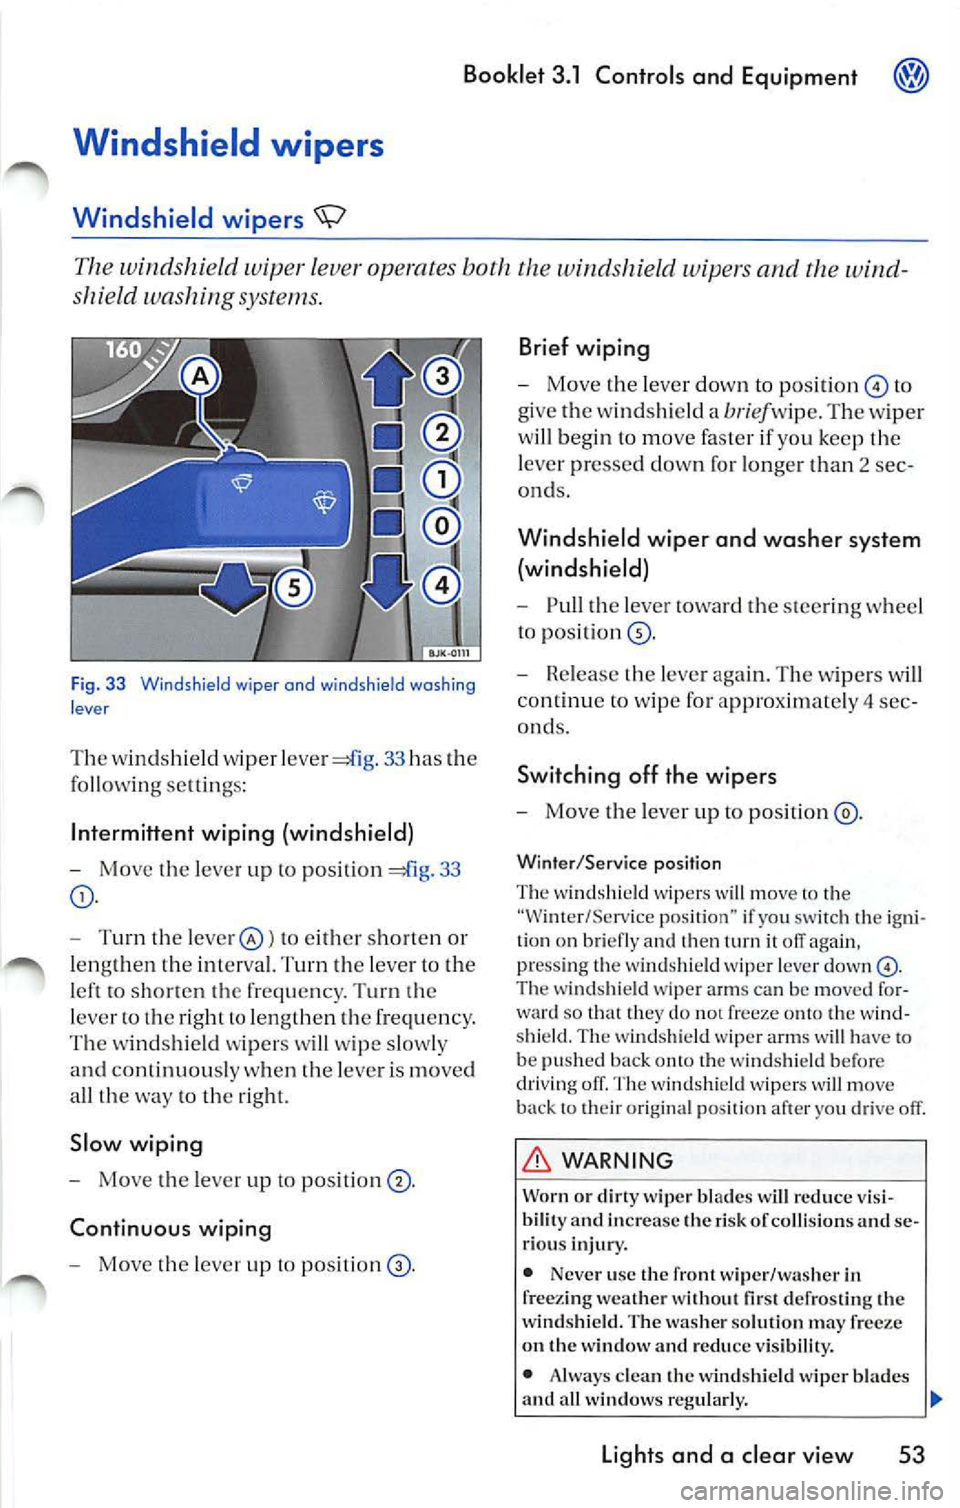
Fig. 33 Windshie ld wiper and wind sh ield washing
lever
T he w in dshield wiper 33 has the
fo llow ing se ltin gs:
Int ermi ttent wiping (windshield)
-Move t he lever up to positi on 33
- Turn th e leve r@ ) to e ither sh or te n or
l e ng th en the int erva l. Turn th e leve r to t he
l e ft t o sh o rt en the freq uen cy . T urn th e
l eve r ro th e right to le n gth en th e frequ en cy .
Th e w inds hield wip er s w ill wip e slo w ly
a nd continuou sly w hen th e leve r is m oved
a ll th e w ay
to th e rig ht.
Slow wiping
- Move the lever up to positi on ® ·
Continuous wiping
- Move the leve r up t o po siti on
Brief wiping
- Move the leve r down to position © to
give t he wind shi eld a
bri ef w ip e. T he w ip er
w ill be gin t o m ove faste r if you ke ep th e
l eve r pr esse d down for lo nge r th an 2 sec
ond s.
Windshield wiper and washer system
(windshield)
- Pull the lever towa rd the steerin g w heel
t o pos ition®·
- Rele ase the leve r ag ain. Th e wipers w ill
co ntinu e to w ipe for approx imate ly 4 sec
ond s.
Switching off the wipers
- Mo ve th e leve r up to po sition ®·
Winter /Service position
Th e wind shi eld wip ers will move to the
"Wi nter/Serv ice pos ition" if yo u sw itch th e ig ni
ti on on br iefly and th en
T he wi ndshi eld wipe r arm s can be moved fo r
w ard so that they do not freeze o nto the w ind
s hi eld. Th e wi nds hie ld wip er arms w ill have to
be pus hed b ack
the w indsh ie ld befo re
dri vin g o ff. T he w in d shi eld w ipe rs w ill m ove
b ack to th eir or ig ina l posit io n af ter yo u drive off.
WARNING
Worn or dirty wip er bl ad es w ill reduc e vis i
bilit y and incre ase the risk or co llis ion s and se
ri ous inju ry.
• Nev er u se the front wip er /wa sher in
fr ee zin g w eather without
defro stin g the
w indshield . The wa sh er solut io n ma y
on t he w indow and reduc e vis ibilit y.
• Alw ays clea n the win dshi eld wip er bl ades
and a ll w in dow s regularly.
Light s and a clear view 53
Page 257 of 477
Bookle t 3 .1 Controls and Equipment
WARN ING (continued)
• Always rep lace w iper b lades that a re worn,
damaged o r do not keep the wind shi eld clear.
th e wind shi eld. T o pr eve nt damag e the wipe r blad es and the wipe r always
l oose n blad es frozen to the windshi eld befor e
operati ng th e w iper s.
Tips
• The w ind shi eld wipers will only funct io n
when the igniti on is sw itch ed on and the en gin e
hood i s clo sed.
App lies lo vehicles: ro in sensor
Rain sensor
• The previou s wiping spe ed will be ca lly se lec ted when the veh icle stops. reg arding
w ipin g spee d 53, fig. 33 or is lected. The s elected speed will be resumed when
th e ve hicle dri ves off aga in.
• The windshi eld will b e wip ed again after
a bout five seconds once the wind shi eld w iper
and washer syste m ha s been operat ed if th e
hicle is in mo tion.
• If th e "inter mittent w iping" function has
b een selec ted, the intervals ar e lin ked to the
s p ee d of th e ve hicle i.e. the int erva ls will be
s horter when th e vehicle is trave lling fas te r.
• The w iper will
wipe away any obstacle s
that are on th e wi nd shi eld. Th e wiper w ill stop
moving if the ob stacl e blocks it s path.
th e ob stacle and switch the wipe r back on
The rain sensor automatically either or lengthens the intervals between
wipes depending on how hard it is raining.
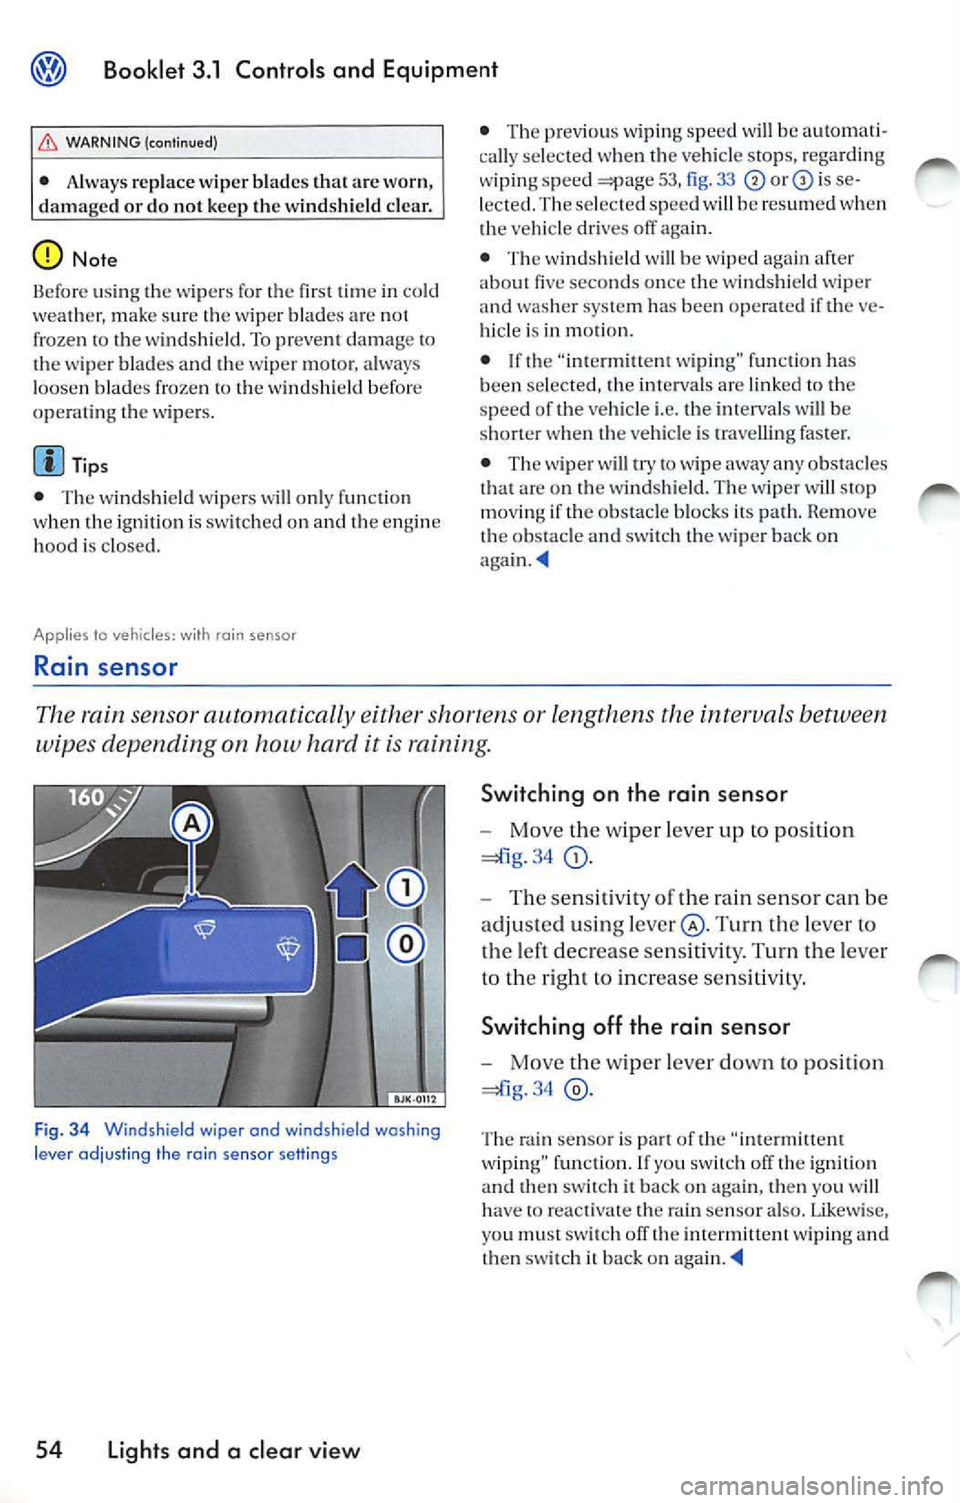
Fig . 3 4 Windshield wiper and windshield washing
l e ve r ad jus ting the rai n se nsor sett in g s
54 Light s and a clear view S
wi tching on th e rain sensor
- Move the wiper lever up to position
34
Turn the leve r to
the left decrease sensit ivity. Turn the lever
to th e right to in crease sensitivit y.
Sw itch ing off th e rain sensor
- Move the wip er lever down to position
34
Th e rain senso r is part of th e "intermitt ent
w iping" function . If yo u sw itc h off the igni tion
an d th en sw itch it ba ck on aga in, then you w ill
h ave
re activate th e rain senso r also . Lik ewis e,
yo u must swit ch off th e int ermittent wiping and
th en sw itch it back on
Page 258 of 477
Booklet 3.1 Controls and Equipment
Appl ies to vehicles: wi th headlight washer sys tem
Headlight washer system
The headlight washer system cleans the headlights.
The head lig h t was he rs are activated automati
cally when th e sw itch for the headlig hts is in an y
o th er posit io n th an O and th e windshie ld wip er
l eve r
53, fig. is pull ed toward the
s tee ring whee l for a t le as t 1. 5 sec onds. H oweve r,
yo u sh ou ld reg ularl y remove any hard or drie d
o n dirt or in sec ts from
hea dli ght s, for ex
ample when ever yo u are refu eling your vehicl e.
Mirrors
Tips
Mak e sure th at t he hea dlight washers wo rk
p ro perl y in wint er, keep the nozz le in th e
bump er fre e of sn ow and re m ove any ice with a
d e- ice r spra y
Self-dimming inside day-night mirror
It is important for safe driving that you have good vision to the rear .
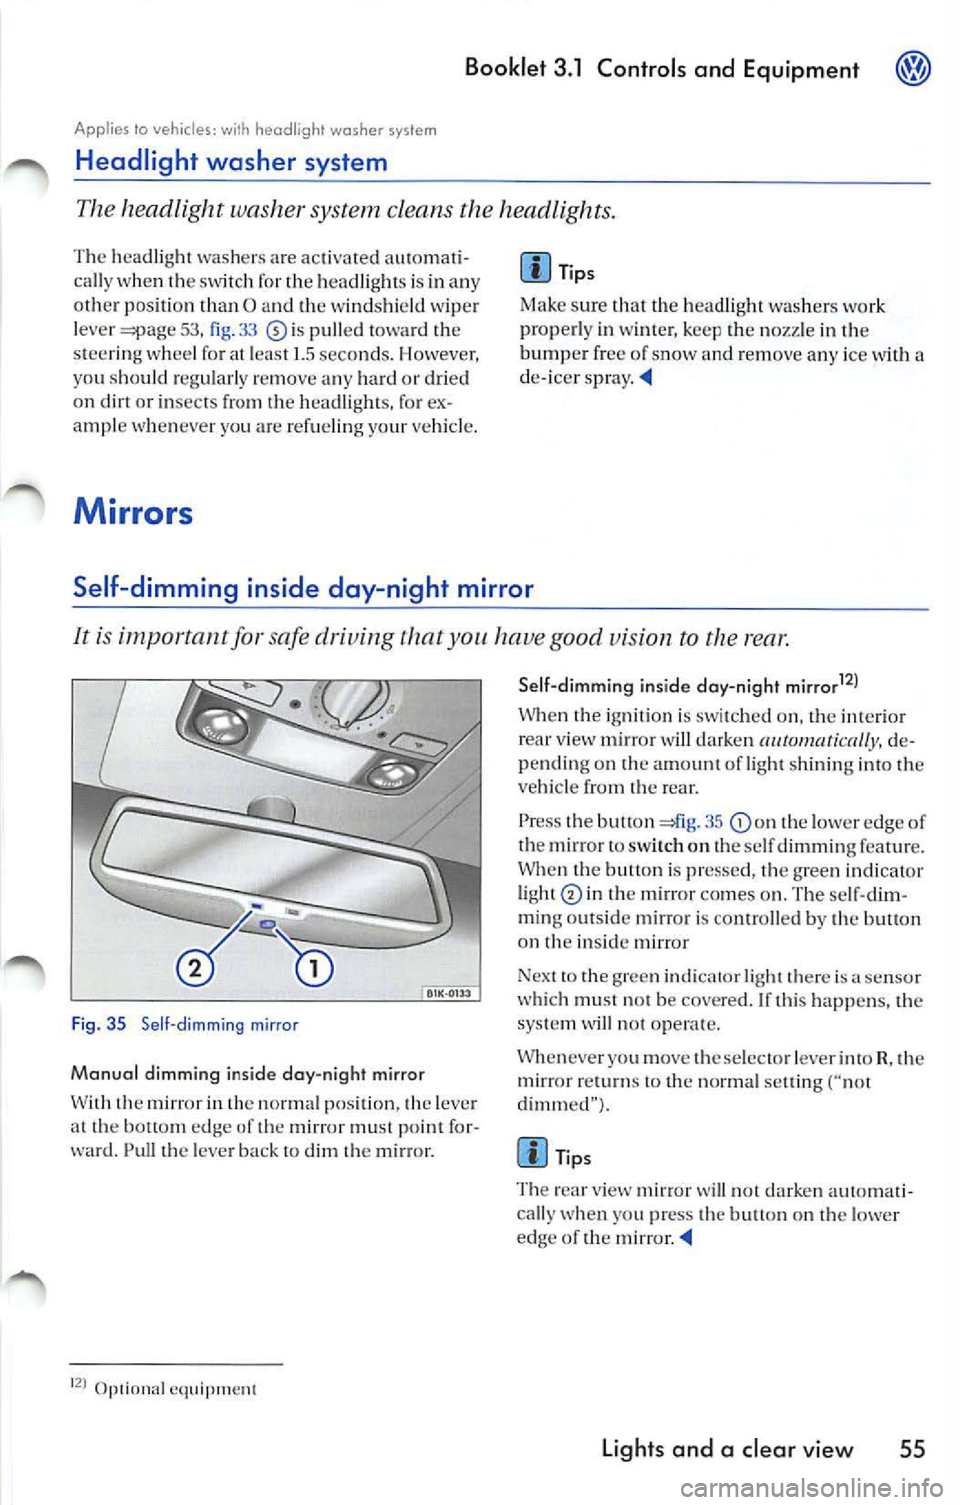
Fig. 35 Se ll-dimming mirror
Manual dimming inside day-night mirror
W ith th e mir ror in th e normal p ositi on, the leve r
a t th e bottom edge of th e mirror must point fo r
ward. Pull th e leve r ba ck t o dim
m ir ro r.
Op1ional eq uipment Sell-dimmi
ng inside day-night mirrar
12
)
W hen igni tion is swi tched o n, the int eri or view mirror w ill darken de
pending on amount of light shinin g into veh icle from rear.
P ress the butt on 41g . 35
th e lower edge of
th e mirror to sw itch o n th e se lf dimming featur e.
Whe n the butt on is pr esse d, th e gree n indicat or
li ght
in the m ir ro r co mes on . The se lf-dim
m in g ou ts id e mirror i s conrro lled by th e butl on
on
in side m irror
Nex t to th e g ree n indi cator light there is
sensor
w hi ch mu st not be cove red. If thi s happe ns, the
sys te m will not oper ate.
Whenever you move th e se lec to r le ver into R, th e
mirror
to the normal settin g ("not
dimm ed" ).
Tips
T he rea r view mirror
will not da rken aut oma ti
cally w hen you press the bu tton on t he lowe r
edge of the mirror
Lights and a clear vie w 55
Page 259 of 477
Booklet 3.1 Controls and Equipment
Applies to vehicles : wi th power ou tside mirrors
Outside mirrors
It is impor tant for saf e dri ving to prop erly adju st th e ou tsid e ,ni rrors using joy
s tic k in
drive r's door.
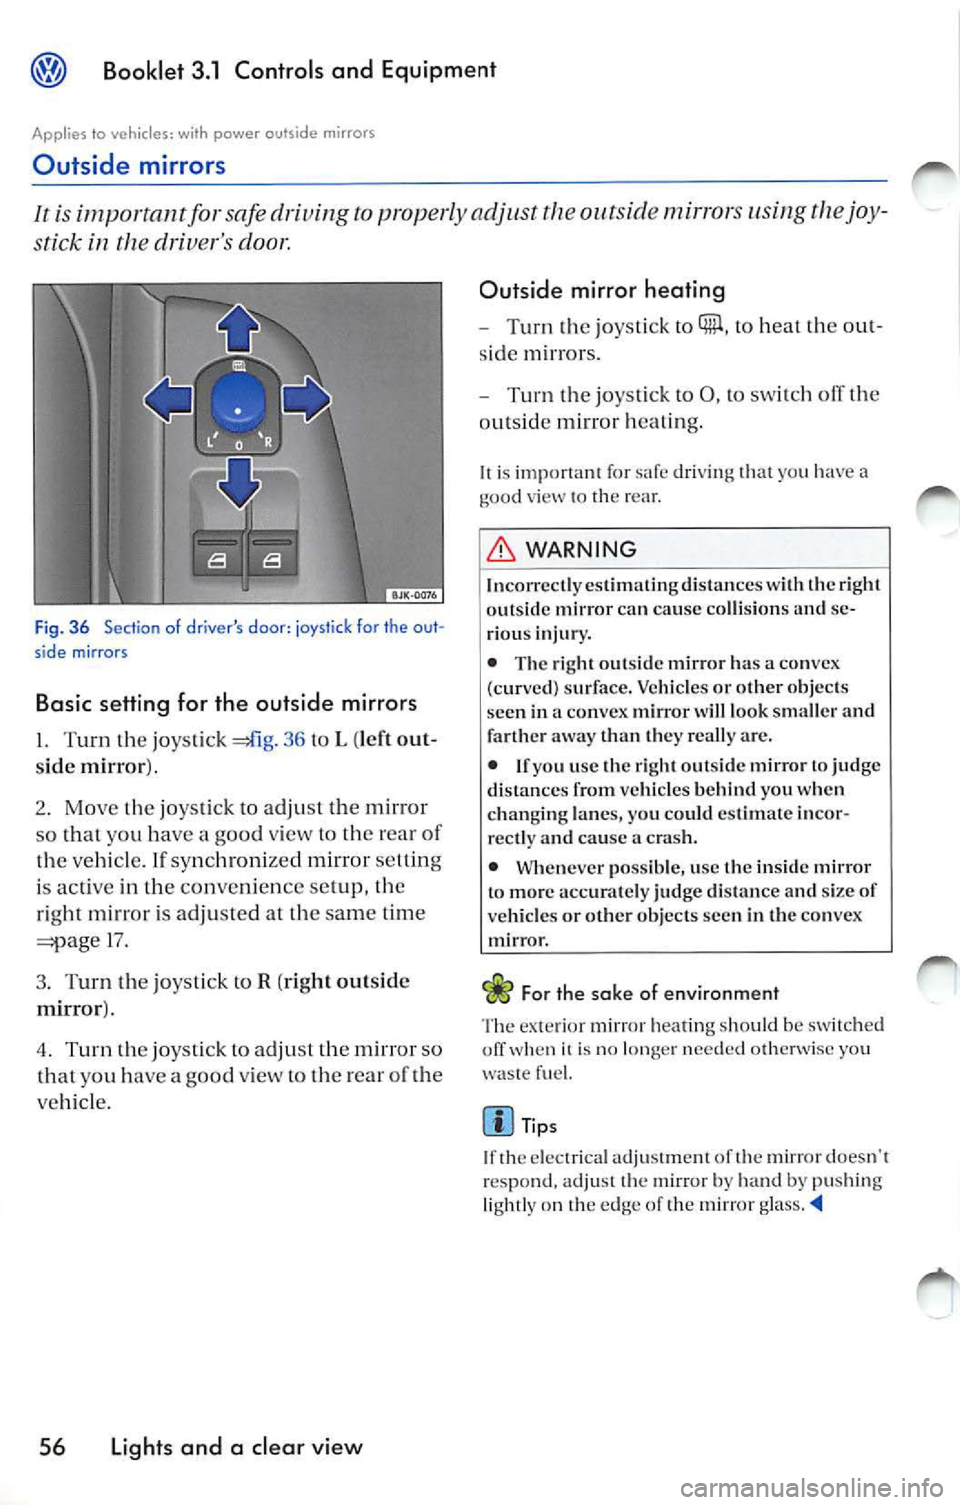
Fi g. 36 Se ct io n of dr iver 's door : joy sti ck fo r th e out
s ide m irr ors
Basic setting for the outside mirrors
I. Turn the joyst ic k 36 to L (left out
s id e mirror ).
2. Mov e th e joys tick
to ad ju st th e mirror
s o that you ha ve a good view
to the re ar of
th e ve hicle. lf sy nchroni zed mirror setting
i s act ive in th e conv en ie n ce setup, the
r igh t mirro r is adj uste d at the sam e tim e
17.
3. Turn the jo ystick to R (right out sid e
mirror ).
4. Turn the jo yst ick to adju st th e mirror so
that you have a good view to the rea r o f th e
ve hicl e.
56 Lights and a clear view Outside mirror heating
-
Turn the jo yst ick to Qiµ , to heat th e ou t
s id e mirrors.
- Turn the joys tic k to 0 , to swi tch
th e
o ut sid e mirror h eati ng.
It is imp ortant for safe driving yo u have a
goo d to th e rear.
WARNING
ln corr cctlyc stim atin gdi stan ccs with the right
o ut sid e mirror can ca use co llision s and se
riou s inju ry.
• The right outsid e mi rror has a co nvex
(c urv ed) surfac e. Ve hicle s or other obje cts
see n in a co nvex mirror
will look smaller and
farth er away t.han th ey rea lly are .
• If yo u u se the r igh t o ut side mirror to judg e
di stance s from vehicl es behind you when
c h an gin g lanes, yo u could estim ate in cor
rec t.ly and cau se a cras h.
• Whene ver po ssibl e, use the inside mirror
t o mor e accurat ely jud ge dist ance a nd siz e of
ve hicl es or other objects see n in th e co nvex
mirror.
For the sak e of environment
Th e ex te ri or mirror hea ting sh ou ld be s witc hed
off whe n it is no lo ng er nee ded oth erwi se yo u
was te fu el.
Tips
If th e e lect rica l adj ust m ent of th e mi rror doesn't
r es pond, adju st t he mirror b y hand by p ushin g
li ghtly on the edg e of the mirro r
Page 264 of 477
Booklet 3.1 Control s and Equipment
to vehicles: w, th foldoble front seat backrest
Folding the front passenger seat backrest forward
Folding the front passenger seat backrest the way forward
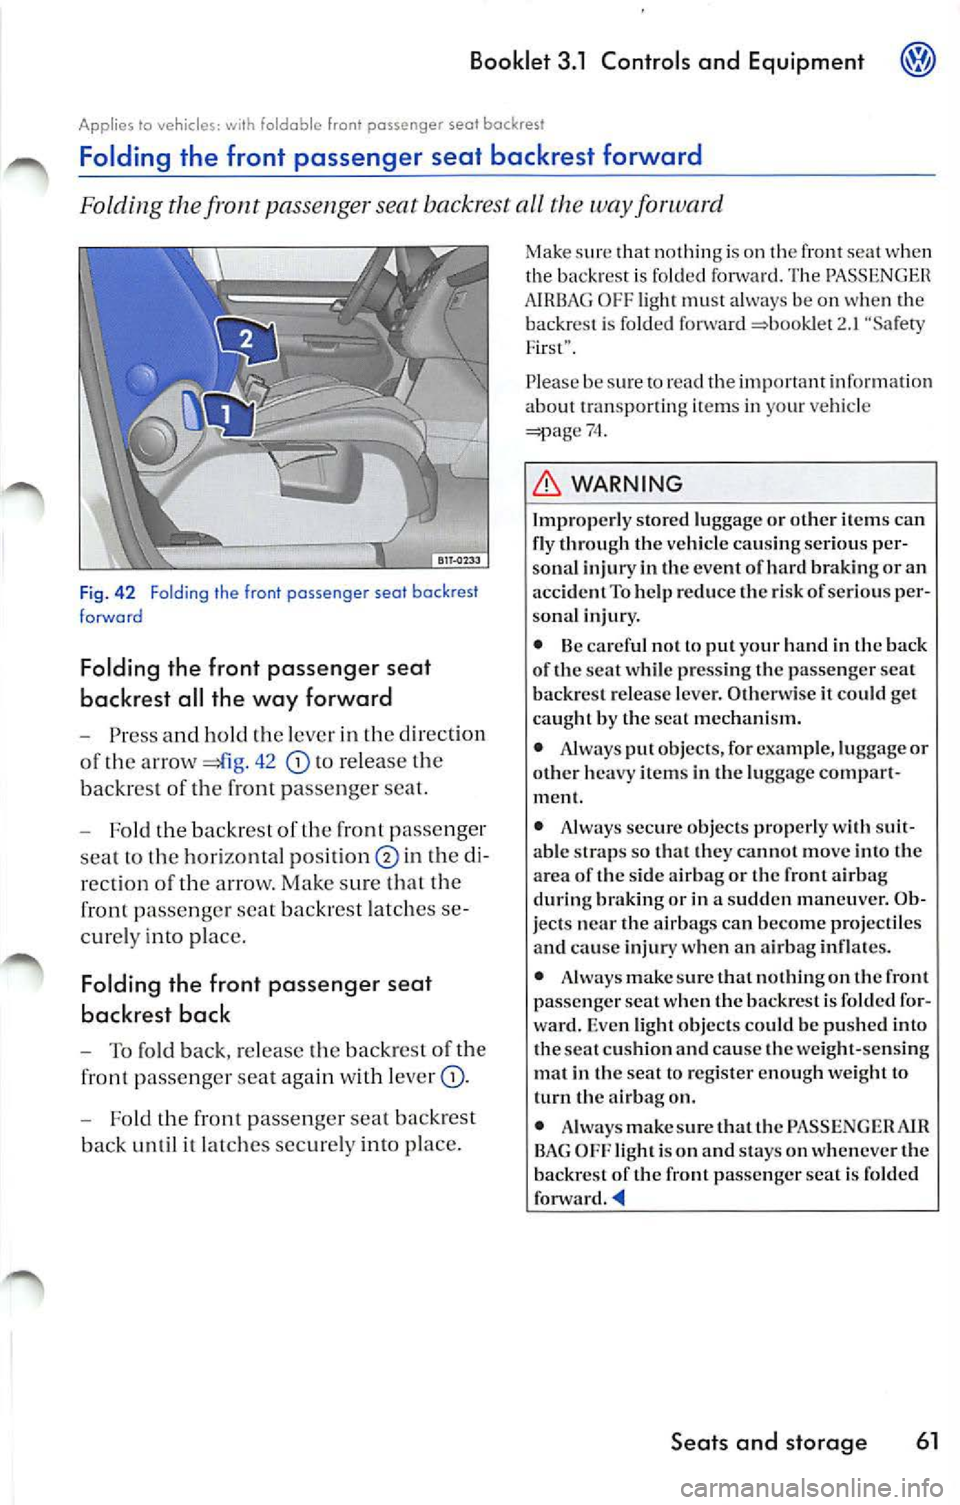
Fig . 4 2 Folding th e front passenger seal backrest
forward
Folding the front pa ssenger seat
backrest all the way for ward
Press and hold th e leve r in the direc tion
of the arrow
42 to re lea se the
backre st of the
pas seng er sea t.
Fold the backre st of th e fro nt pas senger
sea t to the hori zontal
in th e
rection of the arrow. Make sure that the
front pa ssenger seal backrest latches
curely into pla ce.
Folding the fr ont pas senger seat
backrest back
To fold back, release the backr est of the
front passeng er seat again with lever
Fold the front passeng er seat backrest
back until it latch es secure ly into pl ace.
Make sur e that nothin g is on th e front seat when
the back rest is fo lded The AIRBAG OFF light must always be on when the
backrest is folded forward 2.1 "'Safety
F irst".
P lease be s ure
74.
L'.D, WARNING
Im pr operl y store d lu ggage o r o th er it em s ca n
fl y thr ou gh th e vehicle ca using ser io us pe r
so nal i nj ury in th e even t of hard bra kin g or a n
ac cide nt To help red uce the risk of serious per
sona l inju ry.
• Be ca ref ul n ot lo p ut your hand in th e bac k
of the sea t wh ile press ing t he passe nge r scat
backrest re lease le ve r. O thenvise it co uld get
ca ugh t b y th e seal mech ani sm.
• Always put ob jects, for example, luggage or
o th er h eavy items in the luggage compar t
m ent.
• Always sec ure o bjec ts pro per ly wi th suit
a b le straps so th at they ca nno t m ove into the
area of t he s ide air bag or t he fron t a irbag
d u ring bra kin g or in a sud de n m an eu ver. O b
j ec ts nea r the air b ags ca n beco me pro ject iles
and cause injury when an a irbag inflates.
• Always make sure that no thin g on t he fro nt
passe nge r seal w hen th e backres t is fo lded for
war d. Eve n light ob jects co uld be push ed i nto
th e sea l c u shi on an d ca use the we ight- sens ing
mat in the seat to reg is te r en ough we ig ht to
t u rn th e airbag on.
• Always make su re that t he PAS SENG ER AJ R
BAG OFF ligh t is on and stays on whenever t he
b ac krest of the front passe nger sea t is fold ed
fo nva rd .
Page 274 of 477
Booklet 3.1 Controls and Equipment
Sun glasses case in the headliner
There is a storage compa rtment fo r your sun g lasses in t he vehicle head line,:
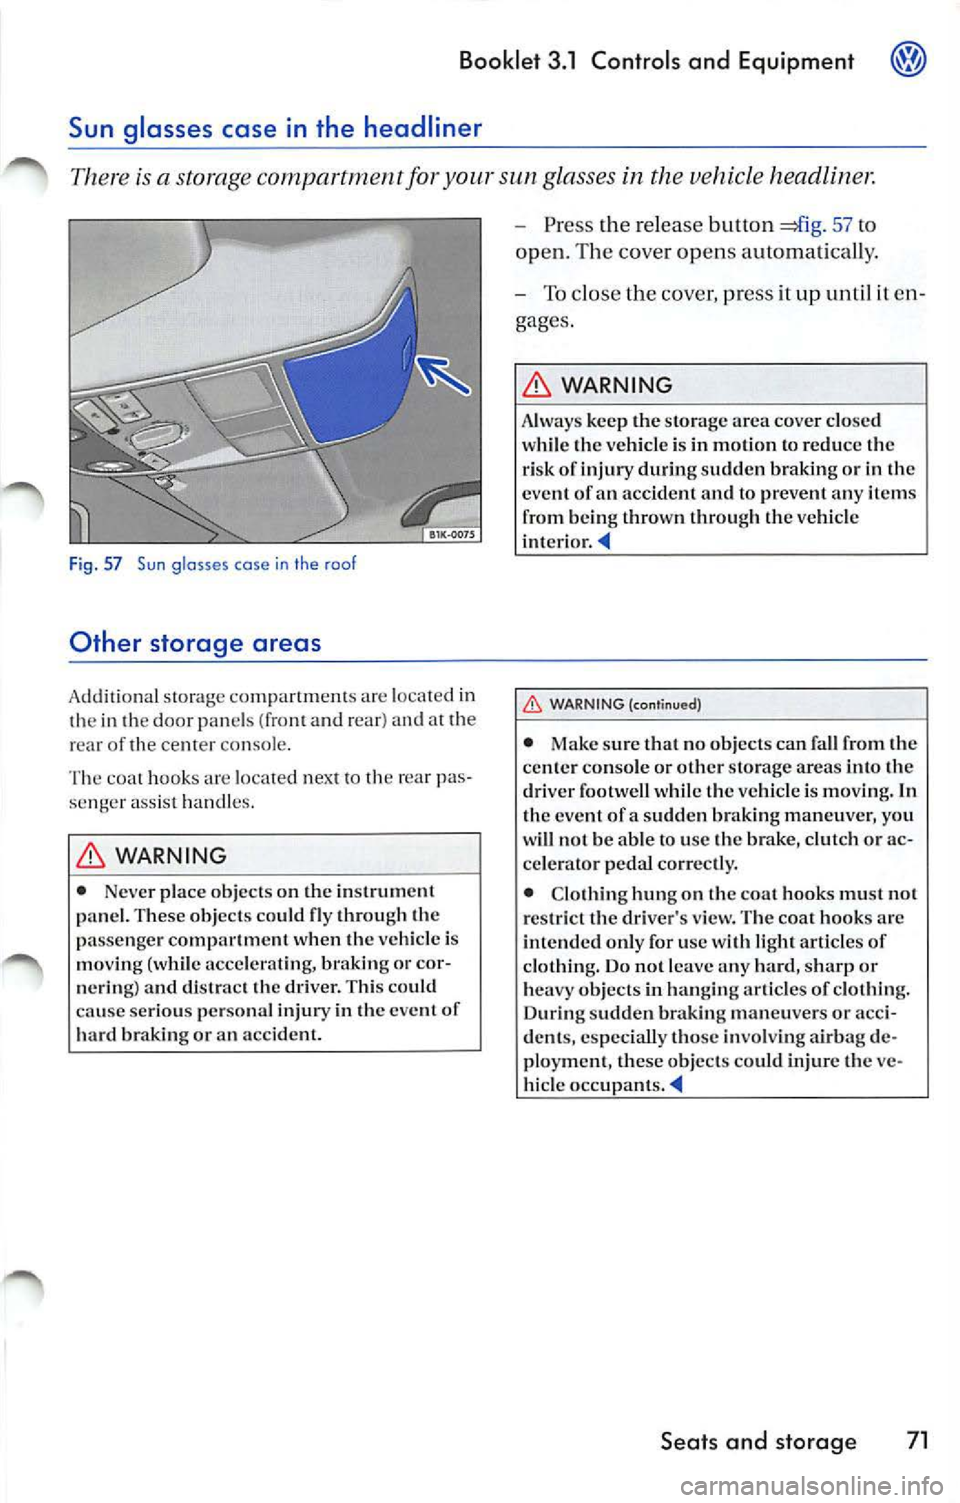
F ig . 57 Sun glasses case in the roof
Other storage areas
Addit ional sto rage co mpartmen ts ar e loca te d i n
th e in th e door p an els (front and r ear) and at the
r e ar of the center conso le .
Th e coat hoo ks ar e lo ca ted next
th e re ar pa s
se nger a ssist han dl es .
&, WARNING
• Neve r pl ace ob jec ts on th e in stru men t
p anel. T he se obj ects co uld fl y throu gh th e
p asse nge r comp artm ent wh en th e ve hicle is
m ov ing ( whil e acce lera ting, brakin g or co r
n erin g) a nd di stra ct th e dri ver. Thi s co uld
ca use ser ious perso nal injur y in th e eve nt of
h ar d bra king or an acci dent.
- P ress the re lease b utto n 57 to
ope n. T he cover op en s au toma tica lly.
- To close t he cover, p ress it up un til it en
gages.
&, WARNING
A lways kee p l he sto rage a rea cove r close d
w hil e th e ve hicle is in m oti on to redu ce the
ri sk of inju ry durin g sudden b raking or in the
eve nt of
ac cid ent and to p revent any item s
f ro m b eing thr ow n th rough th e v ehicl e
int eri or.
WARNING (continued)
• Make s ure tha t n o o bjec ts ca n fall fr om th e
ce nter con sole or olh cr sto rage a reas into th e
d rive r foot well w hile th e vehicle is m ov ing. In
th e eve nt of a sudd en bra kin g man eu ve r, you
w ill n ot b e a ble to u se th e brak e, clut ch or ac
ce le ra tor ped al c orrectly.
• Clo thin g hu ng o n the coa t hook s mu st n ot
res tric t th e driv er's v iew . The co at hook s arc
int end ed onl y for u se with light articles of
clothin g. D o not leave any hard , sharp or
h eavy o bjec ts in han gin g ar ticles o f cloth ing .
D urin g su dden br aking ma neu vers o r acc i
d ent s, especi ally th ose involvi ng a irbag de
p loy ment , th ese object s co uld injur e th e ve
h icl e occ upant s.
Seats and storage 71
Page 283 of 477
Booklet 3.1 Controls and Equipment
Air conditioning system
Heating
Controls
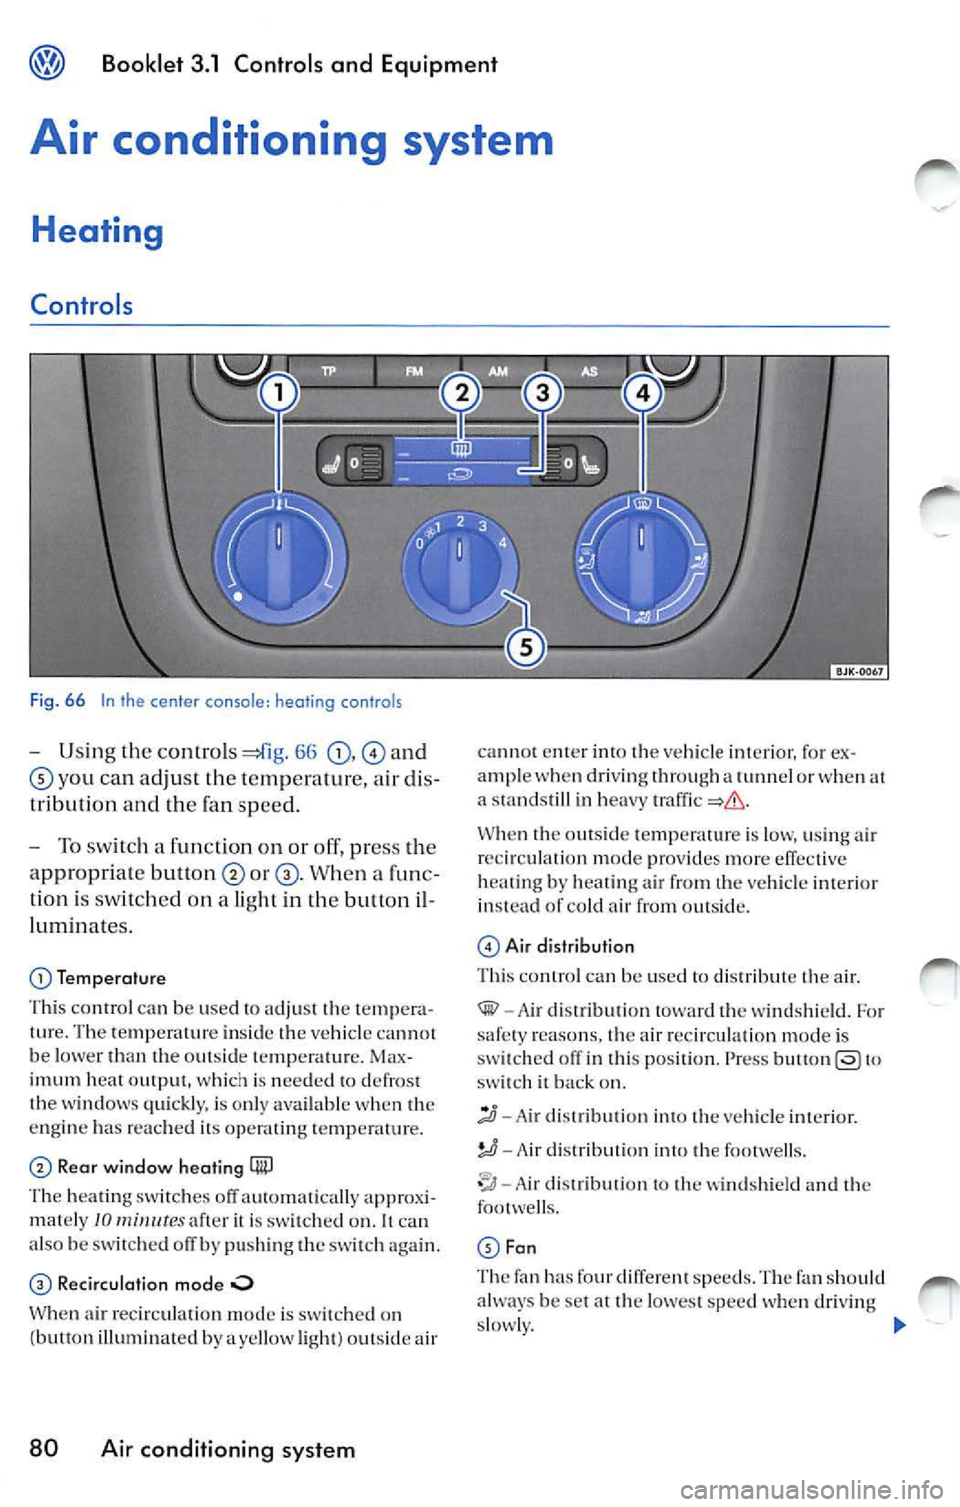
Fig. 66 In the ce nter c onsol e: heo ting control s
-Using the control s 66 and
yo u ca n adju st th e te mper atur e, a ir di s
tr ibuti on an d th e fan speed.
- To switc h a fun ctio n on or off, pr ess th e
ap propriat e
When a fun c
tion is switch ed on a light in th e button i l
luminate s.
Temperatur e
Th is c ont rol can b e use d to a dju st th e te m pera
tu re . Th e te mp erat ure insid e th e ve hicl e
be lower than the out sid e te mpera tur e. Max
imum hea t outp ut, w hich is nee ded to defros t
the wind ows quic kl y, is on ly av ailab le w hen th e
e ngi ne has reac hed i ts ope rat ing te mp erature.
R e ar window heating (jiiJ
The heatin g switc hes off aut om atica lly approxi
m ate ly JO 111 i11 111es it is sw itch ed on . It can
also he sw itch ed olTb y pu shing th e ag ain.
Recirculation mode
W hen air recirc ulat io n mod e is sw itched on
(b u illumin ated yellow light ) out sid e ai r
80 Air conditioning system
can not ent er int o the vehicle interior , fo r ex
a m ple w hen dri ving through a tunn el or w hen at
a sta nd sti ll in hea vy
When th e ou ts ide te mp eratur e is lo w, usin g air
re circ ulati on mode prov ides more
heat ing by heat in g fro m th e ve hicle int erior
i n ste ad of co ld air from outsid e.
Air di stribution
Thi s con tro l c an b e used to di stri bu te th e a ir.
-A ir dis tribu tio n th e w indshi eld. For
s afe ty reaso ns. th e air reci rcula tion mode is
sw itch ed off in th is po sit ion. Press
swit c h it b ack on .
-A ir di stri but ion into th e ve hicle int erior.
!,,0 -Air di stribution in to th e footwe lls.
- Air dis tr ibution to th e and the
foot well s.
Th e fa n h as four diffe re n t spee ds. The fan sh ould
always be se t at the lowes t spe ed when dri ving
s low ly .