Page 339 of 516
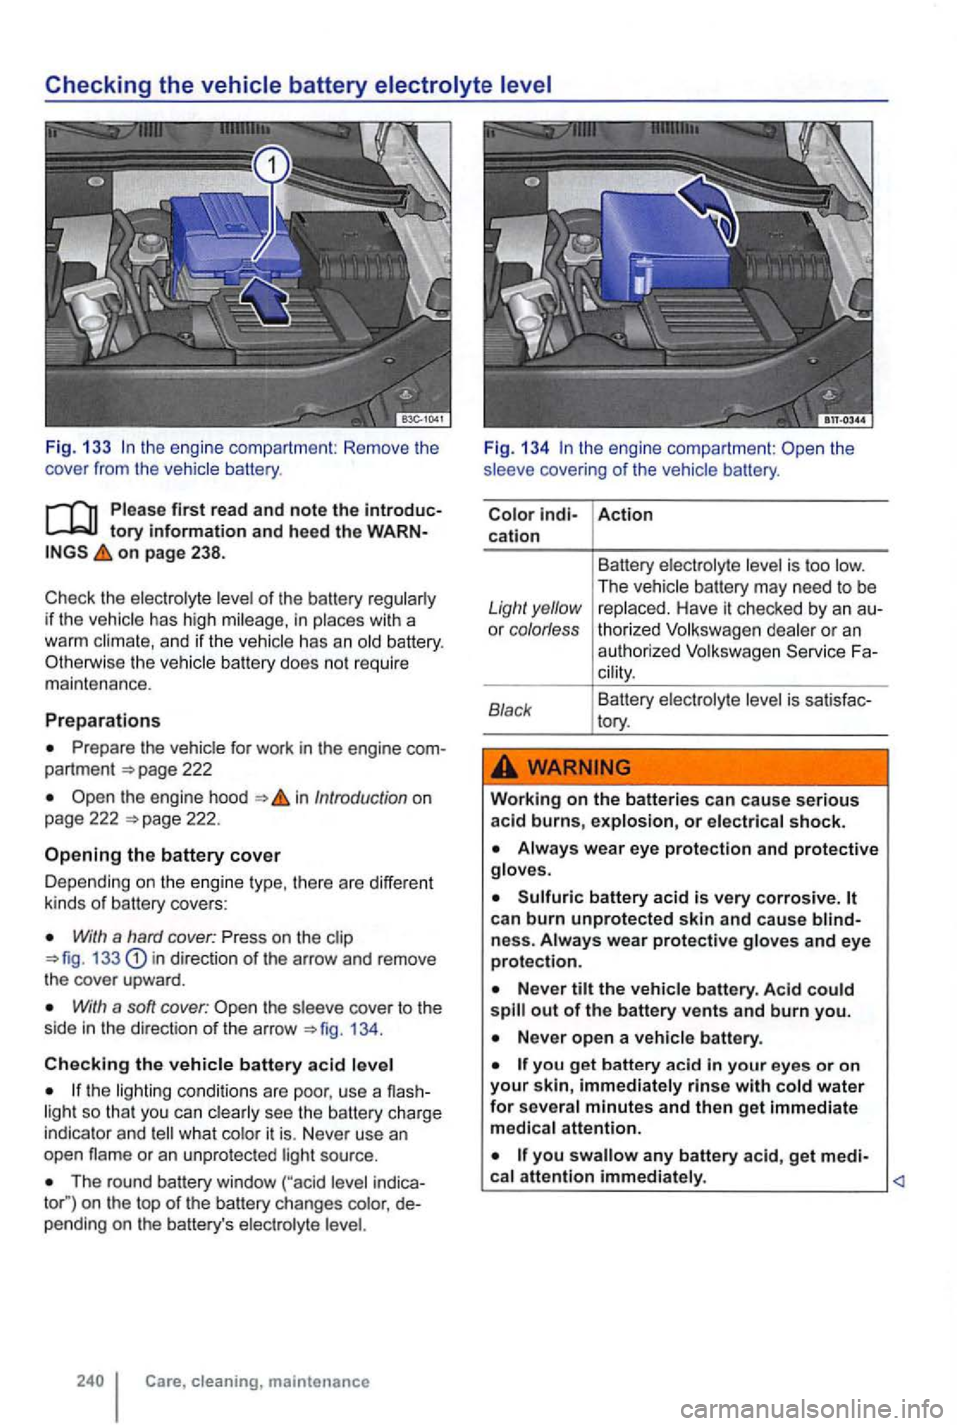
Fig. 133 the engi ne compartment: Remove the
cover from the vehicle battery.
first read and note the tory information and heed the on page 238.
of the battery if th e vehicle has high in with a
warm a nd if the vehicle has an
Prepare the for work in the engine pa rtm ent 222
the engine hood in Introduction on
page 222
With a hard cover: Press on the 133 in direct ion of t h e arrow and remove the cove r upwa rd.
W ith a son cover: the cove r to the
side in th e direction of the arrow 1 34 .
Checking the vehicle battery acid
the lighting co nd it ions are poo r, use a so tha t you can see the ba ttery charge
indica tor and
The rou nd batt ery window on th e top of the battery ch anges
Care, cleaning, maintenance Fi
g. 134
cove ring of the vehic le battery .
Action cation
Battery
is too The vehicle battery may need to be Light yellow replaced. Have it chec ked by an or colorless thorized Volkswagen or an a uthor ized Volksw ag en
is sa tisfac-
tory.
Working on the batteries can cause serious acid burns, explosion, or
can burn unprotec te d skin and cause ne ss. and eye protection.
Never out of th e battery vents a nd burn you.
Never open a vehi cle battery .
you get battery acid in your eyes or on your skin, immediately rinse with water for several minutes and t hen ge t immediate
medical attention.
you any battery acid, get medi-
Page 340 of 516
Charging,
on page 238.
Charging the vehicle battery
Vehicle batteries should be charged by an author
ized Volkswagen dealer or an authorized Volkswa
gen
because the factory -installed
battery requires a charger with overload protection
Replacing the vehicle battery
The battery in your vehicle is
batteries meet
ing standards TL 825
electrical system, note the following :
off
Unlock the vehicle before disconnecting the
battery; otherwise the alarm system
Fir st disconnect the negativ e cable(-) and then the positive
Connecting the vehicle battery
Pr ior to reconnecting the battery , switch off electrical sys tems and devices and the ignition .
Connect the posit ive cable(+) first and then the
negative cable (-)
After the battery is connected and the ignition is
sw itched on, different indicator light s may come on. They should go out after you drive a short distance
ice Facility and have the checked.
th e ign ition not start after reconnecting the vehicle battery , lock the vehic le from the outside
and unlock it again. Then try to start the ignition
again.
lhe ignition cannot be switched on, con
tact an authorized Volkswagen dealer, an author
ized Volkswagen
o r another quali
fied workshop for assistance.
Automatic electrical load deactivation
onboard electrical system management auto mati takes steps to help prevent battery drain.
The idle speed is increa sed so that the alterna
t o r provides more power.
Th e power to devices that consume a lot of electricity is cut back or switched off completely.
When the engine is started, the power supply to the 12
Long periods when the engine is not running,
especially when the ignition is on .
Using electr ical sys tems or devices when the
engine is swi tched off. Leaving the
The selecto r lever is left for a long period of time in any position other than P when the ignition
is swi tched off =>page 175.
Failure to use th e proper battery with proper mounting and connection s may cause short circu its, fires, and serious persona l injuries.
Always use only maintenance-free or cy-
cle-free, leak-proof batteries with the sa me
s p ec ifications and dimensions as the original
equipment b attery. Specifications are listed
on the battery housing.
Wh en the vehicle battery is ch arged, it produ-
ces highly explosive hydroge n gas.
th e engine compartment
Page 341 of 516
Never disconnect the vehicle battery when
th e ignition switched on or the engine is running, as the electrical system or electronic components can be damaged .
socket in order to charge the vehicle
batt ery . This can damage the vehicle's electri
cal
syst e m .
Dispose of the battery according to regulations . batteries contain poison
ous substa nces such as sulfuric acid and lead .
Battery acid can pollute the environment. Catch leaking operating fluids and dispose of
them properly.
Page 382 of 516
Parts, accessories, repairs and modifications
this section find information about:
Break-in period ..
..... .
283
Parts and accesso ries . . . . . . . . . . 284
Operating fluids and equipment . . . 284
Repairs and technical modifications . . . . . . . . 285
Repairs and other things that can affect
Advanced Airbag performance . . . . . . 285
radio equipment . . . . . . . . . . . . . . . . . . . . . 287
Notice about data recorded by vehicle control
modules . . . . . . . . . . . . 287
a phone in a motor vehicle
when it is not connected to the
telephone antenna -some importa nt things to
know .................................. 288
Lift points for the vehicle . . . . . . . . . . . 289
More information:
69
Airbag system
towing
12 163
Braking , stoppi ng and parkin g 179
assistance systems 195
control system 197
Pressure Monitoring
Preparations for working in the eng ine compart
ment page 222
Engine
Engine coolant 233
Vehicle battery 238
243
on page 283.
Not e
requirements for breaking in new
parts .
Cons umer information
booklet Radio
Navigation system
Package
Inappropriate spare parts and accesso ries as
Breaking in a new engine
A new engine must be (1
Vehicle care and maintenanc e 283
Page 396 of 516
Do it
Practical tips
you suspect a ma lfunction or the Facility. addition,
the keyword entries cons ide rations " or may
Description r e m edy
e rs
too 214.
- Battery in the remo te
-the battery in the remote con-
trot
t o using - Synchronize -Buttons pressed outside oper-
-Lock or
entry in the index .
Assistance systems activated. Check the "Assi stance systems " entry in the index. driving behavior Direct Gearbox too
is unl ocked.
Front seats cannot
be ad-238.
justed wi
th power Fuse if necessary 317.
Features do not work as de-
Volkswagen 24.
- Have the
the road as they
Charge
consumers do not Remaining too
3
17 .
tip s 297
Page 399 of 516
up a warning triangle or other warning device in order to alert other motorists and cyclists.
9. Let the engine cool down and get expert assistance if necessary .
are on, use the turn
Traffic suddenly slows down or stops in front of you to warn those approach ing from behind .
any emergency situation.
When being towed.
Always obey traffic laws that govern the use of
emergency
the emergency are not working, a
Disregarding the safety-related checklist may
lead to accidents and serious personal ries.
accepted safety practices and use common sense.
Do it yourself
The vehicle exhaust system and the catalytic converter get very hot. They can cause fires and serious personal injury.
The vehicle battery be drained if the emergency flashers are on for a long time -
even if the ignition is switched off.
Page 426 of 516
Jump-starting
this sect ion find inform atio n about:
U sing jum per cables . . . . . . . . . . . . . . . . . . . . . 328
your eng ine does not start because the
the battery acid
l evel indicator window on the vehicle battery before
jump -starting
with gasoline engines , the cross -sec tion of the jumper
cable wire must be at least
assistance systems 195
Prepara tions for worki ng i n the engine compa rt
ment 222
Vehicle battery
Working on the batterie s or the electrical syste m in your vehicle can cause serious acid burns, fires , or electrical shock.
Never lean over a vehicl e battery. Always
w ea r protective gloves and eye protection. To
r educe your risk o f injury, never tilt the bat
t e rie s; acid could spill out through the vents and burn you.
A highly explosive mixture of gases is give n off when the battery being charged.
you an y battery acid,
g et medical attention immediately .
work on the batterie s or the e lectrica l system in your vehicle can cause serious acid burns, fires, or electrical shocks. Always
read and heed the
Never jump-start a vehicle with a t hawed or frozen vehicle battery. The battery can explode. A d ead battery can freeze at tempera
tures around +32
A batt ery that is frozen or was frozen , but has since thawed, must be replaced.
Wh en the vehicle battery is jump-s ta rted ,
i t give s off hydrogen gas, which is highly ex
plosive! Always keep fire, s park s, open flame,
an d smoking mater ials far aw ay from vehicle batteries. Neve r use a telephon e while connecting or disconnecting jumper ca
bl es.
Practica l tips
Page 427 of 516
{continued)
the non-insulated parts of the
battery clamps to touch.
the jumper cable attached to the positive battery terminal to contact metal parts of the vehicle.
Using jumper cables
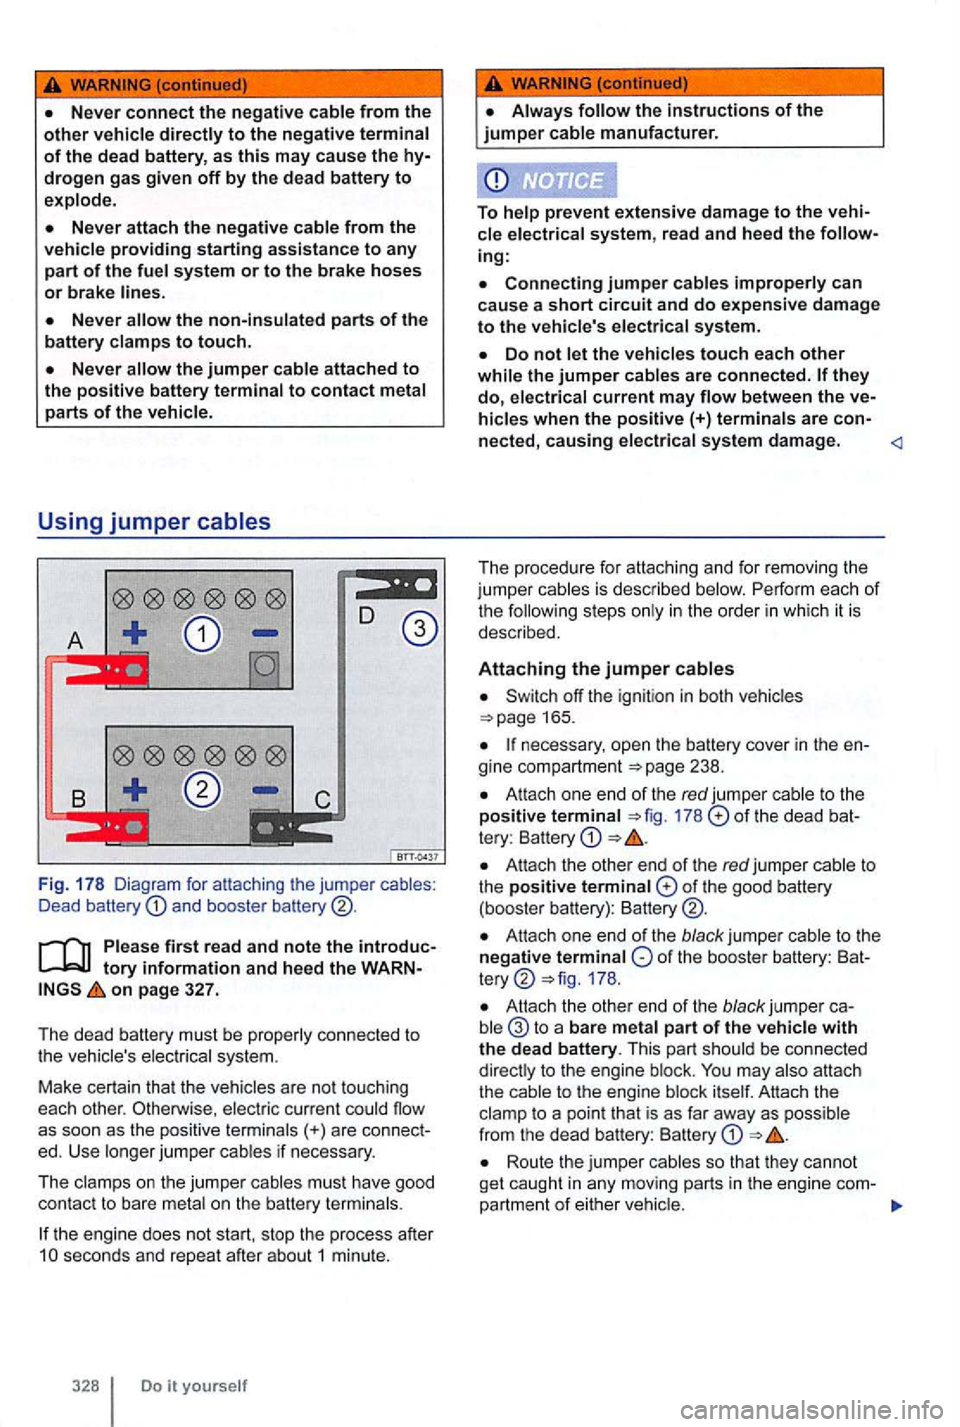
Fig . 17 8 Diagram for attaching the jumper cables:
Dead battery and booste r
on page 327.
The dead battery must be properly connected to
the vehicle's electr ical system .
Make ce
rtain tha t the vehicles are not touchi ng
each other. Otherwise , electric curr ent could flow
as soo n as the positive terminal
s(+) are connec t
ed. Use longer jumper cables if necessary .
Th e clamps on the jumper cables must have good
con tac t to bare metal on
the battery termina ls.
the engine does not start, stop the process after seconds and repeat after about1 minute.
cle electrical system, read and heed the
Connecting jumper cable s improperly can
ca use a short circuit and do ex pen sive dama ge to the vehicle's electrical system .
Switch off the ignition in both vehicles 165.
necessary , open the battery cover in the
At tach one end of the red jumper cable to t he
po sitive terminal 178 of the dead tery : Battery
Attach the othe r end of the red ju mper cable to the positive terminal of the good battery
(booster battery):
Atta ch one end of the black jump er of the booste r battery: 178 .
Attach the other end of the black jumper to a bare meta l part of the vehicle with the dead battery. This part shou ld be connected
dire ctly to the eng ine blo ck.
Route the jumper cables so that they cannot
ge t ca ught in any moving parts in the engine com-
partment of e ith er vehic le.