Page 535 of 672

5
When trouble arises
535
5-1. Essential information
If your vehicle needs to be towed
Before towingThe following may indicate a problem with your transmission. Contact
your Toyota dealer before towing.
● The engine is running, but the vehicle will not move.
● The vehicle makes an abnormal sound.
Emergency towing
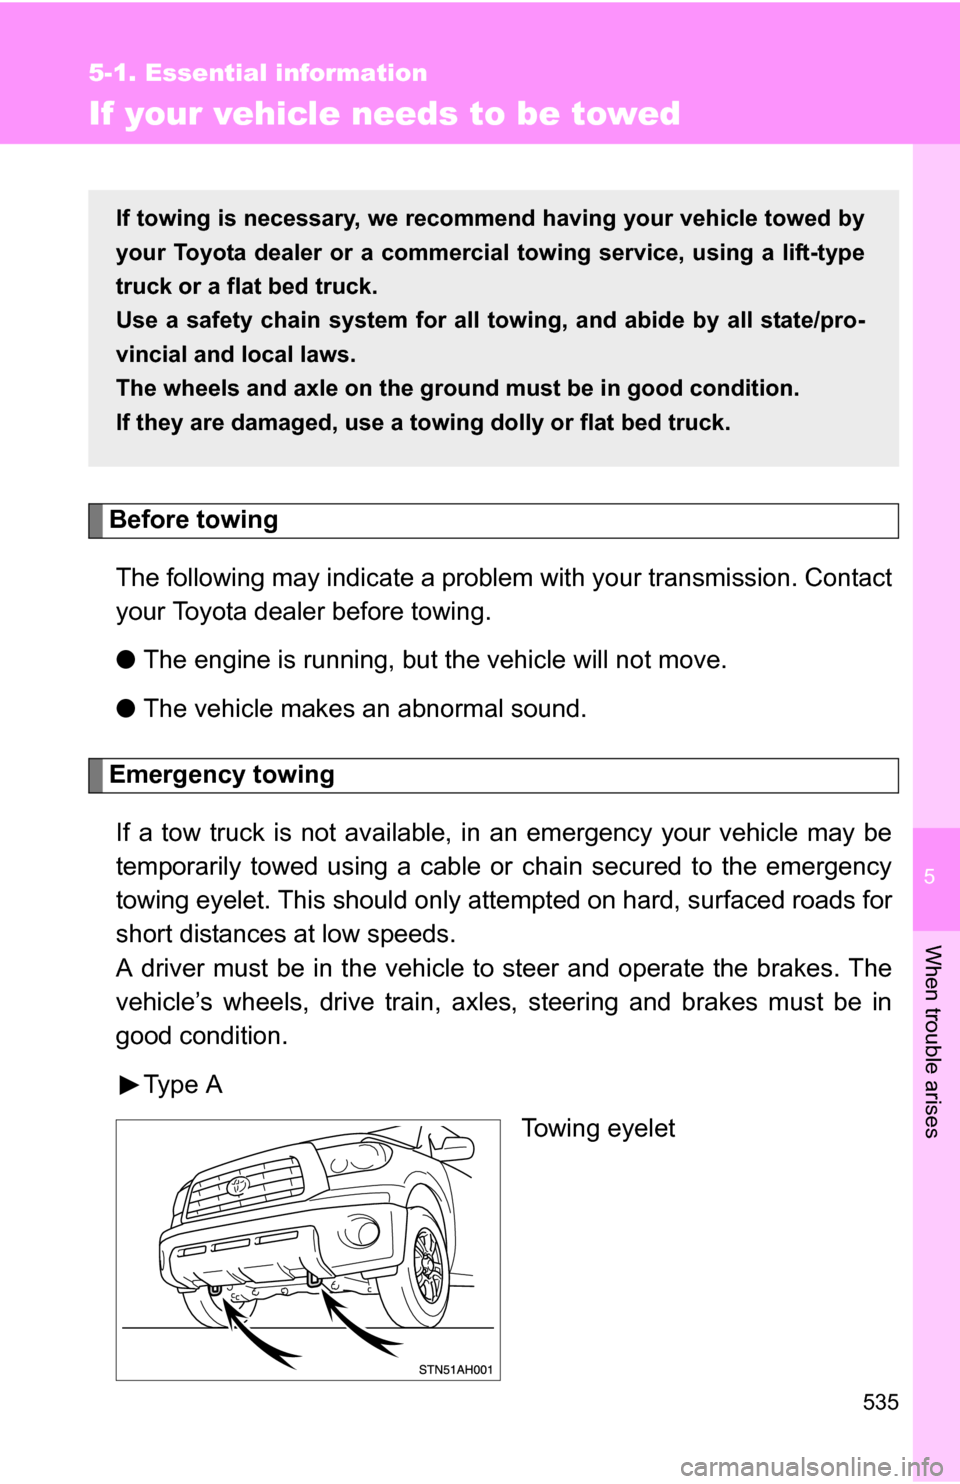
If a tow truck is not available, in an emergency your vehicle may be
temporarily towed using a cable or chain secured to the emergency
towing eyelet. This should only attempted on hard, surfaced roads for
short distances at low speeds.
A driver must be in the vehicle to steer and operate the brakes. The
vehicle’s wheels, drive train, axles, steering and brakes must be in
good condition.
Type A Towing eyelet
If towing is necessary, we recommend having your vehicle towed by
your Toyota dealer or a commerci al towing service, using a lift-type
truck or a flat bed truck.
Use a safety chain system for all to wing, and abide by all state/pro-
vincial and local laws.
The wheels and axle on the groun d must be in good condition.
If they are damaged, use a towing dolly or flat bed truck.
Page 537 of 672
5
When trouble arises
537
5-1. Essential information
Towing with a sling-type truck
NOTICE
■
To prevent causing serious da mage to the transmission
Never tow this vehicle from the rear with the four wheels on the ground.
This may cause serious damage to the transmission.
■ Emergency towing eyelet precautions
● Before emergency towing, check that the eyelet is not broken or damaged
and that the installation bolts are not loose.
● Fasten the towing cable or chain securely to the eyelet.
● Do not jerk the eyelet. Apply steady and even force.
● To avoid damaging the eyelet, do not pull from the side or at a vertical
angle. Always pull straight ahead.
NOTICE
■To prevent body damage
Do not tow with a sling-type truck, either from the front or rear.
Page 549 of 672

5
When trouble arises
549
5-2. Steps to take in an emergency
*1: Open door warning buzzer:
The buzzer sounds to indicate that any door is opened (with the vehicle hav-
ing reached a speed of 3 mph [5 km/h])
*2: Driver’s seat belt reminder:
The driver’s seat belt reminder sounds to alert the driver that his or her seat
belt is not fastened. Once the engine switch is turned to the ON or START
position, the buzzer sounds for 6 seconds. If the vehicle has reached a
speed of at least 12 mph (20 km/h), the buzzer sounds intermittently for 10
seconds. Then, if the seat belt is still unfastened, the buzzer will sound in a
different tone for 20 more seconds.
*3: Front passenger’s seat belt reminder:
The front passenger’s seat belt reminder sounds to alert the right front pas-
senger that his or her seat belt is not fastened. The buzzer sounds intermit-
tently for 10 seconds after the vehicle has reached a speed of at least 12
mph (20 km/h). Then, if the seat belt is still unfastened, the buzzer will sound
in a different tone for 20 more seconds.
*4: Vehicles without multi-information display
*5: Vehicles with multi-information display
■ Four-wheel drive system warning buzzer
The buzzer indicated that the transfer mode is not selected correctly.
■ Key reminder buzzer
The buzzer indicates that the key has not been removed (with the engine
switch in the ACC or LOCK position and the driver’s door opened).
■ Open moon roof reminder buzzer
The buzzer indicate that the moon roof is still opened (with the engine switch
in the ACC or LOCK position and the driver’s door opened).
■ If the malfunction indicator lamp comes on while driving
First check the following:
● Is your vehicle low on gas?
If it is, refuel the vehicle immediately.
● Is the fuel tank cap loose?
If it is, tighten it securely.
Page 571 of 672

5
When trouble arises
571
5-2. Steps to take in an emergency
Stowing the flat tire, jack and all tools
Remove the center wheel ornament by pushing from thereverse side.
Lay down the tire with the outer side facing up, and install the
holding bracket.
Then secure the tire, taking care that the tire goes straight up
without catching on any other part, to prevent it from flying for-
ward during a collision or sudden braking.
Keep winding until three clicks are heard.
Stow the tools and jack securely.
■After completing the tire change
The tire pressure warning system must be reset. (P. 495)
■When using the temporary spare tire
As the temporary spare tire is not equipped with the tire pressure warn-
ing valve and transmitter, low inflation pressure of the spare tire will not
be warned. Also, if you replace the temporary spare tire after the tire
pressure warning light comes on, the light remains on.
CAUTION
■Using the jack
Improper use of the jack may lead to death or injuries due to the vehicle
suddenly falling off the jack.
●Do not use the jack for any purpose other than replacing tires or install-
ing and removing tire chains.
●Only use the jack that comes with this vehicle for replacing a flat tire.
Do not use it on other vehicles, an d do not use other jacks for replac-
ing tires on this vehicle.
●Always check that the jack is securely set to the jack point.
●Do not put any part of your body under the vehicle supported by a jack.
●Do not start or run the engine while your vehicle is supported by the
jack.
Page 572 of 672

572 5-2. Steps to take in an emergency
CAUTION
■Using the jack
●Do not raise the vehicle while someone is in it.
●When raising the vehicle, do not put an object on or under the jack.
●Do not raise the vehicle to a hei ght greater than that required to
replace the tire.
●Use a jack stand if it is necessary to get under the vehicle.
Take particular care when lowering the vehicle to ensure that no one
working on or near the vehicle will be injured.
■Using the jack handle
Insert the square head securely until you hear a click to prevent the
extension parts from coming apart unexpectedly.
■Replacing a flat tire
Observe the following precautions to reduce the risk of death or serious
injury.
●Retighten the wheel nuts within 100 m iles (160 km) of driving. Other-
wise, the nuts may loosen and the wheels may fall off, which could
cause a serious accident.
●Lower the spare tire completely to the ground before removing it from
under the vehicle.
●Do not try to remove the wheel ornament by hand. Take due care in
handling the ornament to avoid unexpected personal injury.
●Never use oil or grease on the wheel bolts or wheel nuts.
The oil or grease can cause the wheel nuts to loosen, causing a seri-
ous accident. Remove any oil or grease on the wheel bolts or wheel
nuts.
●Have the wheel nuts tightened with a torque wrench as soon as possi-
ble after changing wheels.
Steel wheel: 154 ft·lbf (209 N·m, 21.3 kgf·m)
Aluminum wheel: 97 ft·lbf (131 N·m, 13.4 kgf·m)
Failure to follow these precautions could cause the nuts to loosen and
the wheels may fall off, which could lead to an accident causing death
or serious injury.
Page 632 of 672
632 6-1. Specifications
*:Table 1 Occupant loading and distri bution for vehicle normal load
for various designated seating capacities
Tire related termMeaning
TreadThat portion of a tire that comes into contact
with the road
Tread ribA tread section running circumferentially
around a tire
Tread separationPulling away of the tread from the tire carcass
Treadwear
indicators(TWI)The projections within the principal grooves
designed to give a visual indication of the
degrees of wear of the tread
Wheel-holding fixtureThe fixture used to hold the wheel and tire
assembly securely during testing
Designated seating
capacity, Number of occupants Vehicle normal load,
Number of occupantsOccupant distribution in a normally loaded vehicle
2 through 422 in front
5 through 1032 in front, 1 in second seat
11 through 155
2 in front, 1 in second
seat, 1 in third seat, 1 in fourth seat
16 through 207
2 in front, 2 in second
seat, 2 in third seat, 1 in fourth seat
Page 647 of 672
647
7
For owners
Gross axle and vehicle weight ratingsSecure loose items to prevent weight shifts that could affect the bal-
ance of your vehicle. When the truck camper is loaded, drive to a
scale and weigh on the front and on the rear wheels separately to
determine axle loads. Individual ax le loads should not exceed either
of the Gross Axle Weight Ratings (GAWR). The total of the axle loads
should not exceed the Gross Vehicl e Weight Rating (GVWR). These
ratings are given on the vehicle cert ification label which is located on
the door latch post on the left side of the vehicle. ( P. 603) If weight
ratings are exceeded, move or remove items to bring all weights
below the ratings.
Gross axle weight rating Front GAWR
Rear GAWR
Gross vehicle weight rating Not exceed GVWR
Page 654 of 672
654
Abbreviation list
Abbreviation/Acronym list
ABBREVIATIONSMEANING
2WDTwo Wheel Drive
4WD Four Wheel Drive ABS Anti-Lock Brake System
ACC Accessory
AI-SHIFT Artificial Intelligence shifting ALR Automatic Locking Retractor
A-TRAC Active Traction Control
AUTO LSD Automatic Limited Slip Differential CAL Calibration
CRS Child Restraint System
ECU Electronic Control Unit
EDR Event Data Recorder ELR Emergency Locking Retractor
FFV Flexible Fuel Vehicle
GAWR Gross Axle Weight Rating
GCWR Gross Combination Weight Rating
GVWR Gross Vehicle Weight Rating I/M Emission inspection and maintenance
INFO Information
LATCH Lower Anchors and Tethers for Children LED Light Emitting DiodeLT Light truck
M + S Mud + Snow MMT Methylcy clopentadienyl Manganese Tricarbonyl
MTBE Methyl Tertiary Butyl Ether
OBD On Board Diagnostics
PWR Power