Page 167 of 672

When driving2
167
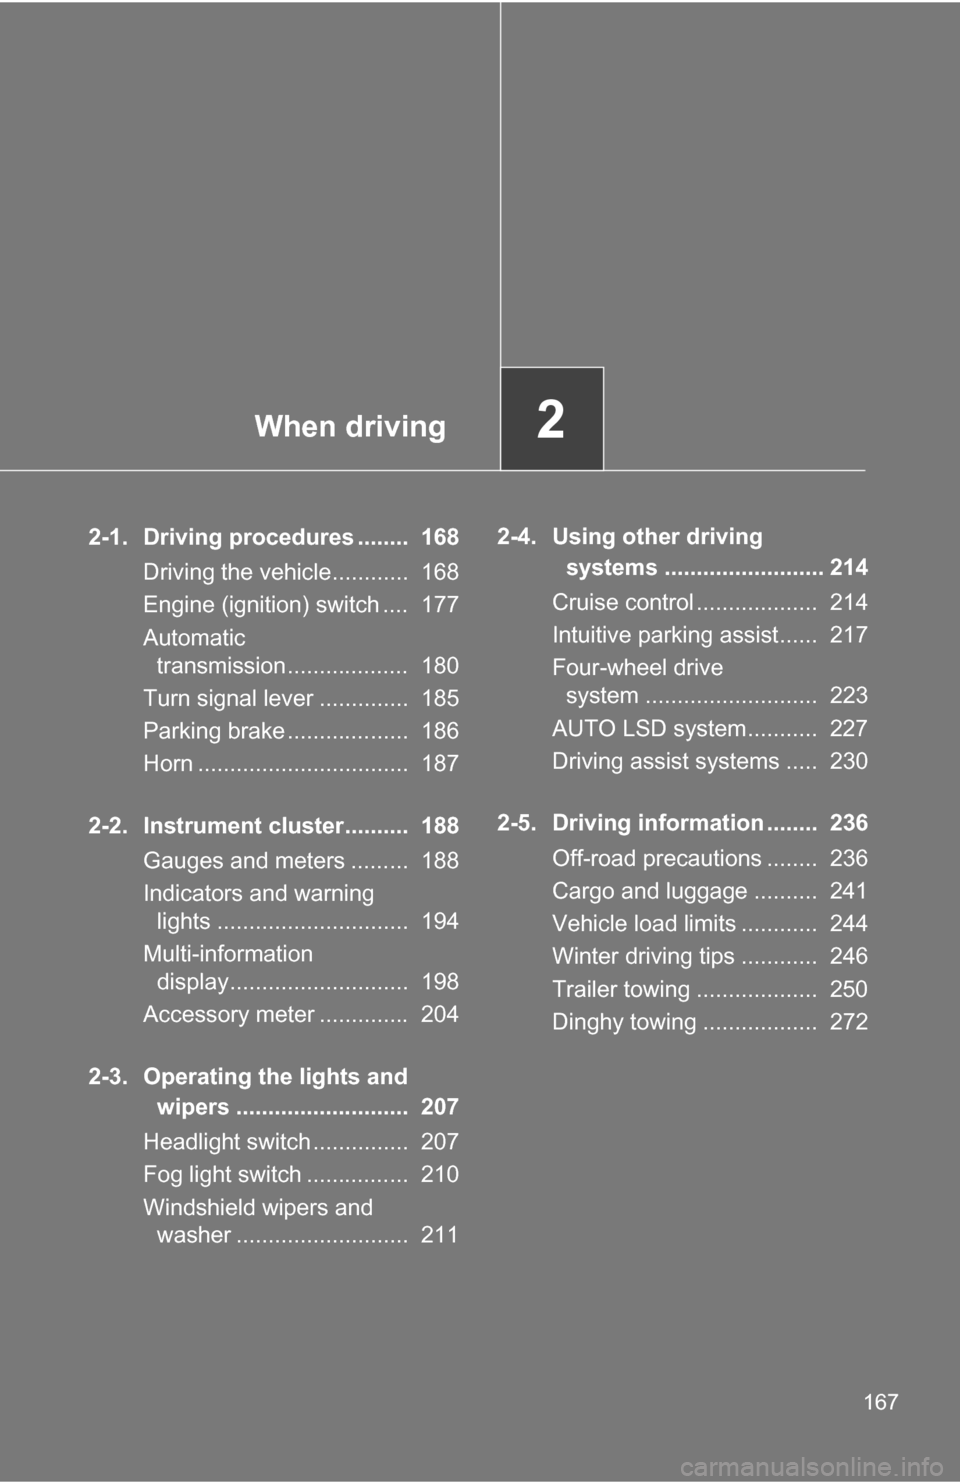
2-1. Driving procedures ........ 168Driving the vehicle............ 168
Engine (ignition) switch .... 177
Automatic transmission................... 180
Turn signal lever .............. 185
Parking brake ................... 186
Horn ................................. 187
2-2. Instrument cluster.......... 188 Gauges and meters ......... 188
Indicators and warning lights .............................. 194
Multi-information display............................ 198
Accessory meter .............. 204
2-3. Operating the lights and wipers ........................... 207
Headlight switch ............... 207
Fog light switch ................ 210
Windshield wipers and washer ........................... 211 2-4. Using other driving
systems ......................... 214
Cruise control ................... 214
Intuitive parking assist...... 217
Four-wheel drive system ........................... 223
AUTO LSD system........... 227
Driving assist systems ..... 230
2-5. Driving information ........ 236 Off-road precautions ........ 236
Cargo and luggage .......... 241
Vehicle load limits ............ 244
Winter driving tips ............ 246
Trailer towing ................... 250
Dinghy towing .................. 272
Page 210 of 672
210
2-3. Operating the lights and wipers
Fog light switch (if equipped)
■The fog lights can be turned on only when
The headlights are on low beam.
The fog lights improve visibility in difficult driving conditions, such
as in rain or fog.
OFF
ON
Page 464 of 672

464 4-1. Maintenance and care
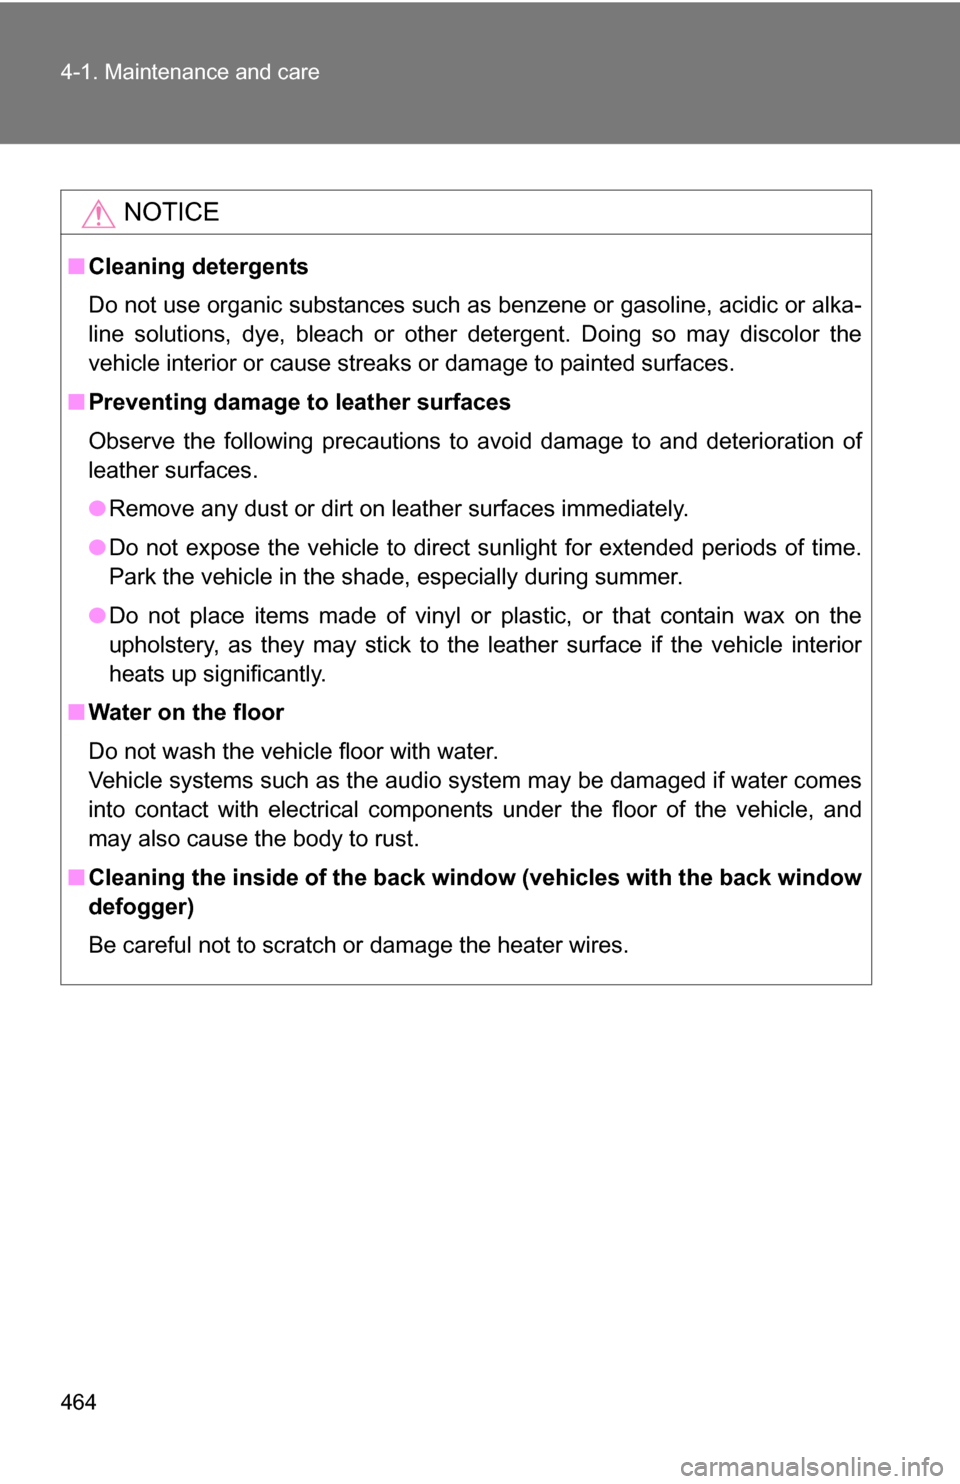
NOTICE
■Cleaning detergents
Do not use organic substances such as benzene or gasoline, acidic or alka-
line solutions, dye, bleach or other detergent. Doing so may discolor the
vehicle interior or cause streaks or damage to painted surfaces.
■ Preventing damage to leather surfaces
Observe the following precautions to avoid damage to and deterioration o\
f
leather surfaces.
●Remove any dust or dirt on leather surfaces immediately.
● Do not expose the vehicle to direct sunlight for extended periods of time.
Park the vehicle in the shade, especially during summer.
● Do not place items made of vinyl or plastic, or that contain wax on the
upholstery, as they may stick to the leather surface if the vehicle interior
heats up significantly.
■ Water on the floor
Do not wash the vehicle floor with water.
Vehicle systems such as the audio system may be damaged if water comes
into contact with electrical components under the floor of the vehicle, and
may also cause the body to rust.
■ Cleaning the inside of the back win dow (vehicles with the back window
defogger)
Be careful not to scratch or damage the heater wires.
Page 515 of 672
515
4-3. Do-it-yourself maintenance
4
Maintenance and care
Fuse layout and amperage ratings
■ Engine compartment
FuseAmpereCircuit
1 A/F 15 A Multiport fuel injection system/
sequential multiport fuel injection
system
2 HORN 10 A Horn
3 EFI NO.1 25 A Multiport fuel injection system/
sequential multiport fuel injection
system
4 IG2 MAIN 30 A INJ, MET, IGN fuses
5 DEICER 20 A Front windshield wiper de-icer
6 TOW TAIL 30 A Trailer lights (tail lights)
7 POWER NO.2 30 A Power back windows
8 FOG 15 A Front fog lights
Page 517 of 672

517
4-3. Do-it-yourself maintenance
4
Maintenance and care
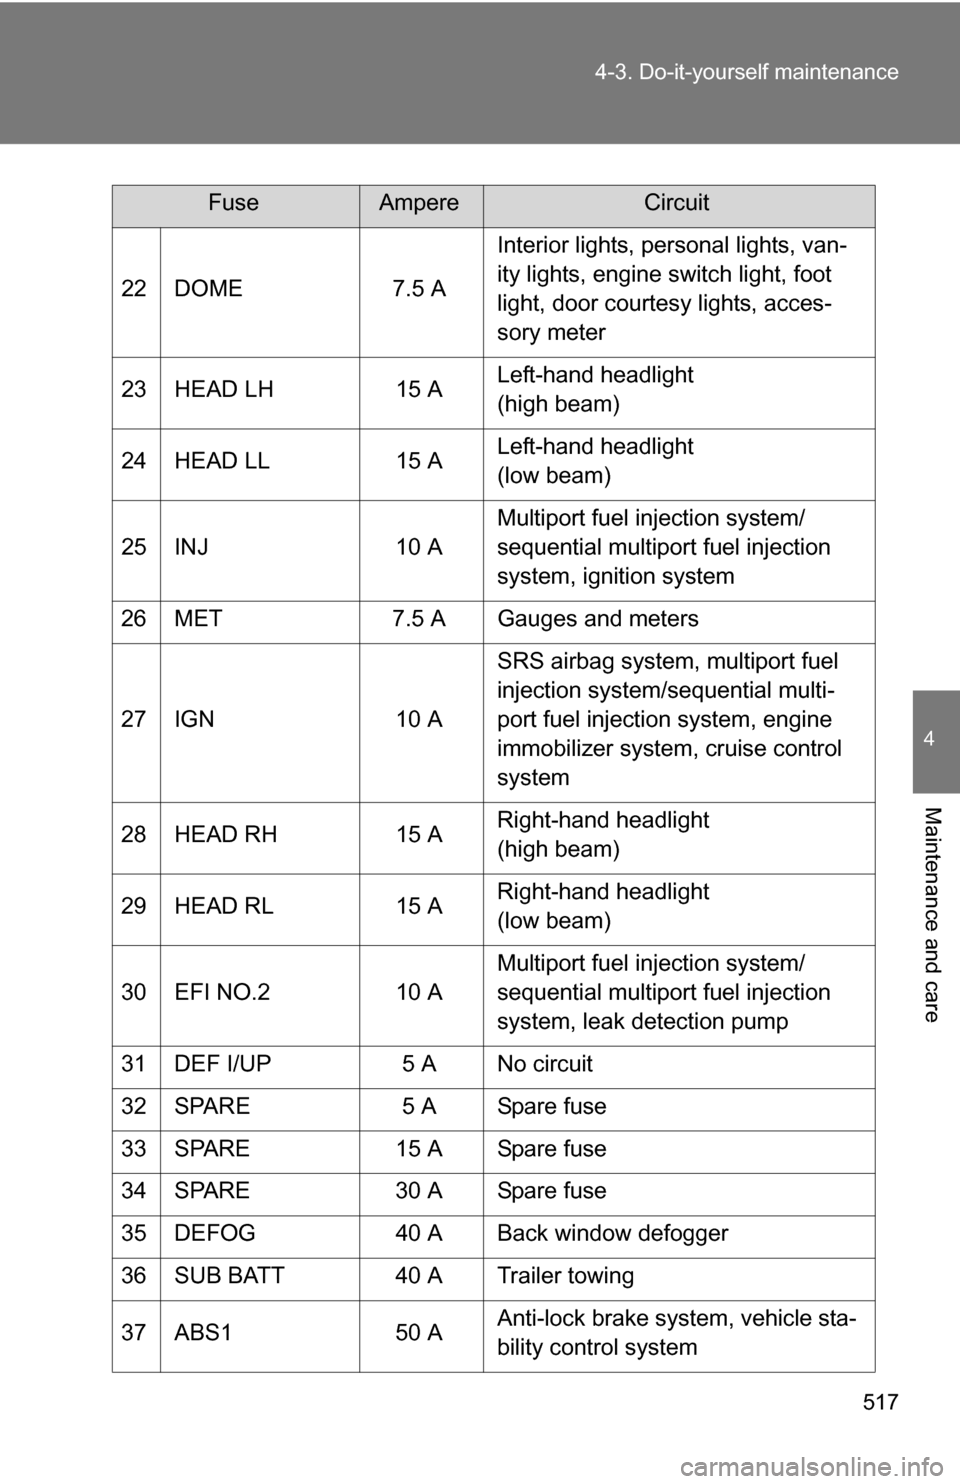
22 DOME
7.5 AInterior lights, personal lights, van-
ity lights, engine switch light, foot
light, door courtesy lights, acces-
sory meter
23 HEAD LH 15 ALeft-hand headlight
(high beam)
24 HEAD LL 15 ALeft-hand headlight
(low beam)
25 INJ 10 AMultiport fuel injection system/
sequential multiport fuel injection
system, ignition system
26 MET 7.5 A Gauges and meters
27 IGN 10 ASRS airbag system, multiport fuel
injection system/sequential multi-
port fuel injection system, engine
immobilizer system, cruise control
system
28 HEAD RH 15 ARight-hand headlight
(high beam)
29 HEAD RL 15 ARight-hand headlight
(low beam)
30 EFI NO.2 10 AMultiport fuel injection system/
sequential multiport fuel injection
system, leak detection pump
31 DEF I/UP 5 A No circuit
32 SPARE 5 A Spare fuse
33 SPARE 15 A Spare fuse
34 SPARE 30 A Spare fuse
35 DEFOG 40 A Back window defogger
36 SUB BATT 40 A Trailer towing
37 ABS1 50 AAnti-lock brake system, vehicle sta-
bility control system
FuseAmpereCircuit
Page 520 of 672

520 4-3. Do-it-yourself maintenance
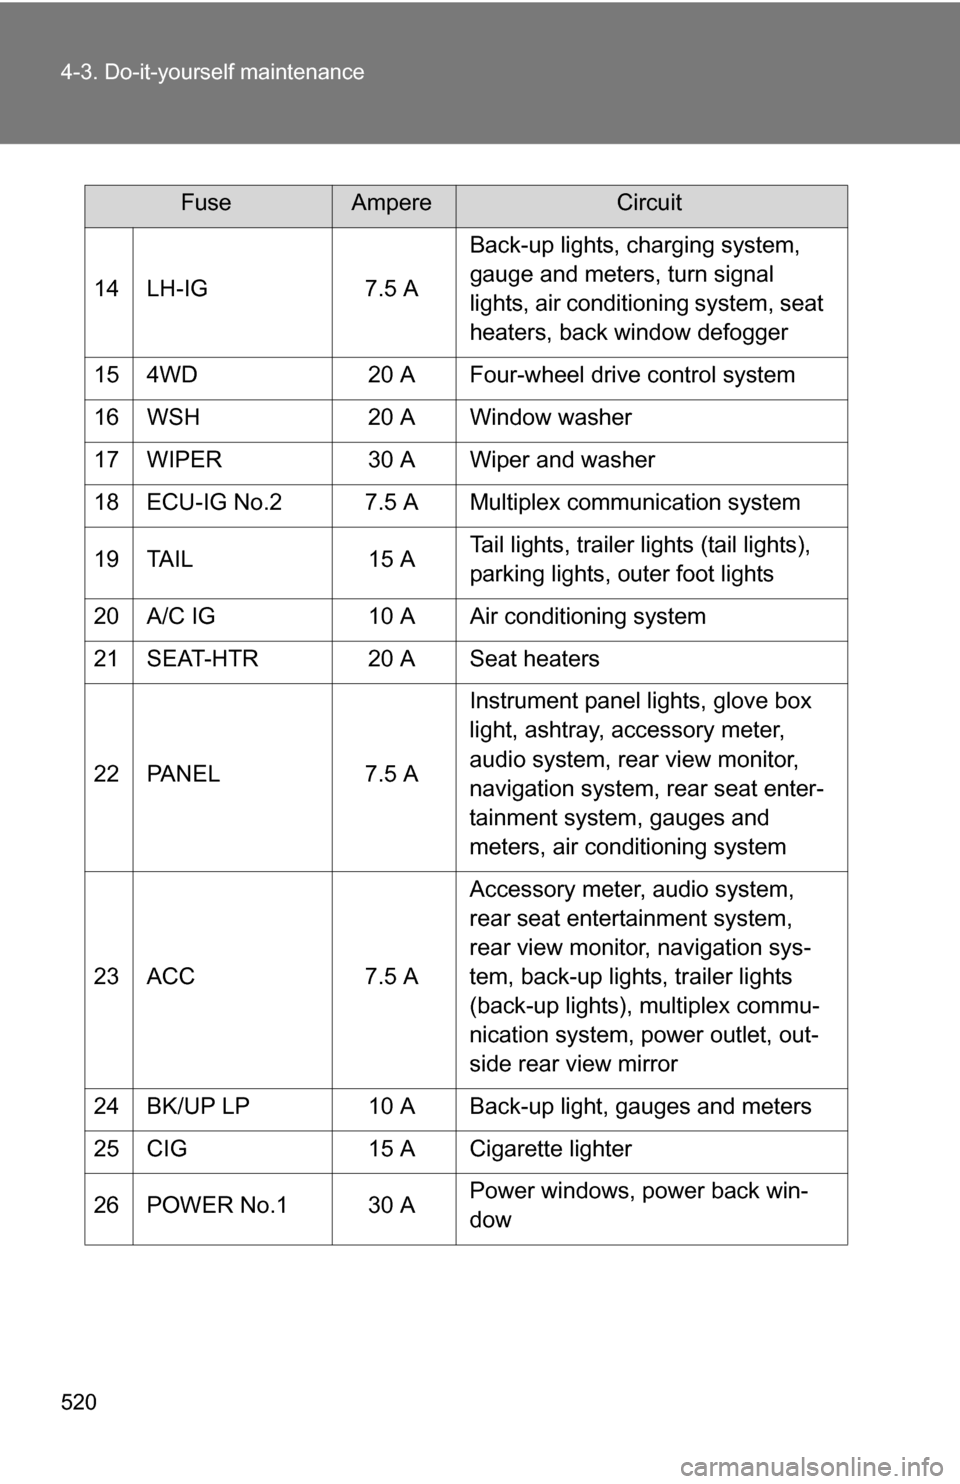
14 LH-IG7.5 ABack-up lights, charging system,
gauge and meters, turn signal
lights, air conditioning system, seat
heaters, back window defogger
15 4WD 20 A Four-wheel drive control system
16 WSH 20 A Window washer
17 WIPER 30 A Wiper and washer
18 ECU-IG No.2 7.5 A Multiplex communication system
19 TAIL 15 ATail lights, trailer lights (tail lights),
parking lights, outer foot lights
20 A/C IG 10 A Air conditioning system
21 SEAT-HTR 20 A Seat heaters
22 PANEL 7.5 AInstrument panel lights, glove box
light, ashtray, accessory meter,
audio system, rear view monitor,
navigation system, rear seat enter-
tainment system, gauges and
meters, air conditioning system
23 ACC 7.5 AAccessory meter, audio system,
rear seat entertainment system,
rear view monitor, navigation sys-
tem, back-up lights, trailer lights
(back-up lights), multiplex commu-
nication system, power outlet, out-
side rear view mirror
24 BK/UP LP 10 A Back-up light, gauges and meters
25 CIG 15 A Cigarette lighter
26 POWER No.1 30 A Power windows, power back win-
dow
FuseAmpereCircuit
Page 522 of 672
522
4-3. Do-it-yourself maintenance
Light bulbs
You may replace the following bulbs yourself. The difficulty level of
replacement varies depending on the bulb. If necessary bulb
replacement seems difficult to perfor m, contact your Toyota dealer.
For more information about replacing other light bulbs, contact your
Toyota dealer.
■ Prepare a replacement light bulb.
Check the wattage of the light bulb being replaced. ( P. 617)
■ Front bulb locations
Headlight low
beam
Front side marker
lights
Headlight
high beam Front fog lights
(if equipped)
Front turn signal/
parking lights
Page 527 of 672
527
4-3. Do-it-yourself maintenance
4
Maintenance and care
Remove the light bulb.
■ Front fog lights (if equipped)
Remove the bolts and partly
remove the fender liner.
Turn the bulb counterclockwise.