2009 TOYOTA tC Accessories, Audio & Navigation (in English)
-
 1
1 -
 2
2 -
 3
3 -
 4
4 -
 5
5 -
 6
6 -
 7
7 -
 8
8 -
 9
9 -
 10
10 -
 11
11 -
 12
12 -
 13
13 -
 14
14 -
 15
15 -
 16
16 -
 17
17 -
 18
18 -
 19
19 -
 20
20 -
 21
21 -
 22
22 -
 23
23 -
 24
24 -
 25
25 -
 26
26 -
 27
27 -
 28
28 -
 29
29 -
 30
30 -
 31
31 -
 32
32 -
 33
33 -
 34
34 -
 35
35 -
 36
36 -
 37
37 -
 38
38 -
 39
39 -
 40
40 -
 41
41 -
 42
42 -
 43
43 -
 44
44 -
 45
45 -
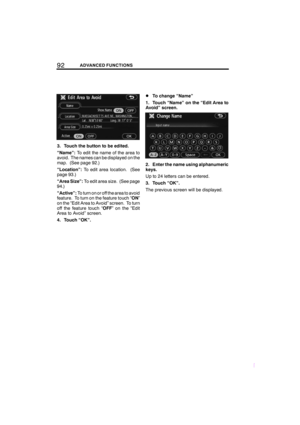
 46
46 -
 47
47 -
 48
48 -
 49
49 -
 50
50 -
 51
51 -
 52
52 -
 53
53 -
 54
54 -
 55
55 -
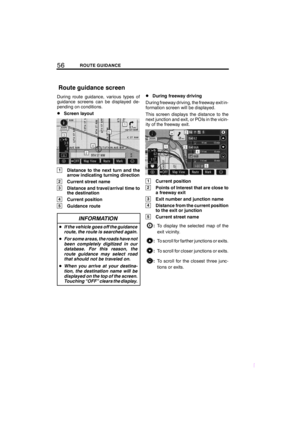
 56
56 -
 57
57 -
 58
58 -
 59
59 -
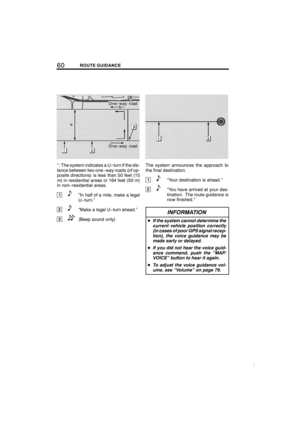
 60
60 -
 61
61 -
 62
62 -
 63
63 -
 64
64 -
 65
65 -
 66
66 -
 67
67 -
 68
68 -
 69
69 -
 70
70 -
 71
71 -
 72
72 -
 73
73 -
 74
74 -
 75
75 -
 76
76 -
 77
77 -
 78
78 -
 79
79 -
 80
80 -
 81
81 -
 82
82 -
 83
83 -
 84
84 -
 85
85 -
 86
86 -
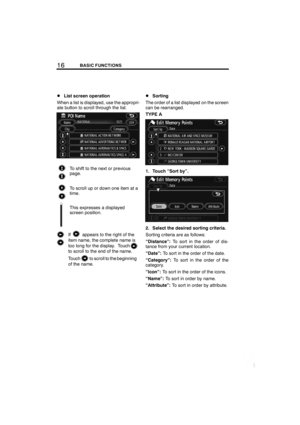
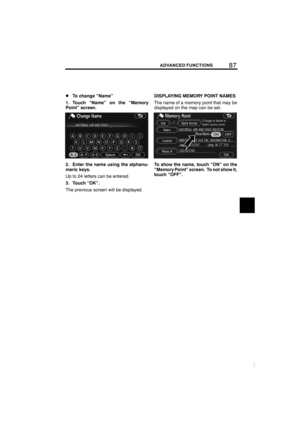
 87
87 -
 88
88 -
 89
89 -
 90
90 -
 91
91 -
 92
92 -
 93
93 -
 94
94 -
 95
95 -
 96
96 -
 97
97 -
 98
98 -
 99
99 -
 100
100 -
 101
101 -
 102
102 -
 103
103 -
 104
104 -
 105
105 -
 106
106 -
 107
107 -
 108
108 -
 109
109 -
 110
110 -
 111
111 -
 112
112 -
 113
113 -
 114
114 -
 115
115 -
 116
116 -
 117
117 -
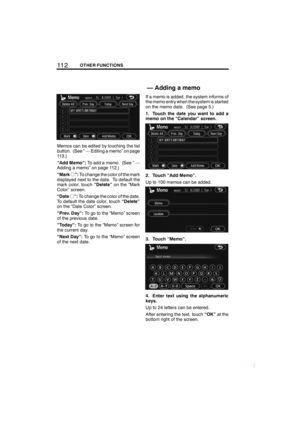 118
118 -
 119
119 -
 120
120 -
 121
121 -
 122
122 -
 123
123 -
 124
124 -
 125
125 -
 126
126 -
 127
127 -
 128
128 -
 129
129 -
 130
130 -
 131
131 -
 132
132 -
 133
133 -
 134
134 -
 135
135 -
 136
136 -
 137
137 -
 138
138 -
 139
139 -
 140
140 -
 141
141 -
 142
142 -
 143
143 -
 144
144 -
 145
145 -
 146
146 -
 147
147 -
 148
148 -
 149
149 -
 150
150 -
 151
151 -
 152
152 -
 153
153 -
 154
154 -
 155
155 -
 156
156 -
 157
157 -
 158
158 -
 159
159 -
 160
160 -
 161
161 -
 162
162 -
 163
163 -
 164
164 -
 165
165 -
 166
166 -
 167
167 -
 168
168 -
 169
169 -
 170
170 -
 171
171 -
 172
172 -
 173
173 -
 174
174 -
 175
175 -
 176
176 -
 177
177 -
 178
178 -
 179
179 -
 180
180 -
 181
181 -
 182
182 -
 183
183 -
 184
184 -
 185
185 -
 186
186 -
 187
187 -
 188
188 -
 189
189 -
 190
190 -
 191
191 -
 192
192 -
 193
193 -
 194
194 -
 195
195 -
 196
196 -
 197
197 -
 198
198 -
 199
199
 43DESTINATION SEARCH
SCION V398
INPUTTING THE CITY CENTER
1. Touch “Input City Center”.
2. Input the city center name.
3. Touch the button of the desired city
center name.
When an arrow facing the")
 44DESTINATION SEARCH
SCION V398
SETTING THE SEARCH POINT FROM
DESTINATIONS
1. Touch the destination buttons at the
bottom of the screen.
When an arrow facing the desired point is
touched, the map scro")
 45DESTINATION SEARCH
SCION V398
“Select Category”:To return to the POI
category selection screen.
“Show List”: To display the list of POIs in
the selected categories.
By touching the button of")
 46DESTINATION SEARCH
SCION V398
1. Touch “Memory” on the “Destina-
tion” screen.
A list of registered memory points is dis-
played. (To register or edit memory points,
see “My places” on p")
 47DESTINATION SEARCH
SCION V398
Touch “Map” on the second page of the
“Destination” screen.
The screen changes and displays the map
location that was previously displayed just
before the desti")
 48DESTINATION SEARCH
SCION V398
If the same two streets cross at more than
one intersection, the screen changes and
displays the menu to select the city name
where the streets intersect. Select the ci")
 49DESTINATION SEARCH
SCION V398
4. Touch the button of the desired en-
trance or exit name.
The screen changes and displays the map
location of the selected destination and the
route preference. (See")
 50DESTINATION SEARCH
SCION V398
1. Touch “Phone #” on the second
page of the “Destination” screen.
2. Input a telephone number.
3. After inputting a telephone number,
touch “OK”.
The scree")