Page 220 of 592

220 2-5. Driving information
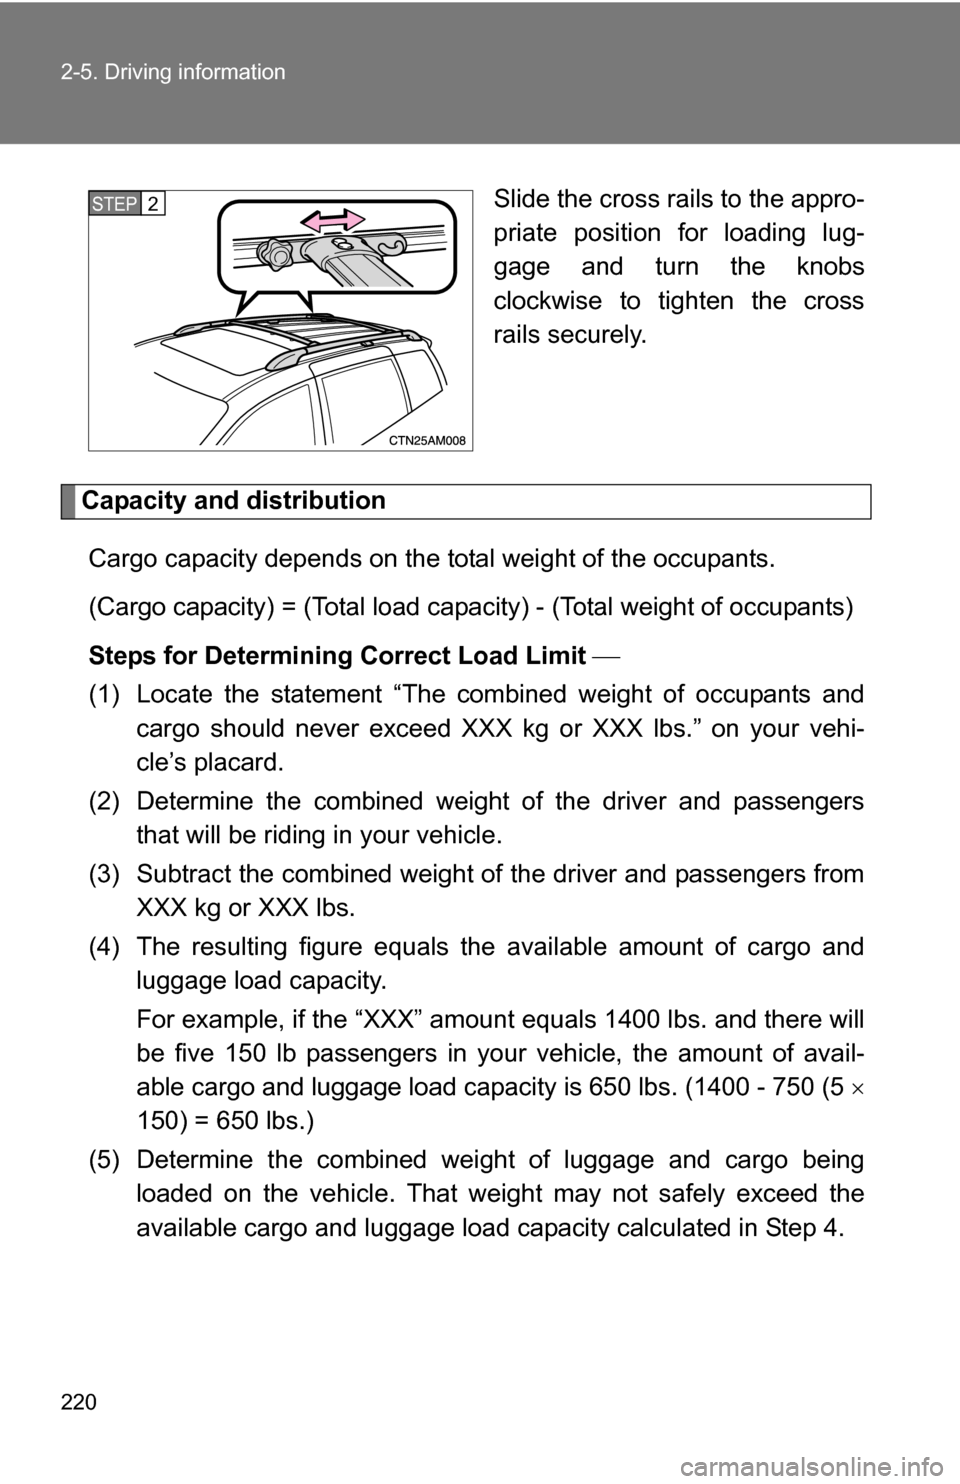
Slide the cross rails to the appro-
priate position for loading lug-
gage and turn the knobs
clockwise to tighten the cross
rails securely.
Capacity and distributionCargo capacity depends on the total weight of the occupants.
(Cargo capacity) = (Total load capacity) - (Total weight of occupants)
Steps for Determining Correct Load Limit
(1) Locate the statement “The co mbined weight of occupants and
cargo should never exceed XXX kg or XXX lbs.” on your vehi-
cle’s placard.
(2) Determine the combined weight of the driver and passengers that will be riding in your vehicle.
(3) Subtract the combined weight of the driver and passengers from XXX kg or XXX lbs.
(4) The resulting figure equals the available amount of cargo and luggage load capacity.
For example, if the “XXX” amount equals 1400 lbs. and there will
be five 150 lb passengers in your vehicle, the amount of avail-
able cargo and luggage load capacity is 650 lbs. (1400 - 750 (5
150) = 650 lbs.)
(5) Determine the combined wei ght of luggage and cargo being
loaded on the vehicle. That weig ht may not safely exceed the
available cargo and luggage load capacity calculated in Step 4.
STEP2
Page 223 of 592

223
2-5. Driving information
2
When driving
CAUTION
■Storage precautions
●Do not stack anything in the luggage compartment higher than the
seatbacks.
Such items may be thrown about and possibly injure people in the
vehicle during sudden braking or in an accident.
●Do not place items in or
on the following locations:
• At the feet of the driver
• On the front passenger or rear seats (when stacking items)
• Instrument panel
• Dashboard
Items placed in the above locations could get thrown around in the event
of sudden braking or an accident and injure the vehicle occupants.
In addition, items could block the driv er’s field of vision or move during
sharp acceleration or turning. If items move about they may get under
the brake or accelerator pedals, preventing them from being depressed
properly, or hit the driver or passeng ers. In these situations, the driver’s
control of the vehicle could be impaired, causing an accident.
●Secure all items in the occupant compartment, as they may shift and
injure someone during an accident or sudden braking.
●Never allow anyone to ride in the luggage compartment. It is not
designed for passengers. They should ride in their seats with their seat
belts properly fastened. Otherwise, they are much more likely to suffer
death or serious bodily injury, in the event of sudden braking or a colli-
sion.
■Capacity and distribution
●Do not exceed the maximum axle weight rating or the total vehicle
weight rating.
●Even if the total load of occupant's weight and the cargo load is less
than the total load capacity, do not apply the load unevenly.
Improper loading may cause deterioration of steering or braking con-
trol which may cause death or serious injury.
Page 224 of 592

224 2-5. Driving information
CAUTION
■Roof luggage carrier precautions
When you load cargo on the roof luggage carrier, observe the following:
●Place the cargo so that its weight is distributed evenly between the
front and rear axles.
●If loading long or wide cargo, never exceed the vehicle overall length
or width. (P. 542)
●Before driving, make sure the cargo is securely fastened on the roof
luggage carrier.
●Loading cargo on the r oof luggage carrier will make the center of the
vehicle gravity higher. Avoid high speeds, sudden starts, sharp turns,
sudden braking or abrupt maneuvers, otherwise it may result in loss of
control or vehicle rollover due to failure to operate this vehicle cor-
rectly.
●If driving for a long distance, on rough roads, or at high speeds, stop
the vehicle now and then during the trip to make sure the cargo
remains in its place.
●Do not exceed 150 lb. (68 kg) cargo weight on the roof luggage carrier.
■Cross rail adjustment
Make sure the cross rails are locked securely by pushing forward and
rearward them.
Failure to do so may cause an unexpected accident or severe injury in
the event of emergency braking or a collision.
NOTICE
■When loading the luggage
Be careful not to scratch the surface of the moon roof.
Page 235 of 592
![TOYOTA SIENNA 2009 XL20 / 2.G Owners Manual 235
2-5. Driving information
2
When driving
●
Due to the added load of the trailer, your vehicles engine may
overheat on hot days (at temperatures over 85°F [30°C]) when
driving up a long or stee TOYOTA SIENNA 2009 XL20 / 2.G Owners Manual 235
2-5. Driving information
2
When driving
●
Due to the added load of the trailer, your vehicles engine may
overheat on hot days (at temperatures over 85°F [30°C]) when
driving up a long or stee](/manual-img/14/6800/w960_6800-234.png)
235
2-5. Driving information
2
When driving
●
Due to the added load of the trailer, your vehicle's engine may
overheat on hot days (at temperatures over 85°F [30°C]) when
driving up a long or steep grade. If the engine coolant temperature
gauge indicates overheating, immedi ately turn off the air condition-
ing (if in use), pull your vehicle off the road and stop in a safe spot.
( P. 536)
● Always place wheel blocks under both the vehicle and the trailer
wheels when parking. Apply the parking brake firmly, and put the
transmission in P. Avoid parking on a slope, but if unavoidable, do
so only after performing the following:
Apply the brakes and keep them applied.
Have someone place wheel blocks under both the vehicle and
trailer wheels.
When the wheel blocks are in pl ace, release the brakes slowly
until the blocks absorb the load.
Apply the parking brake firmly.
Shift into P and turn off the engine.
● When restarting after parking on a slope:
With the transmission in P, start the engine. Be sure to keep
the brake pedal pressed.
Shift into a forward gear. If reversing, shift into R.
Release the parking brake and brake pedal, and slowly pull or
back away from the wheel blocks. Stop and apply the brakes.
Have someone retrieve the blocks.
STEP1
STEP2
STEP3
STEP4
STEP5
STEP1
STEP2
STEP3
STEP4
Page 239 of 592

Interior features3
239
Using the phone book ...... 353
3-5. Using the interior lights ............................. 361
Interior lights list ............... 361
• Personal/interior light main switch .................... 362
• Personal/interior lights ... 362
• Luggage compartment
light ................................ 363
3-6. Using the storage features ......................... 364
List of storage features .... 364
• Glove box....................... 365
• Console box ................... 365
• Coin holder .................... 369
• Cup holders ................... 370
• Bottle holders ................. 374
• Auxiliary boxes............... 375
• Trays .............................. 380
• Note pad holder ............. 381 3-7. Other interior features ... 383
Sun visors ........................ 383
Vanity mirrors ................... 384
Clock ................................ 385
Conversation mirror ......... 386
Power outlets ................... 387
Seat heaters..................... 390
Armrests........................... 392
Rear side sunshades ....... 393
Grocery bag hooks........... 394
Coat hooks ....................... 396
Seatback tables ............... 397
Front seat side table ........ 399
Floor mat .......................... 401
Luggage compartment features .......................... 402
Garage door opener......... 405
Garage door opener box ................................. 410
Compass .......................... 413
Page 240 of 592
240
3-1. Using the air conditioning system and defogger
Front manual air conditioning system (if equipped)
Adjusting the settings
■ Adjusting the temperature setting
Turn the temperature control dial clockwise (warm) or counter-
clockwise (cool).
If is not pressed, the system will blow ambient temperature air or
heated air.
For quick cooling, turn the temperature control dial to the “MAX A/C”
position. The air conditioning will automatically turn on and the air circu-
lation mode will be set to recirculated air mode.
When the dial is in the “MAX A/C” position, the air conditioning system
cannot be turned off even if is pressed.
Front air conditioning
fan speed control dial Air outlet selection dial
Air conditioning on/off switch
Temperature
control dialOutside air or recirculated air mode
Rear air conditioning
fan speed control dial
Page 241 of 592
241
3-1. Using the air conditioning system
and defogger
3
Interior features
■Adjusting the fan speed
Turn the fan speed control dial clockwise (increase) or counter-
clockwise (decrease).
Set the dial to “OFF” to turn the fan off.
■ Changing the air outlets
Set the air outlet selection di al to an appropriate position.
The positions between the air outlet selections shown below can also be
selected for more detailed adjustment.
Upper body
Upper body and feet
Feet
Page 243 of 592
243
3-1. Using the air conditioning system
and defogger
3
Interior features
Changing the rear setting
■ Adjusting the fan speed
Turn the rear fan speed control dial clockwise (increase) or counter-
clockwise (decrease).
When the rear fan speed control dial is turned to “REAR”, rear fan speed
can be operated from the rear air conditioning control panel. ( P. 253)
When the front or rear fan speed control dial is turned to “OFF”, the rear
air conditioning system is turned off.
Adjusting the position of and opening and closing the air outlets
Center outlets Direct air flow to the left or right,
up or down.
Right and left side outlets Direct air flow to the left or
right, up or down.
Turn the knob to open or close
the vent.