Page 13 of 556
13
L/C200_U (OM60D97U)
A
CD INRAND RPTSCAN ALBDISC FLD ART TR FILE ST MEGTRAFPLDGNPAUTO-P ART4 DISC OF OWNER
TYPE∑DISC
ITYPC037
AM-GAT
SCAN
FMDISC∑AUXTRAF
00 H
M
Windshield wiper
de-icer switch
P. 269
Clock P. 353
Security indicator
light
P. 95
Audio system
P. 270
Front passenger AIR BAG
ON and AIR BAG OFF
indicator
P. 117
Front passenger’s seat belt
reminder light
P. 465
Air conditioning
system
P. 254
Rear air conditioning control
switch
P. 264
Emergency flasher
switch
P. 452
Rear window defogger
switch
P. 268
Without navigation system
: If equipped
Outside temperature
display
P. 354
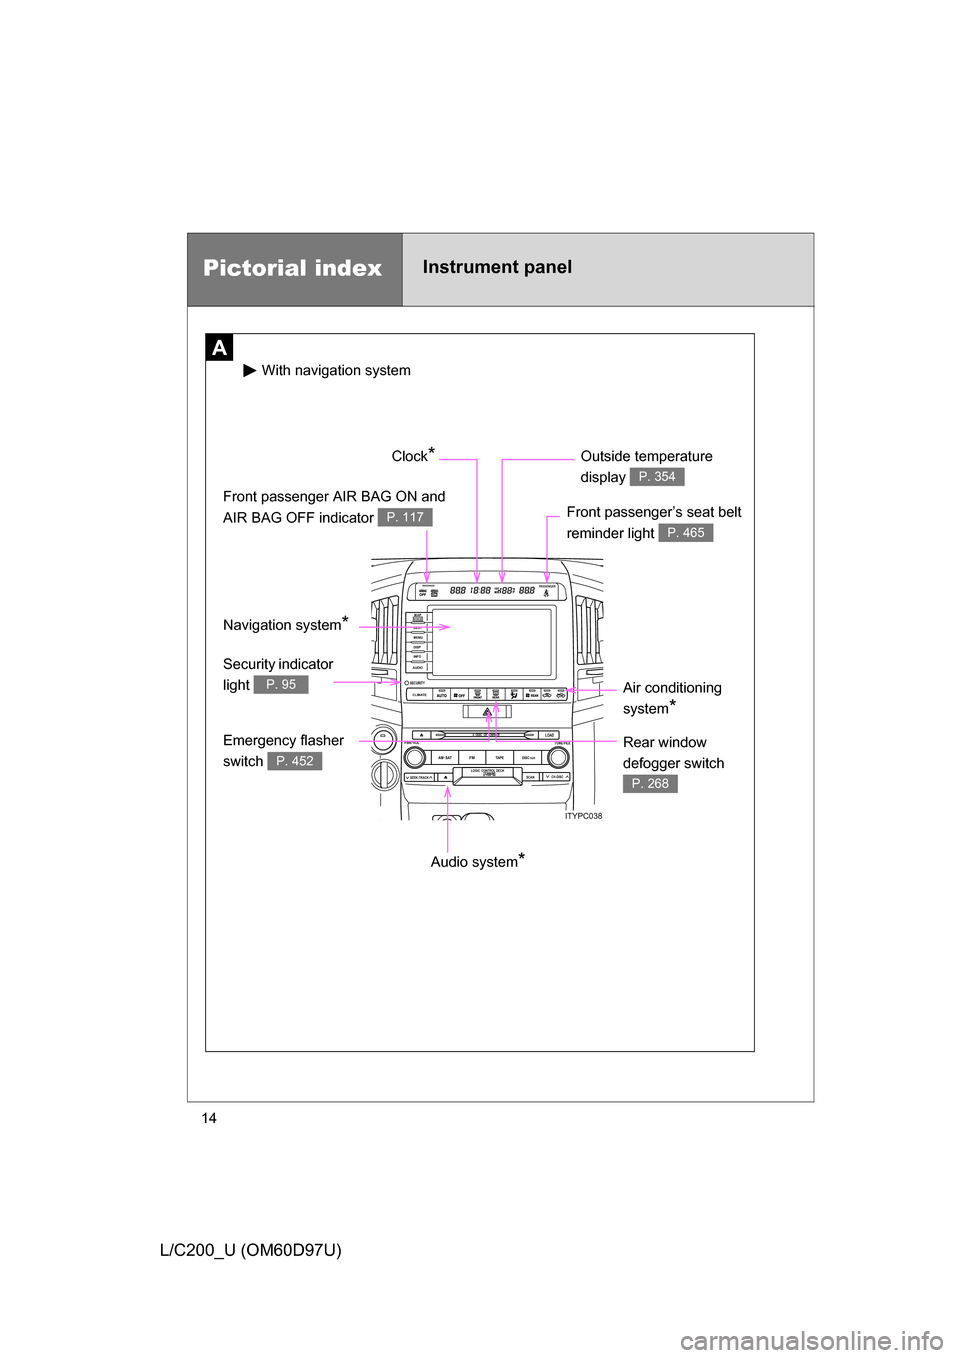
Page 14 of 556
14
L/C200_U (OM60D97U)
Pictorial indexInstrument panel
A
LOADTUNE·FILE
CH-DISC
FM�nTAPEPWR·VOL
SEEK-TRACK
DISC·AUXSAT
AM
4 DISC OF OWNER
SCAN
LOGIC CONTROL DECK
SECURITYCLIMATE
DEST MAVOICEP
MENU
DISP
INFO
AUDIO
ITYPC038
Audio system*
Front passenger’s seat belt
reminder light
P. 465
Front passenger AIR BAG ON and
AIR BAG OFF indicator
P. 117
Clock* Outside temperature
display
P. 354
Air conditioning
system
*
Emergency flasher
switch
P. 452
Security indicator
light
P. 95
With naviga tion system
Rear window
defogger switch
P. 268
Navigation system*
Page 33 of 556

■
Note for the smart key system
● Even when the electronic key is within the effective range (detection
areas),")
33
1-2. Opening, closing and locking the doors
1
Before driving
L/C200_U (OM60D97U)
■
Note for the smart key system
● Even when the electronic key is within the effective range (detection
areas), the system may not operate properly in the following cases.
• The electronic key is too close to the window or outside door handle,
near the ground, or in a high place when the doors are locked or
unlocked.
• The electronic key is near the ground or in a high place, or too close to the rear bumper center when the back door is locked or unlocked.
• The electronic key is on the instrument panel, floor or in the glove box when the engine is started or “ENGINE START STOP” switch modes
are changed.
● As long as the electronic key is within the effective range, the doors may
be locked or unlocked by anyone.
● Even if the electronic key is not inside the vehicle, it may be possible to
start the engine if the electronic key is near the window.
● The doors may unlock if a large amount of water splashes on the door
handle, such as in the rain or in a car wash. (The doors will automatically
be locked after approximately 60 seconds if the doors are not opened
and closed.)
● Gripping the door handle when wearing a glove may not unlock the door.
● If the wireless remote control is used to lock the doors when the elec-
tronic key is near the vehicle, there is a possibility that the door may not
be unlocked by the smart key system. (Use the wireless remote control to
unlock the doors.)
● A sudden approach to the effective range or door handle operation may
prevent the doors from being unlocked. In this case, return the door han-
dle to the original position and check that the doors unlock before pulling
the door handle.
■ When the vehicle is not dr iven for extended periods
To prevent theft of the vehicle, do not leave the electronic key within 6 ft. (2
m) of the vehicle.
■ Security feature
If a door is not opened within approximately 60 seconds after the vehicle is
unlocked, the security feature automatically locks the vehicle again.
Page 41 of 556
41
1-2. Opening, closing and locking the doors
1
Before driving
L/C200_U (OM60D97U)
■
Operation signals
Doors: A buzzer sounds and the emergency flashers flash to indicate that
the doors have been locked/unlocked. (Locked: Once; Unlocked: Twice)
Windows and moon roof: A buzzer s ounds when the windows and moon roof
begin to open.
■ Door lock buzzer
P. 3 0
■ Security feature
P. 3 3
■ Alarm
Using the wireless remote control to lock the door will set the alarm system.
(P. 97)
■ Electronic key battery depletion
P. 494
■ If the wireless remote cont rol does not operate properly
● Locking and unlocking the doors: Use the mechanical key. ( P. 494)
● Starting the engine ( P. 151)
■ When the electronic key battery is fully depleted
P. 423
■ Conditions aff ecting operation
P. 3 0
■ Customization that can be co nfigured at Toyota dealer
Settings (e.g. 2-step unlocking function) can be changed. (Customizable
features P. 533)
Page 54 of 556
54 1-3. Adjustable components (seats, mirrors, steering wheel)
L/C200_U (OM60D97U)
Tumbling the second seats and third seat entry
For easy access to the third seat, perform in “Tumbling sec-
ond seats”. ( P. 5 5 )
■ Before tumbling the second seats
Stow the seat belt buckles and
lower the head restraints to the
lowest position.
Pass the outer seat belts through
the seat belt hangers and secure
the seat belt plates.
This prevents the shoulder belt
from being damage.
Make sure that the seat belts are
removed from the hangers before
using them.
STEP1
STEP1
ITY13C013a
STEP2
Page 55 of 556
55
1-3. Adjustable components (s
eats, mirrors, steering wheel)
1
Before driving
L/C200_U (OM60D97U)■
Tumbling the second seats
Fold down the seatback while
pulling the seatback angle
adjustment lever, and swing the
whole seat up and forward.
Hook the holding strap to the
assist grip and secure the seat
by pulling its free end.
When returning the second seat
to its original position, stow the
holding strap.
STEP1
STEP2
Page 57 of 556
57
1-3. Adjustable components (s
eats, mirrors, steering wheel)
1
Before driving
L/C200_U (OM60D97U)
Folding up the third seats
■ Before folding up the third seats
Stow the seat belts buckles.
Stow the center head restraint in the seatback. ( P. 68)
Pass the outer seat belts through
the seat belt hangers and secure
the seat belt plates.
This prevents the shoulder belt
from being damage.
Make sure that the seat belts are
removed from the hangers before
using them.
Stow the center seat belt tabs in the cover set in the roof.
( P. 7 2 )
ITY13C018
STEP1
STEP2
ITY13C021a
STEP3
STEP4
Page 58 of 556
58 1-3. Adjustable components (seats, mirrors, steering wheel)
L/C200_U (OM60D97U)■
Folding up the third seats
Fold down the head restraints
while pulling the head restraint
angle lever.
Push the seatback angle levers
and fold the third seats.
Pull the seat leg lock release
levers.
The seat will rise, and the seat-
back striker will also automatically
sit up.
Before raising, make sure that the
handle on the rear of the seat-
back is
secure.
ITY13C022
STEP1
STEP2
STEP3

A
CD INRAND RPTSCAN ALBDISC FLD ART TR FILE ST MEGTRAFPLDGNPAUTO-P ART4 DISC OF OWNER
TYPE∑DISC
ITYPC037
AM-GAT
SCAN
FMDISC∑AUXTRAF
00 H
M
Windshield wiper
de-icer swit")

■
Operation signals
Doors: A buzzer sounds and the emergency flashers flash to indicate that
the doors have been l")

L/C200_U (OM60D97U)
Tumbling the second seats and third seat entry
For easy access to the third seat, perform in “Tumbling sec-
ond s")

1
Before driving
L/C200_U (OM60D97U)■
Tumbling the second seats
Fold down the seatback while
pulling the seatback angle
adjustment lev")

1
Before driving
L/C200_U (OM60D97U)
Folding up the third seats
■ Before folding up the third seats
Stow the seat belts buckles.
Stow")

L/C200_U (OM60D97U)■
Folding up the third seats
Fold down the head restraints
while pulling the head restraint
angle lever.
Push the se")