Page 25 of 30
23
OVERVIEW
FEATURES/OPERATIONS
SAFETY AND EMERGENCY FEATURES
Garage door opener (HomeLink®)*
(if equipped)
Garage door openers manufactured under license from HomeLink®* can
be programmed to operate garage doors, estate gates, security lighting, \
etc.
Refer to “Garage door opener,” Section 3-7 in the Owner’s Manualfor
more details.
For programming assistance, contact the Toyota Customer Experience
Center at 1-800-331-4331, or visit http://www.homelink.com.
* HomeLink ®
is a registered trademark of Johnson Controls, Inc.
Cruise control
1 The set speed may also be cancelled by depressing the brake pedal.2 The set speed may be resumed once vehicle speed exceeds 25 mph.
Turning system ON/OFF
Functions
System ON/OFF
Increase speed
Decrease speed
Cancel1
Resume2
Set
412783M2.qxd 8/21/08 4:12 PM Page 23
Page 26 of 30
24
FEATURES/OPERATIONS
Type 2 additional functions
Type 3 (with JBL speakers and Bluetooth®function)
Audio
Eject CD
Push to turn
ON/OFF View CD
text
Seek station/
CD track select
Station/CD
track scan
Mode
AM/Satellite Radio
Preset buttons - functions in other
modes indicated above number
Load CD(s)
Ty p e 1
Push to skip
up/down folder and
radio category type
CD PLAYER
To scan tracks on a disc Push and hold “SCAN.” Push again to hold
selection.
CD changer (Types 2 and 3 only)
-To load one disc
Push “LOAD” and insert one disc.
-To load multiple discs Push and hold “LOAD” until you hear a beep.
Insert one disc. Shutter will close and then re-open for next disc.
To select a file (MP3/WMA only) Turn “TUNE.
FILE.”
To select a folder (MP3/WMA only) Push either side of “FOLDER.”
Push to
adjust tone
& balance
Mute
412783M2.qxd 8/21/08 4:12 PM Page 24
Page 27 of 30
25
OVERVIEW
FEATURES/OPERATIONS
SAFETY AND EMERGENCY FEATURES
RADIO
To preset stations Tune in the desired station and hold down a preset
button (1-6) until you hear a beep. Push desired preset button (1-6)\
to
select.
To scan stations Push and hold “SCAN” to scan preset stations. Push again
to hold selection.
Steering wheel controls (if equipped)
Audio controlA/C control
“ ”
-In radio mode Push to select a preset station; push and hold to seek
the next strong station.
-In CD mode Push to skip up or down to next/previous track.
“MODE”
Push to turn audio ON and select an audio mode. Push and hold to turn
the audio system OFF.vv
Volume controlTemperature
selector
Auto A/C
ONA/C OFF
By inserting a mini plug into the AUX audio jack, you can listen to musi\
c
from a portable audio device through the vehicle’s speaker system while
in AUX mode.
AUX audio jack
Without seat heaterWith seat heater
412783M2.qxd 8/21/08 4:12 PM Page 25
Page 28 of 30
26
FEATURES/OPERATIONS
Rear seat entertainment system
(if equipped)
Remote control
DVD player
Headphone volume control and headphone jacks
DVD screen
115V AC Power outlet ON/OFF switch
Front audio system
A/V input adapter
115V AC Power outlet
Wireless headphones
DAC helps the vehicle to descend steep hills while maintaining a low spe\
ed
without brake pedal operation. Press the “DAC” button (system will
engage only when shifter is in S1 or R mode). Pressing the button again
will turn system off.
Refer to the Owner’s Manual for more details.
Downhill Assist Control system (DAC)
(if equipped)
DAC indicator blinking = DAC not engagedSlip indicator blinking, DAC indicator
solid = DAC engaged
412783M2.qxd 8/21/08 4:12 PM Page 26
Page 29 of 30
27
OVERVIEW
FEATURES/OPERATIONS
SAFETY AND EMERGENCY FEATURES
Cup holders
Front
Console boxRear
Side table
HAC helps prevent rolling backwards on an incline. To engage, push
further down on brake pedal while at a complete stop until a beep sounds\
and slip indicator illuminates. HAC holds for approximately 2 seconds af\
ter
releasing brake pedal.
Refer to the Owner’s Manual for more details.
Brake
pedal
Hill-start Assist Control (HAC)
412783M2.qxd 8/21/08 4:12 PM Page 27
Page 30 of 30

28
SAFETY AND
EMERGENCY FEATURES
If belt is fully extended, then retracted even slightly, it cannot be
re-extended beyond that point, unless fully retracted again. This featur\
e
is used to help hold child restraint systems securely.
To find more information about seatbelts, and how to install a child
restraint system, refer to the Owner's Manual.
Keep as low on
hips as possible
Take up slack
Too high
Seatbelts
System reset initialization
1. Push and hold “ SET” button
until the indicator blinks 3 times.
2. Wait a few minutes to allow initialization to complete.
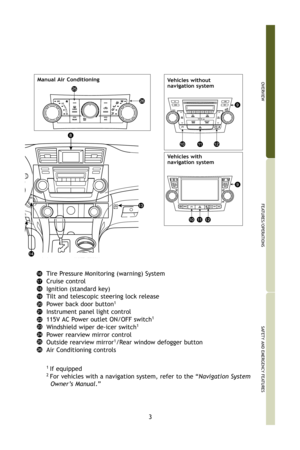
Tire Pressure Monitoring (warning)
System
After adjusting tire pressures, or after tires have been rotated or
replaced, turn the ignition switch to “ON” and press and hold the \
“ SET” button until indicator blinks three times. Let the vehicle sit f\
or
a few minutes to allow initialization to complete.
Refer to the load label on the door jamb or the Owner’s Manualfor tire
inflation specifications.
If the tire pressure indicator flashes for more than 60 seconds and then\
remains on, take the vehicle to your local Toyota dealer.
Note : The warning light may come on due to temperature changes or
changes in tire pressure from natural air leakage. If the system has not\
been initialized recently, setting the tire pressures to factory
specifications should turn off the light.
412783M2.qxd 8/21/08 4:12 PM Page 28


*
(if equipped)
Garage door openers manufactured under license from HomeLink®* can
be programmed to operat")

Audio
Eject CD
Push to turn
ON/OFF View CD
text
Seek station/
CD track select
Station/CD
track sca")
 until you hear a beep. Push desired preset button")

Remote control
DVD player
Headphone volume control and headphone jacks
DVD screen
115V AC Power outlet ON/OFF switch
Front audio sys")
