Page 93 of 274

ADVANCED FUNCTIONS
11 3
�
Voice guidance in all modes
When the “Voice Guidance in All Modes”
feature is turned on, the voice guidance in
all modes can be heard.
When the “Voice Guidance in All Modes”
feature is turned off, voice guidance can-
not be heard when using the audio/video
system.
To turn the “Voice Guidance in All Modes”
on:
1. Push the “MENU” button.
2. Touch “Setup” on the “Menu”
screen.
Then touch
to display page 2 of the
“Setup” screen.
3. Touch “ON” of “Voice Guidance in
All Modes”.
The selected button is highlighted.
4. Touch “OK”.
�Auto voice guidance
When the “Auto V oice Guidance” feature is
turned on, the voice guidance can be
heard automatically.
When the “Auto V oice Guidance” feature is
turned off, the voice guidance can be
heard only if the “MAP/VOICE” button is
pushed.
To turn the “Auto Voice Guidance” mode
on:
1. Push the “MENU” button.
2. Touch “Setup” on the “Menu”
screen.
Then touch
twice to display page 3 of
the “Setup” screen.
3. Touch “ON” of “Auto Voice Guid-
ance”.
The selected button is highlighted.
4. Touch “OK”.
Page 94 of 274
ADVANCED FUNCTIONS
11 4
�
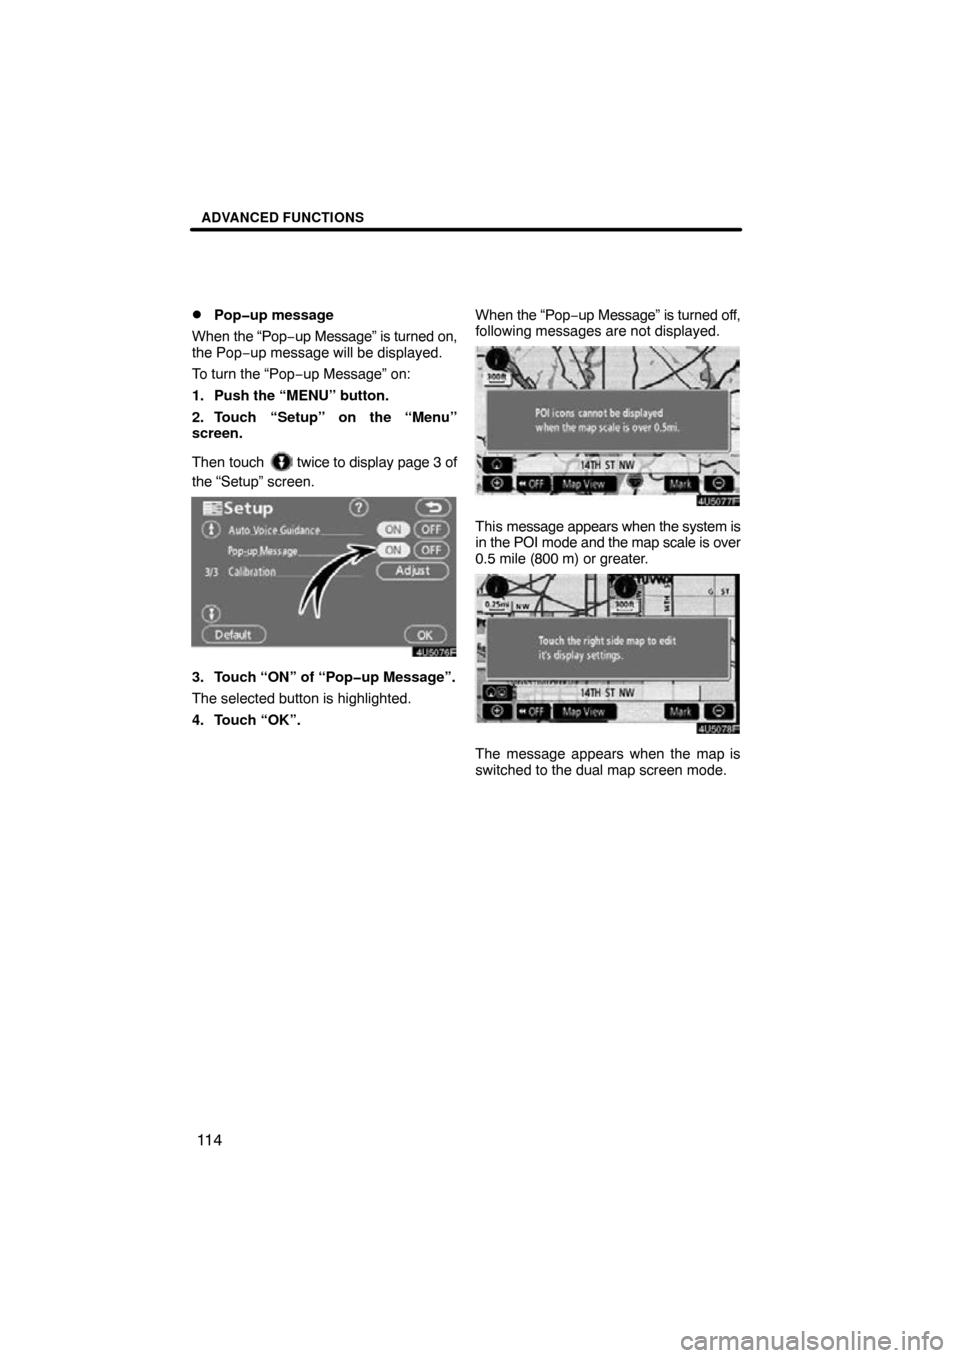
Pop�up message
When the “Pop− up Message” is turned on,
the Pop −up message will be displayed.
To turn the “Pop− up Message” on:
1. Push the “MENU” button.
2. Touch “Setup” on the “Menu”
screen.
Then touch
twice to display page 3 of
the “Setup” screen.
3. Touch “ON” of “Pop�up Message”.
The selected button is highlighted.
4. Touch “OK”. When
the “Pop −up Message” is turned off,
following messages are not displayed.
This message appears when the system is
in the POI mode and the map scale is over
0.5 mile (800 m) or greater.
The message appears when the map is
switched to the dual map screen mode.
Page 95 of 274
ADVANCED FUNCTIONS
11 5
�
Current
position/tire change calibra-
tion
The current vehicle position mark can be
adjusted manually. Miscalculation of the
distance caused by tire replacement can
also be adjusted.
1. Push the “MENU” button.
2. Touch “Setup” on the “Menu”
screen.
Then touch
twice to display page 3 of
the “Setup” screen.
3. Touch “Adjust” of “Calibration”.
4. Touch the desired touch�screen
button.
INFORMATION
For additional information on the ac-
curacy of a current vehicle position,
see “Limitations of the navigation
system” on page 256.
POSITION/DIRECTION CALIBRATION
When driving, the current vehicle position
mark will be automatically corrected by
GPS signals. If GPS reception is poor due
to location, you can manually adjust the
current vehicle position mark.
1. Touch “Position/Direction”.
2. Touch the scroll arrows to move the
cursor
to your desired location.
3. Touch “Enter”.
Page 96 of 274
ADVANCED FUNCTIONS
11 6
4. Touch either or to adjust the
direction of the current vehicle position
mark.
5. Touch “Enter”.
The map screen will be displayed. TIRE CHANGE CALIBRATION
The tire change
calibration function will be
used when replacing the tires. This func-
tion will adjust the mis −calculation caused
by the circumference difference between
the old and new tires. If this procedure is
not performed when tires are replaced, the
current vehicle posi tion mark may be incor-
rectly displayed.
To perform a distance calibration pro-
cedure, touch “Tire Change” on the
“Calibration” screen.
The message appears and the quick dis-
tance calibration is automatically started.
A few seconds later, a map screen will be
displayed.
Page 98 of 274
OTHER FUNCTIONS
11 8
When the Navigation System is turned on,
the “Information” screen displays when it is
time to replace a part or certain compo-
nents. (See page 23.)
1. Push the “INFO” button.
2. Touch “Maintenance”.
3. Touch the desired touch�screen
button.
For details of each touch −screen button,
see “INFORMA TION ITEMS” on page 119.
“Delete All”: To cancel all conditions
which have been inputted.
“Reset All”: To reset the item which has
satisfied a condition.
“Set Dealer”: To register or edit dealer in-
formation. (See “ — Dealer setting” on
page 120.)
If “ON” is selected, the system gives main-
tenance information with the “Information”
screen when the system is turned on. (See
page 23.)
If “OFF” is selected, the “Information”
screen is disabled.
When the vehicle needs to be serviced, the
touch−screen button color will change to
orange.
Maintenance information —
— Maintenance information
setting
Page 100 of 274

OTHER FUNCTIONS
120
It is possible to register a dealer in the sys-
tem. With dealer information registered,
route guidance to the dealer is available.
1. Push the “INFO” button.
2. Touch “Maintenance” on the “Infor-
mation” screen.
3. Touch “Set Dealer” on the “Mainte-
nance” screen.
4. If the dealer has not been registered,
enter the location of the dealer in the
same way as for a destination search.
(See “Destination search” on page 41.)
When “Set Dealer” registration is finished,
the “Edit Dealer” screen will be displayed.
5. Touch the touch�screen button to
be edited.
“Dealer”: To enter the name of a dealer.
(See page 121.)
“Contact”: To enter the name of a dealer
member. (See page 121.)
“Location”: To set a location. (See page
121.)
“Phone #”: To set a telephone number.
(See page 122.)
“Delete Dealer”: To delete the dealer in-
formation displayed on the screen.
“Enter
”: To set the displayed dealer as
a destination. (See “Starting route guid-
ance” on page 60.)
— Dealer setting
Page 101 of 274
OTHER FUNCTIONS
121
�
To edit “Dealer” or “Contact”
1. Touch “Dealer” or “Contact” on the
“Edit Dealer” screen.
2. Enter the name using the alphanu-
meric keys.
Up to 24 letters can be entered.
3. Touch “OK”.
The previous screen will be displayed.
�To edit “Location”
1. Touch “Location” on the “Edit Deal-
er” screen.
2. Touch the eight directional touch�
screen button to move the cursor
to
the desired point on the map.
3. Touch “Enter”.
The previous screen will be displayed.
Page 102 of 274
OTHER FUNCTIONS
122
�
To edit “Phone #” (telephone num-
ber)
1. Touch “Phone #” on the “Edit Deal-
er” screen.
2. Enter the number using numeral
keys.
3. Touch “OK”.
The previous screen will be displayed. It is possible to enter memos for particular
dates on the calendar.
The system informs
you of the memo entry when the system is
turned on. (See page 23.) Memos can also
be used for route guidance if the memo has
been registered with location information.
1. Push the “INFO” button.
2. Touch “Calendar”.
Calendar with memo —


1. Push the “INFO” b")

