Page 295 of 432

295
4-3. Do-it-yourself maintenance
4
Maintenance and care
Engine coolant
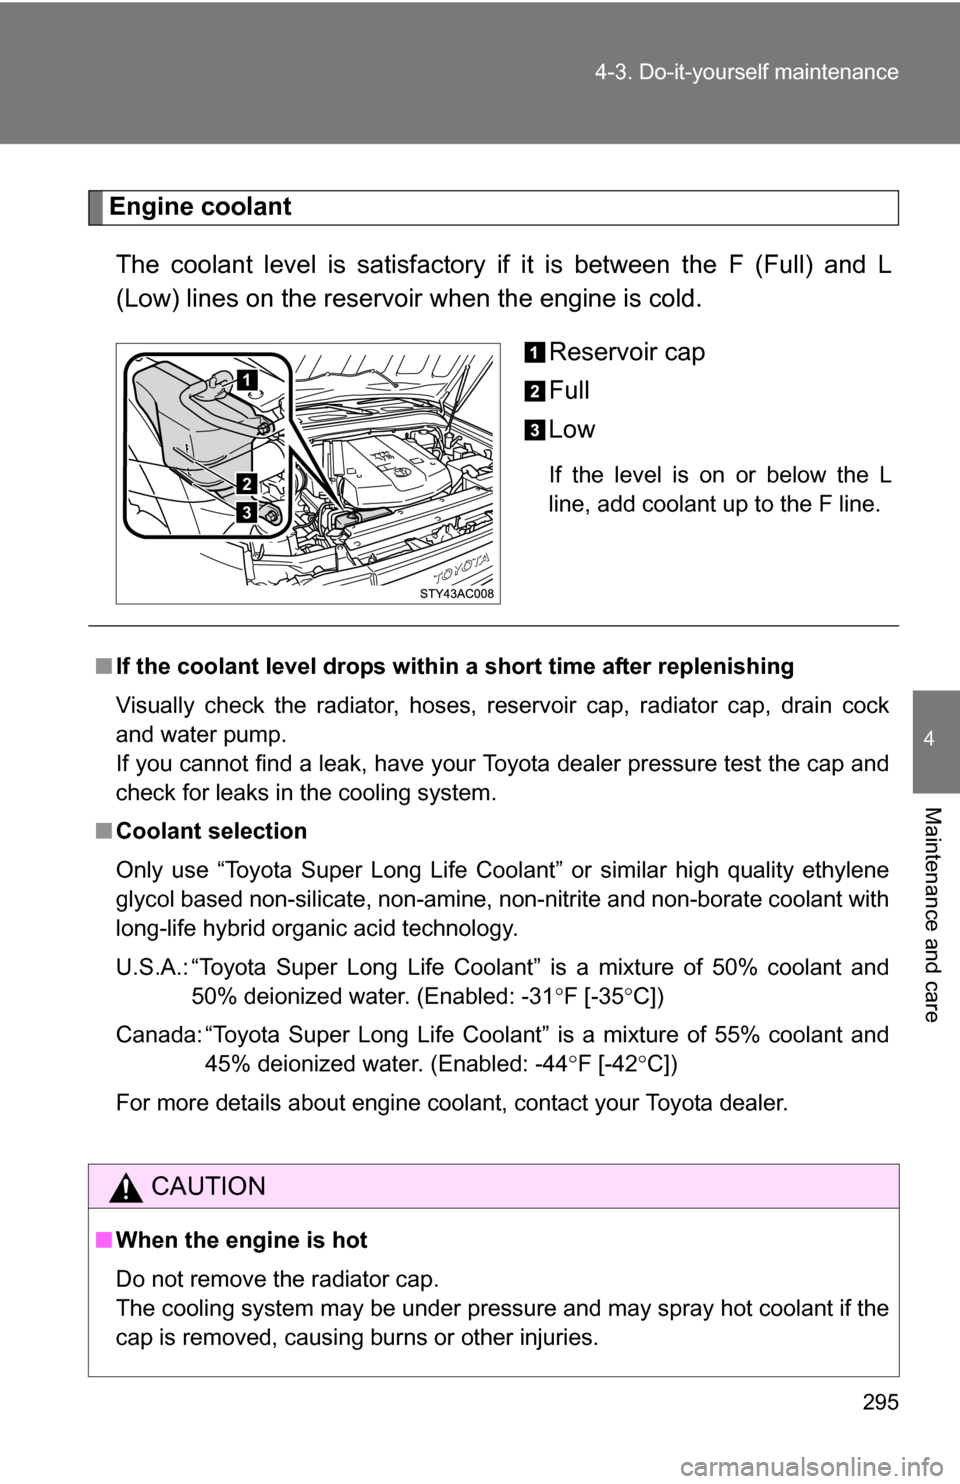
The coolant level is satisfactory if it is between the F (Full) and L
(Low) lines on the reservoir when the engine is cold. Reservoir cap
Full
Low
If the level is on or below the L
line, add coolant up to the F line.
1
2
3
■If the coolant level drops within a short time after replenishing
Visually check the radiator, hoses, reservoir cap, radiator cap, drain cock
and water pump.
If you cannot find a leak, have your Toyota dealer pressure test the cap and
check for leaks in the cooling system.
■ Coolant selection
Only use “Toyota Super Long Life Coolant” or similar high quality ethylene
glycol based non-silicate, non-amine, non-nitrite and non-borate coolant with
long-life hybrid organic acid technology.
U.S.A.: “Toyota Super Long Life Coolant” is a mixture of 50% coolant and 50% deionized water. (Enabled: -31 F [-35 C])
Canada: “Toyota Super Long Life Coolant” is a mixture of 55% coolant and 45% deionized water. (Enabled: -44 F [-42 C])
For more details about engine coolant, contact your Toyota dealer.
CAUTION
■ When the engine is hot
Do not remove the radiator cap.
The cooling system may be under pressure and may spray hot coolant if the
cap is removed, causing burns or other injuries.
Page 296 of 432
296 4-3. Do-it-yourself maintenance
Radiator and condenserCheck the radiator and condenser and clear any foreign objects.
If either of the above parts are ex tremely dirty or you are not sure of
their condition, have your vehicl e checked by your Toyota dealer.
Brake fluid
■ Checking fluid level
The brake fluid level should be
between the MAX and MIN lines
on the reservoir.
NOTICE
■When adding engine coolant
Coolant is neither plain water nor stra ight antifreeze. The correct mixture of
water and antifreeze must be used to provide proper lubrication, corrosion
protection and cooling. Be sure to read the antifreeze or coolant label.
■ If you spill coolant
Be sure to wash it off with water to prevent damage to parts or paint.
CAUTION
■When the engine is hot
Do not touch the radiator or condenser as they may be hot and may cause
burns.
Page 297 of 432

297
4-3. Do-it-yourself maintenance
4
Maintenance and care
■
Adding fluid
Make sure to check the fluid type and prepare the necessary items.
Turn the engine switch off.
Depress the brake pedal 20 times or more.
Remove the reservoir cap.
Add newly opened brake fluid up to the MAX line.
.
Fluid type FMVSS No.116 DOT 3 or SAE J1703 brake fluid
ItemsRag or paper towel
■ Brake fluid can absorb moisture from the air
Excess moisture in the fluid can cause a dangerous loss of braking effi-
ciency. Use only newly opened brake fluid.
CAUTION
■When filling the reservoir
Take care because brake fluid can harm your hands or eyes and damage
painted surfaces.
If fluid gets on your hands or in your eyes, flush the affected area with clean
water immediately.
If you still experience discomfort, see a doctor.
NOTICE
■If the fluid level is low or high
It is normal for the brake fluid level to go down slightly as the brake pads
wear or when the fluid level in the accumulator is high.
If the reservoir needs frequent refilling, it may indicate a serious pro\
blem.
■ If you spill fluid
Be sure to wash it off with water to prevent damage to parts or paint.
Page 298 of 432
298 4-3. Do-it-yourself maintenance
Power steering fluid■ Fluid level
The fluid level should be within the appropriate range.
Full (when cold)
Add fluid (when cold)
Full (when hot)
Add fluid (when hot)
Hot: Vehicle has been driven around 50 mph (80 km/h) for 20 minutes, or slightly longer in frigid temperatures. (Fluid
temperature, 140°F - 175°F [60°C - 80°C])
Cold: Engine has not been run for about 5 hours. (Room tem- perature, 50°F - 85°F[10°C - 30°C])
■ Checking the fluid level
Make sure to check the fluid type and prepare the necessary items.
Clean all dirt off the reservoir.
Remove the cap by turning it counterclockwise.
Wipe the dipstick clean.
Reinstall and remove the reservoir cap again.
Check the fluid level.
Fluid type Automatic transmission fluid DEXRON® II or III
Items Rag or paper towel
Page 320 of 432
320
4-3. Do-it-yourself maintenance
Checking and replacing fuses
If any of the electrical components do not operate, a fuse may have
blown. If this happens, check and replace the fuses as necessary.
Turn the engine switch off.
The fuses are located in the following places. To check the
fuses, follow the in structions below.
■ Engine compartment
Ty p e A
Push the tab in and lift the lid
off.
Type B (if equipped) Push the tab in and lift the lid
off.
Page 342 of 432

342 5-1. Essential information
■Emergency towin g procedure
The engine switch must be in the ACC (engine off) or the ON
(engine running) position.
4WD models with an automatic transmission: Shift the front-wheel
drive control lever in H2.
4WD models with a manual transmission: Unlock the center differ-
ential.
Put the shift lever in N.
Release the parking brake.
CAUTION
■ Caution while towing
●Use extreme caution when towing the vehicle.
Avoid sudden starts or erratic driving maneuvers which place excessive
stress on the emergency towing eyelet and the cables or chains.
● If the engine is not running, the power assist for the brakes and steering
will not function, making steering and braking more difficult.
NOTICE
■To prevent causing serious dama ge to the transmission
(vehicles with an automatic transmission)
Never tow this vehicle from the rear with the four wheels on the ground.
This may cause serious damage to the transmission.
■ Emergency towing eyelet precautions
● Before emergency towing, check that the eyelet is not broken or damaged.
● Fasten the towing cable or chain securely to the eyelet.
● Do not jerk the eyelet. Apply steady and even force.
● To avoid damaging the eyelet, do not pull from the side or at a vertical
angle. Always pull straight ahead.
Page 351 of 432

5
When trouble arises
351
5-2. Steps to take in an emergency
Stop the vehicle immediately.
The following warnings indicate the possibility of damage to the vehi-
cle that may lead to an accident. Immediately stop the vehicle in a
safe place and contact your Toyota dealer.
*: The light may come on when the oil level is extremely low. It is not designed to indicate low oil level, and the oil level must be checked using the engine
oil level dipstick.
Have the vehicle inspected immediately.
Failing to investigate the cause of the following warnings may lead to
the system operating abnormally and possibly cause an accident.
Have the vehicle inspected by your Toyota dealer immediately.
Warning lightWarning light/Details
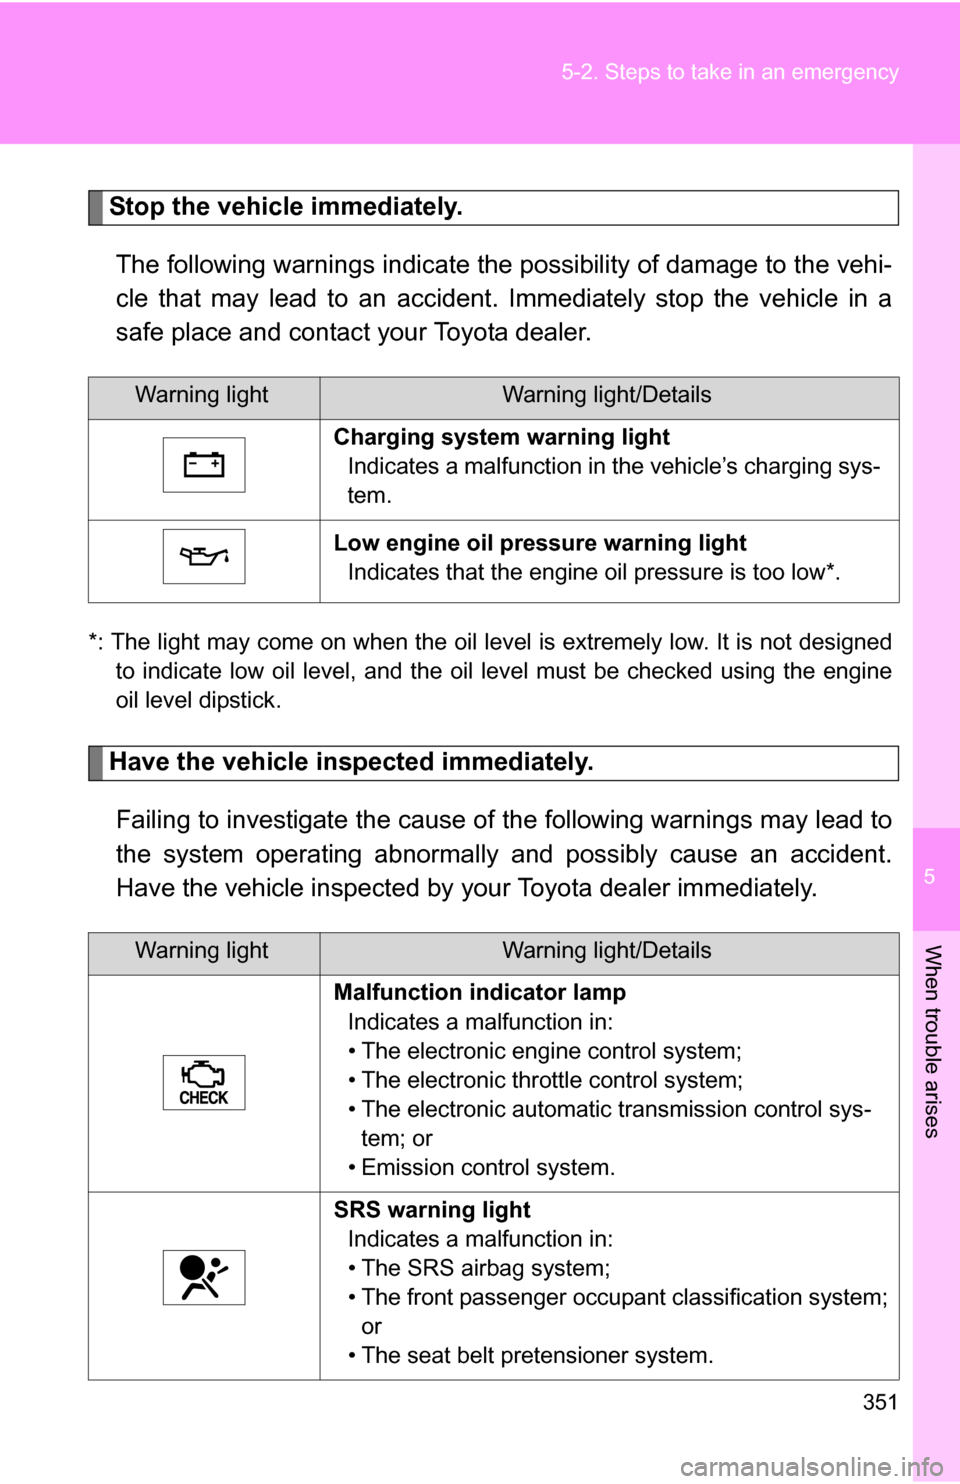
Charging system warning light Indicates a malfunction in the vehicle’s charging sys-
tem.
Low engine oil pressure warning light Indicates that the engine oil pressure is too low*.
Warning lightWarning light/Details
Malfunction indicator lamp Indicates a malfunction in:
• The electronic engine control system;
• The electronic throttle control system;
• The electronic automatic transmission control sys-tem; or
• Emission control system.
SRS warning light Indicates a malfunction in:
• The SRS airbag system;
• The front passenger occupant classification system; or
• The seat belt pretensioner system.
Page 354 of 432

354 5-2. Steps to take in an emergency
*1: Driver's seat belt reminder:The driver’s seat belt reminder sounds to alert the driver that his or her seat
belt is not fastened. Once the engine switch is turned to the ON or START
position, the buzzer sounds for 6 seconds. If the vehicle has reached a
speed of at least 12 mph (20 km/h), the buzzer sounds intermittently for 10
seconds. Then, if the seat belt is still unfastened, the buzzer will sound in a
different tone for 20 more seconds.
*2: Front passenger’s seat belt reminder:
The front passenger’s seat belt reminder sounds to alert the front passenger
that his or her seat belt is not fastened. The buzzer sounds intermittently for
10 seconds after the vehicle has reached a speed of at least 12 mph (20 km/
h). Then, if the seat belt is still unfastened, the buzzer will sound in a different
tone for 20 more seconds. Low fuel level warning
light
Low level of fuel. Refuel the vehicle.
(U.S.A.) Engine oil replacement
reminder light
• Illuminates for about 3
seconds and then flashes
for about 12 seconds: Indi-
cates that the engine oil is
scheduled to be changed. Check the engine oil,
and change if neces-
sary.
• Comes on and remains: Indicates that the engine
oil should be changed. Check and change the
engine oil.
Warning lightWarning light/DetailsCorrection procedure