Page 109 of 468

109
1-7. Safety information
1
Before driving
CAUTION
■
When installing a booster seat
Do not fully extend the shoulder belt to prevent the belt from going to ALR
lock mode: ( P. 56)
● ALR mode causes the belt to tighten only which could cause injury or dis-
comfort to the child.
● Do not allow the child to play with the seat belt or the child could be killed
or seriously injured.
■ When installing a child restraint system
Follow the directions given in the child restraint system installation manual
and fix the child restraint system securely in place.
If the child restraint system is not correctly fixed in place, the child or other
passengers may be seriously injured or even killed in the event of sudden
braking or an accident.
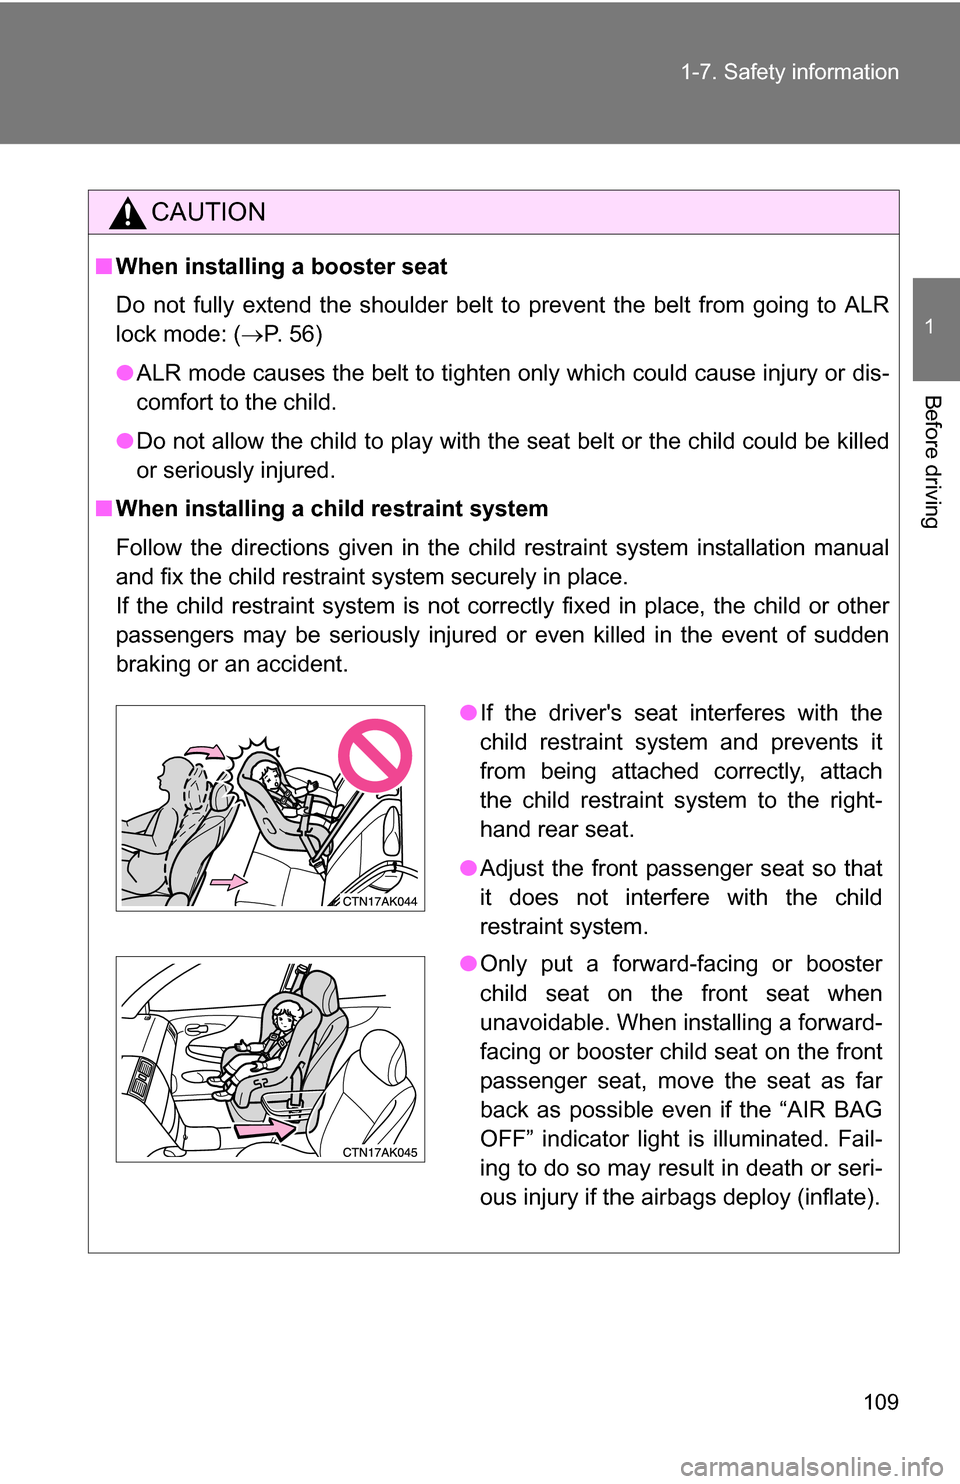
●If the driver's seat interferes with the
child restraint system and prevents it
from being attached correctly, attach
the child restraint system to the right-
hand rear seat.
● Adjust the front passenger seat so that
it does not interfere with the child
restraint system.
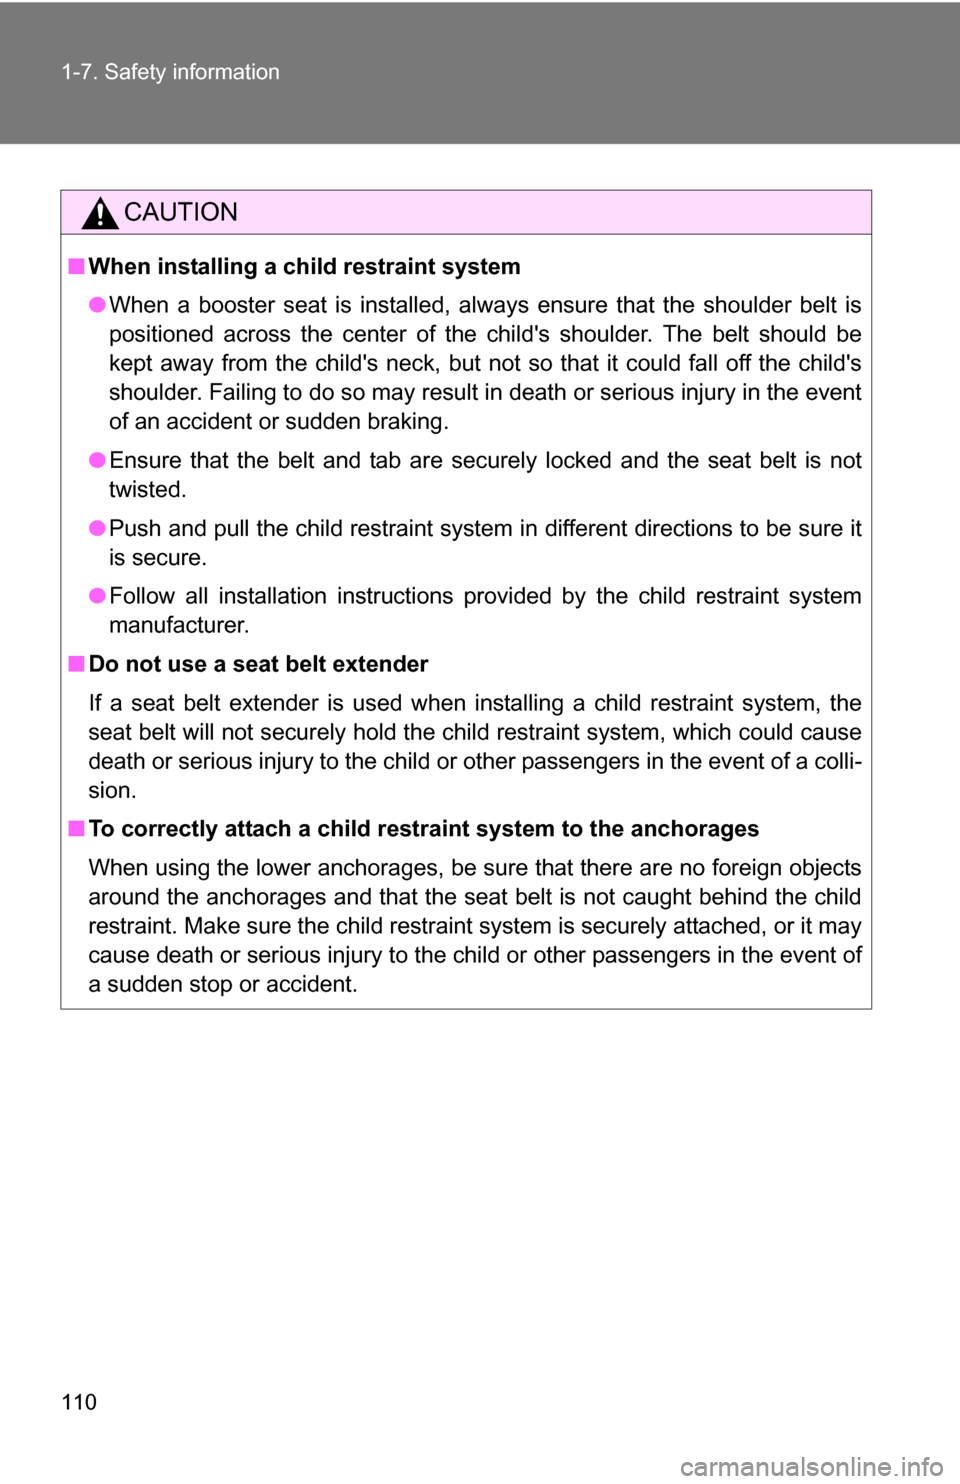
● Only put a forward-facing or booster
child seat on the front seat when
unavoidable. When installing a forward-
facing or booster child seat on the front
passenger seat, move the seat as far
back as possible even if the “AIR BAG
OFF” indicator light is illuminated. Fail-
ing to do so may result in death or seri-
ous injury if the airbags deploy (inflate).
Page 110 of 468

110 1-7. Safety information
CAUTION
■When installing a child restraint system
●When a booster seat is installed, always ensure that the shoulder belt is
positioned across the center of the child's shoulder. The belt should be
kept away from the child's neck, but not so that it could fall off the child's
shoulder. Failing to do so may result in death or serious injury in the event
of an accident or sudden braking.
● Ensure that the belt and tab are securely locked and the seat belt is not
twisted.
● Push and pull the child restraint system in different directions to be sure it
is secure.
● Follow all installation instructions provided by the child restraint system
manufacturer.
■ Do not use a seat belt extender
If a seat belt extender is used when installing a child restraint system, the
seat belt will not securely hold the child restraint system, which could cause
death or serious injury to the child or other passengers in the event of a colli-
sion.
■ To correctly attach a child r estraint system to the anchorages
When using the lower anchorages, be sure that there are no foreign objects
around the anchorages and that the seat belt is not caught behind the child
restraint. Make sure the child restraint system is securely attached, or it may
cause death or serious injury to the child or other passengers in the event of
a sudden stop or accident.
Page 113 of 468
113
2-1. Driving procedures
2
When driving
■
Parking the vehicle
Automatic transmission
With the shift lever in D, depress the brake pedal.
Set the parking brake. ( P. 137)
Shift the shift lever to P. ( P. 130)
When parking on a hill, if necessary, block the wheels.
Vehicles with smart key system:
Turn the “ENGINE START STOP” switch OFF and stop the
engine.
Vehicles without smart key system:
Turn the engine switch to the “LOCK” position and stop the
engine.
Lock the door, making sure that you have the key on your
person.
Manual transmission
With the clutch pedal fully depressed, depress the brake
pedal.
Set the parking brake. ( P. 137)
Shift the shift lever to N. ( P. 135)
When parking on a hill, shift the shift lever to 1 or R. If necessary,
block the wheels.
Turn the engine switch to the “LOCK” position and stop the
engine.
Lock the door, making sure that you have the key on your
person.
STEP1
STEP2
STEP3
STEP4
STEP5
STEP1
STEP2
STEP3
STEP4
STEP5
Page 118 of 468

118 2-1. Driving procedures
CAUTION
■When the vehicle is parked
●Do not leave glasses, cigarette lighters, spray cans, or soft drink cans in
the vehicle when it is in the sun. Doing so may result in the following.\
• Gas may leak from a cigarette lighter or spray can, and may lead to a
fire.
• The temperature inside the vehicle may cause the plastic lenses and plastic material of eye glasses to deform or crack.
• Soft drink cans may fracture, causing the contents to spray over the interior of the vehicle, and may also cause a short circuit in the vehi-
cle's electrical components.
● Always apply the parking brake, shift the shift lever to P (automatic trans-
mission vehicles), stop the engine and lock the vehicle.
Do not leave the vehicle unattended while the engine is running.
● Do not touch the exhaust pipe while the engine is running or immediately
after turning the engine off. Doing so may cause burns.
● Do not leave the engine running in an area with snow build-up, or where it
is snowing. If snowbanks build up around the vehicle while the engine is
running, exhaust gases may collect and enter the vehicle. This may lead
to death or a serious health hazard.
■ Exhaust gases
Exhaust gases include harmful carbon monoxide (CO) that is colorless and
odorless. Inhaling exhaust gases may lead to death or a serious health haz-
ard.
●If the vehicle is in a poorly ventilated area, stop the engine. In a closed
area, such as a garage, exhaust gases may collect and enter the vehicle.
This may lead to death or a serious health hazard.
● The exhaust should be checked occasionally. If there is a hole or crack
caused by corrosion, damage to a joint or abnormal exhaust noise, be
sure to have the vehicle inspected and repaired by your Toyota dealer.
Failure to do so may allow exhaust gases to enter the vehicle, resulting in
death or a serious health hazard.
Page 124 of 468
124 2-1. Driving procedures
■Steering lock release
■ If the engine does not start
The engine immobilizer system may not have been deactivated. ( P. 75)
■ When the “ENGINE START STOP” s witch indicator flashes in amber
The system may be malfunctioning. Have the vehicle inspected by your
Toyota dealer immediately.
■ Auto power OFF function
If the vehicle is left in ACCESSORY mode for more than an hour with the
shift lever in P, the “ENGINE START STOP” switch will automatically turn
OFF.
■ Key battery depletion
P. 2 8
■ When the electronic key battery is discharged
P. 343
■ Conditions affecting operation
P. 2 6
■ Note for the entry function
P. 2 8
Make sure that the steering wheel lock is
released.
To release the steering wheel lock, gently
turn the wheel left or right while pressing
the “ENGINE START STOP” switch.
If the steering wheel lock does not
release, the “ENGINE START STOP”
switch indicator will flash green.
Page 127 of 468
127
2-1. Driving procedures
2
When driving
■
Turning the engine switch from “ACC” to “LOCK”
■ Changing engine switch position
“LOCK”
The steering wheel is locked
and the key can be removed.
“ACC”
Some electrical components
such as the audio system can
be used.
“ON”
All electrical components can
be used.
“START”
For starting the engine.
Shift the shift lever to P (auto-
matic transmission) or N (man-
ual transmission).
(P. 130, 135)
Push in the key and turn to the
“LOCK” position.STEP1
STEP2
Page 128 of 468
128 2-1. Driving procedures
■Steering lock release
■ If the engine does not start
The engine immobilizer system may not have been deactivated. ( P. 75)
■ Key reminder buzzer
A buzzer sounds if the driver’s door is opened while the engine switch is in
the “LOCK” position to remind you to remove the key.
CAUTION
■When starting the engine
Always start the engine while sitting in the driver's seat. Do not depress the
accelerator while starting the engine under any circumstances.
Doing so may cause an accident resulting in death or serious injury.
■ Caution when driving
Do not turn the engine switch to the “LOCK” position while driving. If, in an
emergency, you must turn the engine off while the vehicle is moving, turn the
engine switch only to the “ACC” position.
When starting the engine, the engine
switch may seem stuck in the “LOCK”
position. To free it, turn the key while turn-
ing the steering wheel slightly in either
direction.
Page 141 of 468

141
2-2. Instrument cluster
2
When driving
Instrument panel light control
The brightness of the instrument panel lights can be adjusted.
Darker
Brighter
Optitron type meter: When the
headlight switch is turned on,
the brightness will be reduced
slightly unless the control but-
ton is turned fully clockwise.
Odometer and trip meter display
Odometer: Displays the total distance the vehicle has been driven.
Trip meter: Displays the distance the vehicle has been driven since the
meter was last reset. Trip meters A and B can be used to record and
display different distances independently.
Multi-informat ion display
P. 146
Display button
Switches the multi-information display.
Engine coolant temperature gauge
Displays the engine coolant temperature.
NOTICE
■To prevent damage to the engine and its components
●Do not let the indicator needle of the tachometer enter the red zone, which
indicates the maximum engine speed.
● The engine may be overheating if the engine coolant temperature gauge is
in the red zone (H). In this case, immediately stop the vehicle in a safe
place, and check the engine after it has cooled completely. (
P. 411)