2009 SUBARU OUTBACK ESP
[x] Cancel search: ESPPage 98 of 447

2-6Keys and doors
&Locking and unlocking from
the inside
WARNING
Keep all doors locked when you
drive, especially when small chil-
dren are in your vehicle.
Along with the proper use of seat-
belts and child restraints, locking
the doors reduces the chance of
being thrown out of the vehicle in anaccident.
It also helps prevent passengers
from falling out if a door is acciden-
tally opened, and intruders from
unexpectedly opening doors and
entering your vehicle.
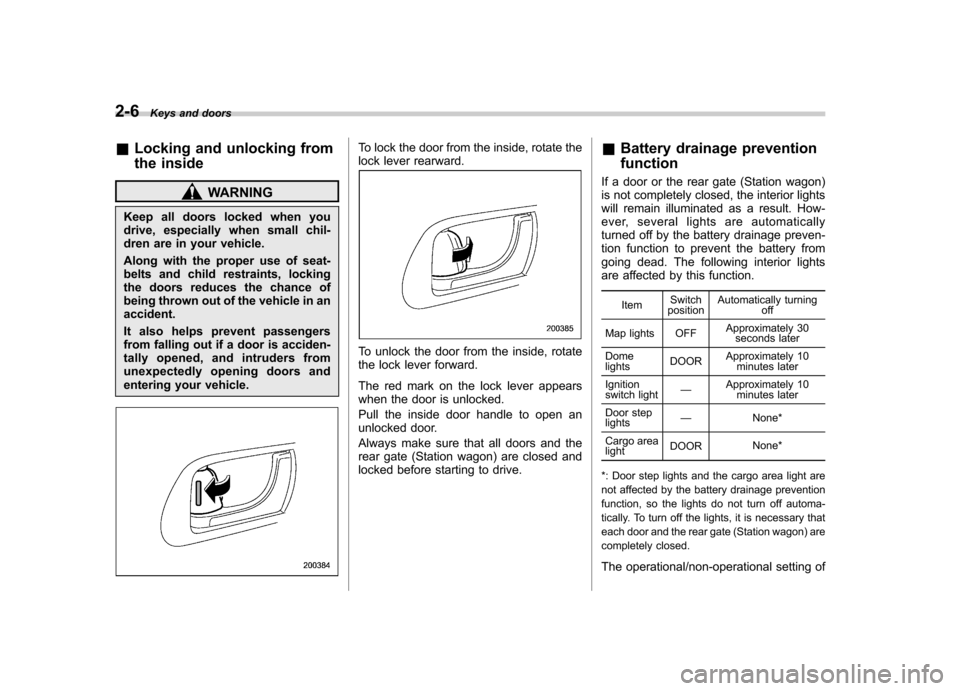
To lock the door from the inside, rotate the
lock lever rearward.
To unlock the door from the inside, rotate
the lock lever forward.
The red mark on the lock lever appears
when the door is unlocked.
Pull the inside door handle to open an
unlocked door.
Always make sure that all doors and the
rear gate (Station wagon) are closed and
locked before starting to drive. &
Battery drainage prevention function
If a door or the rear gate (Station wagon)
is not completely closed, the interior lights
will remain illuminated as a result. How-
ever, several lights are automatically
turned off by the battery drainage preven-
tion function to prevent the battery from
going dead. The following interior lights
are affected by this function.
Item Switch
position Automatically turning
off
Map lights OFF Approximately 30
seconds later
Dome lights DOOR
Approximately 10
minutes later
Ignition
switch light —
Approximately 10
minutes later
Door steplights —
None*
Cargo arealight DOOR
None*
*: Door step lights and the cargo area light are
not affected by the battery drainage prevention
function, so the lights do not turn off automa-
tically. To turn off the lights, it is necessary that
each door and the rear gate (Station wagon) are
completely closed.
The operational/non-operational setting of
Page 100 of 447

2-8Keys and doors
(“ LOCK ”) position.
! Behavior with key lock-in preven-
tion function non-operational
. If the lock lever is turned to the rear
( “ LOCK ”) position with the driver ’s door
open and the driver ’s door is then closed
with the lock lever in that position, thedriver ’s door is locked.
. If the spare key is used to lock the
driver ’s door from the outside of the
vehicle, the door is locked.
This function ’s operational/non-opera-
tional setting can be changed.
Vehicle with genuine SUBARU naviga-
tion system:
The operational/non-operational setting
can be changed using the monitor. For
details, please refer to the Owner ’s Man-
ual supplement for the monitor system.
The setting can also be changed by a
SUBARU dealer. Contact the nearest
SUBARU dealer for details.
Vehicle without genuine SUBARU navi-
gation system:
The setting can be changed by a
SUBARU dealer. Contact the nearest
SUBARU dealer for details. NOTE .
The factory setting (default setting)
for this function is set as “operational ”.
. When leaving the vehicle, make sure
you are holding the key before locking
the doors. Remote keyless entry system
CAUTION
. Do not expose the transmitter to
severe shocks, such as those
experienced as a result of drop-
ping or throwing.
. Do not take the transmitter apart
except when replacing the bat-
tery.
. Do not get the transmitter wet. If it
gets wet, wipe it dry with a cloth
immediately.
This device complies with Part 15 of
the FCC Rules and with RSS-210 of
Industry Canada. Operation is subject
to the following two conditions: (1) This
device may not cause harmful inter-
ference, and (2) this device must
accept any interference received, in-
cluding interference that may cause
undesired operation.
Changes or modifications not ex-
pressly approved by the party respon-
sible for compliance could void theuser ’s authority to operate the equip-
ment.
Page 102 of 447

2-10Keys and doors
& Unlocking the doors
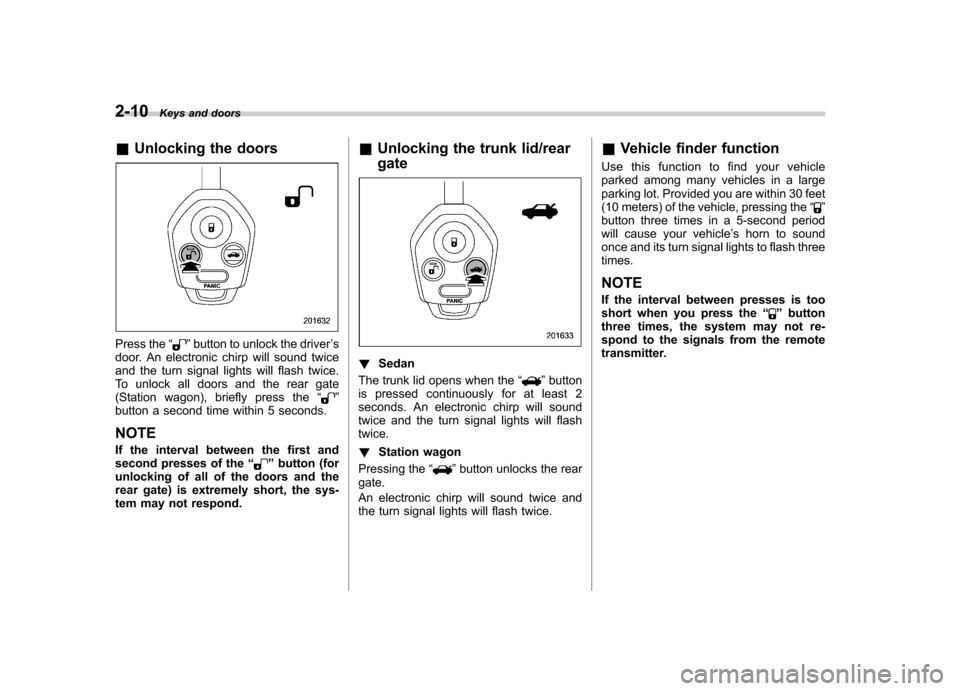
Press the “”button to unlock the driver ’s
door. An electronic chirp will sound twice
and the turn signal lights will flash twice.
To unlock all doors and the rear gate
(Station wagon), briefly press the “
”
button a second time within 5 seconds.
NOTE
If the interval between the first and
second presses of the “
”button (for
unlocking of all of the doors and the
rear gate) is extremely short, the sys-
tem may not respond. &
Unlocking the trunk lid/rear gate
! Sedan
The trunk lid opens when the “
”button
is pressed continuously for at least 2
seconds. An electronic chirp will sound
twice and the turn signal lights will flashtwice. ! Station wagon
Pressing the “
”button unlocks the rear
gate.
An electronic chirp will sound twice and
the turn signal lights will flash twice. &
Vehicle finder function
Use this function to find your vehicle
parked among many vehicles in a large
parking lot. Provided you are within 30 feet
(10 meters) of the vehicle, pressing the “
”
button three times in a 5-second period
will cause your vehicle ’s horn to sound
once and its turn signal lights to flash threetimes. NOTE
If the interval between presses is too
short when you press the “
”button
three times, the system may not re-
spond to the signals from the remote
transmitter.
Page 111 of 447

done during the standby period, the
system will not switch to the surveil-
lance state.–Doors are unlocked using the
remote transmitter. – Any door (including the rear gate
of a Station wagon or the trunk of a
Sedan) is opened. – Ignition switch is turned to the
“ ON ”position.
& Disarming the system
Briefly press the “
”button (for less than
2 seconds) on the remote transmitter. The
driver ’s door will unlock, an electronic
chirp will sound twice, the turn signal
lights will flash twice and the indicator
light will go off.
To unlock all other doors and the rear gate
(Station wagon), briefly press the “
”
button a second time within 5 seconds.
NOTE
If the interval between the first and
second presses of the “
”button (for
unlocking of all of the doors and the
rear gate) is extremely short, the sys-
tem may not respond.
Or the system can be disarmed by the
following method, too. . Insert the key in the door lock of the driver
’s door and turn it to the unlock
position. ! Emergency disarming
If you cannot disarm the system using the
transmitter (i.e. the transmitter is lost,
broken or the transmitter battery is too
weak), you can disarm the system without
using the transmitter.
The system can be disarmed if you turn
the ignition switch from the “LOCK ”to the
“ ON ”position with a registered key.
Insert the key in the door lock of thedriver ’s door and turn it to the unlock
position.
& Valet mode
When you choose the valet mode, the
alarm system does not operate. In valet
mode, the remote transmitter is used only
for locking and unlocking the doors and
rear gate (Station wagon) and panicactivation.
To enter the valet mode, change the
setting of your vehicle ’s alarm system for
deactivation mode. Refer to “Activating
and deactivating the alarm system ”in this
section. The security indicator light will
continue to flash once every 3 seconds
indicating that the system is in the valetmode. To exit valet mode, change the setting of
your vehicle
’s alarm system for activation
mode. Refer to “Activating and deactivat-
ing the alarm system ”in this section.
& Passive arming
When passive arming mode has been
programmed by the dealer, arming of the
system is automatically accomplished
without using the remote transmitter. Note
that in this mode, DOORS MUST BE
MANUALLY LOCKED. ! To enter the passive mode
If you wish to program the passive arming
mode, have it done by your SUBARU
dealer. ! Arming the system
CAUTION
In passive mode, the system will
automatically activate the alarm but
WILL NOT automatically lock the
doors. In order to lock the doors
you must either lock them as in-
dicated in step 4 below or with the
key once they have been closed.
Failure to lock the doors manually
will result in a higher security risk.
1. Turn the ignition switch to the “ON ”
Keys and doors
2-19
– CONTINUED –
Page 134 of 447

off. NOTE
If the connection between the combina-
tion meter and battery is broken for any
reason such as vehicle maintenance or
fuse replacement, the data recorded on
the trip meter will be lost. &Current and average fuel consumption
U.S.-spec. models
Canada-spec. models
1) Current fuel consumption
2) Average fuel consumption
Current fuel consumption shows the rate
of fuel consumption at the present mo-
ment. Average fuel consumption shows
the average rate of fuel consumption since
the trip meter was last reset.
When the vehicle speed is less than
approximately 6 mph (9.5 km/h), the
current fuel consumption is not displayed.
The displayed number with “A ” is the
average fuel consumption corresponding
to the A trip meter indication, and the
displayed number with “B ” is the average
fuel consumption corresponding to the B
trip meter indication.
Those A and B indications can be
changed by depressing the trip knob. When either of the trip meter indications is
reset, the corresponding average fuel
consumption value is also reset. NOTE .
The indicated values vary in accor-
dance with changes in the vehicle ’s
running conditions. Also, the indicated
values may differ slightly from the
actual values and should thus be
treated only as a guide.. When either trip meter indication is
reset, the average fuel consumption
corresponding to that trip meter indica-
tion is not shown until the vehicle has
subsequently covered a distance of 1
mile (or 1 km). Instruments and controls
3-11
– CONTINUED –
Page 145 of 447

3-22Instruments and controls
Warning messages Details
Door open warning
When any of the doors, the rear gate (Station wagon) or the trunk lid
(Sedan) is not fully closed, it is indicated by the corresponding part of the
door light.
Always make sure this warning message is out before you start to drive.
The display shows the interruptive warning message for 3 seconds.
Parking brake warning
This warning message illuminates with the parking brake applied while the
ignition switch is in the“ON ”position. It goes out when the parking brake is
fully released.
The display shows the interruptive warning message for 3 seconds and
then returns to its original display. The interruptive warning message will be
displayed again after 20 seconds.
Run mode change system warning
This warning message indicates a malfunction of the “SI-DRIVE mode ”
change. If this warning message is shown on the display, contact your
nearest SUBARU dealer and have the SI-DRIVE mode system inspected.
The display shows the interruptive warning message for 3 seconds.
Engine coolant temperature warning
When the engine coolant temperature reaches 248 8F (120 8C), this warning
message is indicated. If this warning message is displayed, refer to the “ Engine overheating
”section in chapter 9 for details the necessary measures.
The display shows the interruptive warning message for 3 seconds.
Page 152 of 447

If any lights fail to illuminate, it indicates a
burned-out bulb or a malfunction of the
corresponding system.
Consult your authorized SUBARU dealer
for repair. &Seatbelt warning light
and chime
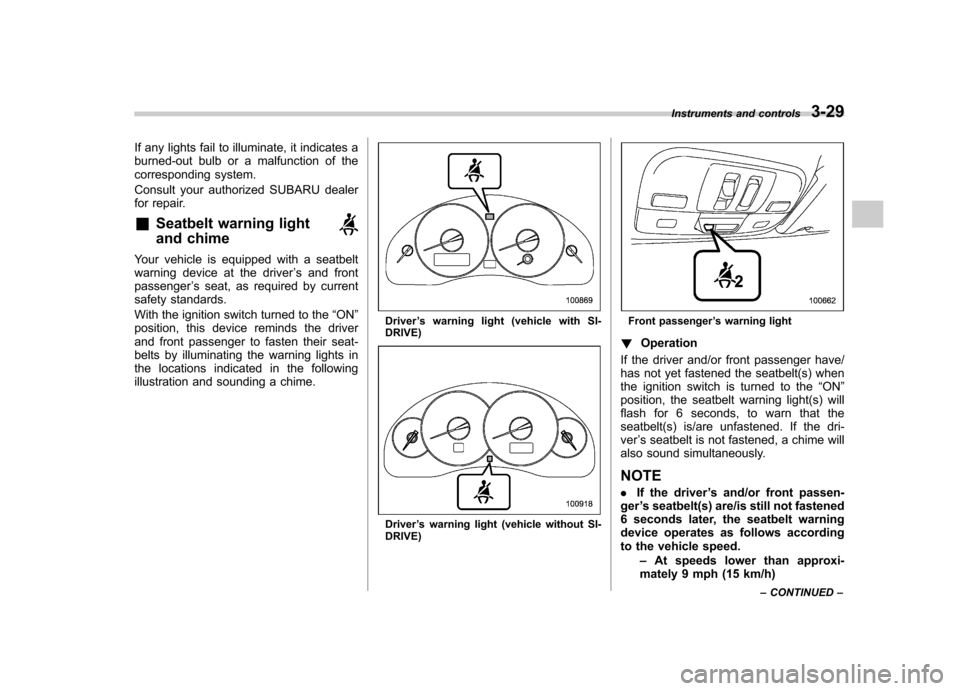
Your vehicle is equipped with a seatbelt
warning device at the driver ’s and front
passenger ’s seat, as required by current
safety standards.
With the ignition switch turned to the “ON ”
position, this device reminds the driver
and front passenger to fasten their seat-
belts by illuminating the warning lights in
the locations indicated in the following
illustration and sounding a chime.
Driver ’s warning light (vehicle with SI-
DRIVE)
Driver ’s warning light (vehicle without SI-
DRIVE)
Front passenger ’s warning light
! Operation
If the driver and/or front passenger have/
has not yet fastened the seatbelt(s) when
the ignition switch is turned to the “ON ”
position, the seatbelt warning light(s) will
flash for 6 seconds, to warn that the
seatbelt(s) is/are unfastened. If the dri-ver ’s seatbelt is not fastened, a chime will
also sound simultaneously. NOTE . If the driver ’s and/or front passen-
ger ’s seatbelt(s) are/is still not fastened
6 seconds later, the seatbelt warning
device operates as follows according
to the vehicle speed.
–At speeds lower than approxi-
mately 9 mph (15 km/h) Instruments and controls
3-29
– CONTINUED –
Page 156 of 447

&AT OIL TEMP warning
light (AT models)
The AT oil temperature warning light “AT
OIL TEMP ”illuminates when the ignition
switch is turned to the “ON ”position and
goes out after approximately 2 seconds.
If this light illuminates when the engine is
running, it may indicate that the automatic
transmission fluid temperature is too hot.
If the light illuminates while driving, im-
mediately stop the vehicle in a safe place
and let the engine idle until the warning
light goes off. ! Automatic transmission control
system warning
If the “AT OIL TEMP ”warning light flashes
after the engine has started, it may
indicate that the automatic transmission
control system is not working properly.
Contact your nearest SUBARU dealer for
service immediately.
& Low tire pressure
warning light (U.S.-spec. models)
When the ignition switch is turned to the “ON ”position, the low tire pressure warn-
ing light will illuminate for approximately 2
seconds to check that the tire pressure
monitoring system (TPMS) is functioning properly. If there is no problem and all tires
are properly inflated, the light will go out.
Each tire, including the spare (if provided),
should be checked monthly when cold
and inflated to the inflation pressure
recommended by the vehicle manufac-
turer on the vehicle placard or tire inflation
pressure label. (If your vehicle has tires of
a different size than the size indicated on
the vehicle placard or tire inflation pres-
sure label, you should determine the
proper inflation pressure for those tires.)
As an added safety feature, your vehicle
has been equipped with a tire pressure
monitoring system (TPMS) that illuminates
a low tire pressure telltale when one or
more of your tires is significantly under-
inflated. Accordingly, when the low tire
pressure telltale illuminates, you should
stop and check your tires as soon as
possible, and inflate them to the proper
pressure. Driving on a significantly under-
inflated tire causes the tire to overheat and
can lead to tire failure. Under-inflation also
reduces fuel efficiency and tire tread life,
and may affect the vehicle
’s handling and
stopping ability.
Please note that the TPMS is not a
substitute for proper tire maintenance,
and it is the driver ’s responsibility to
maintain correct tire pressure, even if
under-inflation has not reached the level to trigger illumination of the TPMS low tire
pressure telltale.
Your vehicle has also been equipped with
a TPMS malfunction indicator to indicate
when the system is not operating properly.
The TPMS malfunction indicator is com-
bined with the low tire pressure telltale.
When the system detects a malfunction,
the telltale will flash for approximately one
minute and then remain continuously
illuminated. This sequence will continue
upon subsequent vehicle start-ups as long
as the malfunction exists. When the
malfunction indicator is illuminated, the
system may not be able to detect or signal
low tire pressure as intended. TPMS
malfunctions may occur for a variety of
reasons, including the installation of re-
placement or alternate tires or wheels on
the vehicle that prevent the TPMS from
functioning properly. Always check the
TPMS malfunction telltale after replacing
one or more tires or wheels on your
vehicle to ensure that the replacement or
alternate tires and wheels allow the TPMS
to continue to function properly.
Should the warning light illuminate stea-
dily after blinking for approximately one
minute, have the system inspected by
your nearest SUBARU dealer as soon aspossible.Instruments and controls
3-33
– CONTINUED –