Page 341 of 447
9-16In case of emergency
Rear towing hook:
The rear towing hook is located below the
center of the rear bumper.
CAUTION
Never use the rear towing hook to
tie the vehicle down. Front tie-down hooks:
The front tie-down hooks are located
between each of the front tires and the
front bumper.
Rear tie-down hooks:
The rear tie-down hooks are located near
each of the jack-up reinforcements.
WARNING
Use the rear tie-down hooks only for
downward anchoring. If they are
used to anchor the vehicle in any
other direction, cables may slip off
the hooks, possibly causing a dan-
gerous situation.
& Using a flat-bed truck
This is the best way to transport your
vehicle. Use the following procedures to
ensure safe transportation.
1. Shift the selector lever into the “P ”
position for automatic transmission vehi-
cles or “1st ”for manual transmission
Page 342 of 447

vehicles.
2. Pull up the parking brake lever firmly.
3. Secure the vehicle onto the carrier
properly with safety chains. Each safety
chain should be equally tightened and
care must be taken not to pull the chains
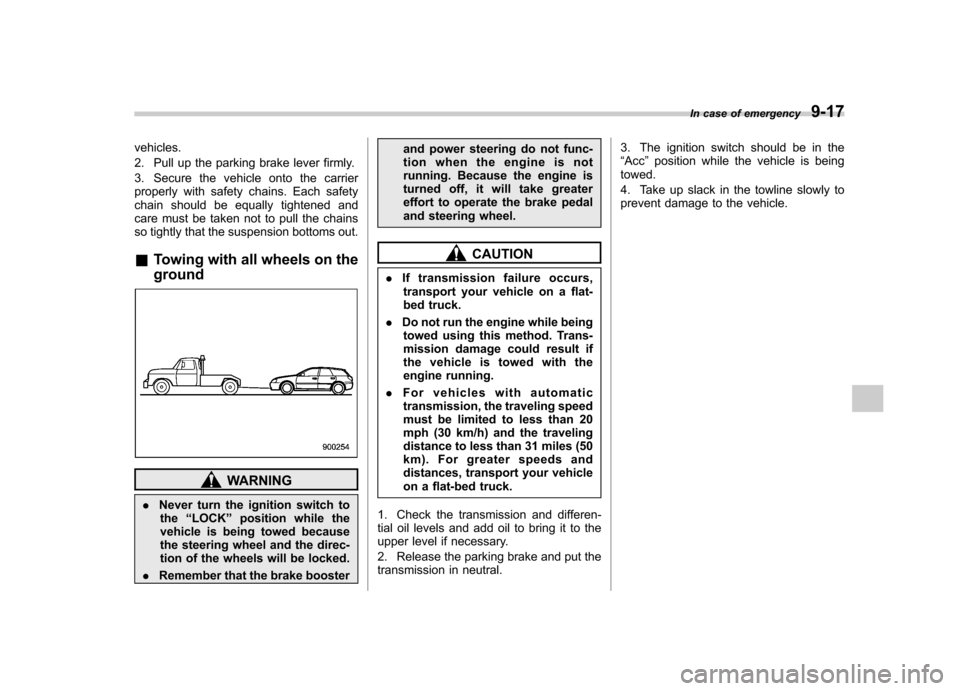
so tightly that the suspension bottoms out. &Towing with all wheels on the ground
WARNING
. Never turn the ignition switch to
the “LOCK ”position while the
vehicle is being towed because
the steering wheel and the direc-
tion of the wheels will be locked.
. Remember that the brake booster and power steering do not func-
tion when the engine is not
running. Because the engine is
turned off, it will take greater
effort to operate the brake pedal
and steering wheel.
CAUTION
. If transmission failure occurs,
transport your vehicle on a flat-
bed truck.
. Do not run the engine while being
towed using this method. Trans-
mission damage could result if
the vehicle is towed with the
engine running.
. For vehicles with automatic
transmission, the traveling speed
must be limited to less than 20
mph (30 km/h) and the traveling
distance to less than 31 miles (50
km). For greater speeds and
distances, transport your vehicle
on a flat-bed truck.
1. Check the transmission and differen-
tial oil levels and add oil to bring it to the
upper level if necessary.
2. Release the parking brake and put the
transmission in neutral. 3. The ignition switch should be in the“
Acc ”position while the vehicle is being
towed.
4. Take up slack in the towline slowly to
prevent damage to the vehicle. In case of emergency
9-17
Page 344 of 447
Station wagon:To take out the jack and
maintenance tools, open the center lid and
remove the bucket from the center of the
spare tire. Then, take the jack out of thebucket. & Jack handle
The jack handle is stowed on the back of
the floor cover of the trunk or on the back
of the center lid of the cargo area.Sedan: Open the floor cover and remove
the jack handle from the back of the floor
cover.
Station wagon: Open the center lid,
remove the left-hand part of the lid, and
take out the jack handle. For how to use the jack, refer to
“Flat
tires ”.
& Other maintenance tools
In addition to a jack and a jack handle, the
tool bucket on your vehicle contains the
following maintenance tools.
Screwdriver
Towing hook
Wheel nut wrench In case of emergency
9-19
Page 355 of 447

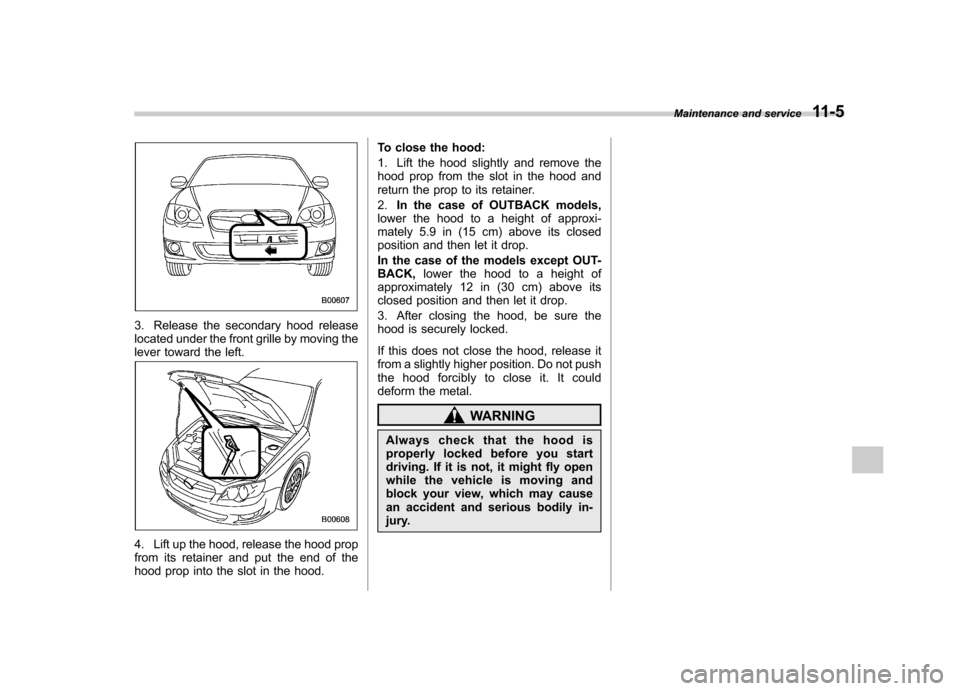
3. Release the secondary hood release
located under the front grille by moving the
lever toward the left.
4. Lift up the hood, release the hood prop
from its retainer and put the end of the
hood prop into the slot in the hood.To close the hood:
1. Lift the hood slightly and remove the
hood prop from the slot in the hood and
return the prop to its retainer. 2.
In the case of OUTBACK models,
lower the hood to a height of approxi-
mately 5.9 in (15 cm) above its closed
position and then let it drop.
In the case of the models except OUT- BACK, lower the hood to a height of
approximately 12 in (30 cm) above its
closed position and then let it drop.
3. After closing the hood, be sure the
hood is securely locked.
If this does not close the hood, release it
from a slightly higher position. Do not push
the hood forcibly to close it. It could
deform the metal.
WARNING
Always check that the hood is
properly locked before you start
driving. If it is not, it might fly open
while the vehicle is moving and
block your view, which may cause
an accident and serious bodily in-
jury. Maintenance and service
11-5
Page 363 of 447

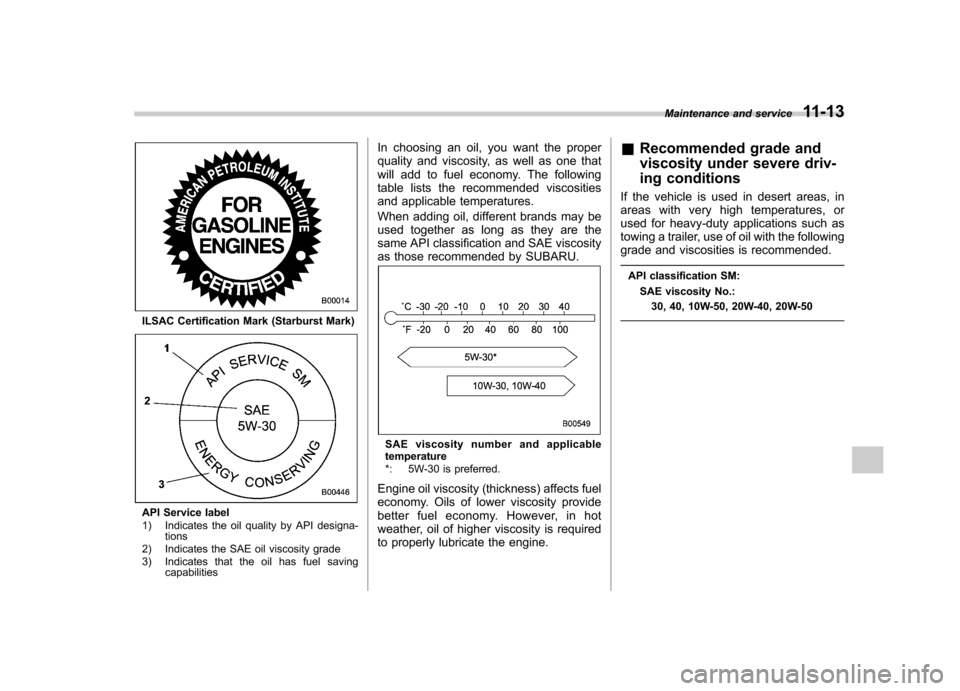
ILSAC Certification Mark (Starburst Mark)
API Service label
1) Indicates the oil quality by API designa-tions
2) Indicates the SAE oil viscosity grade
3) Indicates that the oil has fuel saving capabilities In choosing an oil, you want the proper
quality and viscosity, as well as one that
will add to fuel economy. The following
table lists the recommended viscosities
and applicable temperatures.
When adding oil, different brands may be
used together as long as they are the
same API classification and SAE viscosity
as those recommended by SUBARU.
SAE viscosity number and applicable
temperature
*: 5W-30 is preferred.
Engine oil viscosity (thickness) affects fuel
economy. Oils of lower viscosity provide
better fuel economy. However, in hot
weather, oil of higher viscosity is required
to properly lubricate the engine. &
Recommended grade and
viscosity under severe driv-
ing conditions
If the vehicle is used in desert areas, in
areas with very high temperatures, or
used for heavy-duty applications such as
towing a trailer, use of oil with the following
grade and viscosities is recommended.
API classification SM: SAE viscosity No.:30, 40, 10W-50, 20W-40, 20W-50 Maintenance and service
11-13
Page 394 of 447
11-44Maintenance and service
with the grooves in the rubber and slide
the blade rubber assembly into the metal
support until it locks.
1) Stopper
4. Be sure to position the claws at the
end of the metal support between the
stoppers on the rubber as shown. If the
rubber is not retained properly, the wiper
blade may scratch the windshield. &
Rear window wiper blade assembly
1. Raise the wiper arm off the rear
window.
2. Turn the wiper blade assembly coun- terclockwise.
3. Pull the wiper blade assembly toward
you to remove it from the wiper arm.
Page 397 of 447
distilled water.Fuses
CAUTION
Never replace a fuse with one hav-
ing a higher rating or with material
other than a fuse because serious
damage or a fire could result.
The fuses are designed to melt during an
overload to prevent damage to the wiring
harness and electrical equipment. The
fuses are located in two fuse boxes. One
is located under the instrument panel
behind the fuse box cover on the driver ’s
seat side.
Open the lid that is located above the
hood release knob and pull it toward you
to remove it.
The other one is housed in the engine compartment. Maintenance and service
11-47
– CONTINUED –
Page 414 of 447

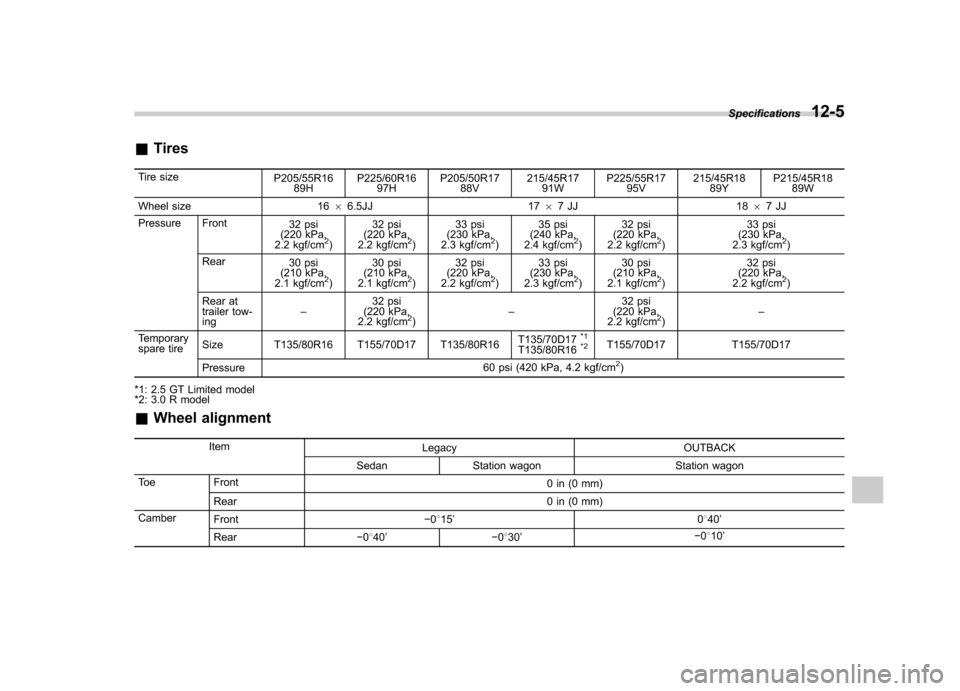
&Tires
Tire size P205/55R16
89H P225/60R16
97H P205/50R17
88V 215/45R17
91W P225/55R17
95V 215/45R18
89Y P215/45R18
89W
Wheel size 16 66.5JJ 17 67JJ 18 67JJ
Pressure Front 32 psi
(220 kPa,
2.2 kgf/cm
2) 32 psi
(220 kPa,
2.2 kgf/cm2) 33 psi
(230 kPa,
2.3 kgf/cm2) 35 psi
(240 kPa,
2.4 kgf/cm2) 32 psi
(220 kPa,
2.2 kgf/cm2) 33 psi
(230 kPa,
2.3 kgf/cm2)
Rear 30 psi
(210 kPa,
2.1 kgf/cm
2) 30 psi
(210 kPa,
2.1 kgf/cm2) 32 psi
(220 kPa,
2.2 kgf/cm2) 33 psi
(230 kPa,
2.3 kgf/cm2) 30 psi
(210 kPa,
2.1 kgf/cm2) 32 psi
(220 kPa,
2.2 kgf/cm2)
Rear at
trailer tow- ing –32 psi
(220 kPa,
2.2 kgf/cm
2) – 32 psi
(220 kPa,
2.2 kgf/cm2) –
Temporary
spare tire Size T135/80R16 T155/70D17 T135/80R16 T135/70D17*1
T135/80R16*2T155/70D17 T155/70D17
Pressure 60 psi (420 kPa, 4.2 kgf/cm
2)
*1: 2.5 GT Limited model
*2: 3.0 R model & Wheel alignment
Item Legacy OUTBACK
Sedan Station wagon Station wagon
Toe Front 0 in (0 mm)
Rear 0 in (0 mm)
Camber Front �0815 ’ 0840 ’
Rear �0840 ’ �0830 ’ �
0810 ’Specifications
12-5