2009 SUBARU LEGACY flat tire
[x] Cancel search: flat tirePage 341 of 447

9-16In case of emergency
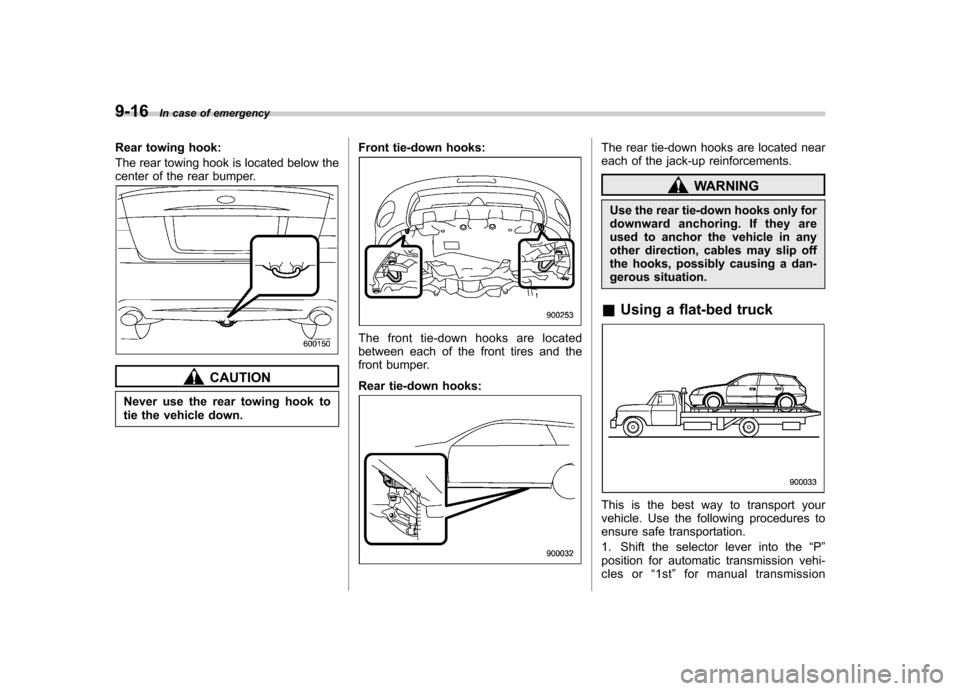
Rear towing hook:
The rear towing hook is located below the
center of the rear bumper.
CAUTION
Never use the rear towing hook to
tie the vehicle down. Front tie-down hooks:
The front tie-down hooks are located
between each of the front tires and the
front bumper.
Rear tie-down hooks:
The rear tie-down hooks are located near
each of the jack-up reinforcements.
WARNING
Use the rear tie-down hooks only for
downward anchoring. If they are
used to anchor the vehicle in any
other direction, cables may slip off
the hooks, possibly causing a dan-
gerous situation.
& Using a flat-bed truck
This is the best way to transport your
vehicle. Use the following procedures to
ensure safe transportation.
1. Shift the selector lever into the “P ”
position for automatic transmission vehi-
cles or “1st ”for manual transmission
Page 343 of 447

9-18In case of emergency
Rear gate (Station wagon) –if
the rear gate cannot be un- locked
In the event that you cannot unlock the
rear gate by operating the power door
locking switches or the remote keyless
entry system, you can unlock it from inside
the cargo area.
1. Remove the access cover at the
bottom-center of the rear gate trim using
flat-head screwdriver.
2. Locate the rear gate lock release lever
behind the rear gate trim panel.
3. Unlock the rear gate by pressing the
lever inside the trim downward.
4. Open the rear gate from outside by
raising the rear gate handle. Maintenance tools &
Jack
A jack and other maintenance tools are
stored in the tool bucket in the center of
the spare tire located in the trunk or in the
cargo area.
Sedan: To take out the jack and main-
tenance tools, open the floor cover and
remove the bucket from the center of the
spare tire. Then, take the jack out of thebucket.
Page 344 of 447

Station wagon:To take out the jack and
maintenance tools, open the center lid and
remove the bucket from the center of the
spare tire. Then, take the jack out of thebucket. & Jack handle
The jack handle is stowed on the back of
the floor cover of the trunk or on the back
of the center lid of the cargo area.Sedan: Open the floor cover and remove
the jack handle from the back of the floor
cover.
Station wagon: Open the center lid,
remove the left-hand part of the lid, and
take out the jack handle. For how to use the jack, refer to
“Flat
tires ”.
& Other maintenance tools
In addition to a jack and a jack handle, the
tool bucket on your vehicle contains the
following maintenance tools.
Screwdriver
Towing hook
Wheel nut wrench In case of emergency
9-19
Page 384 of 447

11-34Maintenance and service
or icy roads, we strongly recommend the
use of winter (snow) tires.
When installing winter tires, be sure to
replace all four tires. !Winter (snow) tires
Winter tires are best suited for driving on
snow-covered and icy roads. However
winter tires do not perform as well as
summer tires and all season tires on roads
other than snow-covered and icy roads. & Tire pressure monitoring
system (TPMS) (if equipped)
The tire pressure monitoring system pro-
vides the driver with a warning message
by sending a signal from a sensor that is
installed in each wheel when tire pressure
is severely low. The tire pressure monitor-
ing system will activate only when the
vehicle is driven. Also, this system may
not react immediately to a sudden drop in
tire pressure (for example, a blow-out
caused by running over a sharp object).
If you adjust the tire pressures in a warm
garage and will then drive the vehicle in
cold outside air, the resulting drop in tire
pressures may cause the low tire pressure
warning light to illuminate. To avoid this
problem when adjusting the tire pressures
in a warm garage, inflate the tires to
pressures higher than those shown on the tire placard. Specifically, inflate them by an
extra 1 psi (6.9 kPa, 0.07 kgf/cm2) for
every difference of 10 8F (5.6 8C) between
the temperature in the garage and the
temperature outside. By way of example,
the following table shows the required tire
pressures that correspond to various out-
side temperatures when the temperature
in the garage is 60 8F (15.6 8C).
Example:
Tire size: P225/55R17 95V, P225/60R16 97H
Standard tire pressures:
Front: 32 psi (220 kPa, 2.2 kgf/cm
2)
Rear: 30 psi (210 kPa, 2.1 kgf/cm2)
Garage temperature: 60 8F (15.6 8C)
Outside
temperature Adjusted pressure
[psi (kPa, kgf/cm
2)]
front rear
30 8F( �18C) 35 (240, 2.4) 33 (230, 2.3)
10 8F( �12 8C) 37
(255, 2.55) 35
(240, 2.4)
� 10 8F
( � 23 8C) 39 (270, 2.7)
37 (255, 2.55)
Example:
Tire size: 215/45R17 91W
Standard tire pressures:
Front: 35 psi (240 kPa, 2.4 kgf/cm
2)
Rear: 33 psi (230 kPa, 2.3 kgf/cm2) Garage temperature: 60
8F (15.6 8C)
Outside
temperature Adjusted pressure
[psi (kPa, kgf/cm
2)]
front rear
30 8F( �18C) 38 (265, 2.65) 36 (250, 2.5)
10 8F( �12 8C) 40
(280, 2.8) 38
(265, 2.65)
� 10 8F
( � 23 8C) 42 (295, 2.95)
40 (280, 2.8)
Example:
Tire size: 215/45R18 89Y, P215/45R18
89W, P205/50R17 88V
Standard tire pressures:
Front: 33 psi (230 kPa, 2.3 kgf/cm
2)
Rear: 32 psi (220 kPa, 2.2 kgf/cm2)
Garage temperature: 60 8F (15.6 8C)
Outside
temperature Adjusted pressure
[psi (kPa, kgf/cm
2)]
front rear
30 8F( �18C) 36 (250, 2.5) 35 (240, 2.4)
10 8F( �12 8C) 38
(265, 2.65) 37
(255, 2.55)
� 10 8F
( � 23 8C) 40 (280, 2.8)
39 (270, 2.7)
If the low tire pressure warning light
illuminates when you drive the vehicle in
cold outside air after adjusting the tire
Page 385 of 447

pressures in a warm garage, re-adjust the
tire pressures using the method described
above. Then, increase the vehicle speed
to at least 20 mph (32 km/h) and check to
see that the low tire pressure warning light
goes off a few minutes later. If the low tire
pressure warning light does not go off, the
tire pressure monitoring system may not
be functioning normally. In this event, go
to a SUBARU dealer to have the system
inspected as soon as possible.
While the vehicle is driven, friction be-
tween tires and the road surface causes
the tires to warm up. After illumination of
the low tire pressure warning light, any
increase in the tire pressures caused by
an increase in the outside air temperature
or by an increase in the temperature in the
tires can cause the low tire pressure
warning light to go off.
System resetting is necessary when the
wheels are changed (for example, a
switch to snow tires) and new TPMS
valves are installed on the newly fitted
wheels. Have this work performed by a
SUBARU dealer following wheel replace- ment.
It may not be possible to install TPMS
valves on certain wheels that are on the
market. Therefore, if you change the
wheels (for example, a switch to snowtires), use wheels that have the same part
number as the standard-equipment
wheels. Without four operational TPMS
valve/sensors on the wheels, the TPMS
will not fully function and the warning light
in the instrument panel will illuminate
steadily after blinking for approximately
one minute.
When a tire is replaced, adjustments are
necessary to ensure continued normal
operation of the tire pressure monitoring
system. As with wheel replacement, there-
fore, you should have the work performed
by a SUBARU dealer.
WARNING
If the low tire pressure warning light
does not illuminate briefly after the
ignition switch is turned ON or the
light illuminates steadily after blink-
ing for approximately one minute,
you should have your Tire Pressure
Monitoring System checked at a
SUBARU dealer as soon as possi-ble.
If this light illuminates while driving,
never brake suddenly and keep
driving straight ahead while gradu-
ally reducing speed. Then slowly
pull off the road to a safe place.
Otherwise an accident involving serious vehicle damage and serious
personal injury could occur.
If this light still illuminates while
driving after adjusting the tire pres-
sure, a tire may have significant
damage and a fast leak that causes
the tire to lose air rapidly. If you have
a flat tire, replace it with a spare tire
as soon as possible.
When a spare tire is mounted or a
wheel rim is replaced without the
original pressure sensor/transmitter
being transferred, the low tire pres-
sure warning light will illuminate
steadily after blinking for approxi-
mately one minute. This indicates
the TPMS is unable to monitor all
four road wheels. Contact your
SUBARU dealer as soon as possible
for tire and sensor replacement and/
or system resetting. If the light
illuminates steadily after blinking
for approximately one minute,
promptly contact a SUBARU dealer
to have the system inspected.
& Tire inspection
Check on a daily basis that the tires are
free from serious damage, nails, and
stones. At the same time, check the tires Maintenance and service
11-35
– CONTINUED –
Page 390 of 447

11-40Maintenance and service
WARNING
. All four tires must be the same in
terms of manufacturer, brand
(tread pattern), construction, de-
gree of wear, speed symbol, load
index and size. Mixing tires of
different types, sizes or degrees
of wear can result in damage to
the vehicle ’s power train. Use of
different types or sizes of tires
can also dangerously reduce
controllability and braking per-
formance and can lead to anaccident.
. Use only radial tires. Do not use
radial tires together with belted
bias tires and/or bias-ply tires.
Doing so can dangerously re-
duce controllability, resulting in
an accident. &
Wheel replacement
When replacing wheels due, for example,
to damage, make sure the replacement
wheels match the specifications of the
wheels that are fitted as standard equip-
ment. Replacement wheels are available
from SUBARU dealers.
WARNING
Use only those wheels that are
specified for your vehicle. Wheels
not meeting specifications could
interfere with brake caliper opera-
tion and may cause the tires to rub
against the wheel well housing dur-
ing turns. The resulting loss of
vehicle control could lead to anaccident. Aluminum wheels
Aluminum wheels can be scratched and
damaged easily. Handle them carefully to
maintain their appearance, performance,
and safety. .
When any of the wheels is removed
and replaced for tire rotation or to change
a flat, always check the tightness of the
wheel nuts after driving approximately 600
miles (1,000 km). If any nut is loose,
tighten it to the specified torque. . Never apply oil to the threaded parts,
wheel nuts, or tapered surface of the wheel. . Never let the wheel rub against sharp
protrusions or curbs.. Be sure to fit tire chains on uniformly
and completely around the tire, otherwise
the chains may scratch the wheel. . When wheel nuts, balance weights, or
the center cap is replaced, be sure to
replace them with genuine SUBARU parts
designed for aluminum wheels.
Page 420 of 447

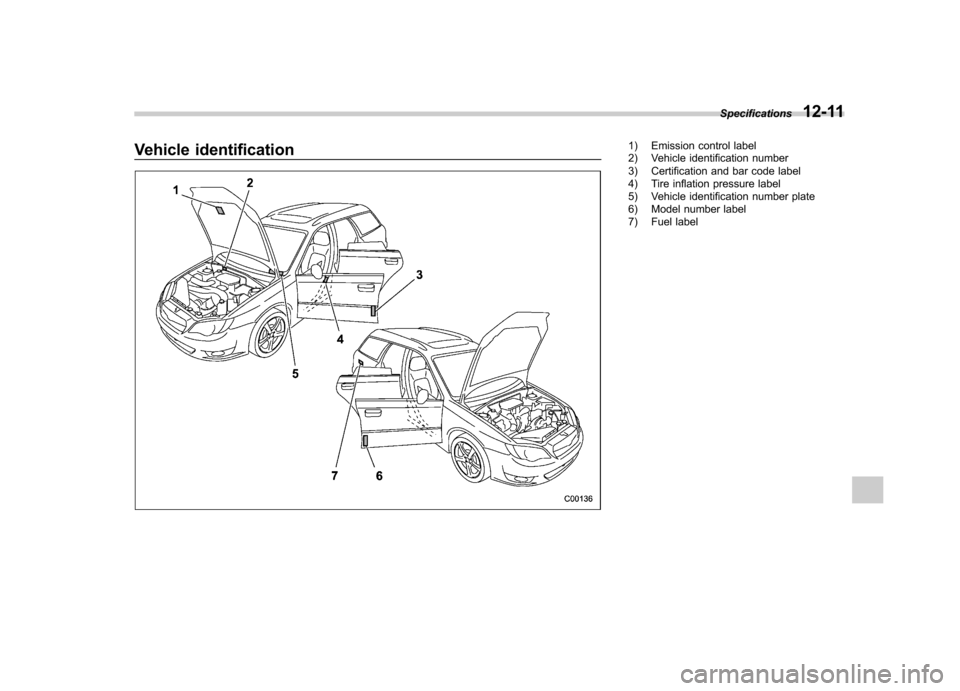
Vehicle identification1) Emission control label
2) Vehicle identification number
3) Certification and bar code label
4) Tire inflation pressure label
5) Vehicle identification number plate
6) Model number label
7) Fuel labelSpecifications
12-11
Page 421 of 447

For U.S.A............................................................ 13-2
Tire information .................................................. 13-2
Tire labeling ....................................................... 13-2
Recommended tire inflation pressure .................. 13-5
Glossary of tire terminology ............................... 13-6
Tire care –maintenance and safety practices ...... 13-7
Vehicle load limit –how to determine .................. 13-8
Determining compatibility of tire and vehicle load capacities ...................................................... 13-11 Adverse safety consequences of overloading on
handling and stopping and on tires ................ 13-11
Steps for Determining Correct Load Limit ......... 13-11
Uniform tire quality grading standards .......... 13-12
Treadwear ....................................................... 13-12
Traction AA, A, B, C ......................................... 13-12
Temperature A, B, C ......................................... 13-13
Reporting safety defects (USA) ...................... 13-13
Consumer information and Reporting safety defects
13