2009 SUBARU LEGACY flat tire
[x] Cancel search: flat tirePage 328 of 447

CAUTION
Never use any temporary spare tire
other than the original. Using other
sizes may result in severe mechan-
ical damage to the drive train of yourvehicle.
The temporary spare tire is smaller and
lighter than a conventional tire and is
designed for emergency use only. Re-
move the temporary spare tire and re-
install the conventional tire as soon as
possible because the spare tire is de-
signed only for temporary use.
Check the inflation pressure of the tem-
porary spare tire periodically to keep the
tire ready for use. The correct pressure is
60 psi (420 kPa, 4.2 kgf/cm
2) .
When using the temporary spare tire, note
the following precautions. . Do not exceed 50 mph (80 km/h).
. Do not put a tire chain on the temporary
spare tire. Because of the smaller tire size,
a tire chain will not fit properly. . Do not use two or more temporary
spare tires at the same time.. Do not drive over obstacles. This tire
has a smaller diameter, so road clearance
is reduced.
1) Tread wear indicator bar
2) Indicator location mark
. When the wear indicator appears on
the tread, replace the tire. . The temporary spare tire must be used
only on a rear wheel. If a front wheel tire
gets punctured, replace the wheel with a
rear wheel and install the temporary spare
tire in place of the removed rear wheel. & Precautions for AWD vehi-
cles with automatic trans- mission
Your vehicle is equipped with the AWD
(All-Wheel Drive) system. In addition, if
your vehicle is an AT model with non-
turbo 2.5 L engine , before driving your
vehicle with the temporary spare tire, deactivate the AWD capability of the
vehicle as follows:
1. Turn the ignition switch to the
“LOCK ”
position.
2. Pull any one spare fuse out of the
spare fuse holder. Spare fuses are at-
tached on the back side of the fuse holder
cover in the engine compartment. You
may pick up any one fuse in the spare
fuse holder. In case of emergency
9-3
– CONTINUED –
Page 329 of 447

9-4In case of emergency
3. Put a spare fuse inside the FWD
socket located in the fuse panel and
confirm that the “
”warning light on
the combination meter illuminates. The
All-Wheel-Drive capability of the vehicle
has now been deactivated.
NOTE
After reinstalling the conventional tire,
remove the spare fuse from the FWD
socket in order to reactivate All-Wheel
Drive. Make sure to restore the re-
moved spare fuse in the spare fuse
holder located in the engine compart-ment. Flat tires
If you have a flat tire while driving, never
brake suddenly; keep driving straight
ahead while gradually reducing speed.
Then slowly pull off the road to a safeplace. &
Changing a flat tire
WARNING
. Do not jack up the vehicle on an
incline or a loose road surface.
The jack can come out of the
jacking point or sink into the
ground and this can result in a
severe accident.
. Use only the jack provided with
your vehicle. The jack supplied
with the vehicle is designed only
for changing a tire. Never get
under the vehicle while support-
ing the vehicle with this jack. .
Always turn off the engine before
raising the flat tire off the ground
using the jack. Never swing or
push the vehicle supported with
the jack. The jack can come out
of the jacking point due to a jolt
and this can result in a severeaccident.
1. Park on a hard, level surface, when-
ever possible, then stop the engine.
2. Set the parking brake securely and
shift a manual transmission vehicle in
reverse or an automatic transmission
vehicle in the “P ”(Park) position.
3. Turn on the hazard warning flasher
and have everyone get out of the vehicle.
4. Put wheel blocks at the front and rear
of the tire diagonally opposite the flat tire.
Page 332 of 447

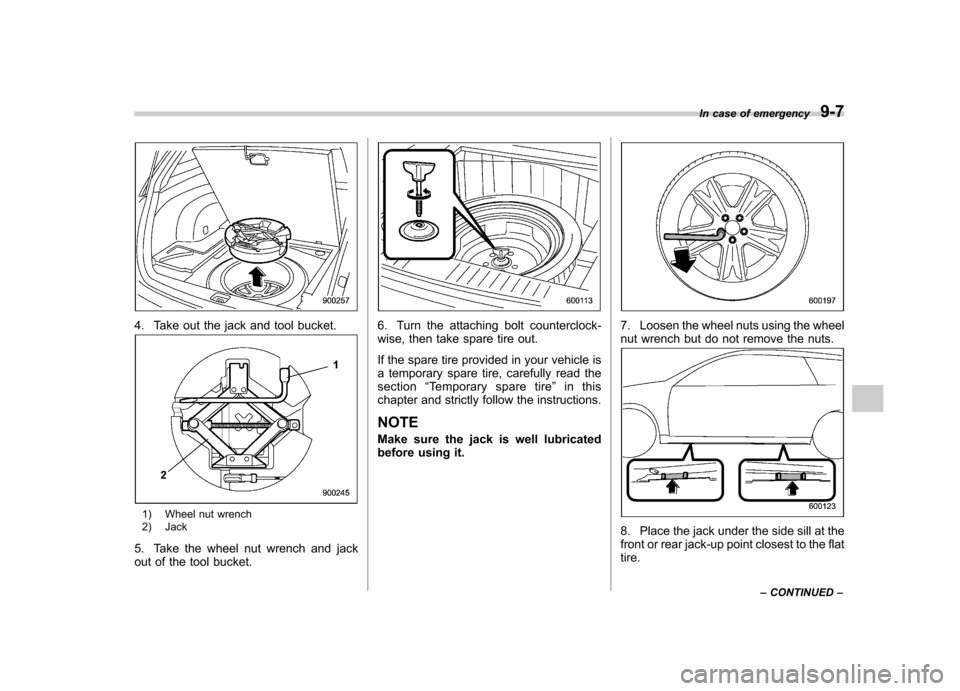
4. Take out the jack and tool bucket.
1) Wheel nut wrench
2) Jack
5. Take the wheel nut wrench and jack
out of the tool bucket.
6. Turn the attaching bolt counterclock-
wise, then take spare tire out.
If the spare tire provided in your vehicle is
a temporary spare tire, carefully read thesection “Temporary spare tire ”in this
chapter and strictly follow the instructions.
NOTE
Make sure the jack is well lubricated
before using it.7. Loosen the wheel nuts using the wheel
nut wrench but do not remove the nuts.
8. Place the jack under the side sill at the
front or rear jack-up point closest to the flattire. In case of emergency
9-7
– CONTINUED –
Page 333 of 447

9-8In case of emergency
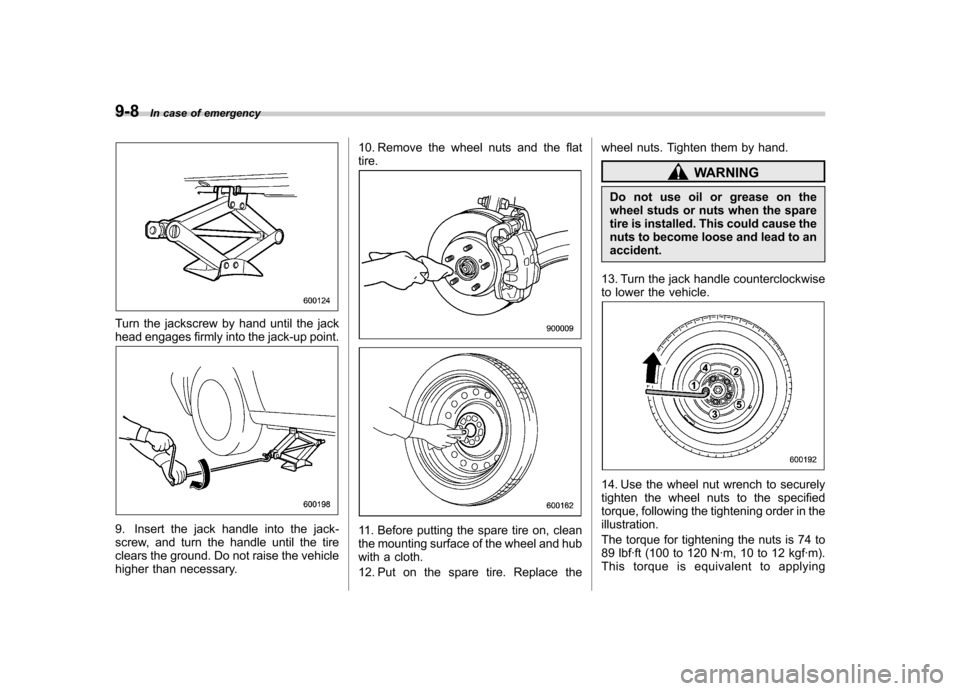
Turn the jackscrew by hand until the jack
head engages firmly into the jack-up point.
9. Insert the jack handle into the jack-
screw, and turn the handle until the tire
clears the ground. Do not raise the vehicle
higher than necessary. 10. Remove the wheel nuts and the flattire.11. Before putting the spare tire on, clean
the mounting surface of the wheel and hub
with a cloth.
12. Put on the spare tire. Replace thewheel nuts. Tighten them by hand.
WARNING
Do not use oil or grease on the
wheel studs or nuts when the spare
tire is installed. This could cause the
nuts to become loose and lead to anaccident.
13. Turn the jack handle counterclockwise
to lower the vehicle.
14. Use the wheel nut wrench to securely
tighten the wheel nuts to the specified
torque, following the tightening order in the illustration.
The torque for tightening the nuts is 74 to
89 lbf·ft (100 to 120 N·m, 10 to 12 kgf·m).
This torque is equivalent to applying
Page 334 of 447

approximately 88 to 110 lbs (40 to 50 kg)
at the top of the wheel nut wrench. Never
use your foot on the wheel nut wrench or a
pipe extension on the wrench because
you may exceed the specified torque.
Have the wheel nut torque checked at
the nearest automotive service facility.
15. Store the flat tire in the spare tire compartment.
Put the spacer and tighten the attaching
bolt firmly.
Also store the jack and jack handle in their
storage locations.
WARNING
Never place a tire or tire changing
tools in the passenger compartment
after changing wheels. In a sudden
stop or collisions, loose equipment
could strike occupants and cause
injury. Store the tire and all tools in
the proper place.
& Tire pressure monitoring
system (TPMS) (if equipped)
Vehicle with SI-DRIVE
Vehicle without SI-DRIVE
The tire pressure monitoring system pro-
vides the driver with the warning message
indicated by sending a signal from a
sensor that is installed in each wheel
when tire pressure is severely low.
The tire pressure monitoring system will
activate only when the vehicle is driven.
Also, this system may not react immedi-
ately to a sudden drop in tire pressure (for
example, a blow-out caused running over
a sharp object).
WARNING
If the low tire pressure warning light
illuminates while driving, never
brake suddenly and keep driving
straight ahead while gradually redu- In case of emergency
9-9
– CONTINUED –
Page 335 of 447

9-10In case of emergency
cing speed. Then slowly pull off the
road to a safe place. Otherwise an
accident involving serious vehicle
damage and serious personal injury
could occur.
Check the pressure for all four tires
and adjust the pressure to the COLD
tire pressure shown on the vehicle
placard on the door pillar on thedriver’s side. If this light still illumi-
nates while driving after adjusting
the tire pressure, a tire may have
significant damage and a fast leak
that causes the tire to lose air
rapidly. If you have a flat tire, replace
it with a spare tire as soon aspossible.
When a spare tire is mounted or a
wheel rim is replaced without the
original pressure sensor/transmitter
being transferred, the low tire pres-
sure warning light will illuminate
steadily after blinking for approxi-
mately one minute. This indicates
the TPMS is unable to monitor all
four road wheels. Contact your
SUBARU dealer as soon as possible
for tire and sensor replacement and/
or system resetting.
Do not inject any tire liquid or
aerosol tire sealant into the tires,
as this may cause a malfunction of the tire pressure sensors.
If the light illuminates steadily after
blinking for approximately one min-
ute, promptly contact a SUBARU
dealer to have the system inspected.
Jump starting
WARNING
. Battery fluid is SULFURIC ACID.
Do not let it come in contact with
the eyes, skin, clothing or thevehicle.
If battery fluid gets on you,
thoroughly flush the exposed
area with water immediately. Get
medical help if the fluid has
entered your eyes.
If battery fluid is accidentally
swallowed, immediately drink a
large amount of milk or water,
and obtain immediate medicalhelp.
Keep everyone including chil-
dren away from the battery.
. The gas generated by a battery
explodes if a flame or spark is
brought near it. Do not smoke or
light a match while jump starting.
. Never attempt jump starting if the
discharged battery is frozen. It
could cause the battery to burst
or explode.
. Whenever working on or around
a battery, always wear suitable
Page 339 of 447

9-14In case of emergency
&Towing and tie-down hooks
The towing hooks should be used only in
an emergency (e.g., to free a stuck vehicle
from mud, sand or snow).
CAUTION
. Use only the specified towing
hooks and tie-down hooks. Never
use suspension parts or other
parts of the body for towing or
tie-down purposes.
. Never use the tie-down hook
closest to the muffler under the
vehicle for towing purposes.
. To prevent deformation to the
bumper and the towing hook, do
not apply excessive lateral load
to the towing hooks.
Front towing hook (OUTBACK models):
1. Take out the towing hook, screwdriver
and wheel nut wrench from the on board
tool bucket.
2. Wrap a flat-head screwdriver in a vinyl
tape or cloth, insert it into the gap between
the cover and the front bumper, and use it
to lever the cover open.
3. Pull the entire front fog light cover
toward you.
4. Screw the towing hook into the thread
hole until the threads can no longer beseen.
5. Tighten the towing hook securely
using a wheel nut wrench.
After towing, remove the towing hook from
the vehicle and stow it in the tool bag.
Fit the towing hook cover on the bumper.
Front towing hook (except OUTBACK models):
1. Take out the towing hook, screwdriver
and wheel nut wrench from the on board
tool bag.
Page 340 of 447

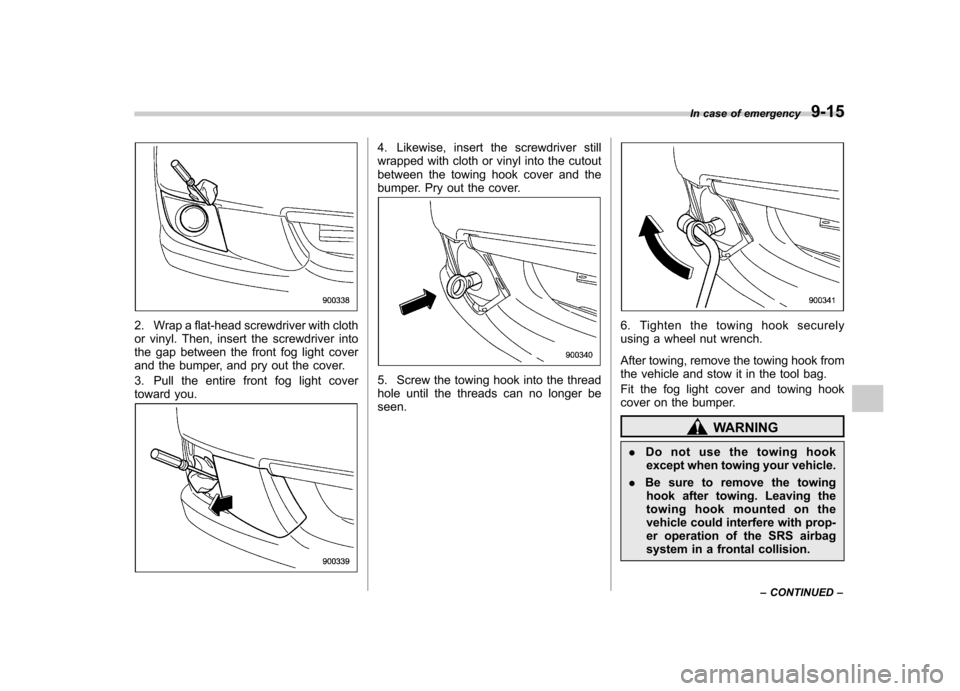
2. Wrap a flat-head screwdriver with cloth
or vinyl. Then, insert the screwdriver into
the gap between the front fog light cover
and the bumper, and pry out the cover.
3. Pull the entire front fog light cover
toward you.
4. Likewise, insert the screwdriver still
wrapped with cloth or vinyl into the cutout
between the towing hook cover and the
bumper. Pry out the cover.
5. Screw the towing hook into the thread
hole until the threads can no longer beseen.
6. Tighten the towing hook securely
using a wheel nut wrench.
After towing, remove the towing hook from
the vehicle and stow it in the tool bag.
Fit the fog light cover and towing hook
cover on the bumper.
WARNING
. Do not use the towing hook
except when towing your vehicle.
. Be sure to remove the towing
hook after towing. Leaving the
towing hook mounted on the
vehicle could interfere with prop-
er operation of the SRS airbag
system in a frontal collision. In case of emergency
9-15
– CONTINUED –