2009 SUBARU LEGACY trunk release
[x] Cancel search: trunk releasePage 7 of 447

The SRS airbag deploys with
considerable speed and force
and can injure or even kill chil-
dren, especially if they are 12
years of age and under and are
not restrained or improperly re-
strained. Because children are
lighter and weaker than adults,
their risk of being injured from
deployment is greater.
. NEVER INSTALL A REARWARD
FACING CHILD SAFETY SEAT IN
THE FRONT SEAT. DOING SO
RISKS SERIOUS INJURY OR
DEATH TO THE CHILD BY PLA-
CING THE CHILD ’S HEAD TOO
CLOSE TO THE SRS AIRBAG.
. Always use the child safety locks
whenever a child rides in the rear
seat. Serious injury could result
if a child accidentally opened the
door and fell out. Refer to the“ Door locks ”section in chapter
2.
. Always lock the passenger ’s win-
dows using the lock switch when
children are riding in the vehicle.
Failure to follow this procedure
could result in injury to a child
operating the power window. Re-
fer to the “Power windows ”sec-
tion in chapter 2. .
Never leave unattended children
in the vehicle. They could acci-
dentally injure themselves or
others through inadvertent op-
eration of the vehicle. Also, on
hot or sunny days, temperature
in a closed vehicle could quickly
become high enough to cause
severe or possibly fatal injuries
to them.
. Help prevent young children from
locking themselves in the trunk.
When leaving the vehicle, either
close all windows and lock all
doors or cancel the inside trunk
lid release. Also make certain
that the trunk is closed. On hot
or sunny days, the temperature
in a trunk could quickly become
high enough to cause death or
serious heat-related injuries in-
cluding brain damage to anyone
locked inside, particularly for
small children.
Carefully read the sections “Child restraint
systems ”, “*SRS airbag (Supplemental
Restraint System airbag) ”, and “Seatbelts ”
in chapter 1 of this Owner ’s Manual for
instructions and precautions concerning
the child restraint system, seatbelt system
and SRS airbag system. &
Engine exhaust gas (carbon monoxide)
WARNING
. Never inhale engine exhaust gas.
Engine exhaust gas contains
carbon monoxide, a colorless
and odorless gas which is dan-
gerous, or even lethal, if inhaled.
. Always properly maintain the en-
gine exhaust system to prevent
engine exhaust gas from enter-
ing the vehicle.
. Never run the engine in a closed
space, such as a garage, except
for the brief time needed to drive
the vehicle in or out of it.
. Avoid remaining in a parked
vehicle for a lengthy time while
the engine is running. If that is
unavoidable, then use the venti-
lation fan to force fresh air into
the vehicle.
. Always keep the front ventilator
inlet grille free from snow, leaves
or other obstructions to ensure
that the ventilation system al-
ways works properly.
. If at any time you suspect that
exhaust fumes are entering the 5
– CONTINUED –
Page 39 of 447

down while pulling the release tab.
WARNING
. Secure long objects properly to
prevent them from shooting for-
ward and causing serious injury
during a sudden stop or sharp
cornering. Tie long objects down
with a rope or something equiva-lent.
. Avoid loading objects longer
than 6.6 ft (2 m) and heavier than
55 lbs (25 kg). Such objects can
interfere with the driver ’s proper
operation of the vehicle, possibly
causing an accident and serious
injury.
NOTE
To protect your belongings in the trunk
from theft, it is recommended that you
lock the seatback panel. Seatbelts &
Seatbelt safety tips
WARNING
. All persons in the vehicle should
fasten their seatbelts BEFORE
the vehicle starts to move. Other-
wise, the possibility of serious
injury becomes greater in the
event of a sudden stop or acci-dent.
. All belts should fit snugly in order
to provide full restraint. Loose
fitting belts are not as effective in
preventing or reducing injury.
. Each seatbelt is designed to
support only one person. Never
use a single belt for two or morepersons –even children. Other-
wise, in an accident, serious
injury or death could result.
. Replace all seatbelt assemblies
including retractors and attach-
ing hardware worn by occupants
of a vehicle that has been in a
serious accident. The entire as-
sembly should be replaced even
if damage is not obvious.
. Put children aged 12 and under in
Seat, seatbelt and SRS airbags
1-13
– CONTINUED –
Page 65 of 447

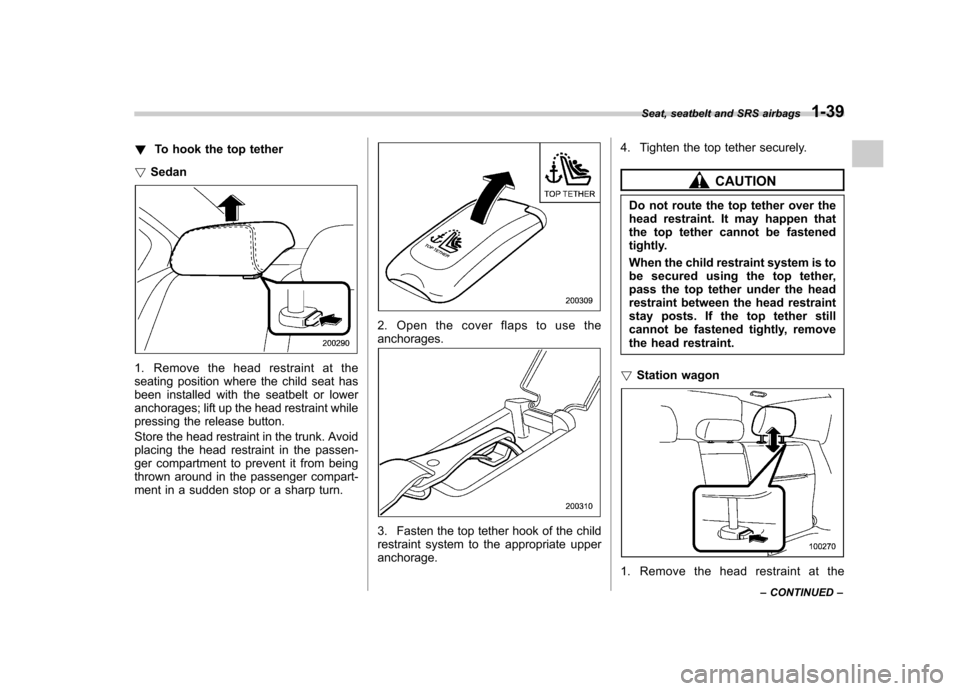
!To hook the top tether
! Sedan
1. Remove the head restraint at the
seating position where the child seat has
been installed with the seatbelt or lower
anchorages; lift up the head restraint while
pressing the release button.
Store the head restraint in the trunk. Avoid
placing the head restraint in the passen-
ger compartment to prevent it from being
thrown around in the passenger compart-
ment in a sudden stop or a sharp turn.
2. Open the cover flaps to use the anchorages.
3. Fasten the top tether hook of the child
restraint system to the appropriate upperanchorage. 4. Tighten the top tether securely.
CAUTION
Do not route the top tether over the
head restraint. It may happen that
the top tether cannot be fastened
tightly.
When the child restraint system is to
be secured using the top tether,
pass the top tether under the head
restraint between the head restraint
stay posts. If the top tether still
cannot be fastened tightly, remove
the head restraint.
! Station wagon
1. Remove the head restraint at the Seat, seatbelt and SRS airbags
1-39
– CONTINUED –
Page 93 of 447

Keys..................................................................... 2-2
Key number ........................................................ 2-2
Immobilizer .......................................................... 2-3
Security ID plate .................................................. 2-3
Security indicator light ........................................ 2-4
Key replacement ................................................. 2-4
Door locks ........................................................... 2-5
Locking and unlocking from the outside .. ............ 2-5
Locking and unlocking from the inside ................ 2-6
Battery drainage prevention function ................... 2-6
Power door locking switches ............................. 2-7
Key lock-in prevention function ........................... 2-7
Remote keyless entry system ............................ 2-8
Locking the doors ............................................... 2-9
Unlocking the doors ........................................... 2-10
Unlocking the trunk lid/rear gate ......................... 2-10
Vehicle finder function ........................................ 2-10
Sounding a panic alarm ...................................... 2-11
Selecting audible signal operation ...................... 2-11
Replacing the battery ......................................... 2-11
Replacing lost transmitters ................................. 2-13 Alarm system
..................................................... 2-16
System alarm operation ..................................... 2-16
Activating and deactivating the alarm system ..... 2-16
If you have accidentally triggered the alarm system ............................................................ 2-17
Arming the system ............................................ 2-17
Disarming the system ........................................ 2-19
Valet mode ........................................................ 2-19
Passive arming .................................................. 2-19
Tripped sensor identification .............................. 2-20
Shock sensors (dealer option).. .......................... 2-20
Child safety locks .............................................. 2-21
Windows ............................................................. 2-21
Power windows ................................................. 2-21
Trunk lid (Sedan) ............................................... 2-24
To open and close the trunk lid from outside . ..... 2-24
To open the trunk lid from inside. ....................... 2-24
To lock and unlock the trunk lid release lever ................................................................ 2-25
Internal trunk lid release handle ......................... 2-25
Rear gate (Station wagon) ................................ 2-27
Moonroof (if equipped) ...................................... 2-28
Tilting/sliding moonroof (Sedan) ......................... 2-29
Moonroof (Station wagon) .................................. 2-30
Keys and doors
2
Page 94 of 447

2-2Keys and doors
Keys
1) Master key
2) Submaster key
3) Valet key
4) Key number plate
5) Security ID plate
Three types of keys are provided for your vehicle.
Master key, submaster key and valet key.
The master key and submaster key fit all
locks on your vehicle. . Ignition switch
. Driver ’s door
. Glove box
. Trunk lid release lever
The valet key fits only the ignition switch and door locks. You can keep the trunk
and glove box locked when you leave your
vehicle and valet key at a parking facility.
CAUTION
Do not attach a large key holder or
key case to either key. If it bangs
against your knees while you are
driving, it could turn the ignition
switch from the “ON ”position to the
“ Acc ”or “LOCK ”position, thereby
stopping the engine.
& Key number
1) Key number plate
2) Security ID plate
The key number is stamped on the key number plate attached to the key set.
Write down the key number and keep it in
another safe place, not in the vehicle. This
number is needed to make a replacement
key if you lose your key or lock it inside thevehicle.
For information on making replacement
keys for vehicles with the immobilizer
system, refer to the
“Immobilizer ”section
in this chapter.
Page 116 of 447

2-24Keys and doors
Rear passengers ’window switches
1) Open
2) Close
To close:
Pull the switch up and hold it until the
window reaches the desired position.
When the lock switch on the power
window switch cluster, located on thedriver ’s side door, is in the “LOCK ”
position, the passengers ’windows cannot
be operated with the passengers ’
switches. Trunk lid (Sedan)
WARNING
. To prevent dangerous exhaust
gas from entering the vehicle,
always keep the trunk lid closed
while driving.
. Help prevent young children from
locking themselves in the trunk.
When leaving the vehicle, either
close all windows and lock all
doors or cancel the inside trunk
lid release. Also make certain
that the trunk is closed. On hot
or sunny days, the temperature
in the trunk could quickly be-
come high enough to cause
death or serious heat-related in-
juries including brain damage to
anyone locked inside, particu-
larly for small children.
& To open and close the trunk
lid from outside
The trunk lid can be opened using the
remote keyless entry system. Refer to the“ Remote keyless entry system ”section in
this chapter.
To close the trunk lid, lightly press the trunk lid down until the latch engages. NOTE
Do not leave your valuables in the
trunk when you leave your vehicle. &
To open the trunk lid from inside
Pull the trunk lid release lever upward.
Page 117 of 447

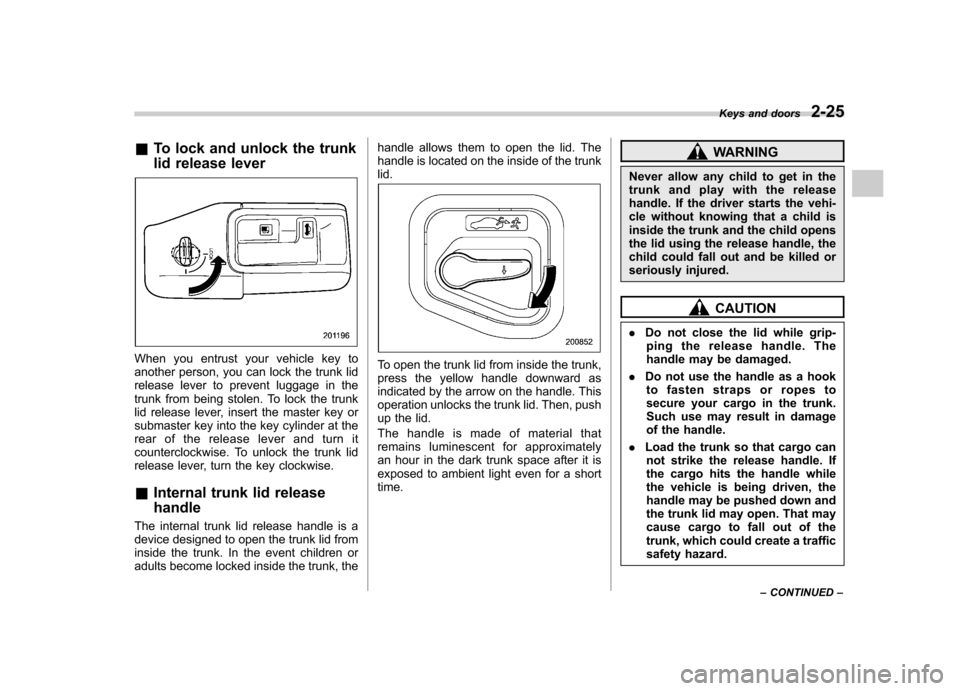
&To lock and unlock the trunk
lid release lever
When you entrust your vehicle key to
another person, you can lock the trunk lid
release lever to prevent luggage in the
trunk from being stolen. To lock the trunk
lid release lever, insert the master key or
submaster key into the key cylinder at the
rear of the release lever and turn it
counterclockwise. To unlock the trunk lid
release lever, turn the key clockwise. &Internal trunk lid release handle
The internal trunk lid release handle is a
device designed to open the trunk lid from
inside the trunk. In the event children or
adults become locked inside the trunk, the handle allows them to open the lid. The
handle is located on the inside of the trunklid.To open the trunk lid from inside the trunk,
press the yellow handle downward as
indicated by the arrow on the handle. This
operation unlocks the trunk lid. Then, push
up the lid.
The handle is made of material that
remains luminescent for approximately
an hour in the dark trunk space after it is
exposed to ambient light even for a shorttime.
WARNING
Never allow any child to get in the
trunk and play with the release
handle. If the driver starts the vehi-
cle without knowing that a child is
inside the trunk and the child opens
the lid using the release handle, the
child could fall out and be killed or
seriously injured.
CAUTION
. Do not close the lid while grip-
ping the release handle. The
handle may be damaged.
. Do not use the handle as a hook
to fasten straps or ropes to
secure your cargo in the trunk.
Such use may result in damage
of the handle.
. Load the trunk so that cargo can
not strike the release handle. If
the cargo hits the handle while
the vehicle is being driven, the
handle may be pushed down and
the trunk lid may open. That may
cause cargo to fall out of the
trunk, which could create a traffic
safety hazard. Keys and doors
2-25
– CONTINUED –
Page 118 of 447

2-26Keys and doors
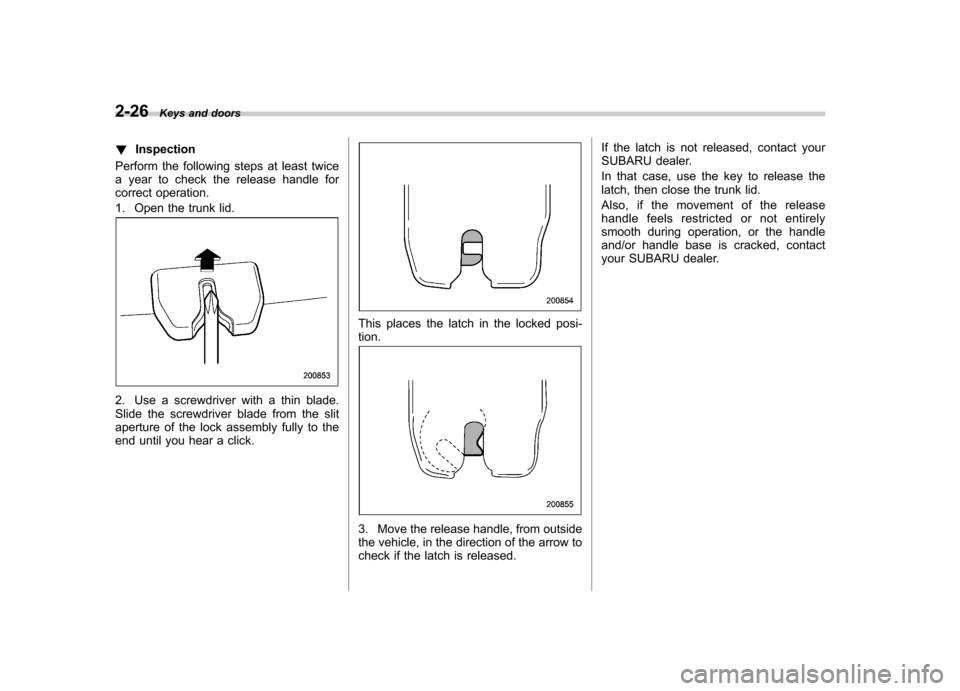
! Inspection
Perform the following steps at least twice
a year to check the release handle for
correct operation.
1. Open the trunk lid.
2. Use a screwdriver with a thin blade.
Slide the screwdriver blade from the slit
aperture of the lock assembly fully to the
end until you hear a click.
This places the latch in the locked posi- tion.
3. Move the release handle, from outside
the vehicle, in the direction of the arrow to
check if the latch is released. If the latch is not released, contact your
SUBARU dealer.
In that case, use the key to release the
latch, then close the trunk lid.
Also, if the movement of the release
handle feels restricted or not entirely
smooth during operation, or the handle
and/or handle base is cracked, contact
your SUBARU dealer.