2009 SKODA ROOMSTER jump cable
[x] Cancel search: jump cablePage 112 of 263

Automatic gearbox111
Using the system
Safety
Driving Tips
General Maintenance
Breakdown assistance
Praktik
Technical Data
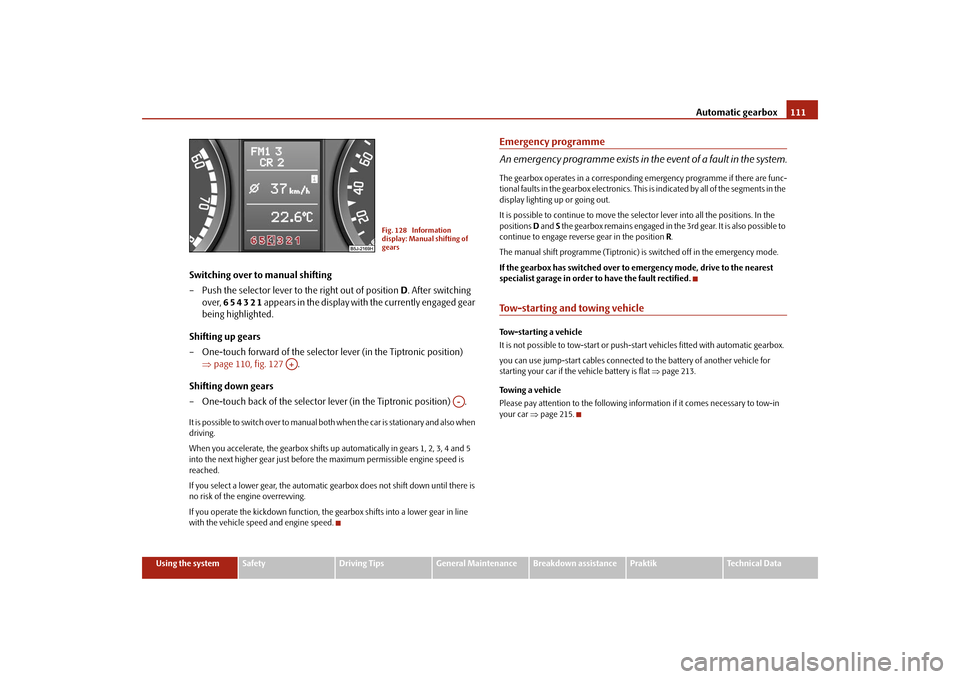
Switching over to manual shifting
– Push the selector lever to the right out of position D. After switching
over, 6 5 4 3 2 1 appears in the display with the currently engaged gear
being highlighted.
Shifting up gears
– One-touch forward of the selector lever (in the Tiptronic position)
⇒page 110, fig. 127 .
Shifting down gears
– One-touch back of the selector lever (in the Tiptronic position) .It is possible to switch over to manual both when the car is stationary and also when
driving.
When you accelerate, the gearbox shifts up automatically in gears 1, 2, 3, 4 and 5
into the next higher gear just before the maximum permissible engine speed is
reached.
If you select a lower gear, the automatic gearbox does not shift down until there is
no risk of the engine overrevving.
If you operate the kickdown function, the gearbox shifts into a lower gear in line
with the vehicle speed and engine speed.
Emergency programme
An emergency programme exists in the event of a fault in the system.The gearbox operates in a corresponding emergency programme if there are func-
tional faults in the gearbox electronics. This is indicated by all of the segments in the
display lighting up or going out.
It is possible to continue to move the selector lever into all the positions. In the
positions D and S the gearbox remains engaged in the 3rd gear. It is also possible to
continue to engage reverse gear in the position R.
The manual shift programme (Tiptronic) is switched off in the emergency mode.
If the gearbox has switched over to emergency mode, drive to the nearest
specialist garage in order to have the fault rectified.Tow-starting and towing vehicle Tow-starting a vehicle
It is not possible to tow-start or push-start vehicles fitted with automatic gearbox.
you can use jump-start cables connected to the battery of another vehicle for
starting your car if the vehicle battery is flat ⇒page 213.
Towing a vehicle
Please pay attention to the following information if it comes necessary to tow-in
your car ⇒page 215.
Fig. 128 Information
display: Manual shifting of
gears
A+
A-
s29g.4.book Page 111 Wednesday, June 17, 2009 9:54 AM
Page 214 of 263

Breakdown assistance213
Using the system
Safety
Driving Tips
General Maintenance
Breakdown assistance
Praktik
Technical Data
– Pull off the full wheel trim/cap from the wheel hub or cap from the
safety wheel bolt.
– Insert the adapter with its toothed side fully into the inner toothing
of the safety wheel bolt right down in such a way that only the
outer hexagon is jutting out ⇒page 212, fig. 194.
– Insert the wheel wrench fully onto the adapter .
– Slacken the wheel bolt, or tighten it firmly ⇒page 211.
– Reinstall the full wheel trim/wheel cap after removing the adapter or
place the cap onto the safety wheel bolt.
–Have the tightening torque checked w i t h a t o rq u e w re n c h a s s o o n a s
possible. Steel and light alloy wheels must be tightened to a tightening
torque of 120 Nm.The safety wheel bolts on vehicles fitted with them (one safety wheel bolt per
wheel) can only be loosened or tighten up by using the adapter provided.
It is meaningful to note the code number hammered into the rear side of the
adapter or the rear side of the safety wheel bolts. You can obtain a replacement
adapter from a specialist garage, if necessary, by quoting this number.
We recommend that you always carry the adapter for the wheel bolts with you in
the vehicle. It should be stowed in the vehicle tool kit.
Caution
•
Damage can occur to the adapter and safety wheel bolt if the safety wheel bolt
is tightened up too much.
•
On steel wheels, the theft-deterrent wheel bolt must always be installed in the
hole, which is close to the valve. Otherwise the full wheel trim cannot be mounted
and the full wheel trim can be damaged during the assembly.Note
The set of safety wheel bolts can be obtained from a specialist garage.
Jump-startingInitial stepsYou can use the battery of another vehicle for jump-starting yours if the engine
does not start because the battery on your vehicle is flat. You will require jump-start
cables for this purpose.
Both batteries must have a rated voltage of 12 V. The capacity (Ah) of the battery
supplying the power must not be significantly less than the capacity of the
discharged battery in your vehicle.
Jump-start cables
Only use jump-start cables which have an adequately large cross-section and insu-
lated terminal clamps. Please pay attention to the manufacturer's instructions.
Positive cable - colour coding in the majority of cases red.
Negative cable - colour coding in the majority of cases black.
WARNING
•
A discharged battery may already freeze at temperatures just below 0°C.
In case of frozen battery carry out no jump-starting - risk of explosion! Also
after thawing of the battery there is a risk of caustic burns due to leaking
acid. Replace the frozen battery.
•
Please pay attention to the warning instructions relating to working in
the engine compartment ⇒page 185.Note
•
There must not be any contact between the two vehicles otherwise current may
flow as soon as the negative terminals are connected.
•
The discharged battery must be properly connected to the system of the
vehicle.
•
Switch off any installed telephone and also pay attention to the instructions for
use of the telephone in such a situation.
AB
AA
AB
s29g.4.book Page 213 Wednesday, June 17, 2009 9:54 AM
Page 215 of 263

Breakdown assistance 214•
We recommend purchasing jump-start cables from Škoda Service Partners as a
Škoda original accessory or from retailers who sell branded batteries.
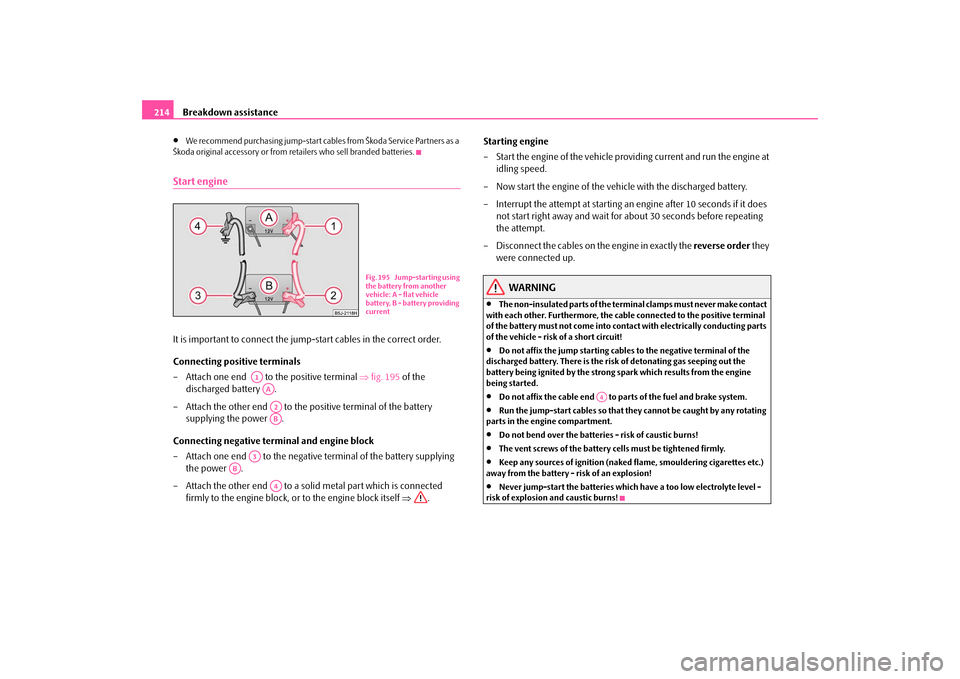
Start engineIt is important to connect the jump-start cables in the correct order.
Connecting positive terminals
– Attach one end to the positive terminal ⇒fig. 195 of the
discharged battery .
– Attach the other end to the positive terminal of the battery
supplying the power .
Connecting negative terminal and engine block
– Attach one end to the negative terminal of the battery supplying
the power .
– Attach the other end to a solid metal part which is connected
firmly to the engine block, or to the engine block itself ⇒.Starting engine
– Start the engine of the vehicle providing current and run the engine at
idling speed.
– Now start the engine of the vehicle with the discharged battery.
– Interrupt the attempt at starting an engine after 10 seconds if it does
not start right away and wait for about 30 seconds before repeating
the attempt.
– Disconnect the cables on the engine in exactly the reverse order they
were connected up.
WARNING
•
The non-insulated parts of the terminal clamps must never make contact
with each other. Furthermore, the cable connected to the positive terminal
of the battery must not come into contact with electrically conducting parts
of the vehicle - risk of a short circuit!
•
Do not affix the jump starting cables to the negative terminal of the
discharged battery. There is the risk of detonating gas seeping out the
battery being ignited by the strong spark which results from the engine
being started.
•
Do not affix the cable end to parts of the fuel and brake system.
•
Run the jump-start cables so that they cannot be caught by any rotating
parts in the engine compartment.
•
Do not bend over the batteries - risk of caustic burns!
•
The vent screws of the battery cells must be tightened firmly.
•
Keep any sources of ignition (naked flame, smouldering cigarettes etc.)
away from the battery - risk of an explosion!
•
Never jump-start the batteries which have a too low electrolyte level -
risk of explosion and caustic burns!
Fig. 195 Jump-starting using
the battery from another
vehicle: A - flat vehicle
battery, B - battery providing
current
A1AAA2AB
A3
AB
A4
A4
s29g.4.book Page 214 Wednesday, June 17, 2009 9:54 AM
Page 217 of 263

Breakdown assistance 216
Installing the towing eye
– Grasp the grille at the points marked with the arrows and take it out
⇒page 215, fig. 196.
– Screw in the towing eye by hand to the left up to the stop ⇒fig. 197.
– Tighten up the towing eye using the wheel wrench (push the wheel
wrench through eye).
Removal of the towing eye
– Unscrew the towing eye.
– Put the grille in place on the side opposite the marking.
– Press into place the protective grille onto the side facing the marking.
– The protective grille must engage firmly.
Rear towing eyeThe rear towing eye is located below the rear bumper on the right ⇒fig. 198.Tow-starting a vehicleIf the engine does not start, we generally do not recommend to tow-start
your vehicle. One should attempt to start the engine using jump start
cables ⇒page 213 or call on the services of the SERVICE mobile.
If your vehicle has to be towed:
– Engage 2nd or 3rd gear with the vehicle stationary.
– Depress the clutch pedal fully and keep it depressed.
– Switch on the ignition.
– Wait until both vehicles are moving then release the clutch pedal
slowly.
– Depress the clutch pedal fully when the engine fires and take the
vehicle out of gear.
Fig. 197 Front bumper:
Installing the towing eye
Fig. 198 Rear towing eye
s29g.4.book Page 216 Wednesday, June 17, 2009 9:54 AM