2009 SKODA ROOMSTER technical data
[x] Cancel search: technical dataPage 98 of 263

Heating and air conditioning system97
Using the system
Safety
Driving Tips
General Maintenance
Breakdown assistance
Praktik
Technical Data Display of selected interior temperature, here: +20 °C
Automatic mode
ECON mode
Buttons / control dial
Setting the interior temperature
Air flow to the windows
Automatic mode
Air flow in the footwell
Air flow to the upper body
Air flow to head
Button for switching off cooling system
Recirculated air mode
Note
The interior temperature sensor is located in the bottom part of the device. Do
not glue or cover over the sensor, otherwise it could have an unfavourable effect on
the Climatronic.Automatic mode
The automatic mode is used in order to maintain a constant temper-
ature and to keep the windows in the interior of the car dry.Switching automatic mode on
– Set a temperature between +18 °C and +29 °C.
– Move the air outlet vents 3 and 4 ⇒page 89, fig. 114, so that the air
flow is directed slightly upwards.
– Press the button , AUTO appears in the display.The automatic mode is switched off by pressing the button for the air distribution
or increasing or decreasing the blower speed. The temperature is nevertheless
regulated.
ECON mode
The cooling system is switched off in the ECON mode - heating and
ventilation are regulated automatically.Switching ECON mode on
–Press the button , ECON appears in the display.
– Set a temperature between +18 °C and +29 °C.
Recirculated air mode in ECON mode
– First of all press the button , AUTO appears in the display.
– Then press the button , ECON appears in the display.The ECON mode operates only within the control temperature range from +18°C
up to +29°C.
The ECON mode is switched off when pressing button or .
Please note that, in the ECON mode, the interior temperature cannot be lower than
the outside temperature. The interior is not cooled and the air is not dehumidified.
Please refer to the information regarding recirculated air mode ⇒page 89, “Recir-
culated air mode”.Defrosting windscreenDefrosting windscreen - switching on
–Press the button ⇒page 96, fig. 117.
Defrosting windscreen - switching off
– Once again press the button or the button .The temperature control is controlled automatically. More air flows out of the air
outlet vents 1 and2.
A8A9A10A11A12A14A15A16A17A18A19
A13
AUTO
ECON
ECON
AUTO
s29g.4.book Page 97 Wednesday, June 17, 2009 9:54 AM
Page 100 of 263
Starting-off and Driving99
Using the system
Safety
Driving Tips
General Maintenance
Breakdown assistance
Praktik
Technical Data
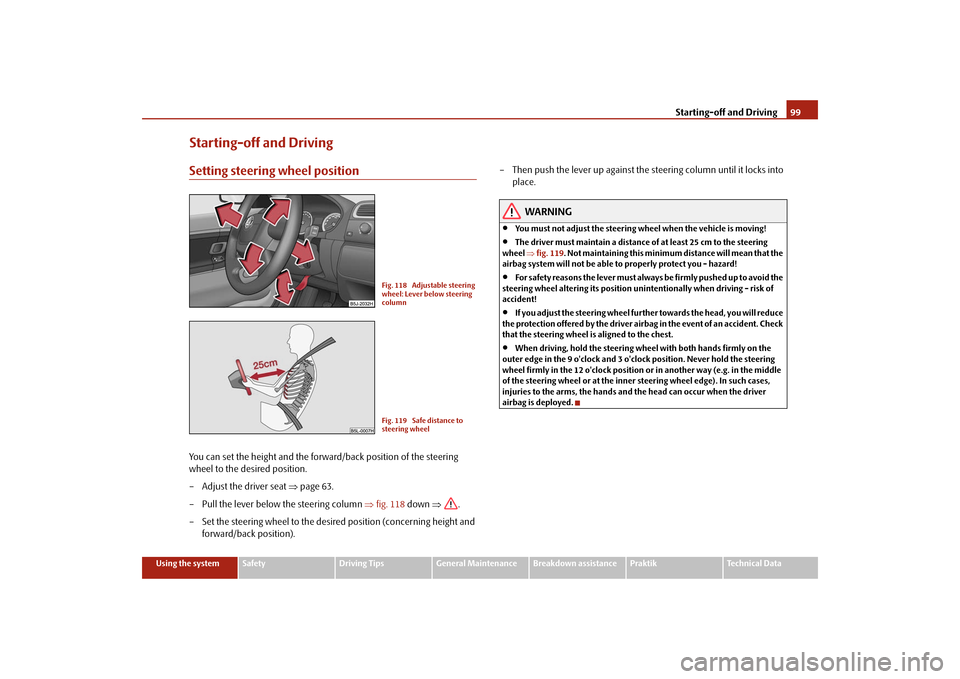
Starting-off and DrivingSetting steering wheel positionYou can set the height and the forward/back position of the steering
wheel to the desired position.
– Adjust the driver seat ⇒page 63.
– Pull the lever below the steering column ⇒fig. 118 down ⇒.
– Set the steering wheel to the desired position (concerning height and
forward/back position).– Then push the lever up against the steering column until it locks into
place.
WARNING
•
You must not adjust the steering wheel when the vehicle is moving!
•
The driver must maintain a distance of at least 25 cm to the steering
wheel ⇒fig. 119. Not maintaining this minimum distance will mean that the
airbag system will not be able to properly protect you - hazard!
•
For s a fe t y re a s ons the le v e r m ust a lwa y s b e fi rm l y pus he d up t o a vo id the
steering wheel altering its position unintentionally when driving - risk of
accident!
•
If you adjust the steering wheel further towards the head, you will reduce
the protection offered by the driver airbag in the event of an accident. Check
that the steering wheel is aligned to the chest.
•
When driving, hold the steering wheel with both hands firmly on the
outer edge in the 9 o'clock and 3 o'clock position. Never hold the steering
wheel firmly in the 12 o'clock position or in another way (e.g. in the middle
of the steering wheel or at the inner steering wheel edge). In such cases,
injuries to the arms, the hands and the head can occur when the driver
airbag is deployed.
Fig. 118 Adjustable steering
wheel: Lever below steering
columnFig. 119 Safe distance to
steering wheel
s29g.4.book Page 99 Wednesday, June 17, 2009 9:54 AM
Page 102 of 263
Starting-off and Driving101
Using the system
Safety
Driving Tips
General Maintenance
Breakdown assistance
Praktik
Technical Data
•
Let go of the key as soon as the engine starts otherwise there may be damage
to the starter.
The engine running noises may louder at first be louder for a short time after
starting the cold engine until oil pressure can be built up in the hydraulic valve
clearance compensation. This is quite normal and is not an operating problem.
If the engine does not start ...
You can use the battery of another vehicle as a jump-start aid ⇒page 213.
It is only possible to tow-start vehicles fitted with a manual gearbox. The tow-
starting distance must not be more than 50 metres ⇒page 216.
WARNING
•
Never run the engine in non ventilated or enclosed areas. The exhaust
gases of the engine contain besides the odorless and colourless carbon
monoxide a poisonous gas - hazard! Carbon monoxide can cause uncon-
sciousness and death.
•
Never leave your vehicle unattended with the engine running.Caution
•
The starter may only be operated (ignition key position ), if the engine is not
running. If the starter is immediately operated after switching off the engine, the
starter or the engine can be damaged.
•
Avoid high engine revolutions, full throttle and high engine loads as long as the
engine has not yet reached its normal operating temperature - risk of damaging the
engine!
•
Vehicles which are fitted with an exhaust gas catalytic converter should not be
tow-started over a distance of more than 50 metres.For the sake of the environment
Never warm up the engine when the vehicle is standing. Drive off right away. When
driving the engine reaches its operating temperature more rapidly and the pollutant
emissions are lower.
Petrol enginesThese engines are fitted with a starter system which selects the correct fuel-air
mixture for every external air temperature.•
Do not operate accelerator before and when starting engine.
•
Interrupt the attempt at starting after 10 seconds if the engine does not start
right awayand wait for about 30 seconds before repeating the attempt.
•
It is possible that the fuse on the electrical fuel pump is defect if the engine still
does not start. Check the fuse and replace it if necessary ⇒page 218.
•
If the engine does not start, contact the nearest specialist garage to obtain
professional assistance.
It may be necessary, if the engine is very hot, to slightly depress the accelerator
after the engine has started.
Diesel enginesGlow plug system
Diesel engines are equipped with a glow plug system, the preglow period being
controlled automatically in line with the coolant temperature and outside temper-
ature.
The preglow indicator light
comes on after the ignition has been switched on.
You should not switch on any major electrical components during the heating
period otherwise the vehicle battery will be drained unnecessarily.
•
You should start the engine immediately after the glow plug warning light
has gone out.
•
The glow plug warning light will come on for about one second if the engine is
at a normal operating temperature or if the outside temperature is above +5°C. This
means that you can start the engine right away.
•
Interrupt the attempt at starting after 10 seconds if the engine does not start
right awayand wait for about 30 seconds before repeating the attempt.
•
It is possible that the fuse on the diesel preglow system is defect if the engine
still does not start. Check the fuse and replace it if necessary ⇒page 218.
A3
s29g.4.book Page 101 Wednesday, June 17, 2009 9:54 AM
Page 104 of 263

Starting-off and Driving103
Using the system
Safety
Driving Tips
General Maintenance
Breakdown assistance
Praktik
Technical Data
HandbrakeApplying the handbrake
– Pull the handbrake lever up fully.
Releasing the handbrake
– Pull the handbrake lever up slightly and at the same time press in the
locking button ⇒fig. 122.
– Hold the button pressed and push the handbrake lever down fully
⇒.The handbrake warning light
lights up when the handbrake is applied, provided
the ignition is on.
A warning signal sounds and the following text appears in the display* if you have
inadvertently driven off with the handbrake applied:
HANDBRAKE ON
The handbrake warning is activated if you drive at a speed of more than 6 km/h for
more than 3 seconds.
WARNING
•
Please note that the handbrake must be fully released. A handbrake
which is only partially released can result in the rear brakes overheating
which will have a negative effect on the operation of the brake system - risk
of accident! In addition this can result in premature wear of the rear brake
pads.
•
Never leave children unattended in the vehicle. The children might, for
example, release the handbrake or take the vehicle out of gear. The vehicle
might then move off - risk of accident!Caution
After the car has come to a stop, always first of all apply the handbrake firmly before
then additionally engaging a gear (manual gearbox) or moving the selector lever
into position P (automatic gearbox).Parking aid*The parking aid provides a warning of obstacles behind the vehicle.The audible parking aid determines the distance between the rear bumper and an
obstacle located behind the vehicle with the aid of ultrasound sensors. The sensors
are integrated in the rear bumper.
Fig. 122 Centre console:
Handbrake
Fig. 123 Parking aid: Range
of sensors
s29g.4.book Page 103 Wednesday, June 17, 2009 9:54 AM
Page 106 of 263
Starting-off and Driving105
Using the system
Safety
Driving Tips
General Maintenance
Breakdown assistance
Praktik
Technical Data
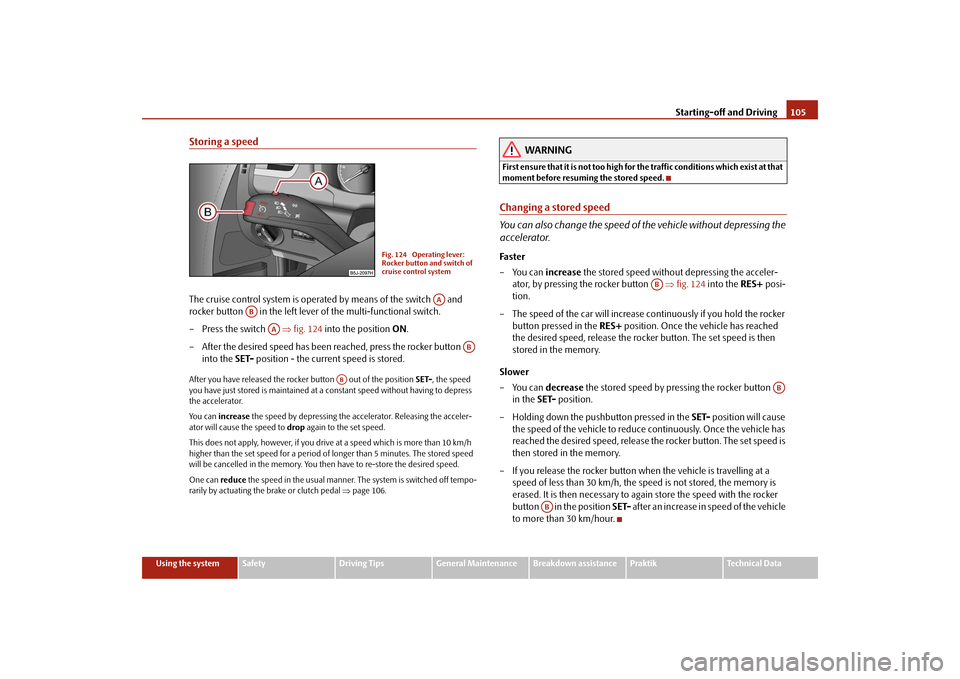
Storing a speedThe cruise control system is operated by means of the switch and
rocker button in the left lever of the multi-functional switch.
– Press the switch ⇒fig. 124 into the position ON.
– After the desired speed has been reached, press the rocker button
into the SET- position - the current speed is stored.After you have released the rocker button out of the position SET-, the speed
you have just stored is maintained at a constant speed without having to depress
the accelerator.
Yo u c a n increase the speed by depressing the accelerator. Releasing the acceler-
ator will cause the speed to drop again to the set speed.
This does not apply, however, if you drive at a speed which is more than 10 km/h
higher than the set speed for a period of longer than 5 minutes. The stored speed
will be cancelled in the memory. You then have to re-store the desired speed.
One can reduce the speed in the usual manner. The system is switched off tempo-
rarily by actuating the brake or clutch pedal ⇒page 106.
WARNING
First ensure that it is not too high for the traffic conditions which exist at that
moment before resuming the stored speed.Changing a stored speed
You can also change the speed of the vehicle without depressing the
accelerator.Fa s t er
–You can increase the stored speed without depressing the acceler-
ator, by pressing the rocker button ⇒fig. 124 into the RES+ posi-
tion.
– The speed of the car will increase continuously if you hold the rocker
button pressed in the RES+ position. Once the vehicle has reached
the desired speed, release the rocker button. The set speed is then
stored in the memory.
Slower
–You can decrease the stored speed by pressing the rocker button
in the SET- position.
– Holding down the pushbutton pressed in the SET- position will cause
the speed of the vehicle to reduce continuously. Once the vehicle has
reached the desired speed, release the rocker button. The set speed is
then stored in the memory.
– If you release the rocker button when the vehicle is travelling at a
speed of less than 30 km/h, the speed is not stored, the memory is
erased. It is then necessary to again store the speed with the rocker
button in the position SET- after an increase in speed of the vehicle
to more than 30 km/hour.
Fig. 124 Operating lever:
Rocker button and switch of
cruise control system
AA
AB
AA
AB
AB
AB
AB
AB
s29g.4.book Page 105 Wednesday, June 17, 2009 9:54 AM
Page 108 of 263

Automatic gearbox107
Using the system
Safety
Driving Tips
General Maintenance
Breakdown assistance
Praktik
Technical Data
Automatic gearbox6-speed automatic gearbox*IntroductionYour car is equipped with an electronically controlled 6-speed automatic gearbox.
Shifting up and also down through the gears is performed automatically.
At the same time this is a conventional automatic gearbox. The maximum speed is
reached in the 5th gear. The 6th gear serves as an economic driving programme,
which is intended to reduce the fuel consumption.Information for driving with an automatic gearbox
Shifting up and down through the gears is performed automatically.You can also, however, switch the gearbox over into the Tiptronic mode.
This mode makes it possible for you to also shift gears manually
⇒page 110.
Starting-off and Driving
– Depress the brake pedal and hold it depressed.
– Press the Shiftlock button (button in handle of the selector lever),
move the selector lever into the desired position, e.g. D ⇒page 108,
and then release the Shiftlock button.
– Wait a moment until the gearbox has shifted (a slight engagement
nudge can be felt).
– Release the brake pedal and depress the accelerator ⇒.Stopping for a short time
– The selector lever position N does not have to be selected when stop-
ping just for a short time, such as at a cross roads. It is sufficient to hold
the vehicle stationary using the foot brake. The engine can, however,
be allowed just to idle.
Parking
– Depress the brake pedal and hold it depressed.
– Apply the handbrake firmly.
– Press and Shiftlock button in the selector lever, move the selector
lever to P and then release the Shiftlock button.
The engine can only be started when the selector lever is in position P or N
⇒page 100.
It is sufficient to engage selector lever position P when parking on a flat surface.
When parking on a slope you should first apply the handbrake firmly and then
move the selector lever into position P. This is to ensure that there is no excessive
pressure acting on the lock mechanism and that it is easier to subsequently move
the selector lever out of position P.
If the selector lever position N is selected by accident while driving it is first neces-
sary to release pressure on the accelerator pedal and wait for idling speed of the
engine to be reached before engaging a drive position in the selector lever.
WARNING
•
Do not depress the accelerator when changing the position of the
selector lever if the car is stationary and the engine is running - risk of acci-
dent!
•
Never move the selector lever into position R or P when driving - risk of
an accident!
s29g.4.book Page 107 Wednesday, June 17, 2009 9:54 AM
Page 110 of 263
Automatic gearbox109
Using the system
Safety
Driving Tips
General Maintenance
Breakdown assistance
Praktik
Technical Data In certain circumstances (e.g. when driving in mountainous regions or when towing
a trailer) it may be beneficial to select the manual shift programme ⇒page 110 for
a short time in order to adapt the gearbox ratios manually to the driving situations.
S - Position for sporty style of driving
Shifting up later into a higher gear makes it possible to fully exploit the power
potential of the engine. The gearbox also then shifts down at higher engine speeds
as in the position D.
The gearbox does not shift into the 6th gear in the position S, because the
maximum speed is achieved with the 5th gear.
The Shiftlock on the selector lever grip must be pressed when moving the selector
lever out of the position D into the position S.
WARNING
•
Never move the selector lever into position R or P when driving - risk of
an accident!
•
When the engine is running and the vehicle is stationary, it is necessary
to hold the car with the brake pedal in all the positions of the selector lever
(except P and N) since the power transmission is never completely inter-
rupted, also not when the engine is idling - the vehicle creeps.
•
You must on no account unintentionally operate the throttle (e.g. by
hand from the engine compartment) if a drive position is engaged when the
car is stationary. The vehicle would otherwise immediately start off - also
when the handbrake is firmly applied - risk of an accident!
•
You must move the selector lever into position P and firmly apply the
handbrake first before you or any other person opens the bonnet and starts
working on the engine when it is running - risk of accident! It is also essential
to observe all warnings ⇒page 185, “Working in the engine
compartment”.
Selector lever lockAutomatic selector lever lock
With the ignition on, the selector lever is locked when it is in the positions P and N.
You must first of all depress the brake pedal in order to move the selector lever out
of this position. The warning light
⇒page 35 lights up in the instrument cluster
as a reminder for the driver when the selector lever is in position P and N.
A time delay element ensures that the selector lever is not blocked when rapidly
switching over the position N (e.g. from R to D). This does, for example, allow one
to seesaw out a stuck vehicle. The selector lever lock will click into place if the lever
is in the N position for more than 2 seconds without the brake pedal being pressed.
The selector lever lock is only active if the vehicle is stationary or moving at speed
of less than 5 km/hour. The lock is switched off automatically into position N when
the car is travelling at a higher speed.
Shiftlock button
The Shiftlock button in the handle of selector lever prevents certain selector lever
positions being engaged inadvertently. The selector lever lock is cancelled when
you press the Shiftlock button.
Keylock
5)- Ignition key withdrawal lock
You can only withdraw the ignition key after switching off the ignition if the selector
lever is in position P. If the ignition key is withdrawn, the selector lever is blocked in
position P.
Note
On vehicles which are fitted with an automatic gearbox, you can withdraw the igni-
tion key after switching off the ignition in any position of the selector lever.5)This function is only valid for some countries.
s29g.4.book Page 109 Wednesday, June 17, 2009 9:54 AM
Page 112 of 263
Automatic gearbox111
Using the system
Safety
Driving Tips
General Maintenance
Breakdown assistance
Praktik
Technical Data
Switching over to manual shifting
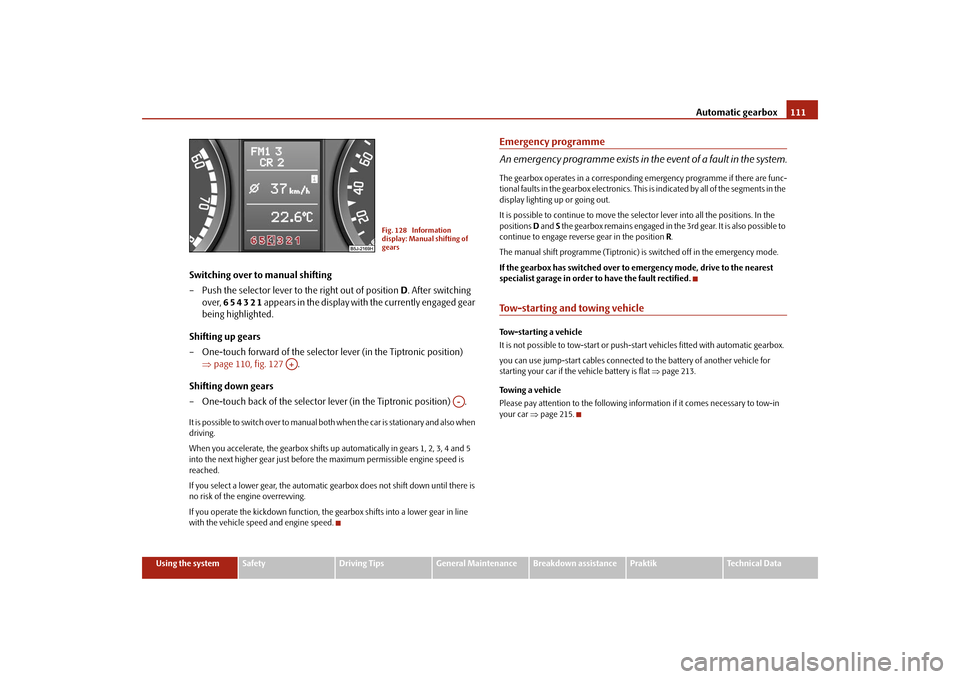
– Push the selector lever to the right out of position D. After switching
over, 6 5 4 3 2 1 appears in the display with the currently engaged gear
being highlighted.
Shifting up gears
– One-touch forward of the selector lever (in the Tiptronic position)
⇒page 110, fig. 127 .
Shifting down gears
– One-touch back of the selector lever (in the Tiptronic position) .It is possible to switch over to manual both when the car is stationary and also when
driving.
When you accelerate, the gearbox shifts up automatically in gears 1, 2, 3, 4 and 5
into the next higher gear just before the maximum permissible engine speed is
reached.
If you select a lower gear, the automatic gearbox does not shift down until there is
no risk of the engine overrevving.
If you operate the kickdown function, the gearbox shifts into a lower gear in line
with the vehicle speed and engine speed.
Emergency programme
An emergency programme exists in the event of a fault in the system.The gearbox operates in a corresponding emergency programme if there are func-
tional faults in the gearbox electronics. This is indicated by all of the segments in the
display lighting up or going out.
It is possible to continue to move the selector lever into all the positions. In the
positions D and S the gearbox remains engaged in the 3rd gear. It is also possible to
continue to engage reverse gear in the position R.
The manual shift programme (Tiptronic) is switched off in the emergency mode.
If the gearbox has switched over to emergency mode, drive to the nearest
specialist garage in order to have the fault rectified.Tow-starting and towing vehicle Tow-starting a vehicle
It is not possible to tow-start or push-start vehicles fitted with automatic gearbox.
you can use jump-start cables connected to the battery of another vehicle for
starting your car if the vehicle battery is flat ⇒page 213.
Towing a vehicle
Please pay attention to the following information if it comes necessary to tow-in
your car ⇒page 215.
Fig. 128 Information
display: Manual shifting of
gears
A+
A-
s29g.4.book Page 111 Wednesday, June 17, 2009 9:54 AM