2009 SKODA ROOMSTER ignition
[x] Cancel search: ignitionPage 59 of 263
Lights and Visibility 58
Lighting of storage compartment on the front passenger side
– When opening the flap of the storage compartment on the front
passenger side the lighting in the storage compartment comes on.
– The light switches on automatically when the parking light is switched
on and goes out when the flap is closed.On vehicles with central locking, the interior light is switched on for about 20
seconds when the vehicle is unlocked, when a door is opened or after withdrawing
the ignition key (if the relevant switch is in the door contact position). The inner light
goes out out immediately after the ignition is switched on.
A time delay switch* causes the inner lighting on vehicles without a central locking
system stays on for a few seconds after the doors have been closed. The inner light
goes out out immediately after the ignition is switched on.
The interior lighting is switched off after about 30 minutes when a door has been
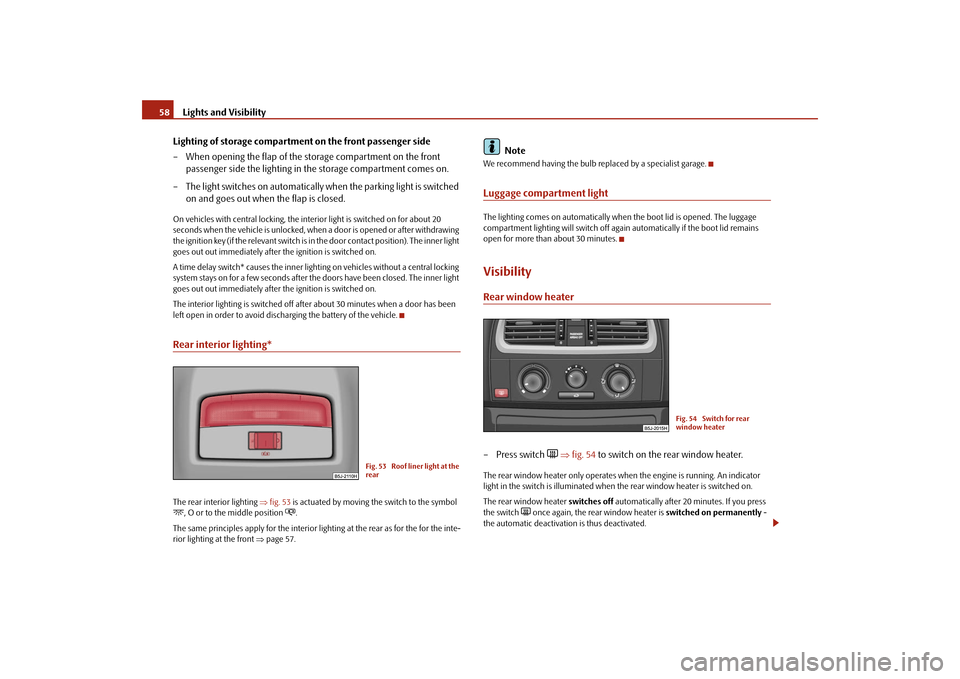
left open in order to avoid discharging the battery of the vehicle.Rear interior lighting*The rear interior lighting ⇒fig. 53 is actuated by moving the switch to the symbol , O or to the middle position
.
The same principles apply for the interior lighting at the rear as for the for the inte-
rior lighting at the front ⇒page 57.
Note
We recommend having the bulb replaced by a specialist garage.Luggage compartment lightThe lighting comes on automatically when the boot lid is opened. The luggage
compartment lighting will switch off again automatically if the boot lid remains
open for more than about 30 minutes.VisibilityRear window heater– Press switch
⇒fig. 54 to switch on the rear window heater.
The rear window heater only operates when the engine is running. An indicator
light in the switch is illuminated when the rear window heater is switched on.
The rear window heater switches off automatically after 20 minutes. If you press
the switch
once again, the rear window heater is switched on permanently -
the automatic deactivation is thus deactivated.
Fig. 53 Roof liner light at the
rear
Fig. 54 Switch for rear
window heater
s29g.4.book Page 58 Wednesday, June 17, 2009 9:54 AM
Page 61 of 263
Lights and Visibility 60
Fast wipe
– Position the lever up into position .
Automatic wipe/wash for windscreen
– Pull the lever towards the steering wheel into position and the
widescreen wiper and wash system will operate - in the sprung posi-
tion.
– Release the lever. The windscreen wash system stops and the wiper
continues for another 1 - 3 wiper strokes (depending on the period of
spraying of the windscreen).
Wiping the rear window pane*
– Push the lever away from the steering wheel into position
⇒page 59, fig. 56, the widescreen wiper will operate every 6 seconds.
Automatic wipe/wash for the rear window pane*
– Push the lever away from the steering wheel into position - the
widescreen wiper and wash system will operate - in the sprung posi-
tion.
– Letting go of the lever will cause the windscreen wash system to stop
and the wiper to continue for another 1 - 3 wiper strokes (depending
on the period of spraying of the windscreen). The lever will stay in
position after releasing it .
Switching windscreen wipers off
– Move the lever back into its home position .The windscreen wipers and the windscreen washer system only operate if the igni-
tion is switched on.
The rear window will be wiped again if the window wipers are on when reverse gear
is selected.
The windscreen washer nozzles are heated* when the ignition is switched on.Top up with wash liquid ⇒page 196.
WARNING
•
Properly maintained windscreen wiper blades are essential for clear visi-
bility and safe driving ⇒page 61.
•
Do not use the windscreen washer system at low temperatures, without
heating the windscreen beforehand. Otherwise the window cleaner could
freeze on the windscreen and restrict the view to the front.
•
In the event of a freezing up of the windscreen, first of all eliminate the ice
⇒page 176 and then operate the windscreen wiper otherwise the wind-
screen wiper blades could be damaged.Caution
In frosty weather, please first of all check whether the windscreen wiper blades are
not frozen to the windscreen before switching them on. Switching on windscreen
wipers when the blades are frozen to the windscreen may result in damage both to
the blades and the motor of the windscreen wipers!Headlight cleaning system*The headlights are being cleaned after the windscreen washer system has been
operated for the fifth time, the low beam or main beam are switched on as well as
the windscreen wiper lever is held in the position ⇒page 59, fig. 56 for about 1
second.
You should remove stubborn dirt (such as insect residues) from the headlight
lenses at regular intervals, for example when refuelling. Please refer to the following
guidelines ⇒page 176, “The headlight lenses”.
You should remove any snow from the fixtures of the washer nozzles and clear ice
in winter with a de-icing spray in order to ensure proper operation of the cleaning
system.
A3
A5A6A7
A6
A0
A5
s29g.4.book Page 60 Wednesday, June 17, 2009 9:54 AM
Page 66 of 263

Seats and Storage65
Using the system
Safety
Driving Tips
General Maintenance
Breakdown assistance
Praktik
Technical Data
– Move the head restraint downwards if required by pressing the locking
button ⇒fig. 62 and by pressing with the other hand the head
restraint downwards.
Removing and installing a head restraint
– Pull the head restraint out of the seat backrest as far as the stop.
– Press the locking button in the direction of arrow ⇒fig. 62 and pull
the head restraint out.
– To re-insert the head restraint, push it down into the seat backrest far
enough until you hear the locking button engage.The position of the front, rear outer head restraints and the rear middle head
restraint* is adjustable for height.
The head restraints must be adjusted to match the size of the seat occupant.
Correctly adjusted head restraints together with the seat belts offer effective
protection for the occupants ⇒page 128.
WARNING
•
The head restraints must be correctly adjusted in order to offer effective
protection for the occupants in the event of an accident.
•
Do not drive under any circumstance with removed head restraints - risk
of injury!
Heating the front seats*The seating and leaning surfaces of the driver and front passenger seat
can be heated when the ignition is switched on.
Front seats
– By pressing the rocker switch in the position or switch on the
front seat heating to 25 % or 100 % of its power output ⇒fig. 63.
– To switch off the heating shift the rocker switch into the horizontal
position.
WARNING
•
If, as an occupant, you have a subdued pain and/or temperature sensi-
tivity, e.g. through medication, paralysis or because of chronic illness (e.g.
diabetes), we recommend not to use the seat heating of the driver or front
passenger seat. This can lead to burns on the back, the posterior and the legs
which are difficult to heal. If the seat heating is used, we recommend to make
regular breaks in your journey when driving long distances, so that the body
can recuperate from the stress of the journey. Please consult your doctor,
who can evaluate your specific condition.
Fig. 63 Rocker switch: Front
seat heatingA1
A2
s29g.4.book Page 65 Wednesday, June 17, 2009 9:54 AM
Page 84 of 263

Seats and Storage83
Using the system
Safety
Driving Tips
General Maintenance
Breakdown assistance
Praktik
Technical Data
WARNING
•
Take care when using the cigarette lighter! Not paying proper attention
or incorrect use the cigarette lighter in an uncontrolled manner may result in
burns.
•
The cigarette lighter and the power socket also operates when the igni-
tion is switched off or the ignition key withdrawn. This is why you should
never leave children unattended in the vehicle!Caution
Only use matching plugs, which fulfils the DIN - ISO Standard 4165, to avoid
damaging the power sockets.
Note
Connecting electrical components when the engine is not running will drain
the battery of the vehicle - risk of battery draining!Power socket in the luggage compartment– Open the cover of the power socket ⇒fig. 102.
– Connect the plug of the electrical appliance to the socket.
The power socket, which fulfils the requirements of DIN standard ISO 4165, must
only be used for connecting approved electrical accessories with a power uptake of
up to 240 watts. The vehicle battery will be discharged in the process if the engine
is stationary.
The same remarks apply here as for ⇒page 82, “Cigarette lighter”.
Further information ⇒page 204, “Accessories, changes and replacement of
parts”.Storage compartmentsOverviewYou will find the following storage facilities in your vehicle:
WARNING
•
Please do not place anything on top of the dash panel. Such objects
might slide or fall down when driving (when accelerating or cornering) and
may distract you from concentrating on the traffic situation - risk of acci-
dent!
Fig. 102 Luggage compart-
ment: Power socket
Storage compartments on the front passenger side*
⇒page 84
Storage compartment on the driver's side
⇒page 85
Storage compartment for spectacles*
⇒page 85
Stowage compartment in centre console
⇒page 85
Storage compartment in the front seat*
⇒page 85
Front seat armrest with storage compartment*
⇒page 86
Storage compartment in the front doors
⇒page 86
Storage compartments in the luggage compartment
⇒page 87
Flexible storage compartment*
⇒page 87
Clothes hooks*
⇒page 87
s29g.4.book Page 83 Wednesday, June 17, 2009 9:54 AM
Page 96 of 263
Heating and air conditioning system95
Using the system
Safety
Driving Tips
General Maintenance
Breakdown assistance
Praktik
Technical Data
Using the air conditioning system economicallyThe compressor on the Climatic uses power from the engine when in cooling mode
which will effect the fuel consumption.
It recommended to open the windows or the doors of a vehicle for which the inte-
rior has been strongly heated through the effect of direct sunlight in order to allow
the heated air to escape.
The cooling system should not be switched on while travelling when the window is
open.
The desired interior temperature can also be achieved without switching in the
cooling system just by switching to fresh air mode.
For the sake of the environment
When you economize on fuel, you also reduce pollutant emissions.Operational problemsIf the cooling system does not operate at outside temperatures higher than +2 °C,
there is a problem in the system. The reasons for this may be:•
The fuse of the Climatic is defective. Check the fuse, replace it if necessary
⇒page 218.
•
The cooling system has switched off automatically for a short time because the
coolant temperature of the engine is too hot ⇒page 19.
If you are not able to rectify the operational problem yourself, or if the cooling
capacity decreases, switch the cooling system off. Contact a specialist garage.
If there is a fault at the Climatronic, all symbols on the display flash after switching
on the ignition for 15 seconds. Contact a specialist garage.
Climatronic (automatic air conditioning)*Description
The Climatronic system is a combination of an automatic heating,
fresh air and cooling system which provides optimal comfort for the
occupants of the car.The Climatronic maintains a constant temperature fully automatically, once it has
been set. This is achieved by automatically varying the temperature of the
outflowing air, the blower stages and the air distribution. The system also takes into
account sunlight which eliminates the need to alter the settings manually. The
automatic mode ⇒page 97 ensures maximum wellbeing of the occupants at all
times of the year.
Description of Climatronic system
The cooling operates only if the following conditions are met:•
engine running,
•
outside temperature above +2°C,
•
the button is not pressed.
If the cooling system is switched on, the temperature and air humidity drops in the
vehicle. The wellbeing of the occupants of the car is enhanced as a result of this
particularly at high outside temperatures and a high air humidity. The system
prevents the windows misting up during the cold season of the year.
The heating effect is dependent upon the coolant temperature, thus full heat
output only occurs when the engine has reached its operating temperature.
It is possible to briefly activate recirculated air mode in order to enhance the
cooling effect ⇒.
The air inlet in front of the windscreen must be free of ice, snow or leaves in order
to ensure that the heating and cooling systems operate properly.
The AC compressor is switched off at a high coolant temperature in order to provide
cooling at a high load of the engine.
ECON
s29g.4.book Page 95 Wednesday, June 17, 2009 9:54 AM
Page 99 of 263
Heating and air conditioning system 98Setting temperature– You can set the desired interior temperature after switching on the
ignition with the control dial .You can set the interior temperature between +18°C and +29 °C. The interior
temperature is regulated automatically within this range. If you select a tempera-
ture of less than +18 °C, “LO” is shown on the display. If you select a temperature
above +29 °C, “HI” is shown on the display. In both limit positions the Climatronic
operates at maximum cooling or heating capacity, respectively. The temperature is
not controlled in this case.
Lengthy and uneven distribution of the air flow out of the vents (in particular at the
leg area) and large differences in temperature, for example when getting out of the
vehicle, can result in chills in sensitive persons.Controlling blower
There are a total of seven blower stages available.The Climatronic system controls the blower stages automatically in line
with the interior temperature. You can also, however, adapt the blower
stages manually to suit your particular needs.
– Turn the control dial ⇒page 96, fig. 117 to the left (reduce blower
speed) or right (increase blower speed).If you switch off the blowers, the Climatronic is switched off and OFF is shown in
the display.
The set blower speed is displayed next to the control dial when the respective
number of warning lights come on.
WARNING
•
“Stale air” may result in fatigue in the driver and occupants, reduce
attention levels and also cause the windows to mist up. The risk of having an
accident increases.
•
Do not switch the Climatronic system off for longer than necessary.
•
Switch the Climatronic system on as soon as the windows mist up.
A11
A1
A1
WARNING (continued)
s29g.4.book Page 98 Wednesday, June 17, 2009 9:54 AM
Page 101 of 263

Starting-off and Driving 100Ignition lockPetrol engines
- ignition switched off, engine off
- ignition switched on
- start engine
Diesel engines
- interruption of fuel supply, ignition switched off, engine off, the steering can
be locked.
- heating glow plugs on, ignition switched on•
You should not switch on any major electrical components during the heating
period otherwise the vehicle battery will be drained unnecessarily.
- start engine
Applies to all models:
Position
To lock the steering, with the ignition key withdrawn, turn the steering wheel until
the steering locking pin is heard to engage. You should always lock the steering as
a general rule if you leave your vehicle. This acts as a deterrent against possible theft
of your vehicle ⇒.
Position Move the steering wheel back and forward a little if the ignition key cannot, or
cannot easily be turned into this position, in order to release the steering lock.
Position
The engine is started in this position. At the same time switched on low beam or
main beam or other electrical components with major power consumption are
briefly switched off. The ignition key moves back into position when one
releases the key.
The ignition key must be turned back into position each time before starting the
engine again. The starter repeat lock in the ignition lock prevents the starter being
engaged when the engine is running and thus getting damaged.
WARNING
•
When driving, the ignition key must always be in the position (igni-
tion switched on) without the engine running. This position is indicated by
the warning lights coming on. If this is not the case, it could result in unex-
pected locking of the steering wheel - risk of accident!
•
Do not withdraw the ignition key from the lock until the vehicle has come
to a stop. The steering lock can engage immediately - risk of accident!
•
Always withdraw the ignition key if you are going to leave the vehicle,
even for a short time. This is particularly important if children are left in the
vehicle. The children might otherwise start the engine or operate electrical
equipment (e.g. power windows) - risk of injury!
Starting the engineGeneral
You can only start the engine only using an original ignition key.•
Place the gearshift lever into neutral and put on the handbrake firmly before
starting the engine.
•
The clutch pedal should be fully depressed when starting the engine - the
starter then only has to crank the engine.
Fig. 120 Ignition lock posi-
tions
A1A2A3A1A2A3
A1A2
A3
A2
A1
A2
s29g.4.book Page 100 Wednesday, June 17, 2009 9:54 AM
Page 102 of 263
Starting-off and Driving101
Using the system
Safety
Driving Tips
General Maintenance
Breakdown assistance
Praktik
Technical Data
•
Let go of the key as soon as the engine starts otherwise there may be damage
to the starter.
The engine running noises may louder at first be louder for a short time after
starting the cold engine until oil pressure can be built up in the hydraulic valve
clearance compensation. This is quite normal and is not an operating problem.
If the engine does not start ...
You can use the battery of another vehicle as a jump-start aid ⇒page 213.
It is only possible to tow-start vehicles fitted with a manual gearbox. The tow-
starting distance must not be more than 50 metres ⇒page 216.
WARNING
•
Never run the engine in non ventilated or enclosed areas. The exhaust
gases of the engine contain besides the odorless and colourless carbon
monoxide a poisonous gas - hazard! Carbon monoxide can cause uncon-
sciousness and death.
•
Never leave your vehicle unattended with the engine running.Caution
•
The starter may only be operated (ignition key position ), if the engine is not
running. If the starter is immediately operated after switching off the engine, the
starter or the engine can be damaged.
•
Avoid high engine revolutions, full throttle and high engine loads as long as the
engine has not yet reached its normal operating temperature - risk of damaging the
engine!
•
Vehicles which are fitted with an exhaust gas catalytic converter should not be
tow-started over a distance of more than 50 metres.For the sake of the environment
Never warm up the engine when the vehicle is standing. Drive off right away. When
driving the engine reaches its operating temperature more rapidly and the pollutant
emissions are lower.
Petrol enginesThese engines are fitted with a starter system which selects the correct fuel-air
mixture for every external air temperature.•
Do not operate accelerator before and when starting engine.
•
Interrupt the attempt at starting after 10 seconds if the engine does not start
right awayand wait for about 30 seconds before repeating the attempt.
•
It is possible that the fuse on the electrical fuel pump is defect if the engine still
does not start. Check the fuse and replace it if necessary ⇒page 218.
•
If the engine does not start, contact the nearest specialist garage to obtain
professional assistance.
It may be necessary, if the engine is very hot, to slightly depress the accelerator
after the engine has started.
Diesel enginesGlow plug system
Diesel engines are equipped with a glow plug system, the preglow period being
controlled automatically in line with the coolant temperature and outside temper-
ature.
The preglow indicator light
comes on after the ignition has been switched on.
You should not switch on any major electrical components during the heating
period otherwise the vehicle battery will be drained unnecessarily.
•
You should start the engine immediately after the glow plug warning light
has gone out.
•
The glow plug warning light will come on for about one second if the engine is
at a normal operating temperature or if the outside temperature is above +5°C. This
means that you can start the engine right away.
•
Interrupt the attempt at starting after 10 seconds if the engine does not start
right awayand wait for about 30 seconds before repeating the attempt.
•
It is possible that the fuse on the diesel preglow system is defect if the engine
still does not start. Check the fuse and replace it if necessary ⇒page 218.
A3
s29g.4.book Page 101 Wednesday, June 17, 2009 9:54 AM