2009 Seat Ibiza ST lights
[x] Cancel search: lightsPage 189 of 250

Checking and refilling levels
188
Caution•If you notice a change in the colour of the liquid because it has been in
use for a long time, it is re commended to change it, as it will have lost some
of its properties and could cause damage to the vehicle.•If a lot of liquid coolant has been lost, wait for the engine to cool down
before putting in cold coolant. This avoids damaging the engine. Large
coolant losses are an indication of leaks in the cooling system. See a special-
ised workshop immediately and have the cooling system checked. Other-
wise, there is a risk of engine damage.Washer fluid and windscreen wiper bladesTopping up washer fluid
The water for cleaning the windscreen should always be
mixed with washer fluid.
The windscreen washer and the headlight washers are supplied with fluid
from the windscreen washer fluid container in the engine compartment. The
container holds approx. 2 litres; in vehicles with headlight washers* it holds
approx. 4.5 litres.
The reservoir is located on the right-hand side of the engine compartment.
Plain water is not enough to clean th e windscreen and headlights. We recom-
mend that you always add a product to the windscreen washer fluid.
Approved windscreen cleaning products exist on the market with high deter-
gent and anti-freeze properties, these may be added all-year-round. Please
follow the dilution instructions on the packaging.
WARNING
Any work carried out in the engine compartment or on the engine must be
carried out cautiously.•When working in the engine compartment, always observe the safety
warnings ⇒page 179.Caution
•Never put radiator anti-freeze or other additives into the windscreen
washer fluid.•Always use approved windscreen cleansing products diluted as per
instructions. If you use other washer fluids or soap solutions, the tiny holes
in the fan-shaped nozzles could become blocked.
Fig. 125 In the engine
compartment: Cap of
windscreen washer fluid
reservoir.
Ibiza ST_EN.book Seite 188 Dienstag, 12. Januar 2010 4:03 16
Page 193 of 250
Checking and refilling levels
192•Before opening the bonnet to check the brake fluid level, read and
observe the warnings ⇒page 179.•Brake fluid should be stored in the closed original container in a safe
place out of reach of children. There is a toxic risk.•Complete the brake fluid change according to the Maintenance
Programme. Heavy use of the brakes may cause a vapour lock if the brake
fluid is left in the system for too long. This would seriously affect the effi-
ciency of the brakes and the safety of the vehicle. This may cause an acci-
dent.Caution
Brake fluid could damage the paintwork. Wipe off any brake fluid from the
paintwork immediately.
For the sake of the environment
Brake fluid must be drained and disposed of in the proper manner observing
environmental regulations.
Vehicle batteryWarnings on handling the battery
WARNING
Always be aware of the danger of injury and chemical burns as well as the
risk of accident or fire when working on the battery and the electrical
system:•Wear eye protection. Protect your eyes, skin and clothing from acid and
particles containing lead.•Battery acid is very corrosive and caustic. Wear protective gloves and
eye protection. Do not tilt the batteries. This could spill acid through the
vents. Rinse battery acid from eyes immediately for several minutes with
clear water. Then seek medical care immediately. Neutralise any acid
splashes on the skin or clothing with a soapy solution, and rinse off with
plenty of water. If acid is swallowed by mistake, consult a doctor immedi-
ately.•Fires, sparks, naked lights and smoking are prohibited. When handling
cables and electrical equipment, av oid causing sparks and electrostatic
WARNING (continued)
Wear eye protection
Battery acid is very corrosive and caustic. Wear protective gloves
and eye protection!
Fires, sparks, naked lights and smoking are prohibited!
A highly explosive mixture of gases is released when the battery is
under charge.
Keep children away from acid and batteries!
Ibiza ST_EN.book Seite 192 Dienstag, 12. Januar 2010 4:03 16
Page 203 of 250
If and when
202Snow chains
For technical reasons, snow chains must not be used on the compact tempo-
rary spare wheel.
If you have a puncture on one of the front wheels when using snow chains, fit
the compact temporary spare in place of one of the rear wheels. You can then
attach the snow chains to the wheel taken from the rear and use this wheel to
replace the punctured front wheel.
WARNING
•The tyre pressures must be checked and corrected as soon as possible.•Do not drive faster than 80 km/h. Higher speeds can cause an accident.•Avoid heavy acceleration, hard braking and fast cornering. Risk of acci-
dent.•Never use two or more compact spare tyres at the same time, risk of
accident.•No other type of tyre (normal summer or winter tyre) may be fitted on
the compact temporary spare wheel rim.
Tyre repair kit*
The tyre repair kit (for vehicles not including a spare wheel) is
stored under the floor panel in the luggage compartment.Your vehicle is equipped with the Tyre Mobility System “Tyre repair kit”.
The tyre repair kit consists of a container with sealing compound to repair the
puncture and a compressor to generate the required tyre pressure. The kit will
reliably seal punctures up to a size of about 4 mm caused by the penetration
of a foreign body into the tyre.
Note
•Seek professional assistance if the repair of a tyre puncture is not
possible with the sealing compound.Wheel changePreparation work
What you must do before changing a wheel.– If you have a flat tyre or puncture, park the vehicle as far away from the flow of traffic as possible. Choose a location that is as
level as possible.
– All passengers should leave the vehicle. They should wait in a safe area (for instance behind the roadside crash barrier).
– Switch the engine off. Switch the hazard warning lights on and place the warning triangles in position.
–Apply the handbrake firmly.
– Engage the first gear, or put the gear lever to position P for those
vehicles with an automatic gearbox.
– If you are towing a trailer, unhitch it from your vehicle.
–Take the vehicle tools and the spare wheel out of the luggage
compartment.
Ibiza ST_EN.book Seite 202 Dienstag, 12. Januar 2010 4:03 16
Page 204 of 250
If and when203
Safety First
Operating instructions
Practical tips
Technical Data
WARNING
Switch on the hazard warning lights and place the warning triangles in
position. This is for your own safety and also warns other road users.
Caution
If you have to change the wheel on a slope, it is essential to lock the parallel
w h e e l o n t h e s a m e a x l e a s t h a t t o b e ch a n g e d , w i t h a w e d g e o r s i m i l a r i n o r d e r
to immobilise the vehicle.
Note
Please observe legal requirements when doing so.Changing a wheelChange the wheel as described below
– Remove the hub caps or the integral trim .
– Slacken the wheel bolts .
– Raise the car with the jack in the corresponding zone.
– Remove the wheel and then fit the spare wheel.
– Lower the vehicle.
– Tighten the wheel bolts firmly with the box spanner.
– Replace the hub cap.
After changing a wheel
After changing the wheel there are still tasks to complete.– Put the tools and jack back in the luggage compartment.
– Place the wheel with the defective tyre in the luggage compart-
ment and secure it.
– Check the tyre pressure of the newly fitted tyre as soon as possible.
– Have the tightening torque of th e wheel bolts checked as soon as
possible with a torque wrench. Th e prescribed torque must be
120 Nm.
Note•If you notice that the wheel bolts are corroded and difficult to turn when
changing a wheel, they must be replaced before having the wheel bolt torque
checked.•For your safety, drive at moderate speeds until the wheel bolt tightening
torque has been checked.
Ibiza ST_EN.book Seite 203 Dienstag, 12. Januar 2010 4:03 16
Page 209 of 250
If and when
208It also contains the instructions for using the compressor.
WARNING
•Do not attempt to repair a puncture with the sealing compound if the
tyre has been damaged by driving the car after the tyre has lost its air.•Always observe warnings and follow safety instructions concerning
compressor and sealing compound carefully.•Do not drive faster than 80 km/h, avoid heavy acceleration, hard
braking and fast cornering.•Tyres which have been repaired with sealing compound are only suit-
able for temporary use over a short period. Therefore, please drive carefully
to the next available qualified workshop.For the sake of the environment
•Used sealing compound containers should be disposed of at a proper
facility.•The bottle containing sealing compound must be recycled in its correct
container.Note
•If sealant should leak out, leave it to dry. When it has dried, you can pull
it off like a piece of foil.•Observe the expiry date stated on the sealing compound can. Have the
sealing compound exchanged by a qualified workshop.•Seek professional assistance if the repair of a tyre puncture is not
possible with the sealing compound.
What to do first
Certain steps must be taken before repairing a tyre.– If you have a flat tyre or puncture, park the vehicle as far away from the flow of traffic as possible.
–Apply the handbrake firmly.
–Engage first gear, or put the selector lever to position P.
– All passengers should leave the vehicle. They should wait in a
safe area (for instance behind the roadside crash barrier).
– Check whether a repair is possible using the Tyre Mobility System “General information and safety notes.”
– Unscrew inflation cap from the affected wheel.
–Take the tyre repair kit out of the luggage compartment.
WARNING
Switch on the hazard warning lights and place the warning triangles in
position. This is for your own safety and also warns other road users.
Caution
Take special care if you have to repair a tyre on a slope.
Note
•Please observe legal requirements when doing so.•Remember to replace the sealing compound as soon as possible.
Ibiza ST_EN.book Seite 208 Dienstag, 12. Januar 2010 4:03 16
Page 212 of 250

If and when211
Safety First
Operating instructions
Practical tips
Technical Data
14
Left-hand AFS headlights
15
15
Right-hand AFS headlights
15
16
12V power socket in luggage compartment
15
17
Number plate light /Dimmer /Side light indicator
light
5
18
Dimmer
5
19
Electronic control unit
5
20
Turn signals
15
21
Lights control/ Instrument panel
5
22
Electronic control unit/ Heated mirrors
5
23
Engine injection module/ Rain sensor/ Gear
lever/ Starter relay
7,5
24
Glove compartment light/ Luggage compartment
light/ Interior light
10
25
Parking aid
5
26
Towing hook
27
12 Volt Input/Cigarette lighter
15
28
Lambda probe
10
29
Engine power supply
20
30
Petrol engine operation
10
31
Petrol engine operation/Glow plugs/Relay
coil/Bi-turbo electric fan
10
32
Engine control unit
15
33
Clutch switch power supply/preheating relay
5
34
Fuel control unit / Bi-turbo engine supply
15
Number
Consumer
Amps
35
Heated seats control unit/ Console area switch
panel (cup holder)
25
36
Main beam headlight, right
10
37
Main beam headlight, left/Coming Home
10
38
Electric fan motor
30
39
Va can t
40
Va can t
41
Va can t
42
Horn
20
43
Panorama roof
30
44
Windscreen wipers
20
45
Heated rear window
30
46
Radio/telephone VDA/Bluetooth/Steering col-
umn controls
20
47
Climatronic/autoclimate
5
48
Locking unit
25
49
Front electric window
30
50
Rear electric windows
30
51
Automatic gearbox control unit
30
52
Alarm/Volume sensor
15
53
Electro-kinetic pump relay/bi-turbo fuel control
unit
15
54
Reverse light for automatic gearbox/ Fog light
15
55
Transformer on
15
Number
Consumer
Amps
Ibiza ST_EN.book Seite 211 Dienstag, 12. Januar 2010 4:03 16
Page 214 of 250
If and when213
Safety First
Operating instructions
Practical tips
Technical Data
BulbsGeneral notesBefore changing any bulb, first turn off the failed component.
Do not touch the bulb glass. Fingerprints vaporise in the heat, causing a
reduction in the bulb life and condensation on the mirror surface, thus
reducing efficiency.
A bulb should only be replaced by one of the sam e type. The type is inscribed
on the bulb, either on the glass part or on the base.
It is highly recommended to keep a box of spare bulbs in the vehicle. At the
very least, the following spare bulbs, which are essential for road safety,
should be kept in the vehicle.
Double headlights
Dipped beam - H7 Long Life
Main beam - H7
Position - 2 x W5W Long Life
Turn signal - PY21W
Single headlight
Dipped/Main H4 Long Life
Position W5W Long Life
Turn signal PY 21W
Xenon headlights
12) /adaptive*
Dipped and full beam - D1S
13)
Position W5W Blue Long Life DRL (day light) P21W Super Long Life
Turn signals PY21W
Fog lights
Fog light/cornering - H11
Ta i l l i g h t s
Fog light - P21W
Reverse gear - R10W
Stop/position P21 /5W Long Life
Turn signal - PY21W
Side turn signal
Side turn signal - W5W
Number plate light
Number plate light - W5W Long Life
Note
•Depending on weather conditions (cold or wet), the front lights, the fog
lights, the tail lights and the turn signals may be temporarily misted. This has
no influence on the useful life of the lighting system. By switching on the
lights, the area through which the beam of light is projected will quickly be
demisted. However, the edges may continue to be misted.•Please check at regular intervals that all lighting (especially the exterior
lighting) on your vehicle is functioning pr operly. This is not only in the interest
of your own safety, but also that of all other road users.•D u e t o t h e d i f f i c u l t y i n a cc e s s i n g s o m e o f t h e b u l b s , a n y r e p l a c e m e n t w o r k
should be done by a SEAT dealer. However, there is a description below as to
how to change these bulbs, except for the fog lights.
12)On this type of headlight, the bulb changes must be made by the SEAT dealer, given
that complex elements must be removed from the vehicle and a reset must be made
on the automatic control system incorporated.
13)The Xenon bulbs discharge 2.5 times the light flux and have an average lifespan of 5
times more than that of halogen bulbs, this means that, except due to unusual circum-
stances, there is no need to change the bulbs for the whole life of the vehicle.
Ibiza ST_EN.book Seite 213 Dienstag, 12. Januar 2010 4:03 16
Page 215 of 250
If and when
214Changing bulbs. Double headlightsDouble headlights summary
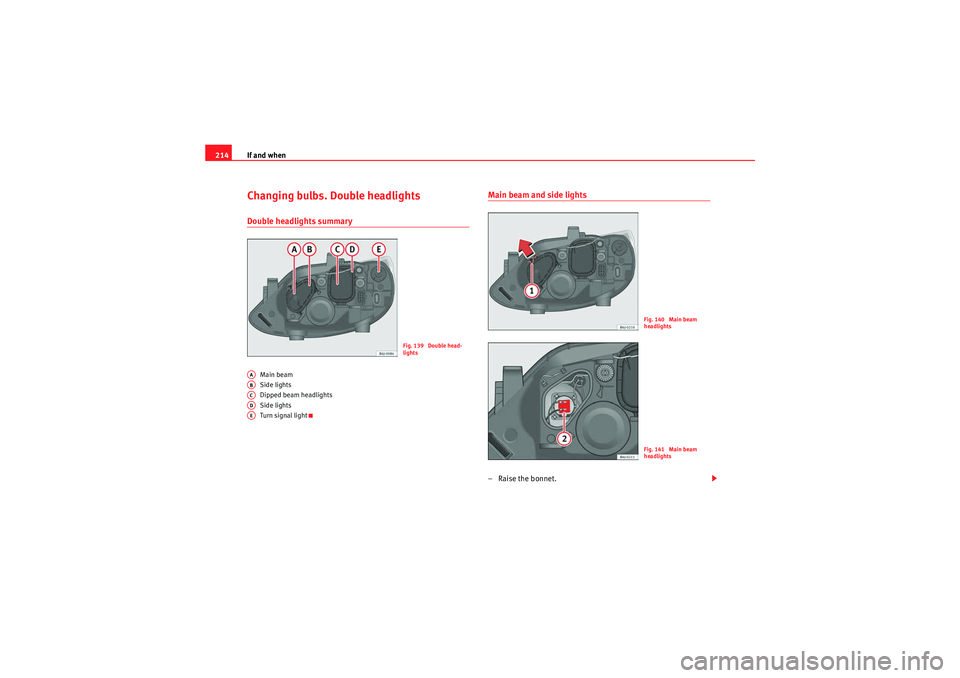
Main beam
Side lights
Dipped beam headlights
Side lights
Turn signal light
Main beam and side lights– Raise the bonnet.
Fig. 139 Double head-
lights
AAABACADAE
Fig. 140 Main beam
headlightsFig. 141 Main beam
headlights
Ibiza ST_EN.book Seite 214 Dienstag, 12. Januar 2010 4:03 16