2009 Seat Ibiza ST change time
[x] Cancel search: change timePage 192 of 250

Checking and refilling levels191
Safety First
Operating instructions
Practical tips
Technical Data
Brake fluidChecking the brake fluid level
The brake fluid is checked at the intervals given in the service
schedule.– Read off the fluid level at the transparent brake fluid reservoir. It
should always be between the “MIN” and “MAX” marks.The position of the brake fluid reservoir is shown in the corresponding engine
compartment illustration ⇒page 234. The brake fluid reservoir has a black
and yellow cap.
The brake fluid level drops slightly when the vehicle is being used as the
brake pads are automatically adjusted as they wear. However, if the level goes down noticeably in a short time, or drops below the
“MIN” mark, there may be a leak in the brake system. A display on the instru-
ment panel will warn you if the brake fluid level is too low
⇒page 56.
WARNING
Before opening the bonnet to check the brake fluid level, read and observe
the warnings ⇒page 179.Changing the brake fluid
The Maintenance Programme indicates the brake fluid
change intervals.We recommend that you have the brake fluid changed by an Authorised
Service Centre.
Before opening the bonnet, please read and follow the warnings ⇒ in
“Safety instructions on working in the engine compartment” on page 179 in
section “Safety notes for working in the engine compartment”.
Brake fluid absorbs moisture. In the course of time, it will absorb water from
the ambient air. If the water content in the brake fluid is too high, the brake
system could corrode. This also considerably reduces the boiling point of the
brake fluid. Heavy use of the brakes may then cause a vapour lock which
could impair the braking effect.
It is important that you use only brake fluid compliant with US standard
FMVSS 116 DOT 4. We recommend the use of Genuine SEAT brake fluid.
WARNING
Brake fluid is poisonous. Old brake fluid impairs the braking effect.
Fig. 128 In the engine
compartment: Brake fluid
reservoir cover
Ibiza ST_EN.book Seite 191 Dienstag, 12. Januar 2010 4:03 16
Page 194 of 250
Checking and refilling levels193
Safety First
Operating instructions
Practical tips
Technical Data
charge. Never short the battery terminals. High-energy sparks can cause
injury.
•A highly explosive mixture of gases is released when the battery is
under charge. The batteries should be charged in a well-ventilated room
only.•Keep children away from acid and batteries.•Before working on the electrical system, you must switch off the
engine, the ignition and all consumers. The negative cable on the battery
must be disconnected. When a light bulb is changed, you need only switch
off the light.•Deactivate the anti-theft alarm by unlocking the vehicle before you
disconnect the battery! The alarm will otherwise be triggered.•When disconnecting the battery from the vehicle electrical system,
disconnect first the negative cable and then the positive cable.•Switch off all electrical consumers before reconnecting the battery.
Reconnect first the positive cable and then the negative cable. Never
reverse the polarity of the connections. This could cause an electrical fire.•Never charge a frozen battery, or one which has thawed. This could
result in explosions and chemical burns. Always replace a battery which
has frozen. A flat battery can freeze at temperatures around 0°C.•Ensure that the vent hose is always connected to the battery.•Never use a defective battery. This may be fatally explosive. Replace a
damaged battery immediately.Caution
•Never disconnect the battery if the ignition is switched on or if the engine
is running. This could damage the electrical system or electronic compo-
nents.•Do not expose the battery to direct sunlight over a long period of time, as
the intense ultraviolet radiation can damage the battery housing.
•If the vehicle is left standing in cold conditions for a long period, protect
the battery from frost. If it “freezes” it will be damaged.Checking the electrolyte level
The electrolyte level should be checked regularly in high-
mileage vehicles, in hot countries and in older batteries.– Open the engine bonnet and the battery cover ⇒ in “Safety
instructions on working in the engine compartment” on
page 179 ⇒ in “Warnings on handling the battery” on
page 192.
– Check the colour display in the "magic eye" on the top of the battery.
– If there are air bubbles in the window, tap the window gently until they disperse.The position of the battery is shown in the corresponding engine compart-
ment diagram ⇒page 234.
The “magic eye” indicator, located on the top of the battery changes colour,
depending on the charge state and electrolyte level of the battery.
There are two different colours:•Black: correct charge status.•Transparent/clear yellow: the battery must be replaced. Contact a
specialist workshop.
WARNING (continued)
Ibiza ST_EN.book Seite 193 Dienstag, 12. Januar 2010 4:03 16
Page 197 of 250
Checking and refilling levels
196Tyre ser vice life
The service life of tyres is dependent on tyre pressure, driving
style and fitting.
Wear indicators
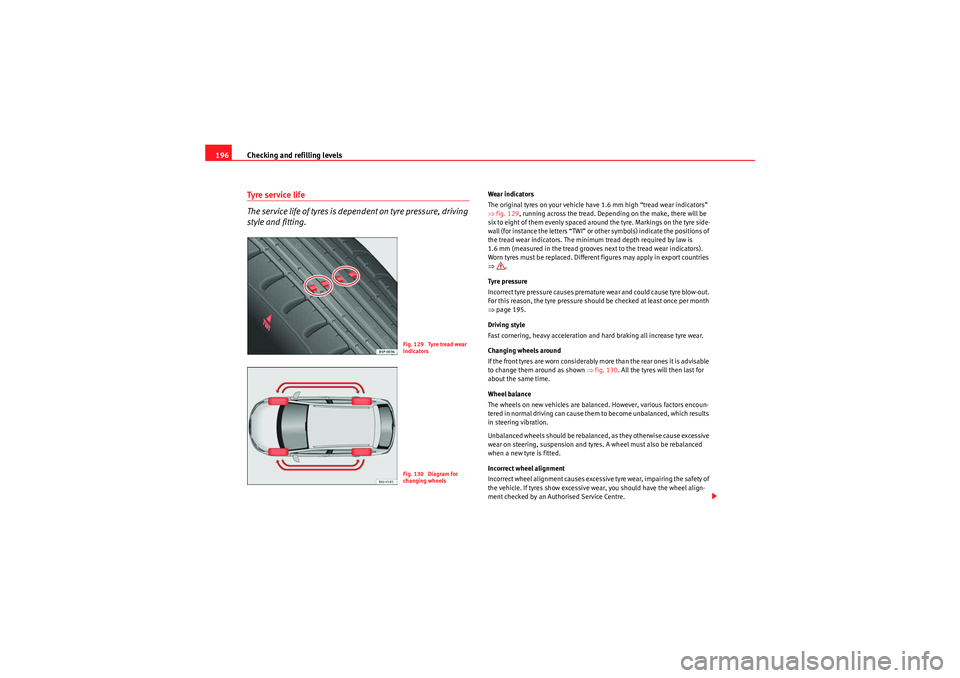
The original tyres on your vehicle have 1.6 mm high “tread wear indicators”
⇒ fig. 129, running across the tread. Depending on the make, there will be
six to eight of them evenly spaced around the tyre. Markings on the tyre side-
wall (for instance the letters “TWI” or other symbols) indicate the positions of
the tread wear indicators. The minimum tread depth required by law is
1.6 mm (measured in the tread grooves next to the tread wear indicators).
Worn tyres must be replaced. Different figures may apply in export countries
⇒ .
Tyre pressure
Incorrect tyre pressure causes premature wear and could cause tyre blow-out.
For this reason, the tyre pressure should be checked at least once per month
⇒ page 195.
Driving style
Fast cornering, heavy acceleration and hard braking all increase tyre wear.
Changing wheels around
If the front tyres are worn considerably more than the rear ones it is advisable
to change them around as shown ⇒fig. 130 . All the tyres will then last for
about the same time.
Wheel balance
The wheels on new vehicles are balanced. However, various factors encoun-
tered in normal driving can cause them to become unbalanced, which results
in steering vibration.
Unbalanced wheels should be rebalanced, as they otherwise cause excessive
wear on steering, suspension and tyres. A wheel must also be rebalanced
when a new tyre is fitted.
Incorrect wheel alignment
Incorrect wheel alignment causes excessive tyre wear, impairing the safety of
the vehicle. If tyres show excessive wear, you should have the wheel align-
ment checked by an Authorised Service Centre.
Fig. 129 Tyre tread wear
indicatorsFig. 130 Diagram for
changing wheels
Ibiza ST_EN.book Seite 196 Dienstag, 12. Januar 2010 4:03 16
Page 202 of 250

If and when201
Safety First
Operating instructions
Practical tips
Technical Data
If and whenVehicle tools, spare wheelVehicle Tools
The vehicle onboard tools are lo cated under the floor panel in
the luggage compartment.– Lift floor panel
– Take the onboard tools out of the vehicle.The tool kit includes:•Jack*•Hook to remove integral* trim and screw caps.•Box spanner for wheel bolts*•Reversible screwdriver with handle (including hexagonal interior) for the
wheel bolts. The screwdriver is a combination tool.•Towing ring*•Adapter for the anti-theft wheel bolts*
Some of the items listed are only provided in certain models / model years,
or are optional extras.WARNING
•Do not use the hexagonal socket in the screwdriver handle to tighten
the wheel bolts as with this it is not possible to tighten the bolts to the
required torque. Risk of accident.
•The jack supplied by the factory is only designed for changing wheels
on this model. On no account attempt to use it for lifting heavier vehicles
or other loads. Risk of injury.•Use the jack only on a firm, level ground.•Never start the engine when the vehicle is on the jack. Risk of accident.•I f w o r k is t o b e ca r r ie d o u t un d e r n ea t h t h e v e h ic l e , t h is m u s t be s e cu re d
by suitable means. Otherwise, there is a risk of injury.
Spare wheel (emergency wheel)*
The spare wheel (emergency wheel) must only be used for the
minimum necessary time.The temporary spare wheel is stored under the floor panel in the luggage
compartment and is attached by a thumbnut.
How to use the temporary spare wheel
If you ever have a punctured tyre or loss of pressure, the emergency wheel is
only intended for temporary use until you reach a workshop. Change it for a
duty wheel as soon as possible.
Please note the following restrictions when using the temporary spare wheel.
This spare wheel has been specially designed for your vehicle, thus, it cannot
be changed with the spare wheel from another vehicle.
No other type of tyre (normal summer or winter tyre) may be fitted on the
compact temporary spare wheel rim.
WARNING (continued)
Ibiza ST_EN.book Seite 201 Dienstag, 12. Januar 2010 4:03 16
Page 203 of 250
If and when
202Snow chains
For technical reasons, snow chains must not be used on the compact tempo-
rary spare wheel.
If you have a puncture on one of the front wheels when using snow chains, fit
the compact temporary spare in place of one of the rear wheels. You can then
attach the snow chains to the wheel taken from the rear and use this wheel to
replace the punctured front wheel.
WARNING
•The tyre pressures must be checked and corrected as soon as possible.•Do not drive faster than 80 km/h. Higher speeds can cause an accident.•Avoid heavy acceleration, hard braking and fast cornering. Risk of acci-
dent.•Never use two or more compact spare tyres at the same time, risk of
accident.•No other type of tyre (normal summer or winter tyre) may be fitted on
the compact temporary spare wheel rim.
Tyre repair kit*
The tyre repair kit (for vehicles not including a spare wheel) is
stored under the floor panel in the luggage compartment.Your vehicle is equipped with the Tyre Mobility System “Tyre repair kit”.
The tyre repair kit consists of a container with sealing compound to repair the
puncture and a compressor to generate the required tyre pressure. The kit will
reliably seal punctures up to a size of about 4 mm caused by the penetration
of a foreign body into the tyre.
Note
•Seek professional assistance if the repair of a tyre puncture is not
possible with the sealing compound.Wheel changePreparation work
What you must do before changing a wheel.– If you have a flat tyre or puncture, park the vehicle as far away from the flow of traffic as possible. Choose a location that is as
level as possible.
– All passengers should leave the vehicle. They should wait in a safe area (for instance behind the roadside crash barrier).
– Switch the engine off. Switch the hazard warning lights on and place the warning triangles in position.
–Apply the handbrake firmly.
– Engage the first gear, or put the gear lever to position P for those
vehicles with an automatic gearbox.
– If you are towing a trailer, unhitch it from your vehicle.
–Take the vehicle tools and the spare wheel out of the luggage
compartment.
Ibiza ST_EN.book Seite 202 Dienstag, 12. Januar 2010 4:03 16
Page 214 of 250
If and when213
Safety First
Operating instructions
Practical tips
Technical Data
BulbsGeneral notesBefore changing any bulb, first turn off the failed component.
Do not touch the bulb glass. Fingerprints vaporise in the heat, causing a
reduction in the bulb life and condensation on the mirror surface, thus
reducing efficiency.
A bulb should only be replaced by one of the sam e type. The type is inscribed
on the bulb, either on the glass part or on the base.
It is highly recommended to keep a box of spare bulbs in the vehicle. At the
very least, the following spare bulbs, which are essential for road safety,
should be kept in the vehicle.
Double headlights
Dipped beam - H7 Long Life
Main beam - H7
Position - 2 x W5W Long Life
Turn signal - PY21W
Single headlight
Dipped/Main H4 Long Life
Position W5W Long Life
Turn signal PY 21W
Xenon headlights
12) /adaptive*
Dipped and full beam - D1S
13)
Position W5W Blue Long Life DRL (day light) P21W Super Long Life
Turn signals PY21W
Fog lights
Fog light/cornering - H11
Ta i l l i g h t s
Fog light - P21W
Reverse gear - R10W
Stop/position P21 /5W Long Life
Turn signal - PY21W
Side turn signal
Side turn signal - W5W
Number plate light
Number plate light - W5W Long Life
Note
•Depending on weather conditions (cold or wet), the front lights, the fog
lights, the tail lights and the turn signals may be temporarily misted. This has
no influence on the useful life of the lighting system. By switching on the
lights, the area through which the beam of light is projected will quickly be
demisted. However, the edges may continue to be misted.•Please check at regular intervals that all lighting (especially the exterior
lighting) on your vehicle is functioning pr operly. This is not only in the interest
of your own safety, but also that of all other road users.•D u e t o t h e d i f f i c u l t y i n a cc e s s i n g s o m e o f t h e b u l b s , a n y r e p l a c e m e n t w o r k
should be done by a SEAT dealer. However, there is a description below as to
how to change these bulbs, except for the fog lights.
12)On this type of headlight, the bulb changes must be made by the SEAT dealer, given
that complex elements must be removed from the vehicle and a reset must be made
on the automatic control system incorporated.
13)The Xenon bulbs discharge 2.5 times the light flux and have an average lifespan of 5
times more than that of halogen bulbs, this means that, except due to unusual circum-
stances, there is no need to change the bulbs for the whole life of the vehicle.
Ibiza ST_EN.book Seite 213 Dienstag, 12. Januar 2010 4:03 16
Page 226 of 250
If and when225
Safety First
Operating instructions
Practical tips
Technical Data
Towing and tow-startingTo w - s t a r t i n g *
The use of jump leads is pr eferable to tow-starting.We recommend that you do not tow-start your vehicle. Jump-starting
is preferable ⇒page 222.
However, if your vehicle has to be tow-started:
– Engage the 2
nd or the 3
rd gear.
– Keep the clutch pressed down.
– Switch the ignition on.
– Once both vehicles are moving, release the clutch.
– As soon as the engine starts, press the clutch and move the gear lever into neutral. This helps to prevent driving into the towing
vehicle.
WARNING
The risk of accidents is high when tow-starting. The vehicle being towed
can easily collide with the towing vehicle.
Caution
When tow-starting, fuel could enter the catalytic converter and damage it.
CommentsPlease observe the following po ints if you use a tow-rope:
Notes for the driver of the towing vehicle
– Drive slowly at first until the tow-rope is taut. Then accelerate gradually.
– Begin and change gears cautiously. If you are driving an auto- matic vehicle, accelerate gently.
– Remember that the brake servo and power steering are not working in the vehicle you are towing. Brake earlier than you
would normally, but with a more gentle pressure on the brake.
Notes for the driver of the towed vehicle
– Ensure that the tow-rope remains taut at all times when towing.Tow-rope or tow-bar
It is easier and safer to tow a vehicle with a tow-bar. You should only use a
tow-rope if you do not have a tow-bar.
A tow-rope should be slightly elastic to reduce the loading on both vehicles.
It is advisable to use a tow-rope made of synthetic fibre or similarly elastic
material.
Attach the tow-rope or the tow-bar only to the towing eyes provided or a
towing bracket.
Driving style
Towing requires some experience, especially when using a tow-rope. Both
drivers should be familiar with the technique required for towing. Inexperi-
enced drivers should not attempt to tow-start or tow away another vehicle.
Ibiza ST_EN.book Seite 225 Dienstag, 12. Januar 2010 4:03 16