2009 SATURN ASTRA belt
[x] Cancel search: beltPage 58 of 314

If the child restraint has the LATCH
system, seeLower Anchors and
Tethers for Children (LATCH)
on page 1-46for how and where to
install the child restraint using
LATCH. If a child restraint is secured
in the seating position using a
safety belt and it uses a top tether,
seeLower Anchors and Tethers
for Children (LATCH) on page 1-46
for top tether anchor locations.
Do not secure a child seat in
a position without a top tether
anchor if a national or local
law requires that the top tether be
anchored, or if the instructions
that come with the child restraint
say that the top strap must be
anchored.
In Canada, the law requires that
forward-facing child restraints have
a top tether, and that the tether
be attached.You will be using the lap-shoulder
belt to secure the child restraint
in this position. Follow the
instructions that came with the
child restraint.
1. Move the seat as far back as it
will go before securing the
forward-facing child restraint.
When the passenger sensing
system has turned off the
right front passenger frontal and
seat-mounted side impact
airbag, the off indicator on the
passenger airbag status indicator
should light and stay lit when
you start the vehicle. See
Passenger Airbag Status
Indicator on page 4-15.
2. Put the child restraint on
the seat.
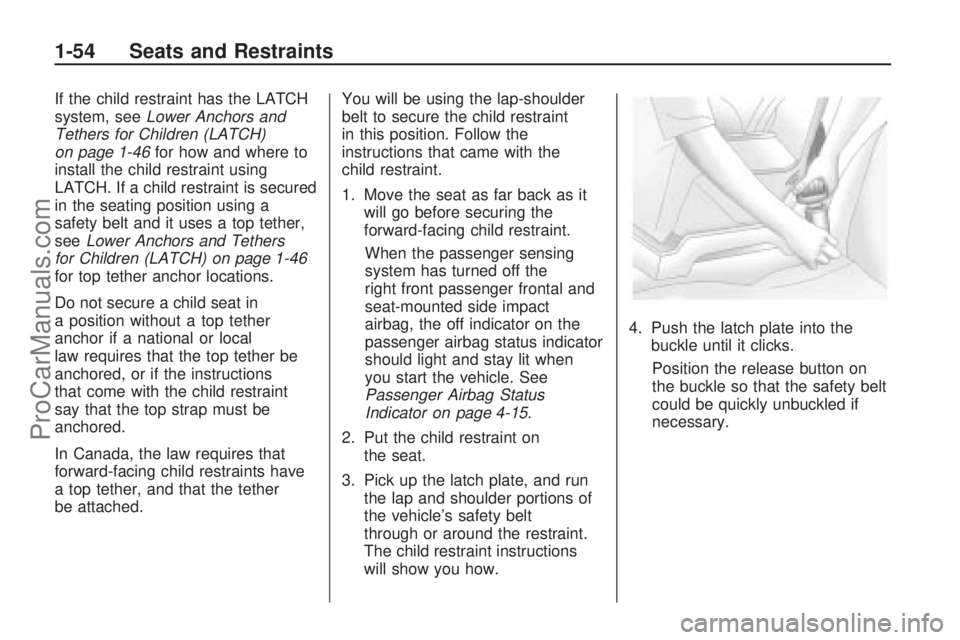
3. Pick up the latch plate, and run
the lap and shoulder portions of
the vehicle’s safety belt
through or around the restraint.
The child restraint instructions
will show you how.4. Push the latch plate into the
buckle until it clicks.
Position the release button on
the buckle so that the safety belt
could be quickly unbuckled if
necessary.
1-54 Seats and Restraints
ProCarManuals.com
Page 59 of 314

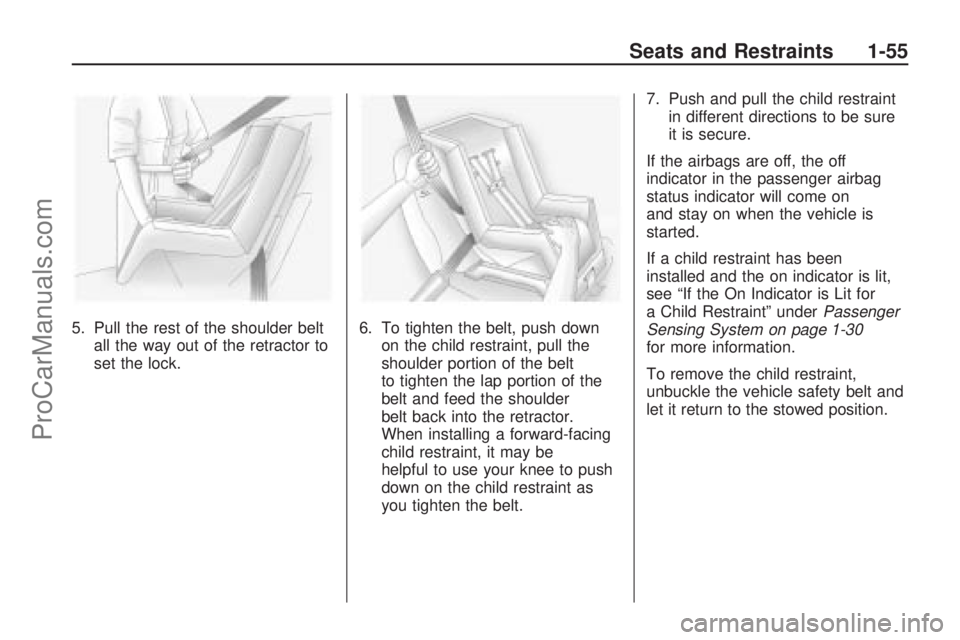
5. Pull the rest of the shoulder belt
all the way out of the retractor to
set the lock.6. To tighten the belt, push down
on the child restraint, pull the
shoulder portion of the belt
to tighten the lap portion of the
belt and feed the shoulder
belt back into the retractor.
When installing a forward-facing
child restraint, it may be
helpful to use your knee to push
down on the child restraint as
you tighten the belt.7. Push and pull the child restraint
in different directions to be sure
it is secure.
If the airbags are off, the off
indicator in the passenger airbag
status indicator will come on
and stay on when the vehicle is
started.
If a child restraint has been
installed and the on indicator is lit,
see “If the On Indicator is Lit for
a Child Restraint” underPassenger
Sensing System on page 1-30
for more information.
To remove the child restraint,
unbuckle the vehicle safety belt and
let it return to the stowed position.
Seats and Restraints 1-55
ProCarManuals.com
Page 65 of 314

2. Open the RKE transmitter.
3. Remove the old battery. Do not
use a metal object.
4. Insert the new battery, positive
side facing up. Replace with a
CR2032 or equivalent battery.
5. Close the RKE transmitter.
Synchronization
After changing the battery,
turn the ignition to ON/RUN.
This synchronizes the key.
Doors and Locks
Door Locks
{CAUTION
Unlocked doors can be
dangerous.
Passengers, especially
children, can easily open the
doors and fall out of a moving
vehicle. When a door is
locked, the handle will not
open it. You increase the
chance of being thrown out of
the vehicle in a crash if the
doors are not locked. So,
wear safety belts properly
and lock the doors whenever
you drive.
(Continued)
CAUTION (Continued)
Young children who get into
unlocked vehicles may be
unable to get out. A child can
be overcome by extreme heat
and can suffer permanent
injuries or even death from
heat stroke. Always lock
your vehicle whenever you
leave it.
Outsiders can easily enter
through an unlocked door
when you slow down or stop
your vehicle. Locking your
doors can help prevent this
from happening.
To manually lock or unlock your
vehicle, use the key in the driver’s
door from the outside to unlock
it. When the driver door is opened
the entire vehicle is unlocked. There
are also window sill knobs that
unlock each door from the inside.
Keys, Doors and Windows 2-5
ProCarManuals.com
Page 75 of 314

Instruments and
Controls
Instrument Panel
Overview
Instrument Panel
Overview...........................4-2
Hazard Warning Flashers. . .4-4
Horn...................................4-4
Tilt Wheel...........................4-4
Turn Signal/Multifunction
Lever................................4-4
Cruise Control....................4-5
Turn and Lane-Change
Signals.............................4-8
Headlamp High/
Low-Beam Changer..........4-8
Flash-to-Pass......................4-8
Windshield Wipers..............4-8
Windshield Washer.............4-9
Rear Window Wiper/
Washer.............................4-9
Accessory Power
Outlet(s)..........................4-10
Warning Lights, Gages,
and Indicators
Warning Lights, Gages,
and Indicators.................4-11
Instrument Panel Cluster. . .4-12
Speedometer and
Odometer........................4-13
Trip Odometer(s)...............4-13Tachometer.......................4-13
Safety Belt Reminders......4-13
Airbag Readiness Light.....4-14
Passenger Airbag Status
Indicator..........................4-15
Charging System Light......4-16
Brake System Warning
Light................................4-16
Antilock Brake System
(ABS) Warning Light.......4-17
StabiliTrak®Indicator
Light................................4-17
Engine Coolant
Temperature Warning
Light
................................4-18
Tire Pressure Light...........4-18
Malfunction
Indicator Lamp................4-18
Oil Pressure Light.............4-21
Low Oil Level Light...........4-22
Winter Driving Mode
Light................................4-22
Fog Lamp Light................4-22
Exterior Lamps Off
Reminder........................4-23
Cruise Control Light..........4-23
Highbeam On Light...........4-23
Door Ajar Light.................4-23
Service Vehicle Soon
Light................................4-23
Fuel Gage........................4-24
Low Fuel Warning Light. . . .4-24
Driver Information
Center (DIC)
Driver Information
Center (DIC)...................4-25
DIC Operation and
Displays (Uplevel DIC
and Audio)
.......................4-26
DIC Operation and
Displays (Base Level
DIC and Audio)
...............4-32
DIC Warnings and
Messages (Base and
Uplevel Systems)
............4-36
OnStar®System
OnStar®System................4-38
Instruments and Controls 4-1
ProCarManuals.com
Page 77 of 314

The main components of the
instrument panel are the:
A.Exterior Lamps Controls on
page 5-1.
B. Outlets.Outlet Adjustment on
page 7-4.
C.Turn Signal/Multifunction Lever
on page 4-4.
D.DIC Operation and Displays
(Uplevel DIC and Audio) on
page 4-26orDIC Operation and
Displays (Base Level DIC and
Audio) on page 4-32andAudio
Steering Wheel Controls on
page 6-23. (If Equipped)
E.Instrument Panel Cluster on
page 4-12.F.Audio Steering Wheel Controls
on page 6-23. (If Equipped)
G.Windshield Wipers on page 4-8.
H.Heated Seats on page 1-6.
(If Equipped)
I.StabiliTrak
®System on
page 8-19. (If Equipped)
J.Driver Information Center (DIC)
on page 4-25. (If Equipped)
K.Hazard Warning Flashers on
page 4-4.
L.Power Door Locks on page 2-6.
M. Passenger Safety Belt
Reminder.Safety Belt
Reminders on page 4-13.
N. Front Passenger Airbag.
Airbag System on page 1-24.O.Fog Lamps on page 5-2.
(If Equipped)
P.Instrument Panel Brightness
on page 5-3.
Q.Hood Release on page 9-5.
R.Tilt Wheel on page 4-4.
S.Horn on page 4-4.
T.Ignition Positions on page 8-2.
U.Climate Control System on
page 7-1.
V.Accessory Power Outlet(s) on
page 4-10. (Covered)
W.Audio System(s) on page 6-1.
X.Glove Box on page 3-1.
Instruments and Controls 4-3
ProCarManuals.com
Page 87 of 314

Speedometer and
Odometer
The speedometer shows the
vehicle’s speed in both miles per
hour (mph) or kilometers per
hour (km/h).
The odometer shows how far the
vehicle has been driven, in either
miles or kilometers.
If a new odometer is installed, the
new one is set to the mileage total
of the old odometer. If it cannot,
it will be set at zero and a label
must be put on the driver’s door to
show the old mileage reading
when the new odometer was
installed. If the mileage is unknown,
the label should then indicate
“previous mileage unknown.”
Trip Odometer(s)
The trip odometer, located at the
center of the instrument panel
cluster, tells how far the vehicle has
been driven since the trip odometer
was set to zero.To reset the trip odometer, hold the
reset stem, located to the right of
the speedometer, for approximately
one second while the trip odometer
is displayed. The engine must be
turned on.
Service Display
The vehicle may have a display
above the odometer that shows when
service is needed. The number that
displays with “INSP” is the remaining
distance that can be driven until
service is required. SeeEngine Oil
Life System on page 9-9and the
index of the Saturn Astra Limited
Warranty, Maintenance and Owner
Assistance Information Manual.
Tachometer
The tachometer displays the engine
speed in revolutions per minute.
Safety Belt Reminders
Driver Safety Belt Reminder
Light
There is a Driver Safety Belt
Reminder Light on the instrument
panel cluster.
When the engine is started this light
and chime come on and stay on
for several seconds to remind
drivers to fasten their safety belts.
The light also begins to �ash.
This cycle repeats if the driver
remains unbuckled and the vehicle
is moving.
If the driver safety belt is already
buckled, neither the light nor chime
come on.
Instruments and Controls 4-13
ProCarManuals.com
Page 88 of 314

Passenger Safety Belt
Reminder Light
For vehicles with this light, it
operates the same as the Safety
Belt Reminder Light except that it
is meant for the front passenger.
If the passenger safety belt is
buckled, neither the chime nor the
light comes on.
The front passenger safety belt
warning light and chime may
turn on if an object is put on the
seat such as a briefcase, handbag,
grocery bag, laptop or other
electronic device. To turn off the
warning light and or chime, remove
the object from the seat or buckle
the safety belt
Airbag Readiness Light
This light shows if there is an
electrical problem. The system
check includes the airbag sensor,
the pretensioners, the airbag
modules, the wiring and the crash
sensing and diagnostic module.
For more information on the airbag
system, seeAirbag System on
page 1-24.
This light will come on and stay on
for several seconds when the
vehicle is started. Then the light
should go out.If the airbag readiness light stays on
after the vehicle has been started
or comes on when while driving,
the airbag system may not work
properly. Have the vehicle serviced
right away.
{CAUTION
If the airbag readiness light stays
on after the vehicle is started or
comes on while driving, it means
the airbag system might not be
working properly. The airbags in
the vehicle might not in�ate in a
crash, or they could even in�ate
without a crash. To help avoid
injury, have the vehicle serviced
right away.
4-14 Instruments and Controls
ProCarManuals.com
Page 162 of 314

Defensive Driving
Defensive driving means “always
expect the unexpected.” The
�rst step in driving defensively is to
wear your safety belt, seeSafety
Belts on page 1-8.
{CAUTION
Assume that other road users
(pedestrians, bicyclists, and other
drivers) are going to be careless
and make mistakes. Anticipate
what they might do and be ready.
In addition:
Allow enough following
distance between you and
the driver in front of you.
Focus on the task of driving.
Driver distraction can cause
collisions resulting in injury or
possible death. These simple
defensive driving techniques could
save your life.
Drunk Driving
{CAUTION
Drinking and then driving is very
dangerous. Your re�exes,
perceptions, attentiveness, and
judgment can be affected by even
a small amount of alcohol. You
can have a serious — or even
fatal — collision if you drive after
drinking. Do not drink and drive or
ride with a driver who has been
drinking. Ride home in a cab; or if
you are with a group, designate a
driver who will not drink.
Death and injury associated with
drinking and driving is a global
tragedy.
Alcohol affects four things that
anyone needs to drive a vehicle:
judgment, muscular coordination,
vision, and attentiveness.Police records show that almost
40 percent of all motor
vehicle-related deaths involve
alcohol. In most cases, these deaths
are the result of someone who was
drinking and driving. In recent years,
more than 17,000 annual motor
vehicle-related deaths have been
associated with the use of alcohol,
with about 250,000 people injured.
For persons under 21, it is against
the law in every U.S. state to
drink alcohol. There are good
medical, psychological, and
developmental reasons for
these laws.
The obvious way to eliminate the
leading highway safety problem
is for people never to drink alcohol
and then drive.
8-16 Driving and Operating
ProCarManuals.com