Page 89 of 304

89 Instruments and controls
If the needle repeatedly enters the red zone
and the engine at the same time loses
power, because the monitoring system is
limiting the boost pressure, you should
contact a Saab dealer as soon as possible.
If the speed of the car exceeds 143 mph
(230 km/h) (this speed varies between dif-
ferent engine variants), acceleration is lim-
ited by reducing the boost pressure. The
pressure gauge then moves towards the
middle of the white field, indicating a drop in
engine power and consequently the car’s
speed.
Fuel gaugeWhen less than about 2.5 gallons (10 liter)
of fuel is left in the tank, a warning light on
the main instrument panel comes on.
Because of the fuel remaining in the tank,
the amount of fuel required to fill the tank
may be less than the specified tank capac-
ity.
Refueling, see page 156.
Saab Information
Display (SID) Various types of information are shown on
the SID: warnings, indications, trip
computer information and information
from the car’s Infotainment System.
Selected gear is shown on the left-hand
side of the display. When gears are
selected manually, the letter M (manual)
and the selected gear are displayed (see
page 168) (cars with automatic transmis-
sion).
In the first row trip computer information is
displayed and in the second row odome-
ter and tripmeter is displayed.
93_US_MY09.book Page 89 Tuesday, April 15, 2008 10:30 AM
ProCarManuals.com
Page 90 of 304

90 Instruments and controlsWhen a message is displayed
The odometer and tripmeter is temporarily
turned off when a two row message is dis-
played. The icon is displayed in the left part
of the display.
The warnings and indications that can be
shown on the SID are listed on page 294.
If there is more than one message on the
SID, a plus sign will be displayed to the left
of the first message. Each message will be
displayed for 10 seconds.
Press the CLR button to acknowledge a SID
message. If you acknowledge a message
but do nothing about it, the message will be
displayed again the next time you start the
car.
When the engine is switched off the warn-
ing/indicator lights still active are displayed,
this is to remind the driver. At this point the
warning/indicator lights previously acknowl-
edged with the CLR button are also dis-
played.
You can adjust the settings of several of the
car’s systems, such as the alarm3, rain
sensor3 and climate control system. These
are known as Settings se page 94.
Odometer and trip meterThe odometer records the distance trav-
elled in miles on U.S. vehicles and on Cana-
dian vehicles the distance indicated is in
kilometres, and the trip meter in miles and
tenths (kilometres and tenths of kilometres
on Canadian vehicles).Reset buttonThe reset button is positioned immediately
to the left of the speedometer.
Press once to resets the trip meter, the igni-
tion shall be in position ON.
Trip computer function of the SID
WARNING
It is strongly recommended that the SID
settings be changed only when the car is
stationary. The driver’s attention can oth-
erwise easily be distracted from the road.
SID contains the following functions:
TempOutdoor temperature
D.T.E.Estimated range (distance to
empty fuel tank).
When the possible range is
less than 18 miles (30 km)
then the text Refill fuel now
is displayed.
Fuel ØAverage fuel consumption
since function last reset
DistDistance to destinations.
Function can also be used as
a trip meter
Speed ØAverage speed since function
last reset
Speed WSpeed warning (chime)
SettingsSettings of features such as
alarm clock, language and
rain sensor3
SID, control unit and display
93_US_MY09.book Page 90 Tuesday, April 15, 2008 10:30 AM
ProCarManuals.com
Page 91 of 304

91 Instruments and controls
When the engine is started, the function that
was selected when the engine was
switched off is displayed, with the following
exceptions:
Temp is displayed if the outside tempera-
ture is between 26 and 38°F (–3 and
+3°C).
D.T.E. is displayed if less than or equal to
30 miles (50 km).
Outdoor temperature
The Temp function is always activated
(even in NIGHTPANEL mode) if the outdoor
temperature rises or falls to between 26 and
38 °F (–3 and +3 °C).
If the temperature sensor, located under the
front bumper, is covered by snow or ice,
temperature readings will be unreliable.Setting values
1 Select one of the functions using the
steering wheel controls, or .
Dist (preset to 100 miles (100 km) if not
previously set)
Speed Ø
Speed W (preset to 55 mph (90 km/h).
2 Press and hold the SET button until
given audible confirmation.
3 Use the steering wheel controls to select
the value. (Press CLR to reset the
value.)
4 Press the SET button to finish setup.
Using DIST as a trip meter
1Select Dist using the steering wheel
controls, or .
2 Press and hold the CLR button for
approx. 1 second.
An arrow will now appear on the right-hand
side of the display, indicating that the trip
meter is running.Resetting a single function
1 Select the function you wish to reset
using the steering wheel controls, or
.
FuelØ
Speed Ø
Tr i p (Dist used as trip meter).
2 Press and hold the CLR button for
approx. 1 second.
The selected function will now be reset.
WARNING
Remember that roads can be icy even at
temperatures of above 38°F (+3°C),
especially on bridges and stretches of
road that are sheltered from the sun.93_US_MY09.book Page 91 Tuesday, April 15, 2008 10:30 AM
ProCarManuals.com
Page 92 of 304

92 Instruments and controlsResetting the trip computer
Press and hold the CLR button (approx.
3 seconds) until audible confirmation is
given.
The following functions will be rest:
FuelØ
Speed Ø
D.T.E. (the value is reset to the distance
possible on the remaining fuel if fuel
consumption is 10l/100 km, lower
consumption means a longer possible
distance)
Tr i p (Dist used as trip meter).Speed warning
This value is preset to 55 mph (90 km/h).
The value can be set to between 0 and
150 mph (0 and 250 km/h).
1Select Speed W using the steering
wheel controls, or .
2 Press and hold the SET button until
given audible confirmation.
3 Adjust the speed using the steering
wheel controls.
4 Confirm the setting by pressing the SET
button.
Go back/modify using the CLR-button.
The word ON on the right-hand side of the
display indicates when the speed warning
function is active.
An audible alarm will sound if the set speed
is exceeded.
Disengage the function with the CLR button.
Re-engage the function using the SET but-
ton.Calculating the arrival time
(When will I arrive if I know how far I have to
drive?)
This function should be used before starting
out a journey.
To calculate the arrival time, the distance
must first be given.
1Select Dist using the steering wheel
controls, or .
2 Press and hold the SET button until
given audible confirmation.
3 Set the distance to the destination using
the steering wheel controls.
4 Confirm the setting by pressing the SET
button.
The calculated arrival time will now appear
on the right-hand side of the display.
If you take a break, this time will be added to
the previously calculated arrival time.93_US_MY09.book Page 92 Tuesday, April 15, 2008 10:30 AM
ProCarManuals.com
Page 93 of 304

93 Instruments and controls
You can check the distance left by selecting
Dist. At the same time you can check the
calculated time of arrival.
After the distance to destination has
decreased to zero, Dist will function as a trip
meter (see Using DIST as a trip meter). The
starting value for the trip meter will be the
last distance set for the Dist function.
Example: The Dist function is set to
100 miles. After the count-down has
reached 0 miles, Dist will act as a trip meter
beginning at 100 miles.Calculating the arrival time if a specified
average speed is maintained
(When will I arrive if I know how far I have to
drive and know what my average speed will
be?)
This function should be used before starting
out a journey.
First, set the distance under Dist.
1 Then select Speed Ø function.
2 Press and hold the SET button until
given audible confirmation.
3 Set the estimated average speed using
the steering wheel controls.
4 Confirm the setting by pressing the SET
button.
The distance and the calculated time of
arrival is now displayed.
The time of arrival is updated during the
journey based on the average speed since
Dist was set. The speed of the car must
exceed 12 mph (20 km/h).
By selecting Dist during the journey, you
can see how much distance is left to travel.
When Dist reaches zero it acts as a trip
meter. The trip meter starts from the dis-
tance that was set previously.
NIGHTPANELTo improve night-driving conditions inside
the car, the Night Panel mode can be
selected. In this mode, the amount of infor-
mation displayed is reduced, and only the
most important instruments and displays
will be illuminated.
When the NIGHTPANEL button is pressed,
only the speedometer will be illuminated.
All other instrument lighting will be switched
off and the needles drop to zero.
Note: All indicator and warning lights and
messages will operate normally if required.
Temp (when the outside temperature falls
or rises to between 26 and 38 °F (–3 and
+3 °C)) and D.T.E. (when the remaining fuel
is only sufficient for approx. 80 miles
(50 km) of driving) are even shown in Night
Panel model.
93_US_MY09.book Page 93 Tuesday, April 15, 2008 10:30 AM
ProCarManuals.com
Page 94 of 304

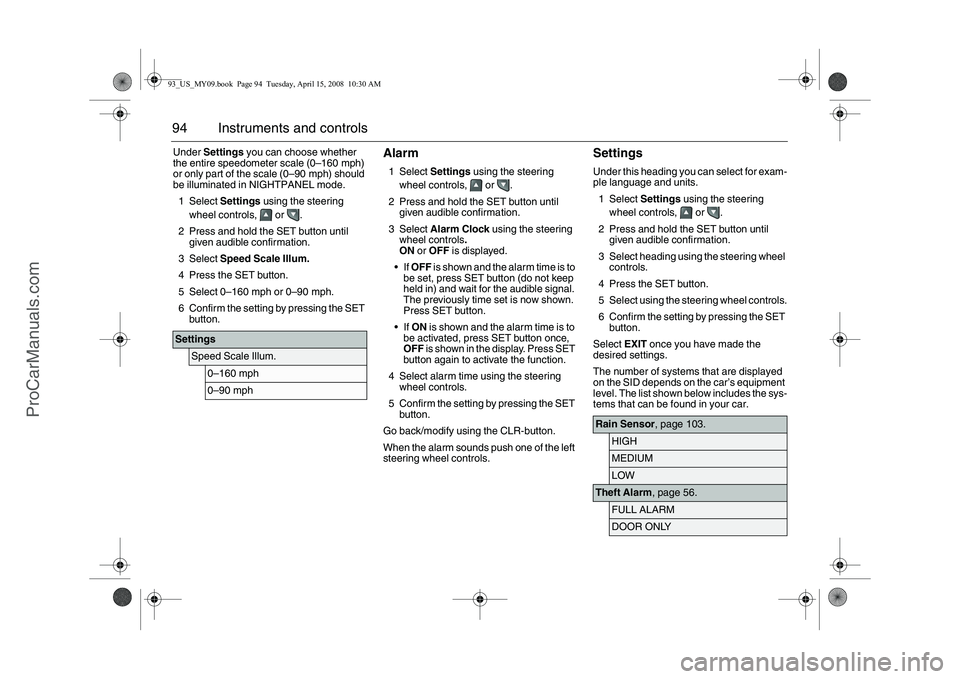
94 Instruments and controlsUnder Settings you can choose whether
the entire speedometer scale (0–160 mph)
or only part of the scale (0–90 mph) should
be illuminated in NIGHTPANEL mode.
1Select Settings using the steering
wheel controls, or .
2 Press and hold the SET button until
given audible confirmation.
3Select Speed Scale Illum.
4 Press the SET button.
5 Select 0–160 mph or 0–90 mph.
6 Confirm the setting by pressing the SET
button.
Alarm1Select Settings using the steering
wheel controls, or .
2 Press and hold the SET button until
given audible confirmation.
3Select Alarm Clock using the steering
wheel controls.
ON or OFF is displayed.
If OFF is shown and the alarm time is to
be set, press SET button (do not keep
held in) and wait for the audible signal.
The previously time set is now shown.
Press SET button.
If ON is shown and the alarm time is to
be activated, press SET button once,
OFF is shown in the display. Press SET
button again to activate the function.
4 Select alarm time using the steering
wheel controls.
5 Confirm the setting by pressing the SET
button.
Go back/modify using the CLR-button.
When the alarm sounds push one of the left
steering wheel controls.
SettingsUnder this heading you can select for exam-
ple language and units.
1Select Settings using the steering
wheel controls, or .
2 Press and hold the SET button until
given audible confirmation.
3 Select heading using the steering wheel
controls.
4 Press the SET button.
5 Select using the steering wheel controls.
6 Confirm the setting by pressing the SET
button.
Select EXIT once you have made the
desired settings.
The number of systems that are displayed
on the SID depends on the car’s equipment
level. The list shown below includes the sys-
tems that can be found in your car.
Settings
Speed Scale Illum.
0–160 mph0–90 mph
Rain Sensor, page 103.
HIGHMEDIUMLOW
Theft Alarm, page 56.
FULL ALARMDOOR ONLY
93_US_MY09.book Page 94 Tuesday, April 15, 2008 10:30 AM
ProCarManuals.com
Page 95 of 304

95 Instruments and controls
Explanation of the various selections under
Settings.
Park Assistance, page 180.
ONOFF
Alarm Clock, page 94.
ONOFF
Language.
ENGLISH UKENGLISH USFRANCAISDEUTSCHITALIANOESPANOLSVENSKA
Speed Scale Illum.
0–160 mph0–90 mph
Speed Scale Sel.
BOTH SCALESONLY MPH SCALE
Unit
METRICUSIMPERIAL
Climate System, page 115.Next Service: xx%.
INTERMEDIATEMAIN
Time for Service.
INTERMEDIATEMAINMAIN & INTERMEDReset Service Ind?
YES NO
TCS, page 173.
ONOFF
ESP, page 175.
ONOFF
Rain Sensor
The sensitivity has three levels.
Park Assistance
The Park Assistance can be shut off by
choosing OFF.
Alarm Clock
Setting of alarm clock is possible.
Language
Select the desired language. The num-
ber of languages can vary between
markets.
Speed Scale Illum.
Select the proportion of the speedo-
meter to be illuminated in NIGHT-
PANEL mode.
Speed Scale Sel.
Select if both scales or just mph-scale
shall be illuminated in NIGHTPANEL
mode.
93_US_MY09.book Page 95 Tuesday, April 15, 2008 10:30 AM
ProCarManuals.com
Page 96 of 304

96 Instruments and controls
Resetting the service indication
Reset the service indication in accordance
with the following:
1 Turn the ignition switch to the ON posi-
tion, the engine must be switched off.
2Select Settings using the steering
wheel controls, or .
3 Press and hold the SET button until
given audible confirmation.
4Select Time for Service.
5 Press the SET button.
6 To the question Reset Service Ind?
select YES (Press CLR button to undo).ClockAdjustments can be made in the Infotain-
ment system.
See separate Manual. Unit
Select the desired group of units.
Next Service: xx%
The SID includes two mutually inde-
pendent counters, one for the main
service and one for the intermediate
service. When a service is carried out,
e.g. intermediate service, the counter is
reset for the intermediate service. The
counter for the other service type, main
service, continues unaffected. This
means that once a service has been
carried out, the counter may show e.g.
47% even though a service has just
been carried out. The percentage
refers, then, to the other service type.
MAIN
Main services are carried out at specific
meter settings. This interval varies
depending on market and engine var-
iant. Contact a workshop for more infor-
mation. We recommend that you con-
tact an authorised Saab workshop.INTERMEDIATE
The intermediate service, on the other
hand, is carried out depending on the
number of cold starts and the climate
conditions in which the car is driven, for
example. This is why the interval for
this type of service varies.
MAIN & INTERMED
A combined service is carried out when
the counters of both service types are
close to one another.
Time for Service.
A service indication must only be reset
after the service has been performed.
TCS/ESP
Select whether the system shall be on
or off. The car has either TCS or ESP.
93_US_MY09.book Page 96 Tuesday, April 15, 2008 10:30 AM
ProCarManuals.com