2009 PORSCHE PANAMERA wheel
[x] Cancel search: wheelPage 173 of 343
Driving and Driving Safety
171
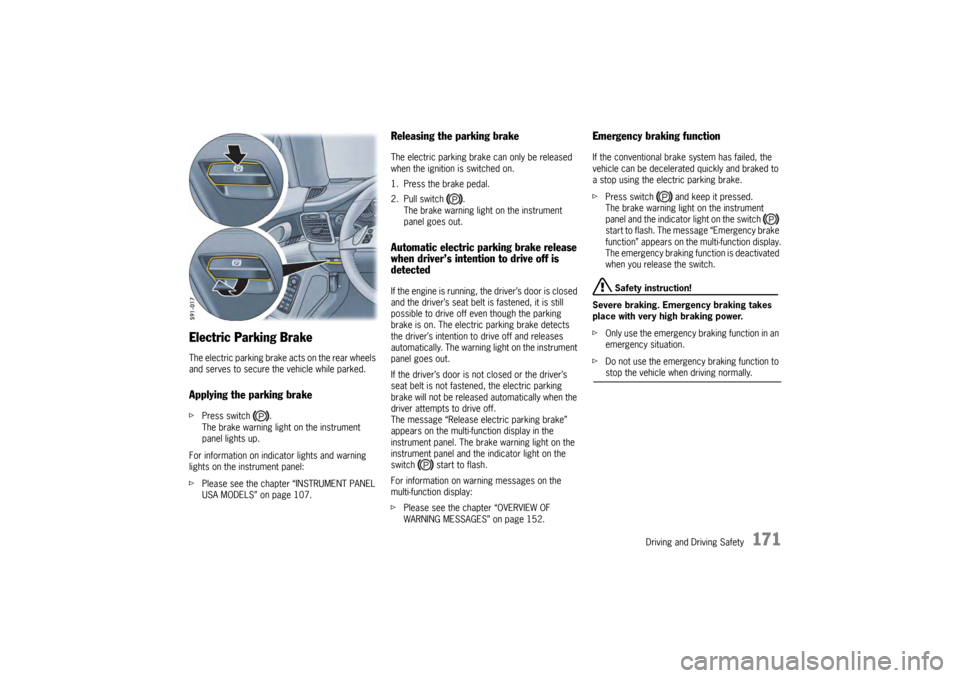
Electric Parking BrakeThe electric parking brake acts on the rear wheels
and serves to secure the vehicle while parked.Applying the parking brakefPress switch .
The brake warning light on the instrument
panel lights up.
For information on indi cator lights and warning
lights on the instrument panel:
f Please see the chapter “INSTRUMENT PANEL
USA MODELS” on page 107.
Releasing the parking brakeThe electric parking brake can only be released
when the ignition is switched on.
1. Press the brake pedal.
2. Pull switch .
The brake warning light on the instrument
panel goes out.Automatic electric parking brake release
when driver’s intention to drive off is
detectedIf the engine is running, the driver’s door is closed
and the driver’s seat belt is fastened, it is still
possible to drive off even though the parking
brake is on. The electric parking brake detects
the driver’s intention to drive off and releases
automatically. The warning light on the instrument
panel goes out.
If the driver’s door is not closed or the driver’s
seat belt is not fastened, the electric parking
brake will not be released automatically when the
driver attempts to drive off.
The message “Release electric parking brake”
appears on the multi-function display in the
instrument panel. The brake warning light on the
instrument panel and the indicator light on the
switch start to flash.
For information on warning messages on the
multi-function display:
fPlease see the chapter “OVERVIEW OF
WARNING MESSAGES” on page 152.
Emergency braking functionIf the conventional brak e system has failed, the
vehicle can be decelerated quickly and braked to
a stop using the electric parking brake.
f Press switch and keep it pressed.
The brake warning light on the instrument
panel and the indicator light on the switch
start to flash. The messa ge “Emergency brake
function” appears on the multi-function display.
The emergency braking function is deactivated
when you release the switch.
Safety instruction!
Severe braking. Emergency braking takes
place with very high braking power.
f Only use the emergency braking function in an
emergency situation.
f Do not use the emergency braking function to stop the vehicle when driving normally.
Page 174 of 343

172
Driving and Driving Safety
If the electric parking brake could not be applied
fully when the vehicle is stopped, the brake
warning light on the instrument panel starts to
flash.
For information on warning messages on the
multi-function display:
f
Please see the chapter “OVERVIEW OF
WARNING MESSAGES” on page 152.
BrakesfMake it a habit to chec k the operation of your
brakes before driving.
Keep in mind that the braking distance increases
very rapidly as the speed increases. At 60 mph
(100 km/h), for example, it is not twice but four
times longer than 30 mph (50 km/h). Tire traction
is also less effective when the roads are wet or
slippery.
f Therefore, always maintain a safe distance
from the car in front of you.Vehicles without Porsche Ceramic
Composite Brake (PCCB)Even though the brake discs consist of alloyed
grey cast iron, they will unavoidably start to
corrode if your car is parked for an extended
period. The brakes will tend to “rub” as a result.
The nature, extent and effects of corrosion
depend on the amount of time the vehicle was
parked, whether road salt or grit was spread and
whether grease-dissolving agents were used in
car washes.
If the braking comfort is noticeably impaired, we
recommend having the brake system checked by
experts at an authorized Porsche dealer.
Brake system functionYour Porsche is equipped with a power assisted
hydraulic dual circuit brake system with disc
brakes at the front and rear.
Both circuits function independently. One brake
circuit operates the front left and rear right wheel
and the other operates the front right and rear left
wheel.
If one brake circuit has failed, the other will still
operate. However, you will notice an increased
pedal travel when you apply the brakes. Failure of
one brake circuit will cause the stopping distance
to increase.
Warning!
Risk of an accident, resulting in serious
personal injury or death.
In the unlikely event of hydraulic failure of
one brake circuit:
f Push the brake pedal down firmly and hold it in
that position. A mechanical linkage activates
the second circuit, and you will be able to bring
the vehicle to a stop.
f After bringing your vehicle to a complete stop,
avoid driving the vehicle and instead have it
towed to the nearest authorized Porsche dealer for repair.
Brake warning light USA
Brake warning light Canada
Page 178 of 343
176
Driving and Driving Safety
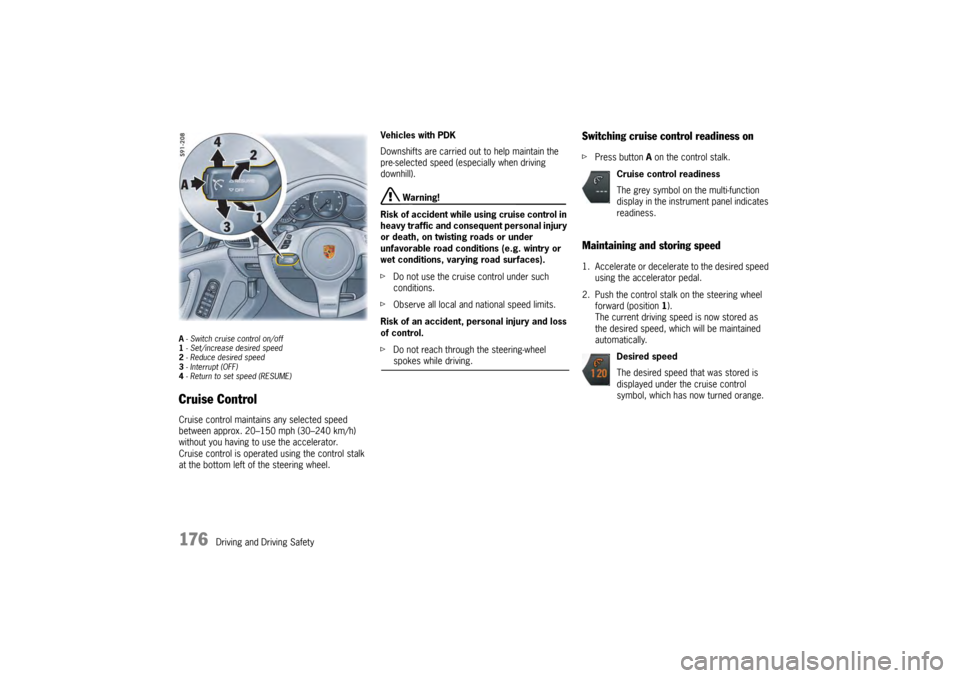
A- Switch cruise control on/off
1 - Set/increase desired speed
2 - Reduce desired speed
3 - Interrupt (OFF)
4 - Return to set speed (RESUME)Cruise ControlCruise control maintains any selected speed
between approx. 20–150 mph (30–240 km/h)
without you having to use the accelerator.
Cruise control is operated using the control stalk
at the bottom left of the steering wheel. Vehicles with PDK
Downshifts are carried out to help maintain the
pre-selected speed (especially when driving
downhill).
Warning!
Risk of accident while using cruise control in
heavy traffic and consequent personal injury
or death, on twisting roads or under
unfavorable road conditions (e.g. wintry or
wet conditions, varying road surfaces).
f Do not use the cruise control under such
conditions.
f Observe all local and national speed limits.
Risk of an accident, personal injury and loss
of control.
f Do not reach through the steering-wheel spokes while driving.
Switching cruise control readiness onfPress button A on the control stalk.Maintaining and storing speed1. Accelerate or decelera te to the desired speed
using the accelerator pedal.
2. Push the control stalk on the steering wheel forward (position 1).
The current driving speed is now stored as
the desired speed, which will be maintained
automatically.
Cruise control readiness
The grey symbol on the multi-function
display in the instrument panel indicates
readiness.
Desired speed
The desired speed that was stored is
displayed under the cruise control
symbol, which has now turned orange.
Page 179 of 343

Driving and Driving Safety
177
Accelerating (e.g. to overtake)Variant 1
fIncrease the speed as usual with the
accelerator pedal.
When you ease off the accelerator, the
previously stored value is set again.
Variant 2
f Push the control stalk on the steering wheel
forward (position 1).
The desired speed is increased in steps of
1mph (1km/h).
or
Press the control stalk on the steering wheel
forward and keep it pressed (position 1).
The desired speed is increased in steps of
5 mph (10 km/h).
The new desired speed is displayed on the
multi-function display in the instrument panel.
Deceleratingf Briefly pull the control stalk on the steering
wheel towards the steering wheel (position 2).
The desired speed is decreased in steps of
1 mph (1 km/h).
or
Pull the control stalk on the steering wheel
towards the steering whee l and keep it pulled
(position 2).
The desired speed is decreased in steps of
5 mph (10 km/h).
The new desired speed is displayed on the
multi-function display in the instrument panel.
Vehicles with PDK
Downshifts are carried out to help maintain the
pre-selected speed (especially when driving
downhill).
Interrupting cruise control
operation–OFFThe speed driven before the interruption remains
stored in the memory and can be reactivated by
pressing the control stalk.
f Please see the chapter “RESUMING THE
STORED SPEED – RESUME” on page 178.
f Press the control stalk down (position 3).
or
Press the brake or clutch pedal or move
the PDK selector lever to position N.
For more information on driving with Porsche
Doppelkupplung:
f Please see the chapter “PORSCHE
DOPPELKUPPLUNG (PDK)” on page 193.
Cruise control operation is interrupted
automatically:
– If the set vehicle speed is exceeded by more than approx. 16 mph (25 km/h) for longer
than 20 seconds.
– If the actual vehicle speed falls below the set vehicle speed by approx. 37 mph (60 km/h)
for longer than 60 seconds (e.g. gradients).
– If Porsche Stability Management (PSM) intervenes for longer than 0.5 seconds.
Page 182 of 343
180
Driving and Driving Safety
Override
The speed of the vehicle can be increased at any
time by pressing the accelerator.
If the set ACC speed is exceeded, the ACC is
deactivated.
The message “ACC passive” will appear on the
multi-function display in the instrument panel.
The desired speed that was stored is retained.
After releasing the accelerator pedal, the ACC
accelerates to the desired speed if there is no
vehicle in front and controls the distance if a
vehicle in front is present.
For information on the “ACC passive” status:
f
Please see the chapter “OPERATING STATES
WHEN ADAPTIVE CRUISE CONTROL IS
SWITCHED ON” on page 182.
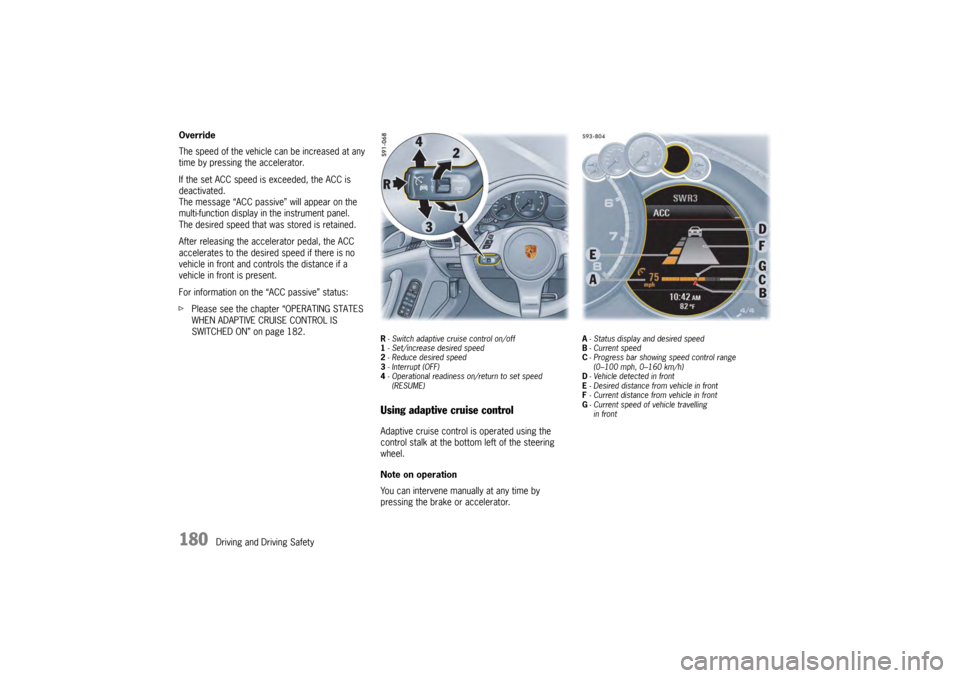
R- Switch adaptive cruise control on/off
1 - Set/increase desired speed
2 - Reduce desired speed
3 - Interrupt (OFF)
4 - Operational readiness on/return to set speed
(RESUME)Using adaptive cruise controlAdaptive cruise control is operated using the
control stalk at the bottom left of the steering
wheel.
Note on operation
You can intervene manually at any time by
pressing the brake or accelerator.
A - Status display and desired speed
B - Current speed
C - Progress bar showing speed control range
(0–100 mph, 0–160 km/h)
D - Vehicle detected in front
E - Desired distance from vehicle in front
F - Current distance from vehicle in front
G - Current speed of vehicle travelling
in front
Page 183 of 343
Driving and Driving Safety
181
Adaptive cruise control displayAll important information, messages and warnings
are displayed on the multi-function display in the
instrument panel.
“ACC” main menu
The adaptive cruise control display on the multi-
function display can be selected permanently
using the buttons on the multifunction steering
wheel or the control stalk at the bottom right of
the steering wheel.
For information on using the multi-function display:
f Please see the chapter “OPERATING THE
MULTI-FUNCTION DISPLAY IN THE
INSTRUMENT PANEL” on page 115. Status display
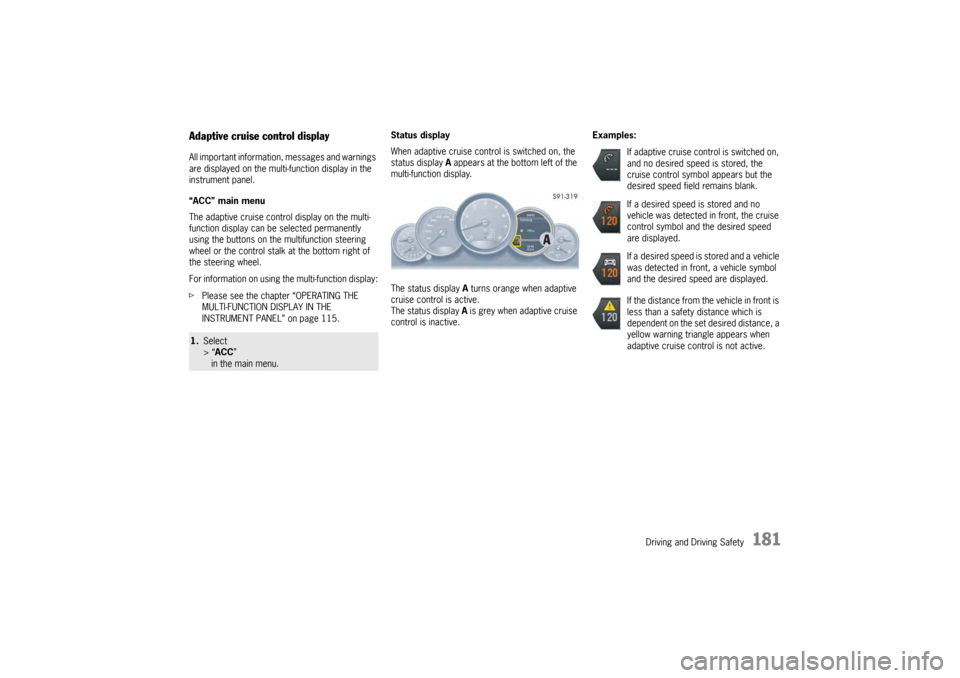
When adaptive cruise control is switched on, the
status display
A appears at the bottom left of the
multi-function display.
The status display A turns orange when adaptive
cruise control is active.
The status display A is grey when adaptive cruise
control is inactive. Examples:1.
Select
> “ACC ”
in the main menu.
If adaptive cruise control is switched on,
and no desired speed is stored, the
cruise control symbol appears but the
desired speed field remains blank.
If a desired speed is stored and no
vehicle was detected in front, the cruise
control symbol and the desired speed
are displayed.
If a desired speed is stored and a vehicle
was detected in front, a vehicle symbol
and the desired speed are displayed.
If the distance from the vehicle in front is
less than a safety distance which is
dependent on the set desired distance, a
yellow warning triangle appears when
adaptive cruise control is not active.
Page 184 of 343

182
Driving and Driving Safety
Switching adaptive cruise control on
and offSwitching adaptive cruise control on
fPress button R on the control stalk.
The grey status display appears on the
multi-function display.
Adaptive cruise control is ready.
Switching adaptive cruise control off
f Press button R on the control stalk.
“ACC off” appears on the multi-function
display.
The desired speed that was stored is deleted.
The desired distance is set to the default value.Operating states when adaptive cruise
control is switched onThere are three possible operating states when
adaptive cruise control is switched on.
Adaptive cruise control active
Adaptive cruise control automatically regulates
the speed and distance fr om the vehicle in front.
The status display A turns orange. Adaptive cruise control is ready
Cruise control and distance control is inactive
after pressing the brakes or interrupting by
pressing the control stalk down (position
3, OFF ).
The desired speed that was stored and the
desired distance that was set are retained.
The status display A turns grey.
Adaptive cruise control is active again after
you release the accelerator.
For information on resuming cruise control and
distance control:
f Please see the chapter “RESUMING CRUISE
CONTROL AND DISTANCE CONTROL –
RESUME” on page 185.
Adaptive cruise control passive
Cruise control and distance control is inactive
after pressing the accelerator.
“ACC passive” appears on the multi-function
display.
The desired speed that was stored and the
desired distance that was set are retained.
The status display A turns grey.
Adaptive cruise control is active again after
you release the accelerator.
Setting and changing the desired speedPreconditions
– ACC is switched on.
– Vehicle is moving.
– No stationary objects are detected in front.
Setting the desired speed
1. Press the control stalk on the steering wheel forward (position 1).
The current driving speed is stored as the
desired speed, which will be maintained
automatically (within the control range from 20
to 100 mph, 30 to 210 km/h), and appears
orange in the status display A.
The red triangle B under the progress bar for
the speed control range shows the speed of
your vehicle.
2. Release the accelerator pedal. The desired speed is maintained automatically
unless a vehicle travelling in front is detected
as driving slower than the desired speed.
Note
If your vehicle is stopped, the message
“Impossible when parked” appears on the multi-
function display when you press the control stalk
forward (position 1).
If a stationary object wa s detected in front, the
message “Stationary ob ject” appears on the
multi-function display.
Page 185 of 343
Driving and Driving Safety
183
Increasing the desired speed
fPush the control stalk on the steering wheel
forward (position 1).
The desired speed is increased in steps of
1mph (1km/h).
or
Press the control stalk on the steering wheel
forward and keep it pressed (position 1).
The desired speed is increased in steps of
5 mph (10 km/h).
The status display A shows the new desired
speed.
The red triangle B under the progress bar for
the speed control range shows the speed of
your vehicle.
Reducing the desired speed
f Briefly pull the control stalk on the steering
wheel towards the steering wheel (position 2).
The desired speed is decreased in steps of
1mph (1km/h).
or
Pull the control stalk on the steering wheel
towards the steering wheel and keep it pulled
(position 2).
The desired speed is decreased in steps of
5 mph (10 km/h).
The status display A shows the new desired
speed.
The red triangle B under the progress bar for
the speed control range shows the speed of
your vehicle.
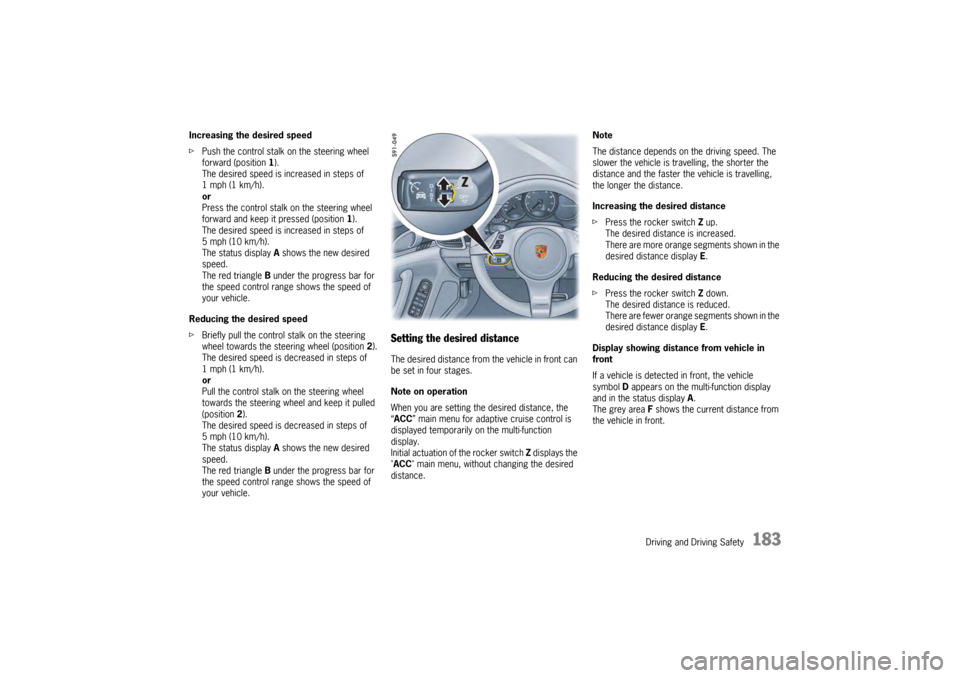
Setting the desired distanceThe desired distance from the vehicle in front can
be set in four stages.
Note on operation
When you are setting the desired distance, the
“ ACC ” main menu for adaptive cruise control is
displayed temporarily on the multi-function
display.
Initial actuation of the rocker switch Z displays the
"ACC " main menu, without changing the desired
distance. Note
The distance depends on the driving speed. The
slower the vehicle is travelling, the shorter the
distance and the faster the vehicle is travelling,
the longer the distance.
Increasing the desired distance
f
Press the rocker switch Z up.
The desired distance is increased.
There are more orange segments shown in the
desired distance display E.
Reducing the desired distance
f Press the rocker switch Z down.
The desired distance is reduced.
There are fewer orange segments shown in the
desired distance display E.
Display showing distance from vehicle in
front
If a vehicle is detected in front, the vehicle
symbol D appears on the multi-function display
and in the status display A.
The grey area F shows the current distance from
the vehicle in front.