Page 149 of 343
Instrument Panel and Multi-Function Display
147
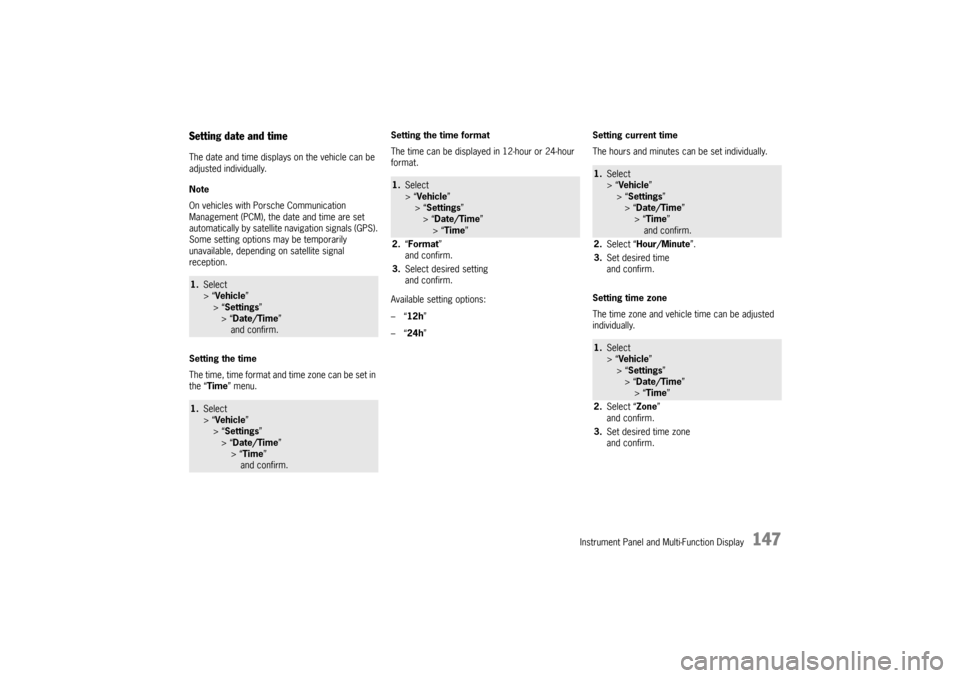
Setting date and timeThe date and time displays on the vehicle can be
adjusted individually.
Note
On vehicles with Porsche Communication
Management (PCM), the date and time are set
automatically by satellite navigation signals (GPS).
Some setting options may be temporarily
unavailable, depending on satellite signal
reception.
Setting the time
The time, time format and time zone can be set in
the “Time ” menu. Setting the time format
The time can be displayed in 12-hour or 24-hour
format.
Available setting options:
–“
12h ”
–“ 24h ” Setting current time
The hours and minutes can be set individually.
Setting time zone
The time zone and vehicle time can be adjusted
individually.1.
Select
> “Vehicle ”
> “ Settings ”
> “Date/Time ”
and confirm.1. Select
> “Vehicle ”
> “ Settings ”
> “Date/Time ”
> “Time ”
and confirm.
1. Select
> “Vehicle ”
> “Settings ”
> “ Date/Time ”
> “ Time”
2. “Format ”
and confirm.
3. Select desired setting
and confirm.
1.Select
> “Vehicle ”
> “ Settings ”
> “Date/Time ”
> “Time ”
and confirm.
2. Select “Hour/Minute ”.
3. Set desired time
and confirm.1.Select
> “Vehicle ”
> “ Settings ”
> “Date/Time ”
> “Time ”
2. Select “Zone ”
and confirm.
3. Set desired time zone
and confirm.
Page 150 of 343
148
Instrument Panel and Multi-Function Display
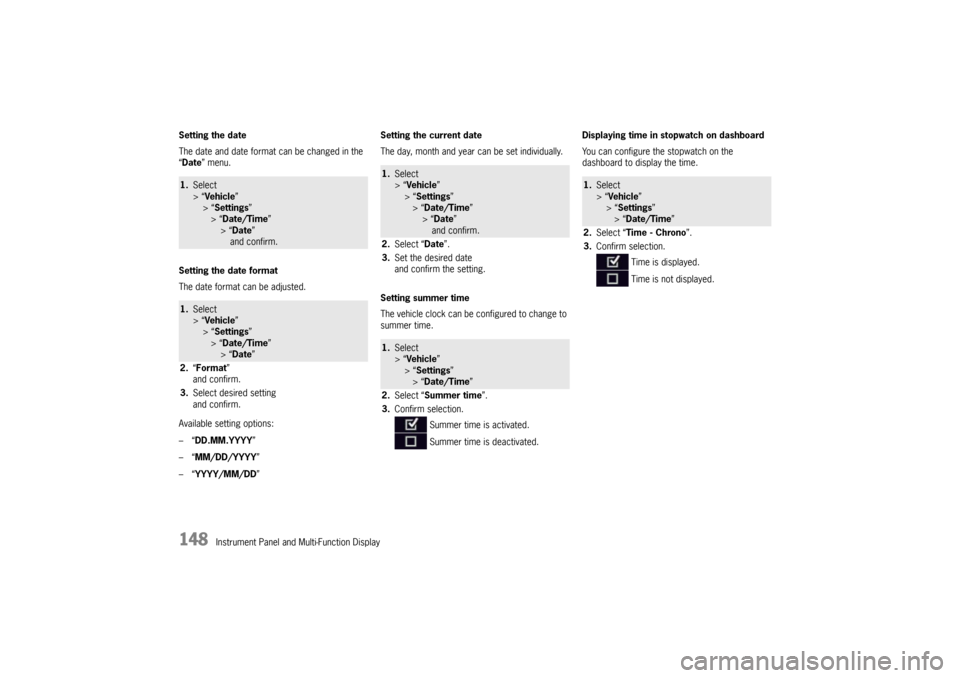
Setting the date
The date and date format
can be changed in the
“ Date ” menu.
Setting the date format
The date format can be adjusted.
Available setting options:
–“ DD.MM.YYYY”
–“ MM/DD/YYYY”
–“ YYYY/MM/DD ” Setting the current date
The day, month and year can be set individually.
Setting summer time
The vehicle clock can be configured to change to
summer time.
Displaying time in
stopwatch on dashboard
You can configure the stopwatch on the
dashboard to display the time.
1. Select
> “Vehicle ”
> “ Settings ”
> “Date/Time ”
> “Date ”
and confirm.1. Select
> “Vehicle ”
> “ Settings ”
> “Date/Time ”
> “Date ”
2. “Format”
and confirm.
3. Select desired setting
and confirm.
1.Select
> “Vehicle ”
> “ Settings ”
> “Date/Time ”
> “ Date ”
and confirm.
2. Select “ Date”.
3. Set the desired date
and confirm the setting.1.Select
> “Vehicle ”
> “ Settings ”
> “Date/Time ”
2. Select “ Summer time ”.
3. Confirm selection.
Summer time is activated.
Summer time is deactivated.
1.Select
> “Vehicle ”
> “Settings ”
> “Date/Time ”
2. Select “Time - Chrono”.
3. Confirm selection.
Time is displayed.
Time is not displayed.
Page 151 of 343
Instrument Panel and Multi-Function Display
149
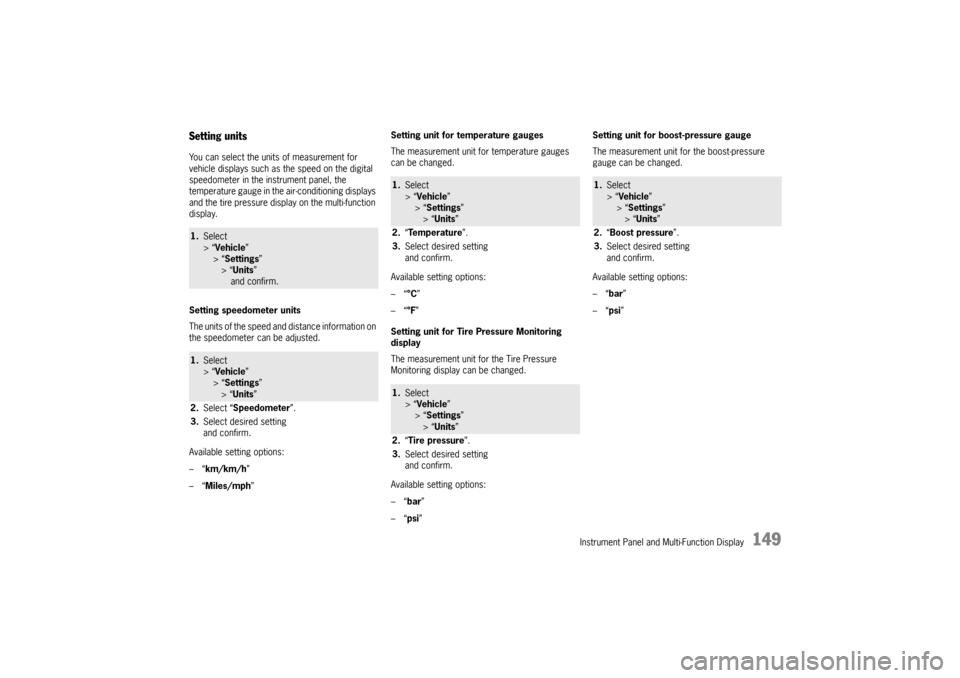
Setting unitsYou can select the units of measurement for
vehicle displays such as the speed on the digital
speedometer in the instrument panel, the
temperature gauge in the air-conditioning displays
and the tire pressure display on the multi-function
display.
Setting speedometer units
The units of the speed and distance information on
the speedometer can be adjusted.
Available setting options:
–“ km/km/h ”
–“ Miles/mph” Setting unit for temperature gauges
The measurement unit for temperature gauges
can be changed.
Available setting options:
–“
°C”
–“ °F”
Setting unit for Tire Pressure Monitoring
display
The measurement unit for the Tire Pressure
Monitoring display can be changed.
Available setting options:
–“ bar”
–“ psi” Setting unit for boost-pressure gauge
The measurement unit for the boost-pressure
gauge can be changed.
Available setting options:
–“
bar”
–“ psi” 1. Select
> “Vehicle ”
> “ Settings ”
> “Units ”
and confirm.1. Select
> “Vehicle ”
> “ Settings ”
> “Units ”
2. Select “ Speedometer ”.
3. Select desired setting
and confirm.
1.Select
> “Vehicle ”
> “Settings ”
> “ Units ”
2. “Temperature ”.
3. Select desired setting
and confirm.1.Select
> “Vehicle ”
> “Settings ”
> “ Units ”
2. “Tire pressure ”.
3. Select desired setting
and confirm.
1.Select
> “Vehicle ”
> “ Settings ”
> “Units ”
2. “Boost pressure ”.
3. Select desired setting
and confirm.
Page 152 of 343
150
Instrument Panel and Multi-Function Display
Setting unit for fuel consumption display
The unit can be set for the fuel consumption
display.
Available setting options:
–“
l/100 km”
–“ MPG (US) ”
–“ MPG (UK) ”
–“ km/l ”
Changing the languageThe language of the display text on the multi-
function display can be changed.Adjusting volume of warning and
information tonesThe volume of the warning tones and ParkAssist
information tones can be adjusted. Adjusting ParkAssist volume
The volume of the ParkAssist information tones
can be adjusted.
Available setting options:
–“
Loud”
–“ Medium”
–“ Low ”
1.Select
> “Vehicle ”
> “ Settings ”
> “Units ”
2. “Consumption”.
3. Select desired setting
and confirm.
1.Select
> “Vehicle ”
> “ Settings ”
> “Language ”
2. Select desired language
and confirm.1.Select
> “Vehicle ”
> “ Settings ”
> “Volume ”
and confirm.
1. Select
> “Vehicle ”
> “Settings ”
> “Volume ”
2. “ParkAssist”.
3. Select desired setting
and confirm.
Page 153 of 343

Instrument Panel and Multi-Function Display
151
Adjusting volume of warning tones
The volume of the warning tones can be adjusted
individually.
Available setting options:
–“Loud ”
–“ Medium”
–“ Low ”
Changing button assignment on multi-
function steering wheelThe assignment of the MFS button on the multi-
function display can be changed individually.
Functions from the multi-function display or PCM
can be assigned to the MFS button.
Available PCM functions:
–“Source change ”
Change audio source.
–“ Voice control ”
Activate voice control.
–“ Dri. instr. (Rep) “
Repeat voice instruction from the navigation
system.
–“ Station/track < ”
Previous radio station/title.
–“ Station/track > ”
Next radio station/track. –“
Map ”
Display navigation map in PCM.
–“ Menu change ”
Change main menu area.
Available instrument cluster functions:
–“ Start/Stop Chr. ”
Start/stop timing.
–“ Vehicle menu ”
Display vehicle menu.
–“ Tr i p m e n u ”
Display trip menu.
–“ TPM menu ”
Display TPM menu.
–“ Chrono menu”
Display chrono menu.
–“ ACC menu ”
Display ACC menu.
–“ Audio menu ”
Display audio menu.
–“ Phone menu ”
Display telephone menu.
–“ Navi menu ”
Display navigation menu.
–“ Map menu ”
Display navigation map on the multi-function
display.
1. Select
> “Vehicle ”
> “ Settings ”
> “Volume ”
2. “Warn. tones ”.
3. Select desired setting
and confirm.
1.Select
> “Vehicle ”
> “Settings ”
> “ Steering wheel op. ”
2. “Multif. key ”
and confirm.
3. Select “PCM function” or
“ Inst. clus. fun. ”
and confirm.
4. Select desired function assignment
and confirm.
Page 154 of 343

152
Instrument Panel and Multi-Function Display
Overview of Warning MessagesIf a warning message appears, always refer to the corresponding sections in this Owner’s Manual.
Warning messages are issued only if all measurement prerequisites are met.
Therefore, check all fluid levels regu larly – in particular, always check the engine oil level before refuelling.Warning message categoriesRed warning: System failure warning
fVisit or consult a qualified spec ialist workshop immediately*.
Yellow warning: Fault or system failure warning
f Visit a qualified specialist worksh op at the next opportunity*.
Yellow warning: Information message
f Visit a qualified specialist workshop at the next opportunity* or remedy yourself.
Light in
instrument
panel
Warning message on multi-function
display Meaning/Action required
Oil press. too low
Stop immediately in a suitable place and switch engine off.
Do not continue driving.
Select “Oil level” on the multi-func tion display. Add engine oil if
necessary.
Do not continue driving if the wa rning light comes on even when
the oil level is correct. Have the fault corrected at a qualified
specialist workshop.*Fault Oil pressure monitoring Have the faul t corrected at a qualified specialist workshop.*Oil temperature too highSwitch off engine and allow to cool. Check oil level and,
if necessary, add oil.Oil temperature display defective Have the faul t corrected at a qualified specialist workshop.*
Page 155 of 343
Instrument Panel and Multi-Function Display
153
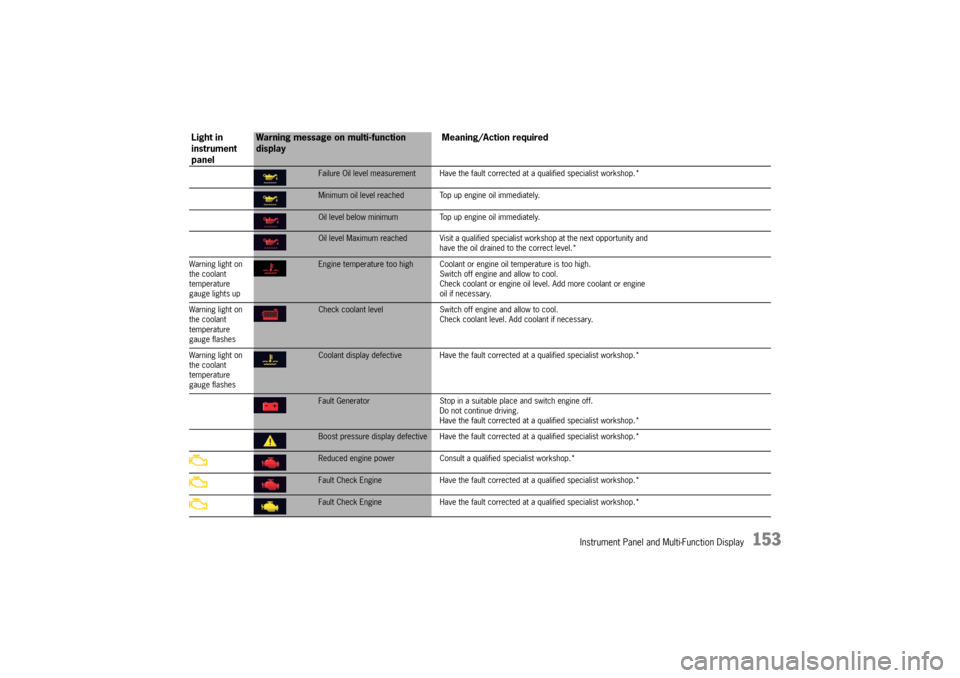
Failure Oil level measurement Have the fault corrected at a qualified specialist workshop.*Minimum oil level reached Top up engine oil immediately.Oil level below minimum Top up engine oil immediately.Oil level Maximum reached Visit a qualified spec ialist workshop at the next opportunity and
have the oil drained to the correct level.*
Warning light on
the coolant
temperature
gauge lights upEngine temperature too high Coolant or engine oil temperature is too high.
Switch off engine and allow to cool.
Check coolant or engine oil leve l. Add more coolant or engine
oil if necessary.
Warning light on
the coolant
temperature
gauge flashesCheck coolant level Switch off engine and allow to cool.
Check coolant level. Add coolant if necessary.
Warning light on
the coolant
temperature
gauge flashesCoolant display defective Have the fault corr ected at a qualified specialist workshop.*Fault Generator Stop in a suitable place and switch engine off.
Do not continue driving.
Have the fault corrected at a q ualified specialist workshop.*Boost pressure display defective Have the fault corrected at a qualified specialist workshop.*Reduced engine power Consult a qualified specialist workshop.*Fault Check Engine Have the fault corrected at a qualified specialist workshop.*Fault Check Engine Have the fault corrected at a qualified specialist workshop.*
Light in
instrument
panel
Warning message on multi-function
display Meaning/Action required
Page 156 of 343
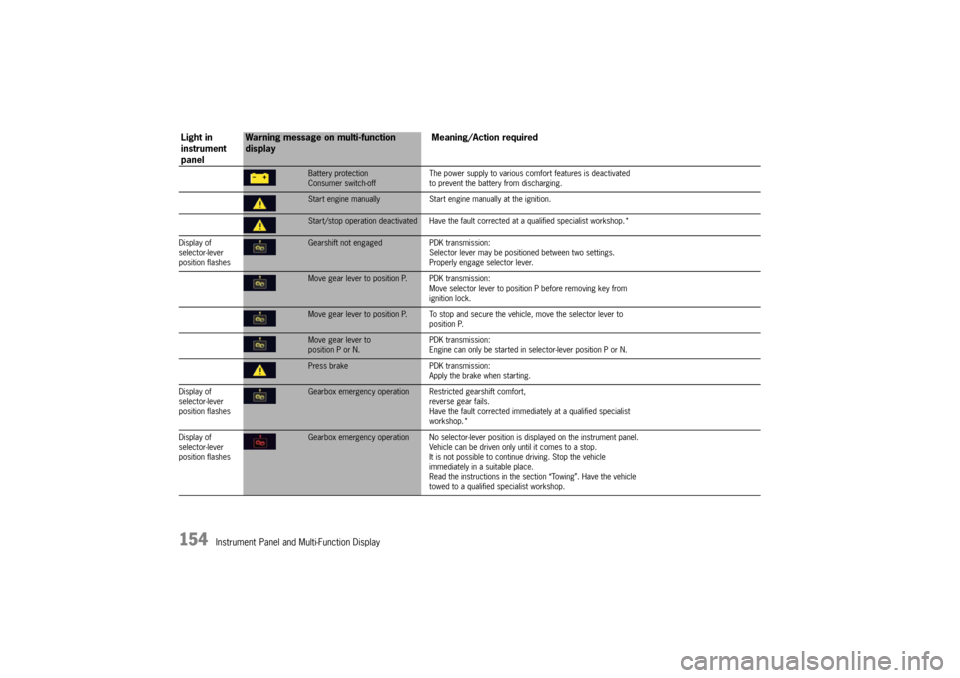
154
Instrument Panel and Multi-Function Display
Battery protection
Consumer switch-offThe power supply to various comf
ort features is deactivated
to prevent the battery from discharging.Start engine manually Start engine manually at the ignition.Start/stop operation deactivated Have the faul t corrected at a qualified specialist workshop.*
Display of
selector-lever
position flashesGearshift not engaged PDK transmission:
Selector lever may be positi oned between two settings.
Properly engage selector lever.Move gear lever to position P. PDK transmission:
Move selector lever to position P before removing key from
ignition lock.Move gear lever to position P. To stop and se cure the vehicle, move the selector lever to
position P.Move gear lever to
position P or N. PDK transmission:
Engine can only be started in selector-lever position P or N.Press brake
PDK transmission:
Apply the brake when starting.
Display of
selector-lever
position flashesGearbox emergency operation R estricted gearshift comfort,
reverse gear fails.
Have the fault corrected immediately at a qualified specialist
workshop.*
Display of
selector-lever
position flashesGearbox emergency operation No selector-lever po sition is displayed on the instrument panel.
Vehicle can be driven only until it comes to a stop.
It is not possible to contin ue driving. Stop the vehicle
immediately in a suitable place.
Read the instructions in the se ction “Towing”. Have the vehicle
towed to a qualified specialist workshop.
Light in
instrument
panel
Warning message on multi-function
display Meaning/Action required