2009 PORSCHE PANAMERA steering
[x] Cancel search: steeringPage 99 of 343

Lights, Turn Signals and Windshield Wipers
97
The emergency flasher can be switched on
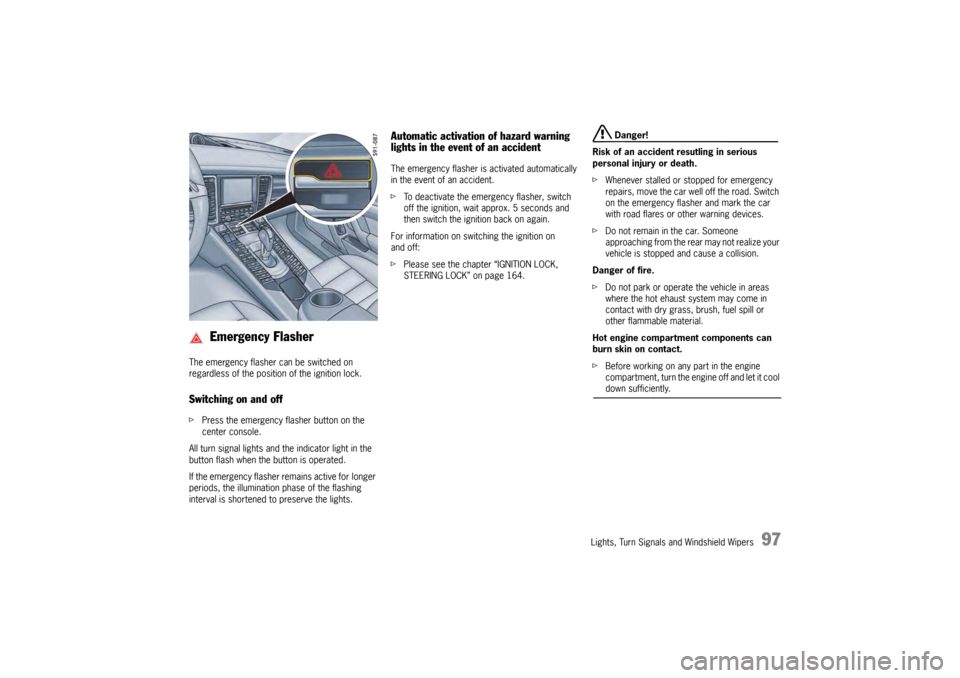
regardless of the position of the ignition lock.Switching on and offfPress the emergency fl asher button on the
center console.
All turn signal lights and the indicator light in the
button flash when the button is operated.
If the emergency flasher remains active for longer
periods, the illumination phase of the flashing
interval is shortened to preserve the lights.
Automatic activation of hazard warning
lights in the event of an accidentThe emergency flasher is activated automatically
in the event of an accident.
f To deactivate the emergency flasher, switch
off the ignition, wait approx. 5 seconds and
then switch the ignition back on again.
For information on switching the ignition on
and off:
f Please see the chapter “IGNITION LOCK,
STEERING LOCK” on page 164.
Danger!
Risk of an accident resutling in serious
personal injury or death.
f Whenever stalled or stopped for emergency
repairs, move the car well off the road. Switch
on the emergency flasher and mark the car
with road flares or other warning devices.
f Do not remain in the car. Someone
approaching from the rear may not realize your
vehicle is stopped and cause a collision.
Danger of fire.
f Do not park or operate the vehicle in areas
where the hot ehaust system may come in
contact with dry grass, brush, fuel spill or
other flammable material.
Hot engine compartment components can
burn skin on contact.
f Before working on any part in the engine
compartment, turn the engine off and let it cool down sufficiently.
Emergency Flasher
Page 101 of 343

Lights, Turn Signals and Windshield Wipers
99
Switching automatic interior lighting on
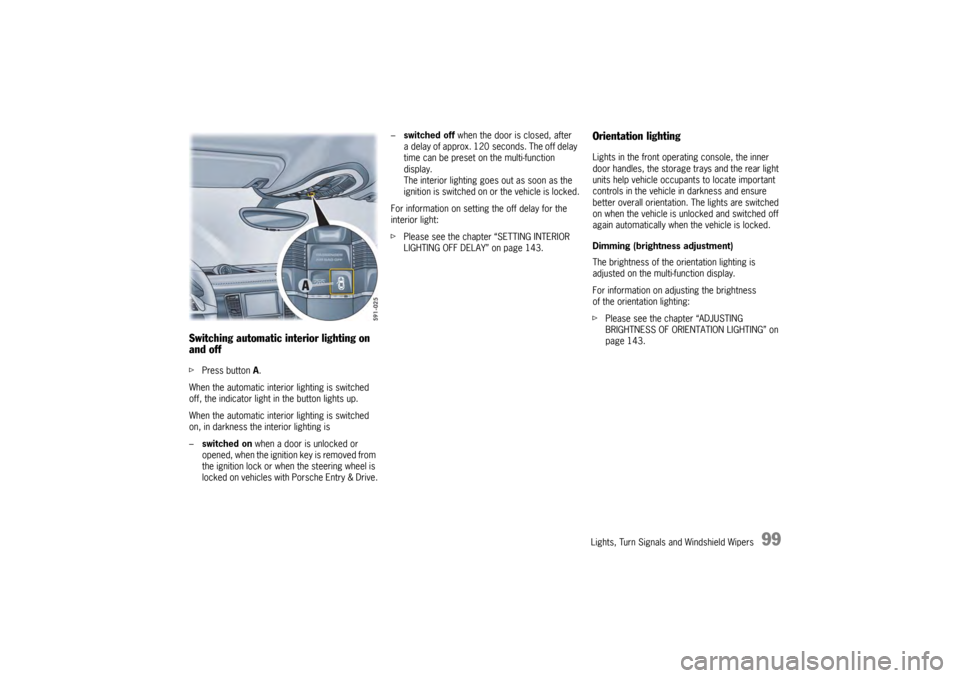
and off fPress button A.
When the automatic interior lighting is switched
off, the indicator light in the button lights up.
When the automatic interior lighting is switched
on, in darkness the interior lighting is
– switched on when a door is unlocked or
opened, when the ignition key is removed from
the ignition lock or when the steering wheel is
locked on vehicles with Porsche Entry & Drive. –
switched off when the door is closed, after
a delay of approx. 120 seconds. The off delay
time can be preset on the multi-function
display.
The interior lighting goes out as soon as the
ignition is switched on or the vehicle is locked.
For information on setting the off delay for the
interior light:
f Please see the chapter “SETTING INTERIOR
LIGHTING OFF DELAY” on page 143.
Orientation lightingLights in the front operating console, the inner
door handles, the storage trays and the rear light
units help vehicle occupa nts to locate important
controls in the vehicle in darkness and ensure
better overall orientation. The lights are switched
on when the vehicle is unlocked and switched off
again automatically when the vehicle is locked.
Dimming (brightness adjustment)
The brightness of the orientation lighting is
adjusted on the multi-function display.
For information on adjusting the brightness
of the orientation lighting:
f Please see the chapter “ADJUSTING
BRIGHTNESS OF ORIENTATION LIGHTING” on
page 143.
Page 104 of 343

102
Lights, Turn Signals and Windshield Wipers
Windshield Wiper/Washer Stalk
Caution!
Danger of injury if the windshield wipers
operate unintentionally.
Risk of damage to the engine compartment
lid, windshield and wiper system.
f Only wipe the windshield when sufficiently wet,
otherwise it could become scratched.
f Loosen frozen wiper blades before starting
to drive.
f Do not operate a frozen headlight washer
system.
f Always switch off windshield wipers in car
washes to prevent them wiping unintentionally
(rain sensor operation).
f Do not operate headlight washer system in
car washes.
f Always switch off windshield wipers before
cleaning the windshield to avoid unintentional
operation (rain sensor operation).
f Always hold the wiper arm securely when
replacing the wiper blade.
f Always switch off windshield wipers before
opening the engine compartment lid (wiper switch in position 0).
Front wiper and headlight washer system0 – Windshield wipers off
When the windshield wipers are switched off,
the wipers move up slightly from their rest
position so that the wiping edges are aligned
correctly.
1 – Rain sensor operation Front windshield wipers
Move wiper stalk upwards to the first click.
2 – Front windshield wipers – slow Move wiper stalk upwards to the second
click.
3 – Front windshield wipers – fast Move wiper stalk upwards to the third click. 4 – Front windshield wipers – one-touch
operation
Move wiper stalk downwards.
The front windshield wipers carry out one
wiping cycle.
5 – Front windshield wiper and washer system
Pull wiper stalk toward s the steering wheel.
The washer system wipes and sprays while
the stalk is pulled towards the steering
wheel.
When the wiper stalk is released, a few
drying wipes are performed.
After every 10 wipes on the windshield,
the headlights are cleaned automatically.
Maintenance notes
f If heavily soiled, repeat wash.
f Persistent dirt (e.g. insect remains) should
be removed regularly.
For information on car care:
f Please see the chapter “CAR CARE
INSTRUCTIONS” on page 269.
The front windshield washer nozzles are
heated when the ignition is on, as a precaution
against freezing. However, this does not replace
the use of antifreeze.
Page 116 of 343

114
Instrument Panel and Multi-Function Display
Warning!
Risk of accidents and ri sk of engine damage.
A broken drive belt means there is no power
assistance to the steering (more effort is
required to steer) and engine cooling fails.
f Do not continue driving.
f Have the fault corrected.
f Please contact a qualif ied specialist workshop.
We recommend that you have an authorized
Porsche dealer to do this work as they have
trained workshop personnel and the necessary
parts and tools.
Danger of steering assistance failing during
a long journey in water if the drive belt slips.
f If steering assistance fails, more effort will be required to steer.
Check Engine
(Emission Control)The emission control system detects malfunctions
that could cause increased pollutant emissions or
consequential damage etc. well in advance.
Faults are indicated by the warning light on the
instrument panel which then either lights up
continuously or flashes.
The faults are recorded in the control unit’s
fault memory.
The warning light on the instrument panel lights up
when the ignition is switched on as a lamp check
and goes out approx. 1 second after the engine
starts.
The warning light on the instrument panel flashes
to indicate operating states (e.g. engine misfiring)
which may cause damage to certain parts of the
emission control system.
f In this case, immediately reduce the engine
load by easing off the accelerator pedal.
In order to avoid consequential damage to the
engine or the exhaust-gas cleaning system
(e.g. catalytic converter):
f Please contact a qualified specialist workshop.
We recommend that you have an authorized
Porsche dealer to do this work as they have
trained workshop personnel and the necessary
parts and tools.
Caution!
Risk of damage. If the warning light on the
instrument panel continues flashing even
when you have eased off the accelerator
pedal, the emission control system may
overheat.
f Stop as soon as possible in a safe place.
Make sure that combustible materials, such as
dry grass or leaves, cannot come into contact
with the hot exhaust system.
f Switch off the engine.
fHave the fault corrected.Acoustic SignalsA speaker in the instrument panel generates
acoustic signals.
If the speaker is faulty, a warning will appear and
the speaker will no longer make an acoustic signal
(i. e. sound).
f Please see the chapter “OVERVIEW OF
WARNING MESSAGES” on page 152.
Warning light
Page 117 of 343

Instrument Panel and Multi-Function Display
115
Operating the Multi-Function
Display in the Instrument PanelOn the multi-function display, you can view
information relating to the relevant vehicle
equipment, operate the audio source (radio, CD,
iPod, etc.), check the oil level, check the tire
pressure, use the stopwatch or operate the
navigation system.
You can also modify different vehicle settings in
the Vehicle menu.
It is not possible to desc ribe all details of the
functions in this Owner’s Manual. The examples
clearly demonstrate the functional principle and
clarify the menu structure.
Warning!
There is a risk of accident if you set or
operate the multi-funct ion display, radio,
navigation system, telephone or other
equipment while driving. Operating these
devices while driving could distract you from
traffic and cause you to lose control of the
vehicle.
f Operate the equipment while driving only if the
traffic situation allows you to do so safely.
f Carry out any complicated operating or setting procedures only when the vehicle is stationary.
Multi-function displayNote on operation
The multi-function display is only active when the
ignition is on.
Certain menus are only available when the vehicle
has stopped e.g. the adjustment menu for tire
pressure monitoring.
Operating principle on vehicles with
multi-function steering wheelThe multi-function display is operated using the
rotary knob A , the Back button B and the MFS
button C, which can be assigned as required.
Selecting menu, function, setting option
f Turn rotary knob A upwards or downwards.
Confirming selection (Enter)
f Press rotary knob A .
Moving back one or several selection levels
f Press button B (Back button).
Page 118 of 343

116
Instrument Panel and Multi-Function Display
Porsche Communication Management (PCM)
functions or multi-function display functions can be
assigned to the MFS button in the multi-function
display on the instrument panel. Audio source
selection is preset by default.
For information on individual assignment of the
MFS button:
f
Please see the chapter “CHANGING BUTTON
ASSIGNMENT ON MULTI-FUNCTION STEERING
WHEEL” on page 151.
For information on Porsche Communication
Management:
f Please refer to the separate PCM operating
instructions.
Operating principle on vehicles without
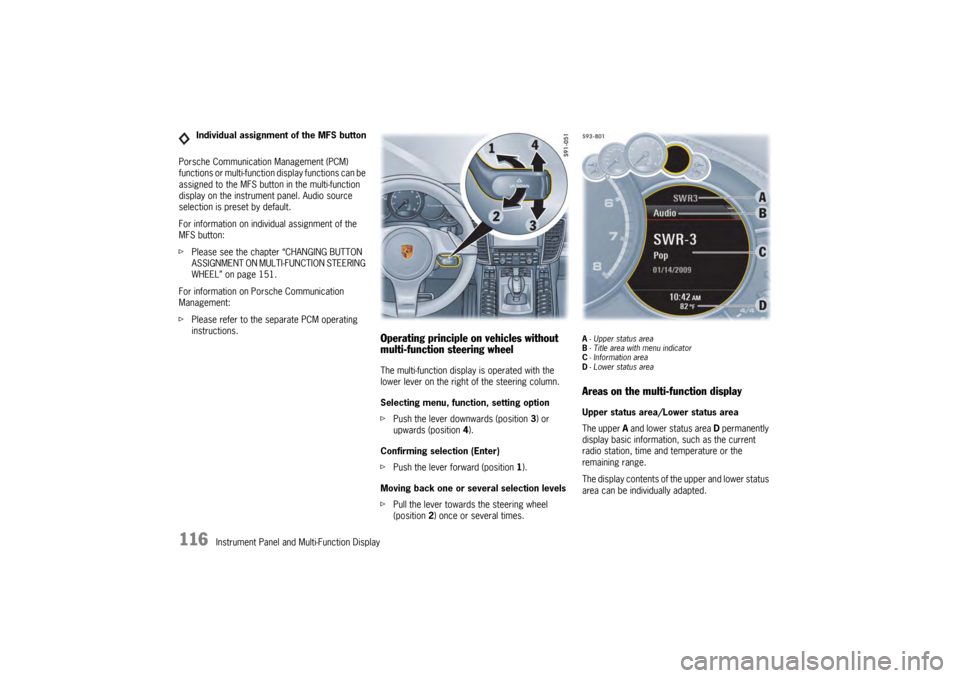
multi-function steering wheelThe multi-function display is operated with the
lower lever on the right of the steering column.
Selecting menu, function, setting option
fPush the lever downwards (position 3) or
upwards (position 4).
Confirming selection (Enter)
f Push the lever forward (position 1).
Moving back one or several selection levels
f Pull the lever towards the steering wheel
(position 2 ) once or several times.
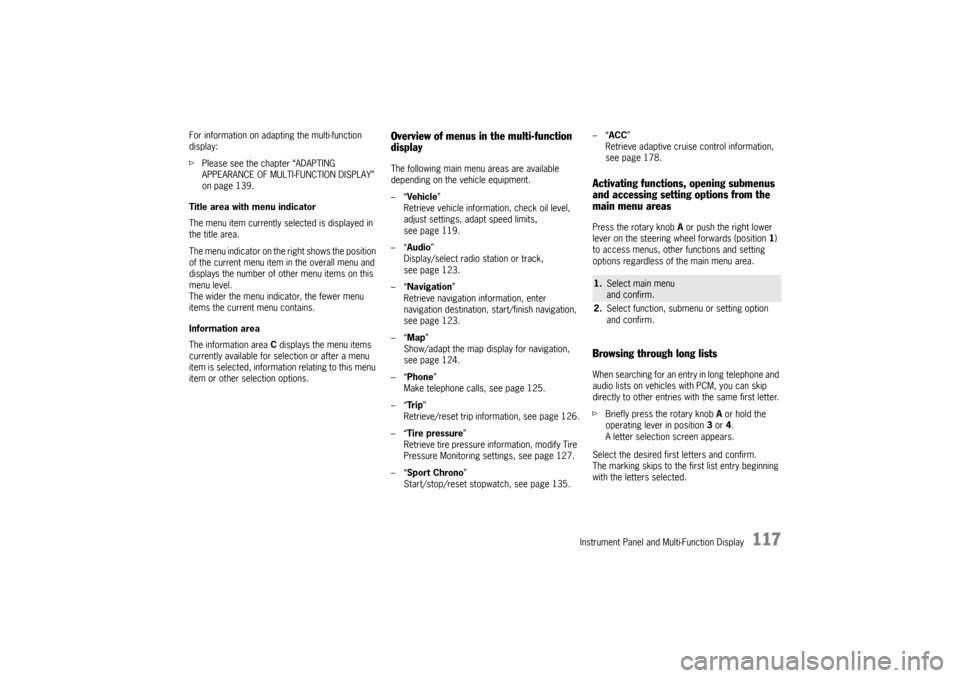
A-Upper status area
B - Title area with menu indicator
C - Information area
D - Lower status areaAreas on the multi-function displayUpper status area/Lower status area
The upper A and lower status area D permanently
display basic information, such as the current
radio station, time and temperature or the
remaining range.
The display contents of th e upper and lower status
area can be individually adapted.
Individual assignment of the MFS button
Page 119 of 343

Instrument Panel and Multi-Function Display
117
For information on adapting the multi-function
display:
fPlease see the chapter “ADAPTING
APPEARANCE OF MULTI-FUNCTION DISPLAY”
on page 139.
Title area with menu indicator
The menu item currently selected is displayed in
the title area.
The menu indicator on the right shows the position
of the current menu item in the overall menu and
displays the number of other menu items on this
menu level.
The wider the menu indicator, the fewer menu
items the current menu contains.
Information area
The information area C displays the menu items
currently available for selection or after a menu
item is selected, information relating to this menu
item or other selection options.
Overview of menus in the multi-function
displayThe following main menu areas are available
depending on the vehicle equipment.
–“ Vehicle ”
Retrieve vehicle inform ation, check oil level,
adjust settings, adapt speed limits,
see page 119.
–“ Audio”
Display/select radio station or track,
see page 123.
–“ Navigation ”
Retrieve navigation information, enter
navigation destination, start/finish navigation,
see page 123.
–“ Map ”
Show/adapt the map display for navigation,
see page 124.
–“ Phone ”
Make telephone calls, see page 125.
–“ Tr i p”
Retrieve/reset trip information, see page 126.
–“ Tire pressure ”
Retrieve tire pressure information, modify Tire
Pressure Monitoring settings, see page 127.
–“ Sport Chrono”
Start/stop/reset stopwatch, see page 135. –“
ACC ”
Retrieve adaptive cruise control information,
seepage178.
Activating functions, opening submenus
and accessing setting options from the
main menu areasPress the rotary knob A or push the right lower
lever on the steering wheel forwards (position 1)
to access menus, other functions and setting
options regardless of the main menu area.Browsing through long listsWhen searching for an entry in long telephone and
audio lists on vehicles with PCM, you can skip
directly to other entries with the same first letter.
f Briefly press the rotary knob A or hold the
operating lever in position 3 or 4.
A letter selection screen appears.
Select the desired first letters and confirm.
The marking skips to the first list entry beginning
with the letters selected.1. Select main menu
and confirm.
2. Select function, submenu or setting option
and confirm.
Page 120 of 343

118
Instrument Panel and Multi-Function DisplayVehicle
Audio
Navigation
Map
Phone
Trip
Tire pressure
Sport Chrono
ACC
Info
Oil level
Settings
Limits
Station/track
Destination input
Start/Stop route guidance
Manual zoom
Show destination/position
Auto zoom
3D map
North up
Answer/Reject/End
Phonebook
Previous calls
Received calls
since
consecutive
to destination
Fill info
Tire info
Charge
Comfort press.
Adjust
Start
Stop
Round
IntMessages
Service intervals
Level
Ø Consumption
Display
Light/visibility
Locking
Air conditioning
Date/Time
Units
Language
Volume
Steering wheel op.
Fact. settings
Limit 1/Limit 2
Last destination
Stored destinations
POIs
Res.
Reset
Menu scope
Audio
Vehicle menu
Upper line
PCM display
Lower line
Shift request
Brightness
Exterior lights
Interior lights
Wiper
Revers. opt.
Door unlock
Door lock
Comfort Entry
Climate style
Vent. panel
Center cooler
Automatic air circ.
Time
Date
Summer time
Time Chrono
Speedometer
Temperature
Tire pressure
Boost pressure
Consumption
German/French …
ParkAssist
Warn. tones
Multif. key
Current speed
Setting the speed