Page 63 of 343

Seats, Mirrors and Steering Wheel
61
Steering WheelPDK shift buttonsPorsche Doppelkupplung (PDK) is a seven-speed
transmission with an “automatic” and a “manual”
selection mode.
You can change temporarily to manual mode or
shift gear in manual mode with the shift buttons A
on the steering wheel. For more information on shifting with the
Porsche Doppelkupplung (PDK):
f
Please see the chapter “PORSCHE
DOPPELKUPPLUNG (PDK)” on page 193.
Horn fPress button B to operate the horn.Air bag unitThe air bag unit C is located behind the padded
steering wheel boss.
In conjunction with the seat belts, the air bag is
a safety system designed to provide the driver
with maximum protection from injury in an
accident.
For information on the air bag system:
f Please see the chapter “AIR BAG SYSTEMS” on
page 47.
Heated steering wheelThe steering wheel heatin g can be switched on
and off with the button on the rear of the steering
wheel when the ignition is switched on.Switching steering wheel heating on/offf Press button.
The message “Steering wheel heating
switched on” or “Steering wheel heating
switched off” appears on the multi-function
display for 2 seconds.
Page 64 of 343

62
Seats, Mirrors and Steering Wheel
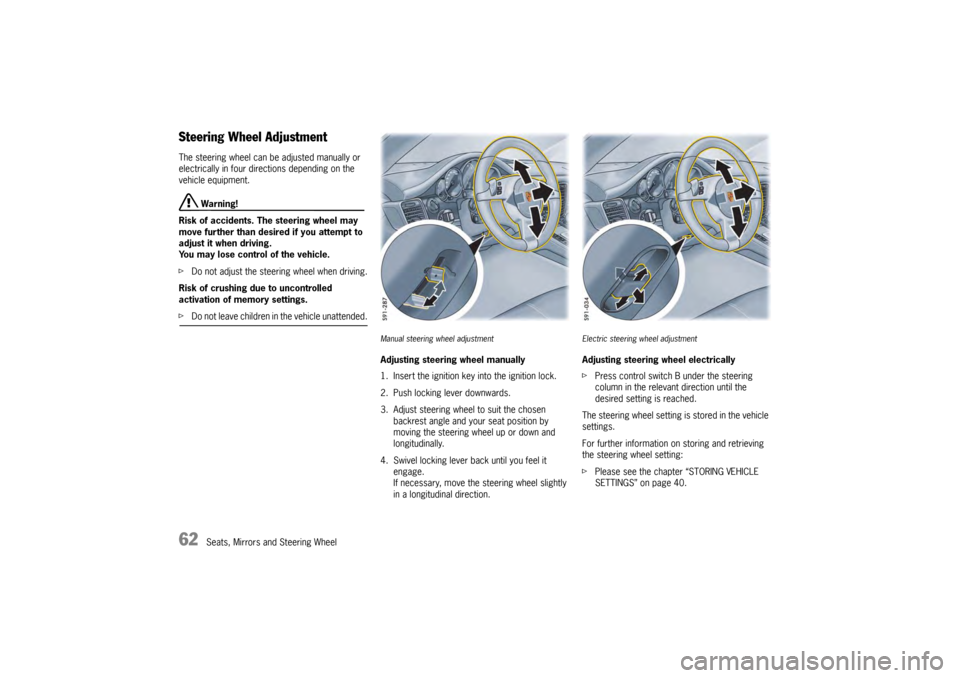
Steering Wheel AdjustmentThe steering wheel can be adjusted manually or
electrically in four directions depending on the
vehicle equipment.
Warning!
Risk of accidents. The steering wheel may
move further than desired if you attempt to
adjust it when driving.
You may lose control of the vehicle.
f Do not adjust the steeri ng wheel when driving.
Risk of crushing due to uncontrolled
activation of memory settings.
f Do not leave children in the vehicle unattended.
Manual steering wheel adjustmentAdjusting steering wheel manually
1. Insert the ignition key into the ignition lock.
2. Push locking lever downwards.
3. Adjust steering wheel to suit the chosen
backrest angle and your seat position by
moving the steering wheel up or down and
longitudinally.
4. Swivel locking lever back until you feel it engage.
If necessary, move the steering wheel slightly
in a longitudinal direction.
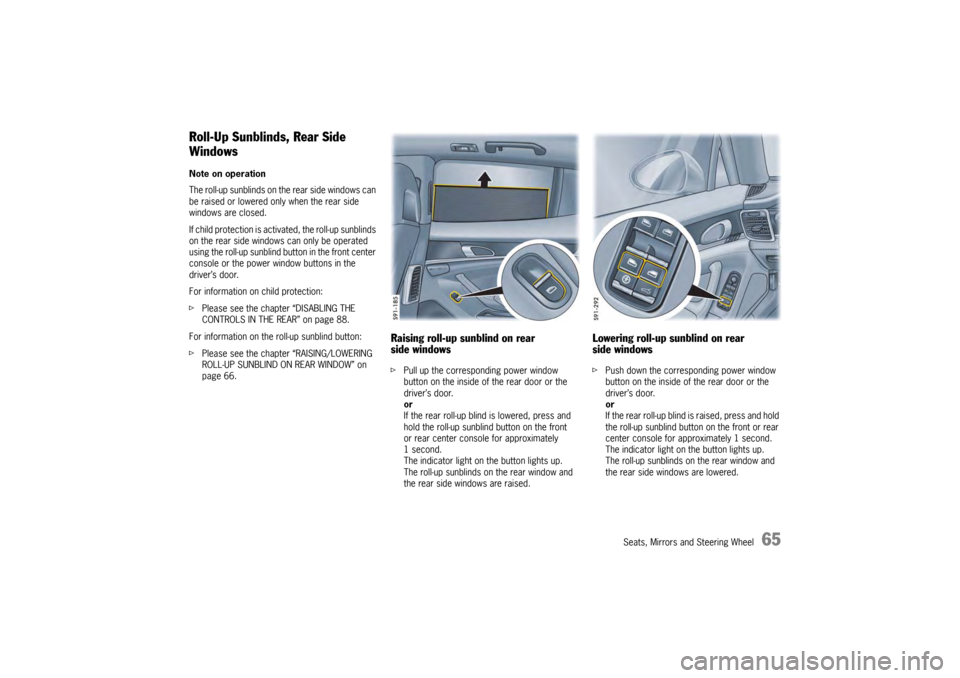
Electric steering wheel adjustmentAdjusting steering wheel electrically
fPress control switch B under the steering
column in the relevant direction until the
desired setting is reached.
The steering wheel setting is stored in the vehicle
settings.
For further information on storing and retrieving
the steering wheel setting:
f Please see the chapter “STORING VEHICLE
SETTINGS” on page 40.
Page 65 of 343

Seats, Mirrors and Steering Wheel
63
Multi-Function Steering Wheel
Warning!
There is a risk of accident if you set or
operate the multi-funct ion display, radio,
navigation system, telephone or other
equipment while driving.
Operating these devices while driving could
distract you from traffic and cause you to
lose control of the vehicle.
f Operate the equipment while driving only if the
traffic situation allows you to do so safely.
f Carry out any complicated operating or setting procedures only when the vehicle is stationary.
Depending on the equipment in your vehicle, you
can use the function keys of the multi-function
steering wheel to operate the following Porsche
communication systems:
– Telephone
–PCM
– Multi-function display in the instrument panel
Readiness for operation of the
multi-function steering wheel– With ignition switched on
f Please observe the operating instructions
supplied for the Porsche communication
systems before operating the function keys.
Note on operation
The Porsche communication systems cannot be
switched on and off using the multi-function
steering wheel.
Function buttons on the multi-function
steering wheelThe rotary buttons at the top left and right of the
steering wheel can also be pressed.
Turn volume control
Upwards – increase volume
Downwards – decrease volume
Press volume control
Switch volume/mute on and off.
Turn rotary knob
Select/highlight the main menu or menu
item on the multi-function display by
turning the rotary knob upward or
downward.
Press rotary knob
Go to submenu or activate selected
function.
Press MFS button
Call up the stored function.
The button can be assigned the desired
function in the multi-fu nction display on the
instrument panel.
Press Back button
Return to the menu.
Press Handset Pickup button
Accept a telephone call.
Press Handset Hangup button
End or refuse a telephone call.
Page 66 of 343
64
Seats, Mirrors and Steering Wheel
Sun VisorsfSwivel the sun visor down to prevent dazzle
from the front.
f If you are dazzled from the side, unclip the sun
visor from the inner brac ket and swivel it round
so that it is in front of the door window.
Vanity MirrorThe vanity mirror on the rear of the sun visor is
closed with a sliding cover.
Caution!
Risk of injury.
f Keep the sliding cover closed while driving.
The vanity mirror lighting is switched on
automatically when the sliding cover is
opened (arrow ).
Page 67 of 343

Seats, Mirrors and Steering Wheel
65
Roll-Up Sunblinds, Rear Side
WindowsNote on operation
The roll-up sunblinds on the rear side windows can
be raised or lowered only when the rear side
windows are closed.
If child protection is activated, the roll-up sunblinds
on the rear side windows can only be operated
using the roll-up sunblind button in the front center
console or the power window buttons in the
driver’s door.
For information on child protection:
f Please see the chapter “DISABLING THE
CONTROLS IN THE REAR” on page 88.
For information on the roll-up sunblind button:
f Please see the chapter “RAISING/LOWERING
ROLL-UP SUNBLIND ON REAR WINDOW” on
page 66.
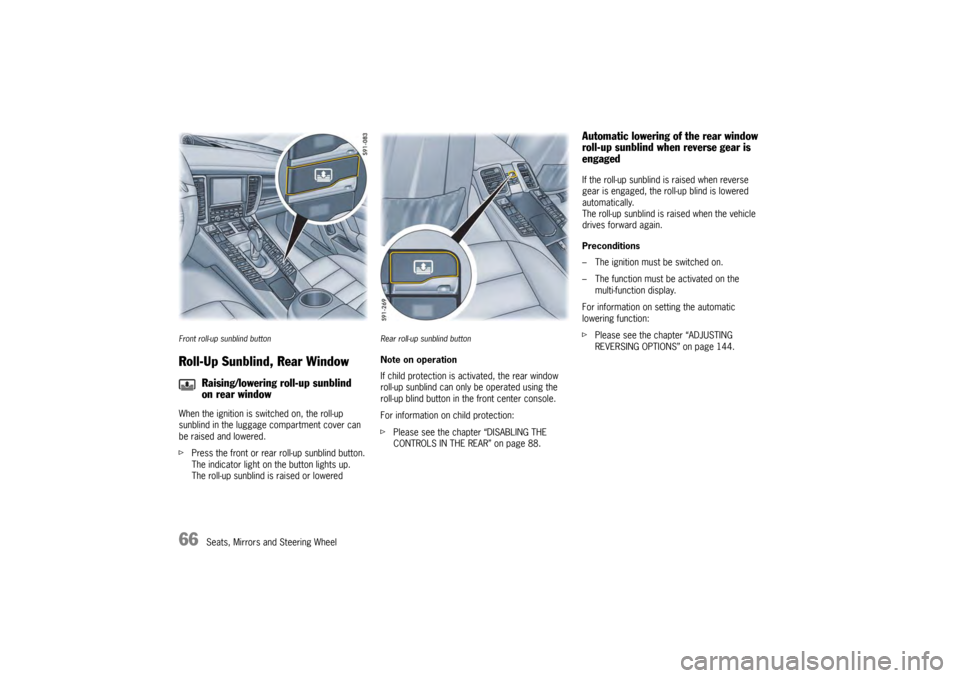
Raising roll-up sunblind on rear
side windowsfPull up the corresponding power window
button on the inside of the rear door or the
driver’s door.
or
If the rear roll-up blind is lowered, press and
hold the roll-up sunblind button on the front
or rear center console for approximately
1second.
The indicator light on the button lights up.
The roll-up sunblinds on the rear window and
the rear side windows are raised.
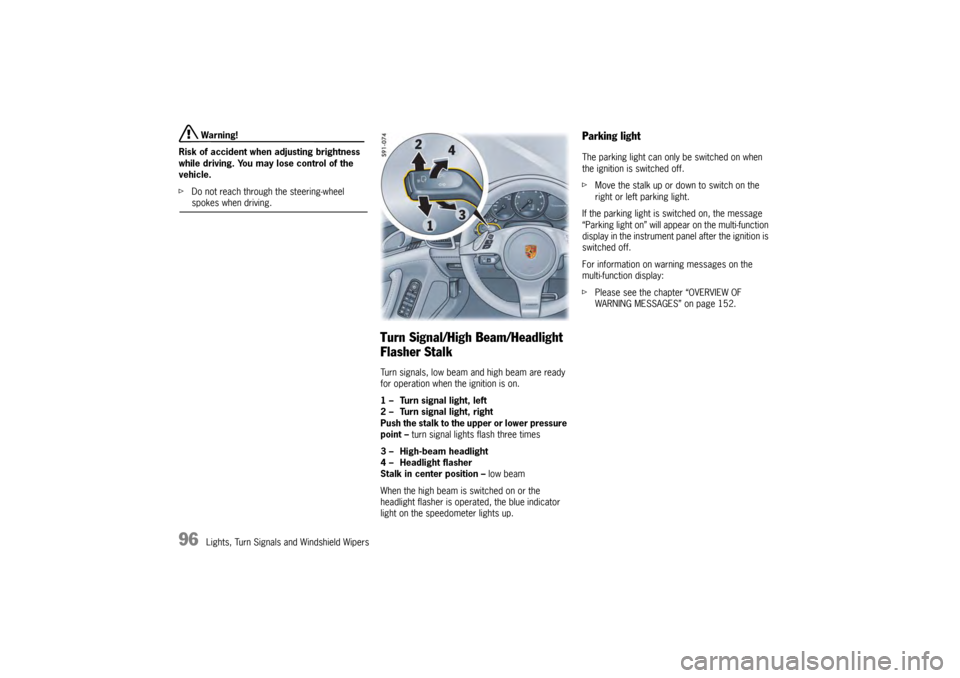
Lowering roll-up sunblind on rear
side windowsf Push down the corresponding power window
button on the inside of the rear door or the
driver’s door.
or
If the rear roll-up blind is raised, press and hold
the roll-up sunblind button on the front or rear
center console for approximately 1 second.
The indicator light on the button lights up.
The roll-up sunblinds on the rear window and
the rear side windows are lowered.
Page 68 of 343

66
Seats, Mirrors and Steering Wheel
Front roll-up sunblind buttonRoll-Up Sunblind, Rear WindowWhen the ignition is switched on, the roll-up
sunblind in the luggage compartment cover can
be raised and lowered.
fPress the front or rear roll-up sunblind button.
The indicator light on the button lights up.
The roll-up sunblind is raised or lowered
Rear roll-up sunblind buttonNote on operation
If child protection is ac tivated, the rear window
roll-up sunblind can only be operated using the
roll-up blind button in the front center console.
For information on child protection:
f Please see the chapter “DISABLING THE
CONTROLS IN THE REAR” on page 88.
Automatic lowering of the rear window
roll-up sunblind when reverse gear is
engagedIf the roll-up sunblind is raised when reverse
gear is engaged, the roll-up blind is lowered
automatically.
The roll-up sunblind is raised when the vehicle
drives forward again.
Preconditions
– The ignition must be switched on.
– The function must be activated on the
multi-function display.
For information on setting the automatic
lowering function:
f Please see the chapter “ADJUSTING
REVERSING OPTIONS” on page 144.
Raising/lowering roll-up sunblind
on rear window
Page 96 of 343

94
Lights, Turn Signals and Windshield Wipers
Automatic headlight levellingWhen the ignition and low beam are switched on,
the level of the headlight beam automatically
changes in accordance with the vehicle load.
The level of the headlight beam is automatically
kept constant during acceleration and braking.
Note on operation
Automatic headlight levellin g is also available
when the light switch is set to the position
(low beam/driving light).
Daytime driving lightsIf the light switch is in po sition (light switched
off), the daytime driving lights are switched on
automatically when the ignition is switched on.
If the light switch is in position , the daytime
driving lights are switched on automatically during
daylight when the ignition is switched on.
If the light switch is in position (low beam/
driving light), the daytime driving lights are not
active.
You can switch the daytime driving lights on and
off on the multi-function display in the instrument
panel (not available in Canada).
Regulations for switching daytime driving lights on
and off vary according to the legal requirements in
each country.
For information on setting the daytime driving
lights:
f Please see the chapter “ACTIVATING AND
DEACTIVATING AUTOMATIC DAYTIME DRIVING
LIGHTS” on page 142.
Static cornering lightThe static cornering light switches on if the
steering wheel is turned sharply.
Note on operation
The static cornering light is also available when
the light switch is set to the position (driving
light/low beam).Dynamic cornering lightAt speeds greater than 5 mph (8 km/h), the low
beam light is swivelled in the direction of the curve
to illuminate the road more clearly, depending on
the speed of the vehicle and the extent to which
the steering wheel is turned.
In the event of a fault in the dynamic cornering
light, the warning light for the adaptive light
system flashes in the instrument panel and
a warning message appears on the multi-function
display in the instrument panel.
For information on indicator lights and warning
lights on the instrument panel:
fPlease see the chapter “INSTRUMENT PANEL
USA MODELS” on page 107.
For information on warning messages on the
multi-function display:
f Please see the chapter “OVERVIEW OF
WARNING MESSAGES” on page 152.
Page 98 of 343

96
Lights, Turn Signals and Windshield Wipers Warning!
Risk of accident when adjusting brightness
while driving. You may lose control of the
vehicle.
f Do not reach through the steering-wheel spokes when driving.
Turn Signal/High Beam/Headlight
Flasher StalkTurn signals, low beam and high beam are ready
for operation when the ignition is on.
1 – Turn signal light, left
2 – Turn signal light, right
Push the stalk to the upper or lower pressure
point – turn signal lights flash three times
3 – High-beam headlight
4 – Headlight flasher
Stalk in center position – low beam
When the high beam is switched on or the
headlight flasher is operated, the blue indicator
light on the speedometer lights up.
Parking lightThe parking light can only be switched on when
the ignition is switched off.
f Move the stalk up or do wn to switch on the
right or left parking light.
If the parking light is switched on, the message
“Parking light on” will appear on the multi-function
display in the instrument panel after the ignition is
switched off.
For information on warning messages on the
multi-function display:
f Please see the chapter “OVERVIEW OF
WARNING MESSAGES” on page 152.