2009 PORSCHE PANAMERA belt
[x] Cancel search: beltPage 171 of 343

Driving and Driving Safety
169
Auto Start Stop FunctionThe engine stops automatically when the vehicle is
stopped, e.g. at traffic lights or in a traffic jam.
The Auto Start Stop function thus helps to
save fuel.
The ignition stays on even when the engine
switches off automatically. All safety functions
are still available.Stopping the engineThe Auto Start Stop function stops the engine
as soon as the vehicle stops moving.
1. Use the footbrake to hold the vehicle in place.
2. Keep the footbrake pressed.or
Move PDK selector lever to position P.
Preconditions for stopping the engine
– Engine compartment lid closed.
– Driver detected: driver’s seat belt fastened and driver’s door closed.
– PDK selector lever in position D, N or P or
transmission range 1 or 2 selected manually.
– Engine, transmission and battery are at operating temperature.
– Vehicle was driven at a speed of more than approx. 1 mph (2 km/h) for at least
1.5 seconds since the engine last stopped
automatically.
Starting the engineThe Auto Start Stop func tion starts the engine:
f In PDK selector-lever position D, N or manually
selected transmission range 1 or 2:
Release the footbrake.
or
Press the accelerator.
or
f Move PDK selector lever to position R.
You can drive off normally.
Note
The engine will start automatically in certain
situations, e.g. if the vehicle starts rolling, if air
conditioning causes reduced comfort, or if the
brake booster vacuum is reduced.
Starting the engine manually after leaving
the vehicle
If the driver’s seat belt is unbuckled or the driver’s
door is opened after the engine was stopped
automatically, the engine will not start
automatically.
Furthermore, if the brake is released, the engine
has to be started manually.
The message “Please start engine manually”
will appear on the multi-function display in the
instrument panel.
f Please see the chapter “OVERVIEW OF
WARNING MESSAGES” on page 152.
Exceptions for the Auto Start Stop
functionThe Auto Start Stop function is not available in the
following situations, for example:
– When Sport mode is activated.
– When PSM is off.
– In Maneuvering mode.
– When AC MAX mode is activated.
– When the “Windshield defrost” function is active.
– While adjusting the chassis level.
– When the rear fog light is on.
The Auto Start Stop fu nction is available with
limited functionality in the following situations,
for example:
– If the air conditioning or passenger compartment heating is operated at a high
setting or if the defrost function is run for long
time periods.
– If the battery charging condition is low.
– On upward or downward slopes.
– During internal vehicle test procedures, e.g. automatic engine checks.
Note
If one of these situations arises after the engine
has stopped automatically, the engine can be
restarted automatically.
Page 172 of 343

170
Driving and Driving Safety
Switching Auto Start Stop function off
f
Press button .
The indicator light on the button lights up.
The engine’s Auto Stop function is disabled.
Switching Auto Start Stop function on
f Press button .
The indicator light on the button goes out.
The engine stops automatically when the
vehicle stops.
Auto Start Stop function displayIf the engine was stoppe d automatically by the
Auto Start Stop function and if the driver is
detected in the vehicle (driver’s seat belt fastened
and driver’s door closed), the indicator light on the
multi-function display in the instrument panel will
light up green.
If the Auto Stop function is not available or if no
driver is detected in the vehicle after the engine
has stopped automatically (driver’s seat belt open
or driver’s door open), the indicator light on the
multi-function display in the instrument panel will
light up yellow when the vehicle is stationary.
The Auto Start Stop system has detected that:
– At least one precondition for stopping the engine automatically is not met.
or
– There is at least one exception for the Auto Start Stop function.
For information on preconditions for stopping the
engine automatically:
f Please see the chapter “PRECONDITIONS FOR
STOPPING THE ENGINE” on page 169. For information on exceptions for the Auto Start
Stop function:
f
Please see the chapter “EXCEPTIONS FOR
THE AUTO START STOP FUNCTION” on
page 169.
Note
If the indicator light in the multi-function display
continuously lights up yellow when the vehicle is
stopped and if the engine does not stop regularly
when the vehicle is stoppe d despite the fact that
the preconditions for stopping the engine
automatically are met, this may be an indication
that the battery is weak.
f Have the Auto Start Stop system checked the
next time you visit an authorized Porsche
dealer.
Fault reporting
If there is a fault, the warning message “Start/
Stop mode deactivated” will appear on the
multi-function display in the instrument panel.
f Have the fault corrected at an authorized
Porsche dealer.
Switching Auto Start Stop function on
and off
Stopping the engine automatically
and restart readiness
Engine does not stop or is not ready
to restart
Page 173 of 343

Driving and Driving Safety
171
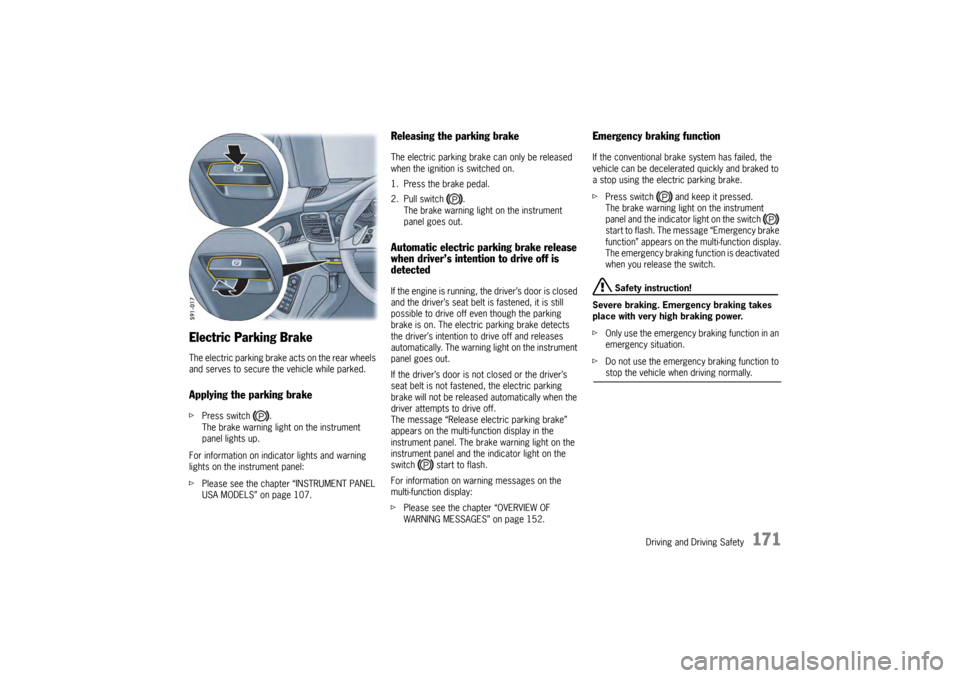
Electric Parking BrakeThe electric parking brake acts on the rear wheels
and serves to secure the vehicle while parked.Applying the parking brakefPress switch .
The brake warning light on the instrument
panel lights up.
For information on indi cator lights and warning
lights on the instrument panel:
f Please see the chapter “INSTRUMENT PANEL
USA MODELS” on page 107.
Releasing the parking brakeThe electric parking brake can only be released
when the ignition is switched on.
1. Press the brake pedal.
2. Pull switch .
The brake warning light on the instrument
panel goes out.Automatic electric parking brake release
when driver’s intention to drive off is
detectedIf the engine is running, the driver’s door is closed
and the driver’s seat belt is fastened, it is still
possible to drive off even though the parking
brake is on. The electric parking brake detects
the driver’s intention to drive off and releases
automatically. The warning light on the instrument
panel goes out.
If the driver’s door is not closed or the driver’s
seat belt is not fastened, the electric parking
brake will not be released automatically when the
driver attempts to drive off.
The message “Release electric parking brake”
appears on the multi-function display in the
instrument panel. The brake warning light on the
instrument panel and the indicator light on the
switch start to flash.
For information on warning messages on the
multi-function display:
fPlease see the chapter “OVERVIEW OF
WARNING MESSAGES” on page 152.
Emergency braking functionIf the conventional brak e system has failed, the
vehicle can be decelerated quickly and braked to
a stop using the electric parking brake.
f Press switch and keep it pressed.
The brake warning light on the instrument
panel and the indicator light on the switch
start to flash. The messa ge “Emergency brake
function” appears on the multi-function display.
The emergency braking function is deactivated
when you release the switch.
Safety instruction!
Severe braking. Emergency braking takes
place with very high braking power.
f Only use the emergency braking function in an
emergency situation.
f Do not use the emergency braking function to stop the vehicle when driving normally.
Page 188 of 343

186
Driving and Driving Safety
Exceptions for adaptive cruise control
Adaptive cruise control is
not available in the
following situations:
– If the ignition is switched off.
– When PSM is off.
– If the driver’s door is opened and the driver’s seat belt is not fastened.
– When parking or maneuvering in very tight spaces.
– If the PDK selector lever is at position N, R or
P .
– On upward or downward slopes of more than 20 %.
– When the electric parking brake is activated.
If one of these exception situations occurs when
adaptive cruise control is switched on, adaptive
cruise control will be switched off.
A message to this effect will appear on the
multi-function display. Messages on the multi-function display
If adaptive cruise control was deactivated
automatically or if an action cannot be performed,
a message to this effect in blue appears on the
multi-function display.
–“
ACC not available! ”
Adaptive cruise control is not available,
e.g. when maneuvering.
–“ ABS/PSM intervention!”
Adaptive cruise control was deactivated
because ABS or PSM intervened as a control
mechanism.
–“ Electric parking brake! ”
Adaptive cruise control was deactivated
because the electric parking brake was
activated.
–“ Selector position!”
Adaptive cruise control was deactivated
because the PDK select or lever is not in
position D or manual position M.
–“ Impossible while parked ”
The required action is not possible because
your vehicle is stationary, e.g. when setting
a desired speed.
–“ Speed! ”
Adaptive cruise control was deactivated
because the rpm limit of the engine was
reached in manual position M of the PDK
selector lever. –“
Gradient too steep! ”
The desired distance or the desired speed
cannot be set because the gradient on the
road is too steep.
–“ Stationary object ”
The action is not possi ble because a stationary
object was detected ahead.
–“ PSM off! ”
Adaptive cruise control is not available
because PSM was switched off.
For information on Porsche Stability
Management (PSM):
f Please see the chapter “PORSCHE STABILITY
MANAGEMENT (PSM)” on page 202.
General information“Sport” and “Sport Plus” mode
Adaptive cruise control regulates your driving
more dynamically in “Sport” and “Sport Plus”
mode.
Page 229 of 343

Storage, Luggage Compartment and Roof Transport System
227
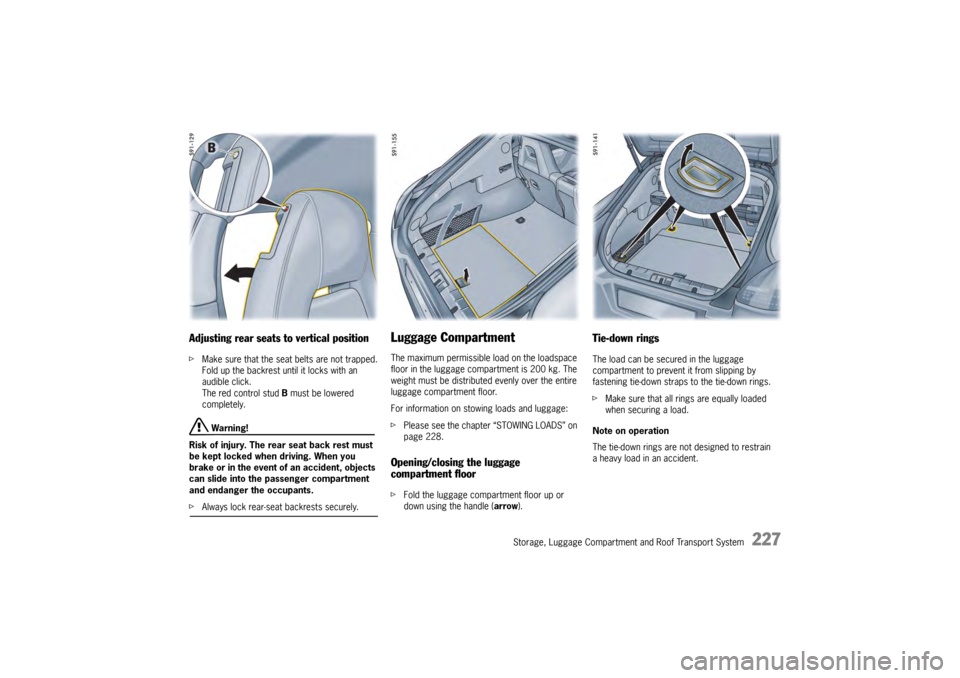
Adjusting rear seats to vertical positionfMake sure that the seat belts are not trapped.
Fold up the backrest until it locks with an
audible click.
The red control stud B must be lowered
completely.
Warning!
Risk of injury. The rear seat back rest must
be kept locked when driving. When you
brake or in the event of an accident, objects
can slide into the passenger compartment
and endanger the occupants.
f Always lock rear-seat backrests securely.
Luggage CompartmentThe maximum permissible load on the loadspace
floor in the luggage compartment is 200 kg. The
weight must be distributed evenly over the entire
luggage compartment floor.
For information on stowing loads and luggage:
fPlease see the chapter “STOWING LOADS” on
page 228.Opening/closing the luggage
compartment floorfFold the luggage compartment floor up or
down using the handle ( arrow).
Tie-down ringsThe load can be secured in the luggage
compartment to prevent it from slipping by
fastening tie-down straps to the tie-down rings.
fMake sure that all ring s are equally loaded
when securing a load.
Note on operation
The tie-down rings are no t designed to restrain
a heavy load in an accident.
Page 230 of 343

228
Storage, Luggage Compartment and Roof Transport System
Stowing Loads
Danger!
Danger of injury. An unsecured or incorrectly
positioned load can slip out of place or
endanger the vehicle occupants during
braking, direction changes or in accidents.
Never transport objects that are not secured.
f Always transport loads in the luggage
compartment, never in the passenger
compartment (e.g. on or in front of the seats).
f Support the load against the seat backrests
wherever possible. Always lock the backrests
into place.
f Only transport heavy objects with the rear seat
backrests upright and engaged.
f Place the load behind unoccupied seats
whenever possible.
f Stow heavy objects as far forward as possible
on the floor, with lightweight objects behind
them.
f Never load the vehicle higher than the top
edge of the seat backrest.
f Always protect the passenger compartment
with a luggage compartment cover. Do not
drive with objects on top of the luggage
compartment cover. f
If the rear seats are not occupied, the
backrests can be addition ally secured with the
seat belts. Simply cro ss the outer seat belts
and insert each into the opposite buckle.
f Make sure that the load cannot damage the
heating filaments and the TV antenna in the
rear window.
Tie-down belts
f Do not use elastic belt s or straps to tie
down a load.
f Do not route belts and straps over
sharp edges.
f Observe the directions for use and information
for the tie-down equipment.
f Use only belts with a tear strength of at least
1543 lbs (700 kg) and a maximum width of
1 in. (25 mm).
f Cross the belts over the load. Driving
f
Vehicle handling changes depending on the
vehicle load. Adapt your driving style to the
changed driving behavior.
f Do not exceed the maximum gross weight
and axle load.
This information can be found under “Technical
data” in this Owner’s Manual:
f Please see the chapter “WEIGHTS” on
page 328.
f Never drive with the tailgate open. Exhaust
gases can enter the passenger compartment.
f Adapt the tire pressure to the load.
After you change the tire pressure, you must
also update the setting for Tire Pressure
Monitoring.
For information on setting Tire Pressure
Monitoring on the multi-function display:
f Please see the chapter “OVERVIEW OF
WARNING MESSAGES” on page 152.
Information on tire pressures for partially and fully
loaded vehicles can be found under “Technical
data” in this Owner’s Manual:
f Please see the chapter “TIRE PRESSURE FOR
COLD TIRES (68 °F/20 °C)” on page 326.
Page 233 of 343

Storage, Luggage Compartment and Roof Transport System
231
Fixed Luggage Compartment
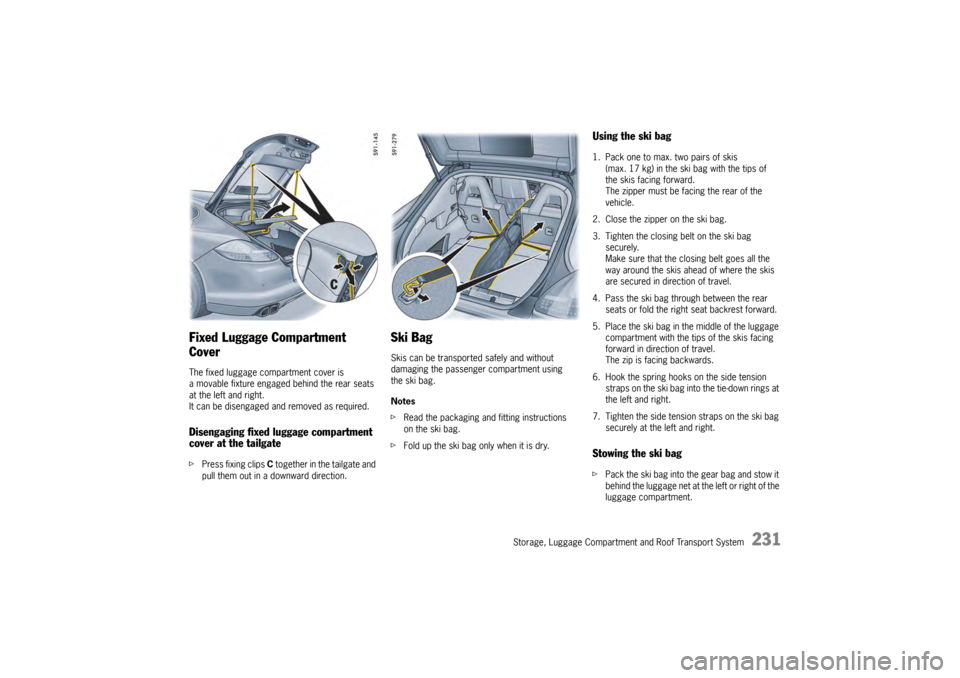
CoverThe fixed luggage compartment cover is
a movable fixture engaged behind the rear seats
at the left and right.
It can be disengaged and removed as required.Disengaging fixed luggage compartment
cover at the tailgatefPress fixing clips C together in the tailgate and
pull them out in a downward direction.
Ski BagSkis can be transported safely and without
damaging the passenger compartment using
the ski bag.
Notes
f Read the packaging and fitting instructions
on the ski bag.
f Fold up the ski bag only when it is dry.
Using the ski bag1. Pack one to max. two pairs of skis
(max. 17 kg) in the ski bag with the tips of
the skis facing forward.
The zipper must be facing the rear of the
vehicle.
2. Close the zipper on the ski bag.
3. Tighten the closing belt on the ski bag securely.
Make sure that the closing belt goes all the
way around the skis ahead of where the skis
are secured in direction of travel.
4. Pass the ski bag through between the rear seats or fold the right seat backrest forward.
5. Place the ski bag in the middle of the luggage compartment with the tips of the skis facing
forward in direction of travel.
The zip is facing backwards.
6. Hook the spring hooks on the side tension straps on the ski bag into the tie-down rings at
the left and right.
7. Tighten the side tension straps on the ski bag securely at the left and right.Stowing the ski bagfPack the ski bag into the gear bag and stow it
behind the luggage net at the left or right of the
luggage compartment.
Page 238 of 343

236
Storage, Luggage Compartment and Roof Transport System
Loading InformationDefinitionsThe rear-axle load is the vehicle weight on the
rear axle plus the weight of the transported load.
The Curb weight - actual weight of your vehicle -
vehicle weight including standard and optional
equipment, fluids, and emergency tools. This
weight does not include passengers and cargo.
The Gross Vehicle Weight is the sum of the curb
weight and the weight of passengers and cargo
combined.
The Gross Vehicle Weight Rating is the
maximum total weight of vehicle, passengers,
luggage, hitch, trailer tongue load and optional
equipment.
The Gross Axle Weight Rating is the maximum
load limit for the front or the rear axle. This
information is located on the safety comliance
sticker located in the dr iver’s side door jamb.
For determining the compat ibility of the tire and
vehicle load capabilities:
f Please see the chapter “TIRES AND WHEELS”
on page 280. The load capacity coefficient (e.g. “106”) is a
minimum requirement. For more information:
f
Please see the chapter “INSCRIPTION ON
RADIAL TIRE” on page 288.
The Gross Combined Weight Rating is the
maximum total weight rating of vehicle,
passengers and cargo.
The Vehicle Capacity Weight - Load Limit - is
the maximum total weight limit specified of the
load (passengers and cargo) for the vehicle. This
is the maximum weight of passengers and cargo
that can be loaded into the vehicle. This infor-
mation can be found on the tire pressure plate.
The maximum loaded vehicle weight is the
sum of curb weight, acce ssory weight, vehicle
capacity weight and production options weight.
The load rating is the maximum load that a tire
is rated to carry for a given inflation pressure.
The maximum load rating is the load rating for
a tire at the maximum permissible inflation
pressure.
The cargo capacity is the permissible weight of
cargo, the subtracted weight of passengers from
the load limit.
f Never exceed the permissible limits.
Danger!
Risk of personal injury or death.
Injuries are much more likely in an accident
if persons ride in the cargo area.
f Persons must ride only on the seats provided
for this purpose.
f Make sure that everybody fastens their safety
belts.
Risk of loss of control, damage to the vehicle
and serious personal injury or death.
f Never exceed the specified axle loads.
Overloading can shorten the service life of the
tires and car, as well as lead to dangerous
vehicle reactions and long braking distances.
Damage due to overloading is not covered by the vehicle warranty.