2009 PORSCHE PANAMERA towing
[x] Cancel search: towingPage 207 of 343

Driving and Driving Safety
205
When you brake in the ABS control range,
the vehicle is stabilised even when PSM is
switched off.
One-sided spinning of the wheels is prevented,
even with PSM switched off.
PSM should always be switched on during
“normal” driving.
H o w e v e r, i t m a y b e a g o o d i d e a to s w it c h o f f P S M
temporarily in exceptional situations:
– On a loose surface and in deep snow.
– When “rocking the vehicle free”.
– When using snow chains.
Tip on driving
The vehicle retains its enhanced braking readiness
through prefilling of the br ake system even when
PSM is switched off.
When PSM is switched off, wheel-specific brake
interventions and the anti-slip control system (ASR)
are also switched off.
The automatic brake differential (ABD) remains on.
Adaptive cruise control is deactivated when PSM
is switched off.
When PSM is switched off, the slip monitoring
function of Porsche Doppelkupplung (PDK) is also
deactivated.
Switching PSM back onf Press button .
PSM is active immediately.
The indicator light on the button and the
PSM OFF warning light on the instrument
panel go out.
The message “PSM switched on” appears on
the multi-function disp lay in the instrument
panel.“Sport Plus” modeA sportier setup is obtained when “Sport Plus”
mode is switched on.
PSM interventions occur later than in Normal
mode. The vehicle can be maneuvered with
greater agility at its pe rformance limits, without
having to dispense with th e assistance of PSM in
emergency situations. This helps to achieve
optimal lap times, particular ly on race circuits and
on a dry road surface. – The PSM warning light on the instrument panel
lights up for a lamp check when the ignition is
switched on.
– The light indicates a control operation, even when PSM is switched off, e.g. brake control in
the event of one-sided wheel spin.
– The light - in conjunction with the multi-function display - indicates a fault.
The warning message “PSM failure” appears
on the multi-function display in the instrument
panel.
For information on warning messages on the multi-
function display:
f Please see the chapter “OVERVIEW OF
WARNING MESSAGES” on page 152.
f Adapt your driving style according to the
changed conditions.
f Contact a qualified spec ialist workshop in
order to correct the fault. We recommend that
you have an authorized Porsche dealer to do
this work, as they have the trained workshop
personnel and the necessary parts and tools
for this type of work.
To w i n g
For information on towing:
f Please see the chapter “TOWING” on
page 316.
PSM warning light
Page 219 of 343
Storage, Luggage Compartment and Roof Transport System
217
Storage, Luggage Compartment and Roof Transport System
Storage ...........................................
.......... 218
Drinks Holder/Cuphold er ............................ 221
Front Ashtray ............... .............................. 224
Rear Ashtray ................ .............................. 224
Cigarette Lighter ..... ................................... 225
Refrigerated box in the re ar of the vehicle .... 226
Folding Rear Seats Forward and Returning
to Upright Position .. ................................... 226
Luggage Compartment . .............................. 227
Stowing Loads ............. .............................. 228
Luggage Compartment Cover ..................... 229
Fixed Luggage Compartm ent Cover............. 231
Ski Bag ....................... .............................. 231
Roof Transport System ............................... 232
Loading Information. ................................... 236
Page 220 of 343
218
Storage, Luggage Compartment and Roof Transport System
Storage
Warning!
Risk of injury during braking, rapid direction
changes or in an accident.
f Do not transport items of luggage or objects
unsecured in the passenger compartment.
f Do not transport any heavy objects in open
storage trays.
f Always keep the covers of the storage trays
closed while driving.
f Always protect the passenger compartment with a luggage compartment cover.
Note on operation
An unsecured or incorrectly positioned load can
slip out of place or endanger the vehicle
occupants during braking, direction changes or
in accidents.
For information on stowing loads and luggage:
f Please see the chapter “STOWING LOADS” on
page 228.
Storage optionsThere are various storage options available,
depending on the vehicle equipment:
– Glove box with pen and paper holder.
– In the front and rear armrests.
– In the door panels.
– In the center console, front and rear.
– On the back of the front seat backrests.
– Clothes hooks on the rear grab handles.
– Under the luggage compartment floor.
– In the front and rear cupholders.
Glove box
Warning!
Risk of injury by the glove box lid in case of
an accident.
f Keep the glove box closed while driving.
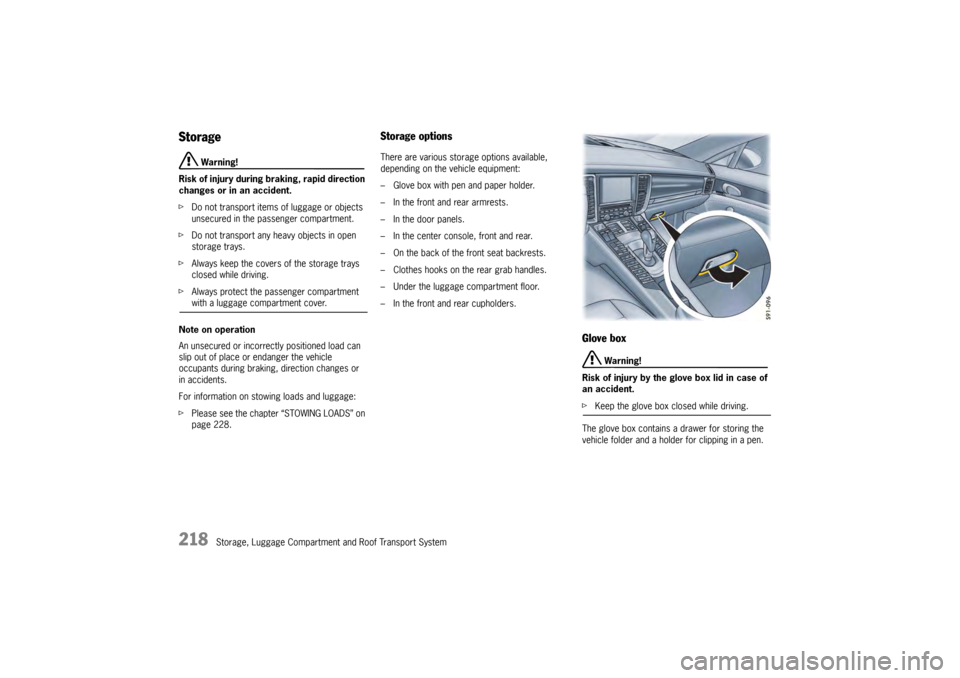
The glove box contains a drawer for storing the
vehicle folder and a holder for clipping in a pen.
Page 223 of 343
Storage, Luggage Compartment and Roof Transport System
221
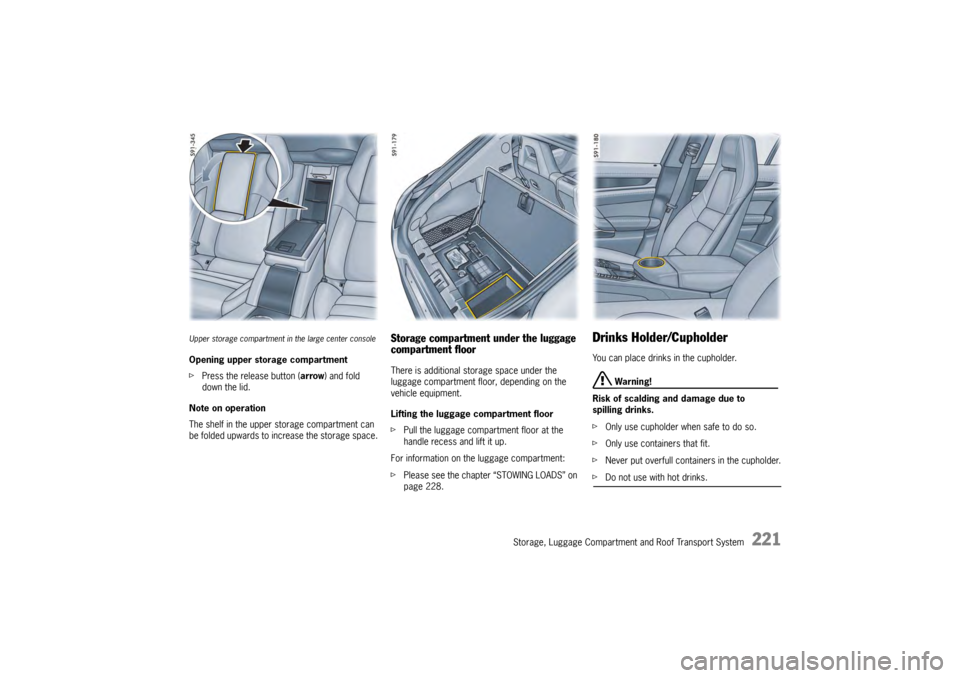
Upper storage compartment in the large center consoleOpening upper storage compartment
fPress the release button ( arrow) and fold
down the lid.
Note on operation
The shelf in the upper storage compartment can
be folded upwards to increase the storage space.
Storage compartment under the luggage
compartment floorThere is additional storage space under the
luggage compartment floor, depending on the
vehicle equipment.
Lifting the luggage compartment floor
f Pull the luggage compartment floor at the
handle recess and lift it up.
For information on the luggage compartment:
f Please see the chapter “STOWING LOADS” on
page 228.
Drinks Holder/CupholderYou can place drinks in the cupholder.
Warning!
Risk of scalding and damage due to
spilling drinks.
f Only use cupholder when safe to do so.
f Only use containers that fit.
f Never put overfull containers in the cupholder.
fDo not use with hot drinks.
Page 229 of 343
Storage, Luggage Compartment and Roof Transport System
227
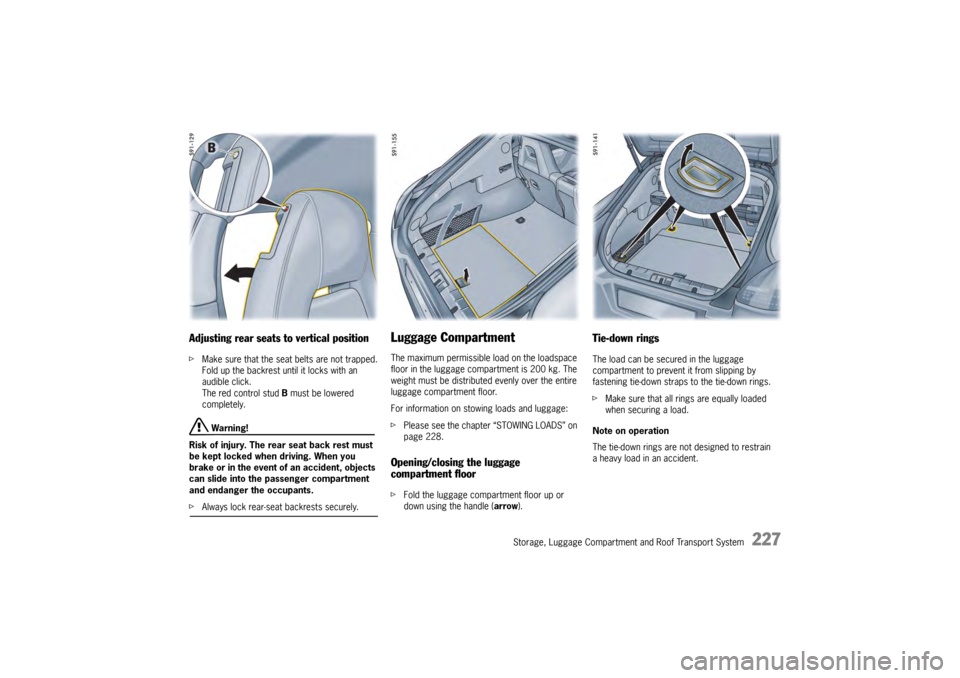
Adjusting rear seats to vertical positionfMake sure that the seat belts are not trapped.
Fold up the backrest until it locks with an
audible click.
The red control stud B must be lowered
completely.
Warning!
Risk of injury. The rear seat back rest must
be kept locked when driving. When you
brake or in the event of an accident, objects
can slide into the passenger compartment
and endanger the occupants.
f Always lock rear-seat backrests securely.
Luggage CompartmentThe maximum permissible load on the loadspace
floor in the luggage compartment is 200 kg. The
weight must be distributed evenly over the entire
luggage compartment floor.
For information on stowing loads and luggage:
fPlease see the chapter “STOWING LOADS” on
page 228.Opening/closing the luggage
compartment floorfFold the luggage compartment floor up or
down using the handle ( arrow).
Tie-down ringsThe load can be secured in the luggage
compartment to prevent it from slipping by
fastening tie-down straps to the tie-down rings.
fMake sure that all ring s are equally loaded
when securing a load.
Note on operation
The tie-down rings are no t designed to restrain
a heavy load in an accident.
Page 230 of 343

228
Storage, Luggage Compartment and Roof Transport System
Stowing Loads
Danger!
Danger of injury. An unsecured or incorrectly
positioned load can slip out of place or
endanger the vehicle occupants during
braking, direction changes or in accidents.
Never transport objects that are not secured.
f Always transport loads in the luggage
compartment, never in the passenger
compartment (e.g. on or in front of the seats).
f Support the load against the seat backrests
wherever possible. Always lock the backrests
into place.
f Only transport heavy objects with the rear seat
backrests upright and engaged.
f Place the load behind unoccupied seats
whenever possible.
f Stow heavy objects as far forward as possible
on the floor, with lightweight objects behind
them.
f Never load the vehicle higher than the top
edge of the seat backrest.
f Always protect the passenger compartment
with a luggage compartment cover. Do not
drive with objects on top of the luggage
compartment cover. f
If the rear seats are not occupied, the
backrests can be addition ally secured with the
seat belts. Simply cro ss the outer seat belts
and insert each into the opposite buckle.
f Make sure that the load cannot damage the
heating filaments and the TV antenna in the
rear window.
Tie-down belts
f Do not use elastic belt s or straps to tie
down a load.
f Do not route belts and straps over
sharp edges.
f Observe the directions for use and information
for the tie-down equipment.
f Use only belts with a tear strength of at least
1543 lbs (700 kg) and a maximum width of
1 in. (25 mm).
f Cross the belts over the load. Driving
f
Vehicle handling changes depending on the
vehicle load. Adapt your driving style to the
changed driving behavior.
f Do not exceed the maximum gross weight
and axle load.
This information can be found under “Technical
data” in this Owner’s Manual:
f Please see the chapter “WEIGHTS” on
page 328.
f Never drive with the tailgate open. Exhaust
gases can enter the passenger compartment.
f Adapt the tire pressure to the load.
After you change the tire pressure, you must
also update the setting for Tire Pressure
Monitoring.
For information on setting Tire Pressure
Monitoring on the multi-function display:
f Please see the chapter “OVERVIEW OF
WARNING MESSAGES” on page 152.
Information on tire pressures for partially and fully
loaded vehicles can be found under “Technical
data” in this Owner’s Manual:
f Please see the chapter “TIRE PRESSURE FOR
COLD TIRES (68 °F/20 °C)” on page 326.
Page 233 of 343
Storage, Luggage Compartment and Roof Transport System
231
Fixed Luggage Compartment
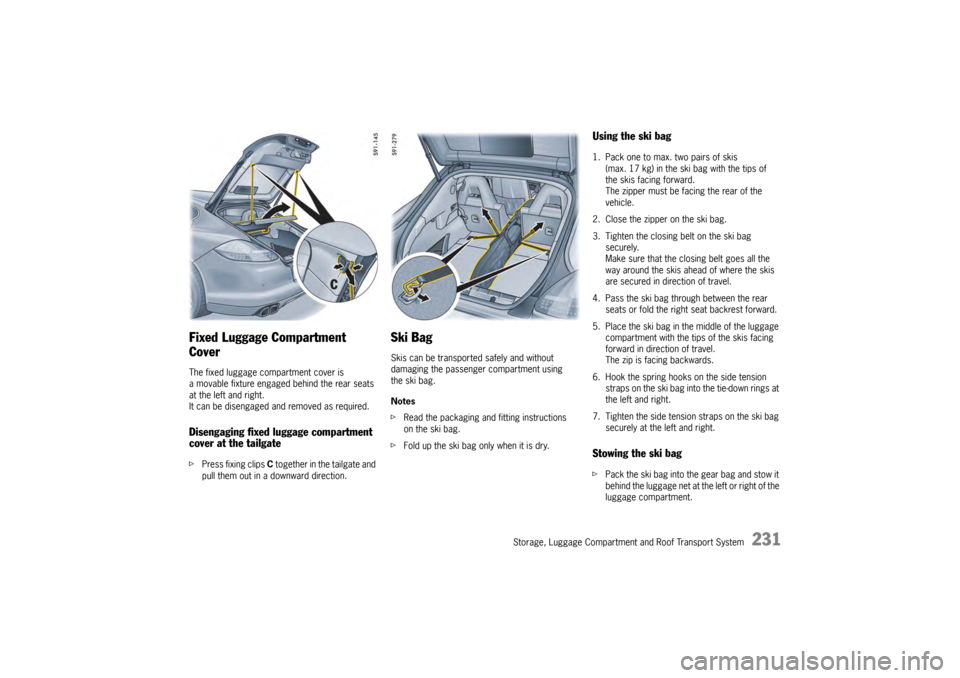
CoverThe fixed luggage compartment cover is
a movable fixture engaged behind the rear seats
at the left and right.
It can be disengaged and removed as required.Disengaging fixed luggage compartment
cover at the tailgatefPress fixing clips C together in the tailgate and
pull them out in a downward direction.
Ski BagSkis can be transported safely and without
damaging the passenger compartment using
the ski bag.
Notes
f Read the packaging and fitting instructions
on the ski bag.
f Fold up the ski bag only when it is dry.
Using the ski bag1. Pack one to max. two pairs of skis
(max. 17 kg) in the ski bag with the tips of
the skis facing forward.
The zipper must be facing the rear of the
vehicle.
2. Close the zipper on the ski bag.
3. Tighten the closing belt on the ski bag securely.
Make sure that the closing belt goes all the
way around the skis ahead of where the skis
are secured in direction of travel.
4. Pass the ski bag through between the rear seats or fold the right seat backrest forward.
5. Place the ski bag in the middle of the luggage compartment with the tips of the skis facing
forward in direction of travel.
The zip is facing backwards.
6. Hook the spring hooks on the side tension straps on the ski bag into the tie-down rings at
the left and right.
7. Tighten the side tension straps on the ski bag securely at the left and right.Stowing the ski bagfPack the ski bag into the gear bag and stow it
behind the luggage net at the left or right of the
luggage compartment.
Page 279 of 343
Minor Repairs
277
Minor Repairs
Exercise Extreme Caution when Working
on your Vehicle .......
................................... 278
Tires and Wheels..... ................................... 280
Wheel Bolts ................ .............................. 293
Flat Tire .................. ................................... 293
Electrical System .... ................................... 296
Battery ............................................ .......... 303
External Power Supply, Jump-Lead
Starting ........................................... .......... 306
Changing the Remote Co ntrol Battery .......... 307
Replacing Bulbs ...... ................................... 308
Headlights ....................................... .......... 308
Side Turn Signal Ligh t................................. 312
Licence Plate Lights ................................... 313
Side Marker Light .... ................................... 313
Changing Light-Emitting Diodes and
Long-Life Bulbs ......................................... 314
Headlight Adjustment .................................. 314
Towing ........................ .............................. 316
Fire Extinguisher .......................... .............. 321