2009 PORSCHE PANAMERA Pressure
[x] Cancel search: PressurePage 113 of 343

Instrument Panel and Multi-Function Display
111
Coolant level warningThe temperature gauge warning light flashes if the
coolant level is too low.
The warning message “Check coolant level” also
appears on the multi-function display in the
instrument panel
f Switch off engine and allow to cool.
f Add coolant.
If the coolant level is too low, warning indicators
may light up if the vehicle tilts at an extreme angle
(e.g. steep slopes) or generates high lateral
acceleration while travelling round long bends
(e.g. driving in circles). If the warnings do not
disappear once the vehicle has assumed “normal”
operating state, check the coolant level.
f Please see the chapter “CHECKING COOLANT
LEVEL AND ADDING COOLANT” on page 257.
f Please see the chapter “OVERVIEW OF
WARNING MESSAGES” on page 152.
Caution!
Risk of engine damage.
f Do not continue driving if the warning persists
even when the engine coolant level is correct.
fHave the fault corrected.
F – Engine Oil Pressure GaugeThe oil pressure is controlled according to
requirements and should be at least 29 psi
(2.0 bar) at an engine speed of 3,000 rpm and
at least 44 psi (3.0 bar) at an engine speed of
5,000 rpm.
The engine oil pressure varies depending on the
engine speed, oil temperature and engine load.
If oil pressure drops abruptly and a message
is displayed on the multi-function display
when the engine is running or while driving:
f Stop immediately in a suitable place.
f Switch off the engine.
f Check whether there is an obvious oil leak on
or under the car.
f Select “Oil level ” on the multi-function display.
f Please see the chapter “OIL LEVEL DISPLAY
AND MEASUREMENT OF THE ENGINE OIL
LEVEL” on page 121.
f Add engine oil if necessary.
Caution!
Risk of engine damage.
f Do not continue driving if there is an obvious
oil leak.
f Do not continue driving if the warning message
appears even when the oil level is correct.
f Have the fault corrected.
Please contact a qualified specialist workshop.
We recommend that you have an authorized
Porsche dealer to do this work as they have
trained workshop personnel and the necessary parts and tools.
G – Fuel GaugeThe fuel gauge displays the contents of the tank
when the ignition is on.
For information on fuel qu ality and refill capacities:
f Please see the chapter “FILLING CAPACITIES”
on page 329.
For information on fuel and refuelling:
f Please see the chapter “FUEL” on page 265.
If the vehicle’s inclination changes (e.g. uphill/
downhill driving), minor deviations in the gauge
may occur.
Page 117 of 343

Instrument Panel and Multi-Function Display
115
Operating the Multi-Function
Display in the Instrument PanelOn the multi-function display, you can view
information relating to the relevant vehicle
equipment, operate the audio source (radio, CD,
iPod, etc.), check the oil level, check the tire
pressure, use the stopwatch or operate the
navigation system.
You can also modify different vehicle settings in
the Vehicle menu.
It is not possible to desc ribe all details of the
functions in this Owner’s Manual. The examples
clearly demonstrate the functional principle and
clarify the menu structure.
Warning!
There is a risk of accident if you set or
operate the multi-funct ion display, radio,
navigation system, telephone or other
equipment while driving. Operating these
devices while driving could distract you from
traffic and cause you to lose control of the
vehicle.
f Operate the equipment while driving only if the
traffic situation allows you to do so safely.
f Carry out any complicated operating or setting procedures only when the vehicle is stationary.
Multi-function displayNote on operation
The multi-function display is only active when the
ignition is on.
Certain menus are only available when the vehicle
has stopped e.g. the adjustment menu for tire
pressure monitoring.
Operating principle on vehicles with
multi-function steering wheelThe multi-function display is operated using the
rotary knob A , the Back button B and the MFS
button C, which can be assigned as required.
Selecting menu, function, setting option
f Turn rotary knob A upwards or downwards.
Confirming selection (Enter)
f Press rotary knob A .
Moving back one or several selection levels
f Press button B (Back button).
Page 119 of 343

Instrument Panel and Multi-Function Display
117
For information on adapting the multi-function
display:
fPlease see the chapter “ADAPTING
APPEARANCE OF MULTI-FUNCTION DISPLAY”
on page 139.
Title area with menu indicator
The menu item currently selected is displayed in
the title area.
The menu indicator on the right shows the position
of the current menu item in the overall menu and
displays the number of other menu items on this
menu level.
The wider the menu indicator, the fewer menu
items the current menu contains.
Information area
The information area C displays the menu items
currently available for selection or after a menu
item is selected, information relating to this menu
item or other selection options.
Overview of menus in the multi-function
displayThe following main menu areas are available
depending on the vehicle equipment.
–“ Vehicle ”
Retrieve vehicle inform ation, check oil level,
adjust settings, adapt speed limits,
see page 119.
–“ Audio”
Display/select radio station or track,
see page 123.
–“ Navigation ”
Retrieve navigation information, enter
navigation destination, start/finish navigation,
see page 123.
–“ Map ”
Show/adapt the map display for navigation,
see page 124.
–“ Phone ”
Make telephone calls, see page 125.
–“ Tr i p”
Retrieve/reset trip information, see page 126.
–“ Tire pressure ”
Retrieve tire pressure information, modify Tire
Pressure Monitoring settings, see page 127.
–“ Sport Chrono”
Start/stop/reset stopwatch, see page 135. –“
ACC ”
Retrieve adaptive cruise control information,
seepage178.
Activating functions, opening submenus
and accessing setting options from the
main menu areasPress the rotary knob A or push the right lower
lever on the steering wheel forwards (position 1)
to access menus, other functions and setting
options regardless of the main menu area.Browsing through long listsWhen searching for an entry in long telephone and
audio lists on vehicles with PCM, you can skip
directly to other entries with the same first letter.
f Briefly press the rotary knob A or hold the
operating lever in position 3 or 4.
A letter selection screen appears.
Select the desired first letters and confirm.
The marking skips to the first list entry beginning
with the letters selected.1. Select main menu
and confirm.
2. Select function, submenu or setting option
and confirm.
Page 120 of 343

118
Instrument Panel and Multi-Function DisplayVehicle
Audio
Navigation
Map
Phone
Trip
Tire pressure
Sport Chrono
ACC
Info
Oil level
Settings
Limits
Station/track
Destination input
Start/Stop route guidance
Manual zoom
Show destination/position
Auto zoom
3D map
North up
Answer/Reject/End
Phonebook
Previous calls
Received calls
since
consecutive
to destination
Fill info
Tire info
Charge
Comfort press.
Adjust
Start
Stop
Round
IntMessages
Service intervals
Level
Ø Consumption
Display
Light/visibility
Locking
Air conditioning
Date/Time
Units
Language
Volume
Steering wheel op.
Fact. settings
Limit 1/Limit 2
Last destination
Stored destinations
POIs
Res.
Reset
Menu scope
Audio
Vehicle menu
Upper line
PCM display
Lower line
Shift request
Brightness
Exterior lights
Interior lights
Wiper
Revers. opt.
Door unlock
Door lock
Comfort Entry
Climate style
Vent. panel
Center cooler
Automatic air circ.
Time
Date
Summer time
Time Chrono
Speedometer
Temperature
Tire pressure
Boost pressure
Consumption
German/French …
ParkAssist
Warn. tones
Multif. key
Current speed
Setting the speed
Page 129 of 343

Instrument Panel and Multi-Function Display
127
Tire Pressure Monitoring (TPM)Each tire should be checked monthly when cold
and inflated to the inflation pressure
recommended by Porsche on the tire inflation
pressure label.
For information on the tire inflation pressure label:
fPlease see the chapter “TIRES AND WHEELS”
on page 280.
As an added safety feature, your vehicle has been
equipped with a tire pressure monitoring system
(TPM) that illuminates a low tire pressure telltale
(warning light) when one or more of your tires is
significantly under-inflated.
Accordingly, when the low tire pressure telltale
illuminates, you should stop and check your tires
as soon as possible, an d inflate them to the
proper pressure. Driving on a significantly under-
inflated tire causes the tire to overheat and can
lead to tire failure. Under-inflation also reduces
fuel efficiency and tire tread life, and may affect
the vehicle’s handling and stopping ability.
However, the tire pressure must still be set
manually on the wheel.
f Please see the chapter “TIRE PRESSURE FOR
COLD TIRES (68 °F/20 °C)” on page 326.
Danger!
Risk of serious personal injury or death.
Driving the vehicle with low tire pressure
increases the risk of a tire failure and
resulting loss of control. Furthermore, low
tire pressure increases rate of wear of the
affected tires.
Please note that the Tire Pressure Monitoring
is not a substitute for proper tire
maintenance, and it is the driver's
responsibility to maintain correct tire
pressure, even if under-inflation has not
reached the level to trigger illumination of
Tire Pressure Monitoring low tire pressure
telltale. Low tire pressure reduces the road
safety of the vehicle and destroys the tire and
wheel.
Tire Pressure Monitoring gives a warning
about tire damage caused by a natural loss
in pressure as well as about a gradual loss of
pressure caused by foreign objects.
Tire Pressure Monitoring cannot warn you
about tire damage that occurs suddenly (e.g.
flat tire due to abrupt external effects).
f When a red tire pressure warning appears,
stop immediately in a suitable place and check
the tires for damage. If necessary, remedy the
damage with a tire sealant.
f Do not by any means continue to drive with
defective tires. f
Sealing the tire with tire sealant is only an
emergency repair so you can drive to the
nearest specialist workshop.
The permitted top speed is 50 mph
(80 km/h) .
f Do not drive with tires in which the tire
pressure drops again very quickly. In case of
doubt, have tires checked by a specialist
workshop.
f Defective tires must be replaced immediately
at an authorized Porsche dealer.
Tires must never be repaired under any
circumstances.
f If Tire Pressure Monitoring is defective
(e.g. defective wheel transmitter), contact an
authorized Porsche dealer immediately and
have the damage repaired.
The tire pressure will not be monitored at all
or will be monitored only partially when Tire
Pressure Monitoring is defective.
For information on warning messages on the multi-
function display:
f Please see the chapter “OVERVIEW OF
WARNING MESSAGES” on page 152.
f Incomplete entries or selection of the wrong
tires on the multi-function display affect the
accuracy of warnings and messages.
The settings in the tire pressure menu must be
updated following a wheel change or changes
in vehicle loading.
Page 130 of 343

128
Instrument Panel and Multi-Function Display
f
Use only the pressure differences shown in the
“Fill info” display in the tire pressure menu or
from the corresponding tire pressure warning
when correcting the tire pressure.
f Tires can lose air over time without a tire
defect being present. A tire pressure warning
will then appear on the multi-function display.
Check the tire pressure at the next opportunity.
Warning!
Your vehicle has also been equipped with a TPM
malfunction indicator to in dicate when the system
is not operating properly.
The TPM malfunction indicator is combined with
the low tire pressure telltale.
When the system detects a malfunction, the
telltale will flash for approximately one minute and
then remain continuously illuminated. This
sequence will continue upon subsequent vehicle
start-ups as long as the malfunction exists.
When the malfunction indicator is illuminated, the
system may not be able to detect or signal low tire
pressure as intended.
TPM malfunctions may occur for a variety of
reasons, including the installation of replacement
or alternate tires or wheels on the vehicle that
prevent the TPM from functioning properly.
f Always check the TPM malfunction telltale after
replacing one or more tires or wheels on your
vehicle to ensure that the replacement or
alternate tires and wheels allow the TPM to continue to function properly. The warning light in the instrument panel lights up:
– When a loss in pressure has been detected.
– In the event of a defect in Tire Pressure
Monitoring or a temporary fault.
– When learning new fitted wheels/wheel transmitters, as long as the vehicle’s own
wheels have not ye t been recognized.
The tire pressure warning light on the instrument
panel goes out only when the cause of the fault
has been rectified.Warning light
Page 131 of 343

Instrument Panel and Multi-Function Display
129
Functional description of Tire Pressure
Monitoring
Tire Pressure Monitoring offers the following
functions:
– Display of the actual tire pressure while the vehicle is in motion.
–“ Fill info ” display:
Display of the deviation from the required
pressure (refilling pressure) at standstill.
–“ Tire info ” display:
Display of current settings (when the vehicle is
stationary).
– Tire pressure warnings in two stages (yellow and red warning).
Selecting the Tire pressure function on the
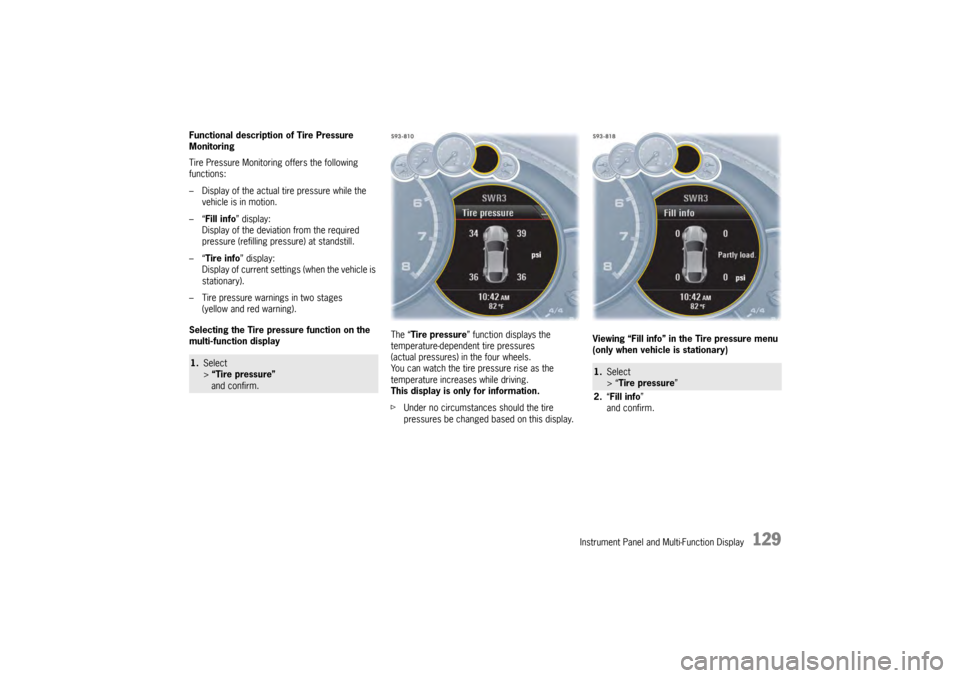
multi-function display The “
Tire pressure ” function displays the
temperature-dependent tire pressures
(actual pressures) in the four wheels.
You can watch the tire pressure rise as the
temperature increases while driving.
This display is only for information.
f Under no circumstances should the tire
pressures be changed based on this display. Viewing “Fill info” in the Tire pressure menu
(only when vehicle is stationary)1.
Select
> “Tire pressure”
and confirm.
1. Select
> “Tire pressure ”
2. “Fill info ”
and confirm.
Page 132 of 343

130
Instrument Panel and Multi-Function Display
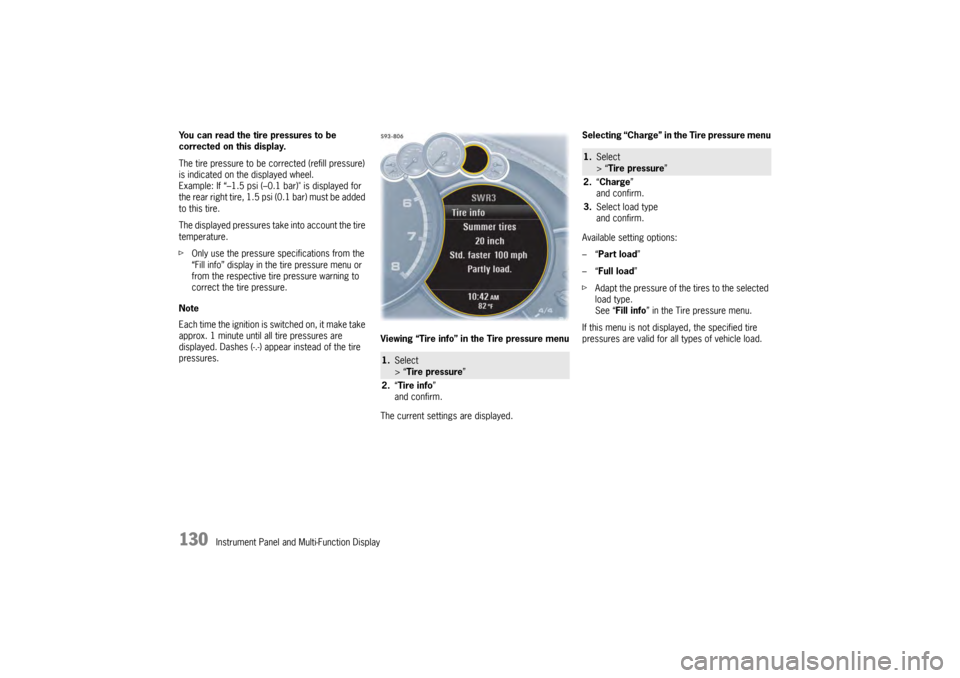
You can read the tire pressures to be
corrected on this display.
The tire pressure to be corrected (refill pressure)
is indicated on the displayed wheel.
Example: If “–1.5 psi (–0.
1 bar)" is displayed for
the rear right tire, 1.5 psi (0.1 bar) must be added
to this tire.
The displayed pressures take into account the tire
temperature.
f Only use the pressure specifications from the
“Fill info” display in the tire pressure menu or
from the respective tire pressure warning to
correct the tire pressure.
Note
Each time the ignition is switched on, it make take
approx. 1 minute until all tire pressures are
displayed. Dashes (-.-) appear instead of the tire
pressures. Viewing “Tire info” in the Tire pressure menu
The current settings are displayed.Selecting “Charge” in the Tire pressure menu
Available setting options:
–“
Part load ”
–“ Full load ”
f Adapt the pressure of the tires to the selected
load type.
See “ Fill info ” in the Tire pressure menu.
If this menu is not displayed, the specified tire
pressures are valid for al l types of vehicle load.
1.Select
> “Tire pressure ”
2. “Tire info ”
and confirm.
1. Select
> “Tire pressure ”
2. “Charge”
and confirm.
3. Select load type
and confirm.