2009 PORSCHE CAYMAN change time
[x] Cancel search: change timePage 82 of 284
80
Operation, SafetyWarning chime
If the ignition key is withdrawn and the door is
opened while the lights (not the Welcome Home
lighting) are on, a
chime warns of possible bat-
tery discharge.
In some countries, differences are possible
due to provisions of law.
Vehicles with the Sport Chrono Package Plus
Further individual light functions are available in ve-
hicles with the Sport Chrono Package Plus.
f Please observe the chapter “Individual
Memory” in the separate PCM operating
instructions.
Daytime driving lightsUSA only:
The daytime driving lights can be activated/deacti-
vated in the on-board computer.
fPlease see the chapter “ON-BOARD
COMPUTER (BC)” on Page 134.Welcome Home LightingSwitching on
fMove light switch to the HOME position.
For improved visibility and security when you get
in and out of the car, the fog lights and the tail
lights remain on for a certain period of time:
– When you get out of the car , the lights are
turned on for approx. 30 seconds after the
door is opened. The off-delay time resumes
when the vehicle is locked.
On vehicles with the Sport Chrono Package
Plus, the PCM can be used to set the off-delay
time. This setting also changes the lighting
period for unlocking the vehicle.
Please observe the chapter “Individual
Memory” in the separate PCM operating
instructions.
– The lights are turned on for approx. 30 seconds when the vehicle is unlocked .
The lights go out if the ignition is switched on
or when leaving the Welcome Home lighting.
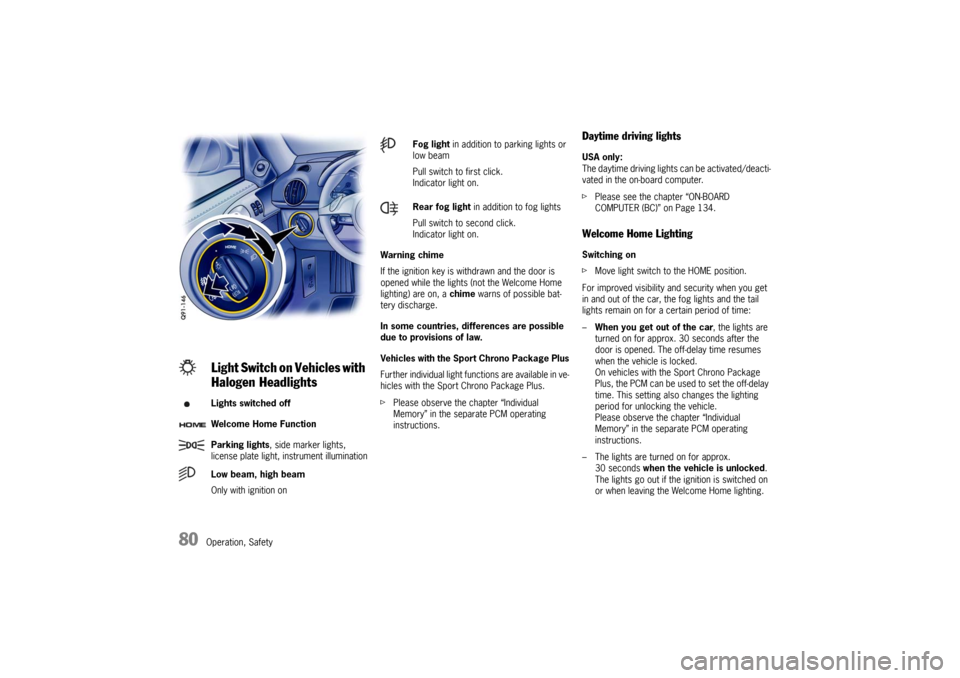
Light Switch on Vehicles with
Halogen HeadlightsLights switched off
Welcome Home Function
Parking lights , side marker lights,
license plate light, instrument illumination
Low beam, high beam
Only with ignition on
Fog light in addition to parking lights or
low beam
Pull switch to first click.
Indicator light on.
Rear fog light in addition to fog lights
Pull switch to second click.
Indicator light on.
Page 83 of 284
Operation, Safety
81
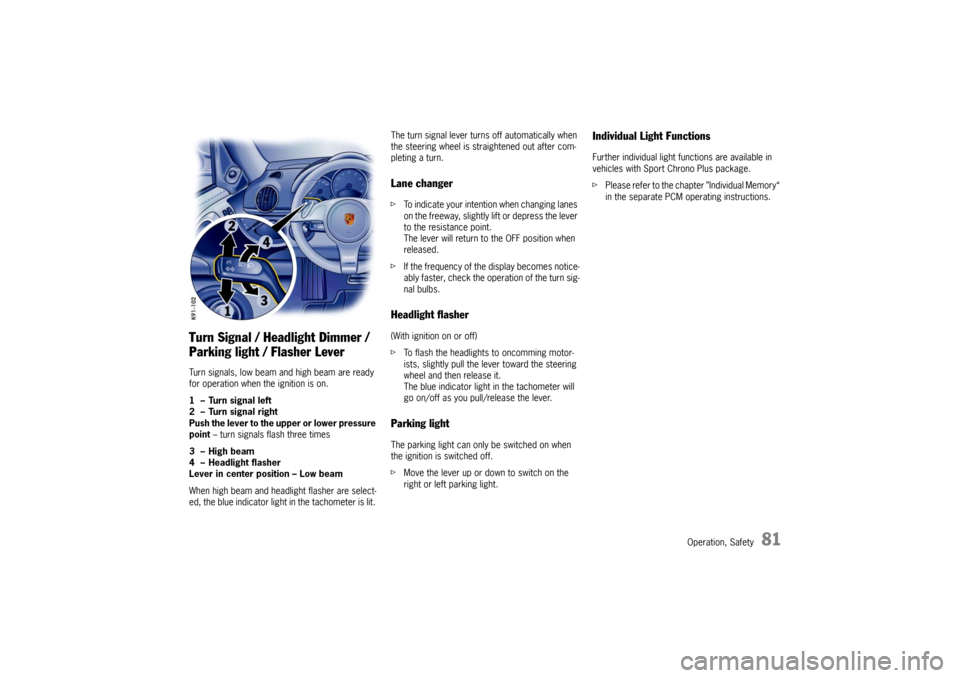
Turn Signal / Headlight Dimmer /
Parking light / Flasher Lever Turn signals, low beam and high beam are ready
for operation when the ignition is on.
1 – Turn signal left
2 – Turn signal right
Push the lever to the upper or lower pressure
point – turn signals flash three times
3 – High beam
4 – Headlight flasher
Lever in center position – Low beam
When high beam and head light flasher are select-
ed, the blue indicator light in the tachometer is lit. The turn signal lever turns off automatically when
the steering wheel is st
raightened out after com-
pleting a turn.
Lane changer f To indicate your intention when changing lanes
on the freeway, slightly lift or depress the lever
to the resistance point.
The lever will return to the OFF position when
released.
f If the frequency of the display becomes notice-
ably faster, check the operation of the turn sig-
nal bulbs. Headlight flasher (With ignition on or off)
fTo flash the headlights to oncomming motor-
ists, slightly pull the lever toward the steering
wheel and then release it.
The blue indicator light in the tachometer will
go on/off as you pull/release the lever. Parking lightThe parking light can only be switched on when
the ignition is switched off.
fMove the lever up or down to switch on the
right or left parking light.
Individual Light FunctionsFurther individual light functions are available in
vehicles with Sport Chrono Plus package.
f Please refer to the chapter ”Individual Memory“
in the separate PCM operating instructions.
Page 103 of 284

Operation, Safety
101
Porsche Communication
Management (PCM) fRefer to the separate operating instructions
before putting the PCM into operation.
f Please see the chapter “LOAD SWITCH-OFF
AFTER 2 HOURS OR 7 DAYS” on Page 236.
Warning!
There is a danger of accident if you set or
operate the on-board computer, radio, navi-
gation system, telephone or other equipment
when driving.
This could distract you from the traffic and
cause you to lose control of the vehicle re-
sulting in serious personal injury or death.
f Operate the components while driving only if
the traffic situation allows you to do so safely.
f Carry out any complicated operating or setting procedures only with the vehicle stationary.
The reception conditions for the radio module
integrated in the PCM ch ange continuously as you
drive. Interference from buildings, terrain and the
weather is unavoidable.
FM stereo reception is particularly susceptible to
varying reception conditions.
Electronic accessories should only be retrofitted
by your authorized Porsche dealer. Accessories which have not been tested and
approved by Porsche may impair radio function
and reception.
NavigationWhen put into operation for the first time, a
distance of approx. 30 miles (50 km) must be
driven in order for the navigation system to
complete the process of fine calibration.
The same applies when the tires are changed (e.g.
summer/snow tires) or new tires fitted.
Full location accuracy is not yet achieved during
the fine-calibration process.
If the vehicle has been transported (e.g. ferry, car
train), the system may take a few minutes to deter-
mine the current locati
on after it has been
switched on.
Serious tire slip (e.g. spinning wheels on snow)
may result in temporaril y inaccurate navigation.
When the battery has been disconnected, it may
take up to 15 minutes before the navigation
system is operational again.
Car Audio Operation/Tips For radio operation see your radio manual
which is included with your on-board litera-
ture.
f Please see the chapter “LOAD SWITCH-OFF AF-
TER 2 HOURS OR 7 DAYS” on Page 236.
FM reception
A vehicle is not an ideal pl ace to listen to a radio.
Because the vehicle moves, reception conditions
are constantly changing.
Buildings, terrain, signal distance and noise from
other vehicles are all working against good recep-
tion.
Some conditions affecting FM may appear to be
problems when they are not.
The following characteristics are completely nor-
mal for a given reception area, and they do not in-
dicate any problem with the radio itself.
Note
Electronic accessories shou ld only be installed by
your authorized Porsche dealer.
Equipment which has not been tested and ap-
proved by Porsche may impair radio reception.
Page 108 of 284
106
Operation, Safety
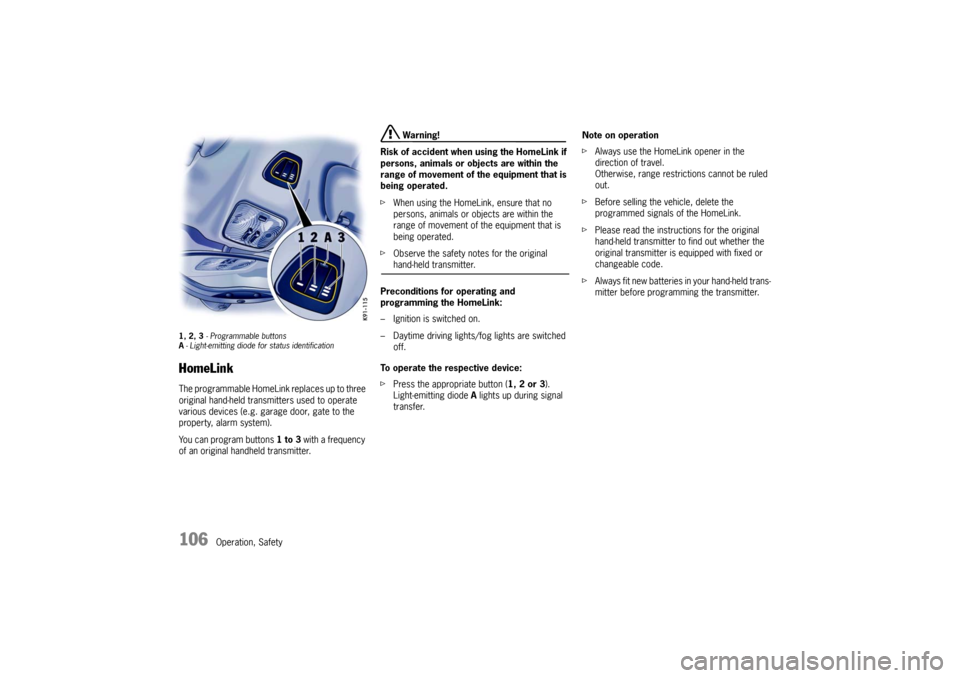
1, 2, 3 - Programmable buttons
A - Light-emitting diode for status identificationHomeLinkThe programmable HomeLink replaces up to three
original hand-held transmitters used to operate
various devices (e.g. garage door, gate to the
property, alarm system).
You can program buttons 1 to 3 with a frequency
of an original handheld transmitter.
Warning!
Risk of accident when using the HomeLink if
persons, animals or objects are within the
range of movement of the equipment that is
being operated.
f When using the HomeLink, ensure that no
persons, animals or objects are within the
range of movement of the equipment that is
being operated.
f Observe the safety notes for the original hand-held transmitter.
Preconditions for operating and
programming the HomeLink:
– Ignition is switched on.
– Daytime driving lights/fog lights are switched off.
To operate the respective device:
f Press the appropriate button ( 1, 2 or 3).
Light-emitting diode A lights up during signal
transfer. Note on operation
f
Always use the HomeLink opener in the
direction of travel.
Otherwise, range restrictions cannot be ruled
out.
f Before selling the vehicle, delete the
programmed signals of the HomeLink.
f Please read the instructions for the original
hand-held transmitter to find out whether the
original transmitter is equipped with fixed or
changeable code.
f Always fit new batteries in your hand-held trans-
mitter before programming the transmitter.
Page 109 of 284
Operation, Safety
107
Allocating signals to the buttonsfPlease follow the operating instructions for the
original hand-held transmitter.
Prior to programming the HomeLink for the
first time
The following process dele tes the standard codes
set at the factory. Do not repeat the process if you
program further buttons.
f Keep the two outer buttons 1 and 3
depressed for approx. 20 seconds until light-
emitting diode A begins to flash quickly.
All programmed signals of buttons 1 to 3 are
deleted. Programming HomeLink with fixed code
hand-held transmitters
1. Press and hold the desired button until the
light-emitting diode begins to flash slowly.
You then have approx. 5 minutes to perform
steps 2 and 3.
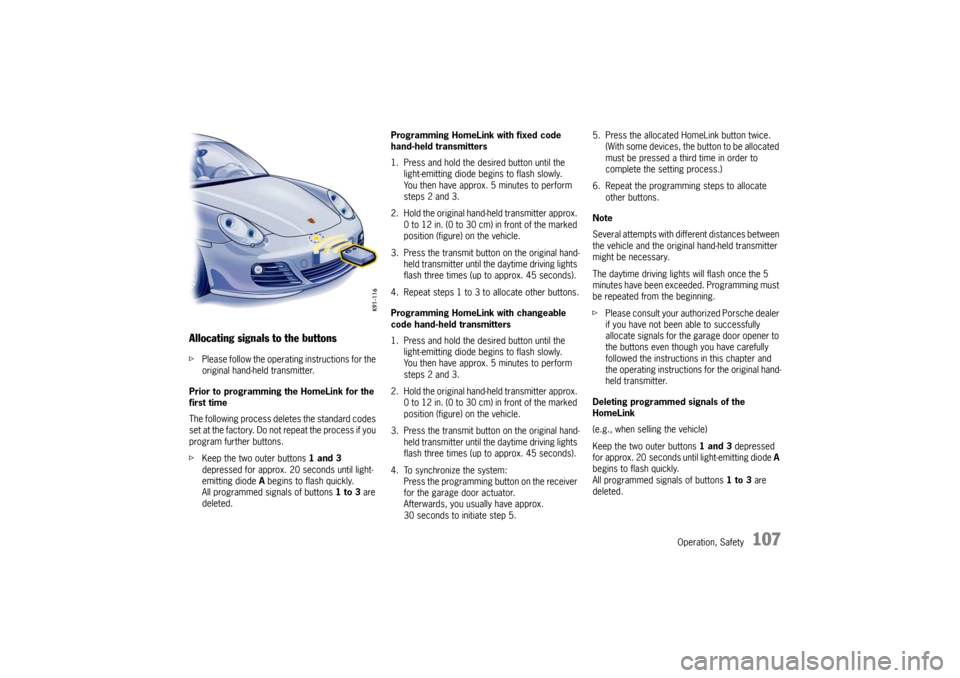
2. Hold the original hand -held transmitter approx.
0 to 12 in. (0 to 30 cm ) in front of the marked
position (figure) on the vehicle.
3. Press the transmit button on the original hand- held transmitter until the daytime driving lights
flash three times (up to approx. 45 seconds).
4. Repeat steps 1 to 3 to allocate other buttons.
Programming HomeLink with changeable
code hand-held transmitters
1. Press and hold the desired button until the light-emitting diode begins to flash slowly.
You then have approx. 5 minutes to perform
steps 2 and 3.
2. Hold the original hand -held transmitter approx.
0 to 12 in. (0 to 30 cm ) in front of the marked
position (figure) on the vehicle.
3. Press the transmit button on the original hand- held transmitter until the daytime driving lights
flash three times (up to approx. 45 seconds).
4. To synchronize the system: Press the programming button on the receiver
for the garage door actuator.
Afterwards, you usually have approx.
30 seconds to initiate step 5. 5. Press the allocated HomeLink button twice.
(With some devices, the button to be allocated
must be pressed a third time in order to
complete the setting process.)
6. Repeat the programming steps to allocate other buttons.
Note
Several attempts with different distances between
the vehicle and the original hand-held transmitter
might be necessary.
The daytime driving lights will flash once the 5
minutes have been exceeded. Programming must
be repeated from the beginning.
f Please consult your authorized Porsche dealer
if you have not been able to successfully
allocate signals for the garage door opener to
the buttons even though you have carefully
followed the instructions in this chapter and
the operating instructions for the original hand-
held transmitter.
Deleting programmed signals of the
HomeLink
(e.g., when selling the vehicle)
Keep the two outer buttons 1 and 3 depressed
for approx. 20 seconds until light-emitting diode A
begins to flash quickly.
All programmed signals of buttons 1 to 3 are
deleted.
Page 133 of 284

Instruments, On-Board Computer, Warnings
131
A- Adjustment button for clock
B - Clock
C - Outside temperature displayClock The clock is blanked out approximately four min-
utes after the ignition is switched off or when the
car is locked.
Setting the time
Warning!
Risk of loss of control or accident, resulting
in serious personal injury or death.
f Do not reach through the steering-wheel spokes while driving.
f Switch ignition on.
Setting hours
f Press adjustment button A for about one sec-
ond.
Hour display flashes.
f Turn button in the appropriate direction:
to right – increase hours figure
to left – decrease hours figure.
Adjustment in hours – turn button briefly
Fast adjustment (display cycles) –
turn and hold button.
Setting minutes
f Press adjustment button again.
Minutes display flashes.
f Set by rotating as in hours mode. Leaving adjustment mode
Automatically after one minute
or:
f Press adjustment button again.
When adjustment mode is deliberately left by
pressing the button, the time begins precisely to
the second.
Note
The time mode can be changed between 12h and
24h in the on-board computer.
Outside Temperature The outside temperature display C does not indi-
cate, if ice is on the road.
Even if a temperature above 32 °F (0 °C) is dis-
played, ice may still form on the road, for instance
on bridges or when the road passes through a
heavily shaded area.
Page 147 of 284
Instruments, On-Board Computer, Warnings
145
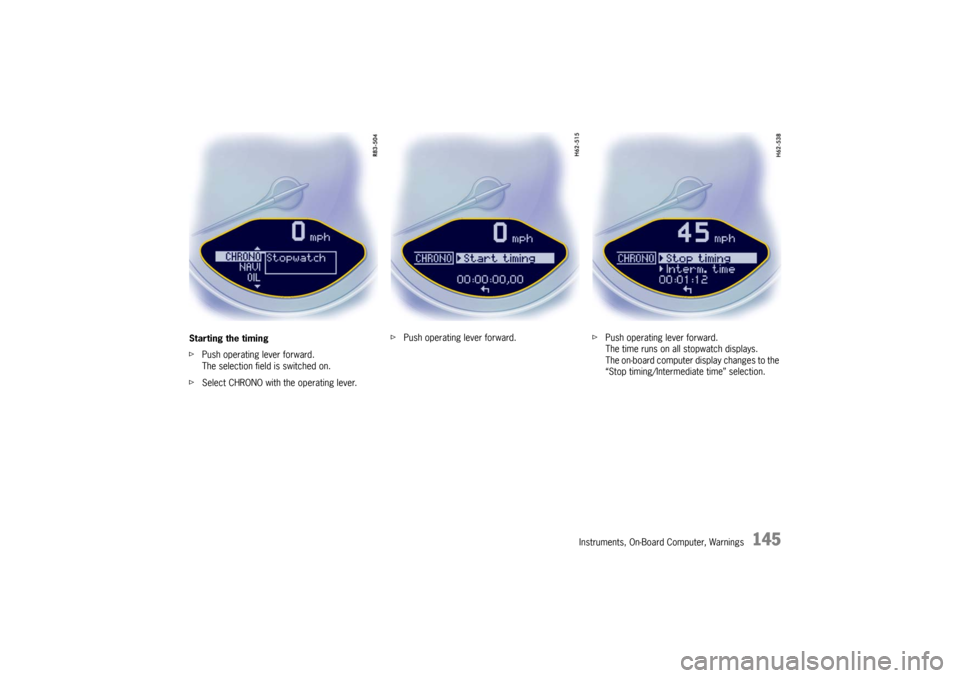
Starting the timing
fPush operating lever forward.
The selection field is switched on.
f Select CHRONO with the operating lever. f
Push operating lever forward. fPush operating lever forward.
The time runs on all stopwatch displays.
The on-board computer display changes to the
“Stop timing/Intermediate time” selection.
Page 148 of 284
146
Instruments, On-Board Computer, Warnings
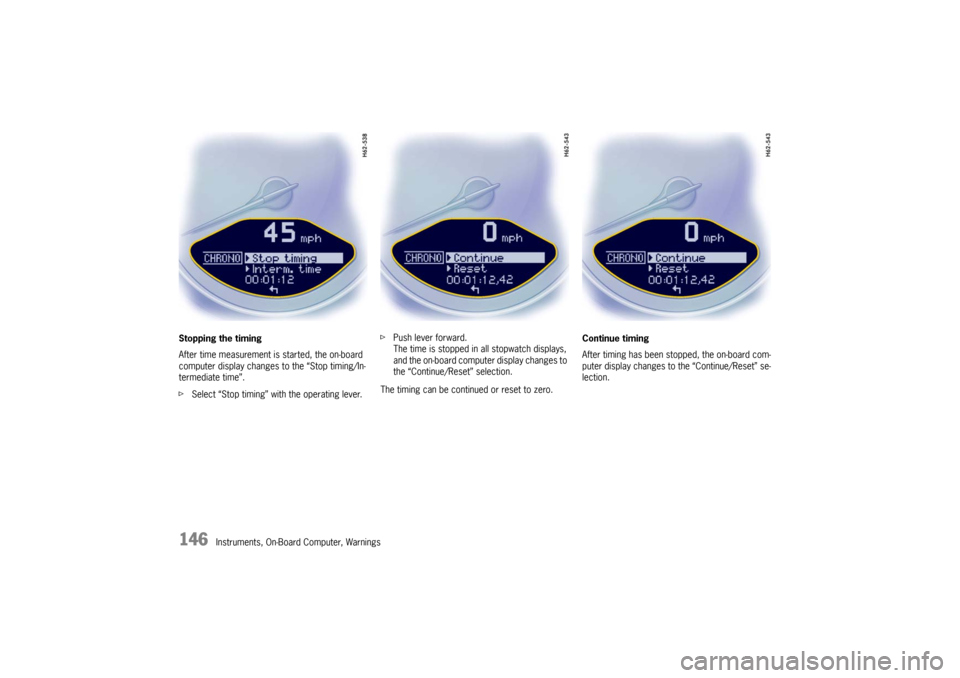
Stopping the timing
After time measurement is started, the on-board
computer display changes
to the “Stop timing/In-
termediate time”.
f Select “Stop timing” with the operating lever. f
Push lever forward.
The time is stopped in all stopwatch displays,
and the on-board computer display changes to
the “Continue/Reset” selection.
The timing can be continued or reset to zero. Continue timing
After timing has been stopped, the on-board com-
puter display changes to the “Continue/Reset” se-
lection.