2009 PONTIAC G8 center console
[x] Cancel search: center consolePage 9 of 356

Heated Seats
On vehicles with heated front seats,
the controls are located on the center
console. To operate the heated seats
the ignition must be on.
L(Heated Seat):Press to turn on
the heated seat.
A light indicates that the feature is
working. The number of indicator
lights shows the level of heat
selected: one for low, two for
medium, and three for high. Press
the button to cycle through the
temperature settings and to turn the
heat off.
Rear Seats
Rear Seat Operation
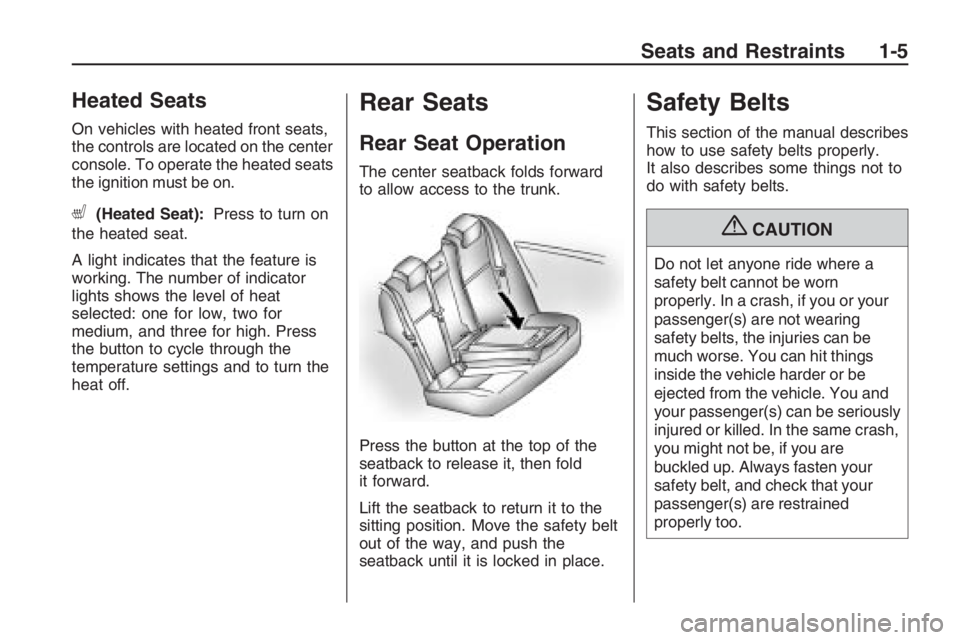
The center seatback folds forward
to allow access to the trunk.
Press the button at the top of the
seatback to release it, then fold
it forward.
Lift the seatback to return it to the
sitting position. Move the safety belt
out of the way, and push the
seatback until it is locked in place.
Safety Belts
This section of the manual describes
how to use safety belts properly.
It also describes some things not to
do with safety belts.
{CAUTION
Do not let anyone ride where a
safety belt cannot be worn
properly. In a crash, if you or your
passenger(s) are not wearing
safety belts, the injuries can be
much worse. You can hit things
inside the vehicle harder or be
ejected from the vehicle. You and
your passenger(s) can be seriously
injured or killed. In the same crash,
you might not be, if you are
buckled up. Always fasten your
safety belt, and check that your
passenger(s) are restrained
properly too.
Seats and Restraints 1-5
Page 65 of 356

The door lock cylinder turns freely
when either the wrong key is
used, or the correct key is not fully
inserted. The free turning door
lock feature prevents the lock from
being forced open.
To reset the lock, turn it to the
vertical position with the correct
key fully inserted. Remove the key
and insert it again.
If this does not reset the lock,
turn the key half-way around in
the cylinder and repeat the reset
procedure.Power Door Locks
The power door lock switch is
located on the center console.
K(Unlock):Press to unlock the
doors.
Q(Lock):Remove the key from
the ignition and press to lock
the doors.
Rear Door Security Locks
Your vehicle has rear door security
locks to prevent passengers
from opening the rear doors from
the inside.Open the rear doors to access the
security locks on the inside edge
of each door.
To set the locks, insert a key into
the slot and turn it to the horizontal
position. The door can only be
opened from the outside with the
door unlocked. To return the door to
normal operation, turn the slot to
the vertical position.
Keys, Doors and Windows 2-9
Page 71 of 356

Power Windows
A. Power Window Switches
B. Rear Window Lockout SwitchThe power window switches (A)
for all doors are located on the
center console. The switches work
when the ignition is in ON/RUN,
ACC/ACCESSORY, or in Retained
Accessory Power (RAP). See
Retained Accessory Power (RAP)
on page 8-3.
Press down or pull up on the switch
to open or close a window.
Express-Down Window
The driver and front passenger
window switches have an
express-down feature to allow the
window to be lowered without
holding the switch. Press the switch
down all the way, release it, and the
window goes down automatically.
Stop the window while it is lowering
by pressing or pulling the switch.
Rear Window Lockout
Press the lockout buttono(B),
to prevent rear seat passengers
from operating the windows.
Press the button again to turn the
feature off.
Rear Power Windows
The rear doors have their own
switches.
R:Press to open the window.
Q:Press to close the window.
Sun Visors
Pull the visor toward you, or move it
to the side to help reduce glare.
Keys, Doors and Windows 2-15
Page 73 of 356

mount, magnetic note pad holder,
or a similar magnetic item. If CAL
should ever display in the compass
window, the compass might need
calibration.
Press and hold
Yfor several
seconds to activate the compass
calibration mode. CAL displays in
the compass window on the mirror.
The mirror can be calibrated by
driving the vehicle in circles
at 5 mph (8 km/h) or less until the
display shows a direction.
Compass Variance
The mirror is set to zone eight.
If you do not live in zone eight or
drive out of the area, the compass
variance needs to be changed
to the appropriate zone.To adjust for compass variance:
1. Find the current location
and variance zone number on
the following zone map.
2. Press and holdYuntil zone
displays.
3. Once zone displays, press
Y
repeatedly until the correct
zone number displays. If CAL
displays in the compass window,
the compass might need
calibration. See “Compass
Calibration” explained previously.
Outside Power Mirror(s)
To adjust the mirrors:
1. With the ignition on, move the
selector switch located on the
center console to the left or right
to choose either the driver’s
or passenger side mirror.
2. Press the arrows located on the
four-way control pad to adjust
the mirror. Adjust each outside
mirror to see a little of your
vehicle, and the area behind
your vehicle.
Keep the selector switch in the
center position when not adjusting
either outside mirror.
Keys, Doors and Windows 2-17
Page 75 of 356

Storage
Storage
Glove Box..........................3-1
Cupholders.........................3-1
Center Console Storage.....3-1
Convenience Net................3-2
Storage
Glove Box
Lift the glovebox handle up to open
it. Use the key to lock and unlock
the glovebox.
Cupholders
For vehicles with a rear seat
cupholder, there is a cupholder on
the front edge of the rear seat
cushion. To open or close, press on
the cupholder.
Center Console Storage
A storage area is provided under the
front armrest.
To open, lift the latch on the
underside of the front edge and lift
the cover.
There is a coin holder towards the
front of the center console storage.
A rubber lining inside the storage
area has slots to hold CDs.
Storage 3-1
Page 85 of 356

Accessory Power
Outlet(s)
The accessory power outlets can be
used to connect auxiliary electrical
equipment, such as a cellular phone.
The vehicle has two accessory
power outlets. One accessory power
outlet is located under the climate
controls and the other is located
inside the center �oor console.
To use the outlet, the ignition
must be in ON/RUN or ACC/
ACCESSORY. Pull down the
small cover to access the outlet.
Notice:Leaving electrical
equipment on for extended
periods will drain the battery.
Always turn off electrical
equipment when not in use and
do not plug in equipment that
exceeds the maximum amperage
rating.This circuit is protected by a fuse and
has a maximum current level. Do not
use equipment exceeding the
maximum amperage rating.
Certain power accessory plugs may
not be compatible to the power
accessory outlet and could result in
blown vehicle or adapter fuses.
If you experience a problem see
your dealer/retailer for additional
information on the power accessory
plugs.
Notice:Adding any electrical
equipment to the vehicle
may damage it or keep other
components from working as they
should. The repairs would not
be covered by the vehicle
warranty. Do not use equipment
exceeding maximum amperage
rating of 10 amperes. Check with
your dealer/retailer before
adding electrical equipment.When adding electrical equipment,
be sure to follow the proper
installation instructions included
with the equipment.
Notice:Improper use of the
power outlet can cause damage
not covered by your warranty.
Do not hang any type of
accessory or accessory bracket
from the plug because the
power outlets are designed for
accessory power plugs only.
Instruments and Controls 4-9
Page 172 of 356

The length of time the heater should
remain plugged in depends on
several factors. Ask a dealer/retailer
in the area where you will be
parking the vehicle for the best
advice on this.
Automatic Transmission
Operation
The shift lever is located on the
center console between the
front seats.
There are several different positions
for the shift lever. When the
position of the shift lever is changed,a message is shown in the Driver
Information Center (DIC). The
selected gear is magni�ed in the
DIC, and changes according to the
shift lever’s movement. There
are also messages for Sport Shift
Mode, Normal Shift Mode and Driver
Shift Control.
P (Park):This position locks the
rear wheels. It is the best position
to use when the engine is started
because the vehicle cannot
move easily.
{CAUTION
It is dangerous to get out of the
vehicle if the shift lever is not fully
in P (Park) with the parking brake
�rmly set. The vehicle can roll.
Do not leave the vehicle when the
engine is running unless you have
to. If you have left the engine
(Continued)
CAUTION (Continued)
running, the vehicle can move
suddenly. You or others could be
injured. To be sure the vehicle will
not move, even when you are on
fairly level ground, always set the
parking brake and move the shift
lever to P (Park). SeeShifting Into
Park (Automatic Transmission) on
page 8-12. If you are pulling a
trailer, seeTowing a Trailer on
page 9-89.
Make sure the shift lever is fully
in P (Park) before starting the
engine. The vehicle has an
automatic transmission shift lock
control system. Fully apply the brake
pedal �rst and then press the shift
lever button before shifting from
P (Park) when the ignition key is in
ON/RUN or ACC/ACCESSORY.
If you cannot shift out of P (Park),
8-6 Driving and Operating
Page 348 of 356

B
Battery...............................9-28
Run-Down Protection.......... 5-4
Bluetooth
®..........................6-25
Brake Fluid.........................9-25
Brakes...............................9-25
System Warning Light.......4-15
Braking...............................8-17
Break-In, New Vehicle............ 8-2
Bulb Replacement................9-31
Front Turn Signal Lamps . . . 9-33
Halogen Bulbs..................9-31
Headlamp Aiming..............9-28
Headlamps and Parking
Lamps .........................9-31
License Plate Lamps.........9-35
Replacement Bulbs...........9-35
Taillamps.........................9-34
Buying New Tires.................9-59
C
Calibration..........................2-16
California Fuel.....................8-35
California Perchlorate
Materials Requirements....... 9-3California Proposition 65
Warning............................ 9-3
Canadian Owners..................... ii
Capacities and
Speci�cations...................10-2
Carbon
Monoxide........2-10, 8-14, 8-27
Care, Safety Belts................1-19
Cautions and Notices............... iii
CD, MP3 ............................6-20
Center Console
Storage Area..................... 3-1
Chains, Tire........................9-65
Charging System Light..........4-15
Check
Engine Lamp...................4-18
Chemical Paint Spotting......9-102
Child Restraints
Child Restraint Systems.....1-39
Infants and Young
Children.......................1-36
Lower Anchors and
Tethers for Children.......1-42
Older Children..................1-34
Securing..................1-48, 1-50
Where to Put the
Restraint......................1-40Cleaning
Exterior...........................9-98
Interior............................9-95
Underbody Maintenance . . . 9-102
Climate Control System.......... 7-1
Automatic.......................... 7-4
Outlet Adjustment............... 7-9
Clock, Setting........................ 6-2
Collision Damage Repair.....12-10
Compact Spare Tire.............9-83
Compass............................2-16
Compressor Kit, Tire
Sealant...........................9-67
Content Theft-Deterrent.........2-13
Control of a Vehicle..............8-17
Convenience Net................... 3-2
Coolant
Engine............................9-15
Engine Temperature Gage . . . 4-17
Cooling System...................9-13
Cruise Control....................... 4-5
Cupholders........................... 3-1
i-2 INDEX