Page 63 of 228
Seats, restraints
63
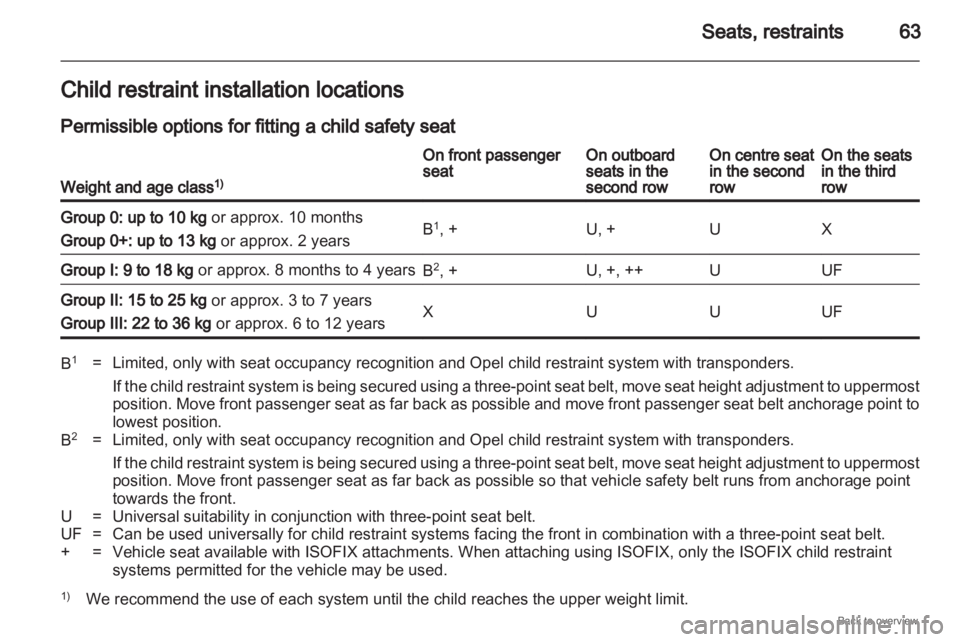
Child restraint installation locations
Permissible options for fitting a child safety seat
Weight and age class 1) On front passenger
seat On outboard
seats in the
second row On centre seat
in the second
row On the seats
in the third
row
Group 0: up to 10 kg or approx. 10 months
Group 0+: up to 13 kg or approx. 2 years
B
1
, + U, + U X
Group I: 9 to 18 kg or approx. 8 months to 4 years
B
2
, + U, +, ++ U UF
Group II: 15 to 25 kg or approx. 3 to 7 years
Group III: 22 to 36 kg or approx. 6 to 12 years
X U U UF
B
1
= Limited, only with seat occupancy recognition and Opel child restraint system with transponders.
If the child restraint system is being secured using a three-point seat belt, move seat height adjustment to uppermost
position. Move front passenger seat as far back as possible and move front passenger seat belt anchorage point to
lowest position.
B 2
= Limited, only with seat occupancy recognition and Opel child restraint system with transponders.
If
the child restraint system is being secured using a three-point seat belt, move seat height adjustment to uppermost
position. Move front passenger seat as far back as possible so that vehicle safety belt runs from anchorage point
towards the front.
U = Universal suitability in conjunction with three-point seat belt.
UF = Can be used universally for child restraint systems facing the front in combination with a three-point seat belt.
+ = Vehicle seat available with ISOFIX attachments. When attaching using ISOFIX, only the ISOFIX child restraint systems permitted for the vehicle may be used.
1) We recommend the use of each system until the child reaches the upper weight limit.
Page 69 of 228
Storage
69
Load compartment
Stowage in the load
compartment To open the cover, lift the carpeting.
Raise, rotate and lift the ring. The
stowage compartment contains the
vehicle tools
3 173 and the coupling
ball bar.
The
fuse box is on the left side behind
the cover in the load compartment
side panelling 3 171.
The tyre repair kit is on the right side
behind the cover 3 179. Load compartment cover
Do not place any heavy or sharp-
edged objects on the load
compartment cover.
Before operating the load
compartment cover, the rear seat
belts
must be fed through the side belt
holders.
Opening Remove load compartment cover
from side brackets. It rolls up
automatically. Closing
Pull the cover towards the rear using
the handle and engage it in the
retainers at the sides.
Removing
Open the load compartment cover.
Pull
the release lever up and hold. Lift
cover on right side and remove from
retainers.
Page 70 of 228
70
Storage
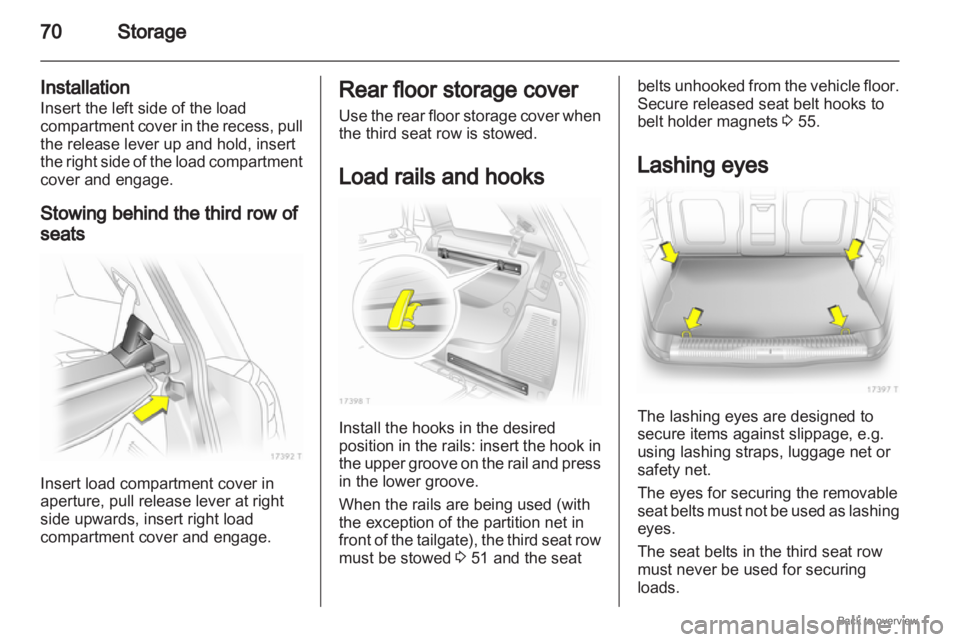
Installation
Insert the left side of the load
compartment cover in the recess, pull
the release lever up and hold, insert
the right side of the load compartment
cover and engage.
Stowing behind the third row of
seats Insert load compartment cover in
aperture, pull release lever at right
side upwards, insert right load
compartment cover and engage. Rear floor storage cover
Use
the rear floor storage cover when
the third seat row is stowed.
Load rails and hooks Install the hooks in the desired
position
in the rails: insert the hook in
the upper groove on the rail and press
in the lower groove.
When the rails are being used (with
the exception of the partition net in
front of the tailgate), the third seat row
must be stowed 3 51 and the seat belts unhooked from the vehicle floor.
Secure released seat belt hooks to
belt holder magnets
3 55.
Lashing eyes The lashing eyes are designed to
secure items against slippage, e.g.
using lashing straps, luggage net or
safety net.
The eyes for securing the removable
seat
belts must not be used as lashing
eyes.
The seat belts in the third seat row
must never be used for securing
loads.
Page 72 of 228
72
Storage
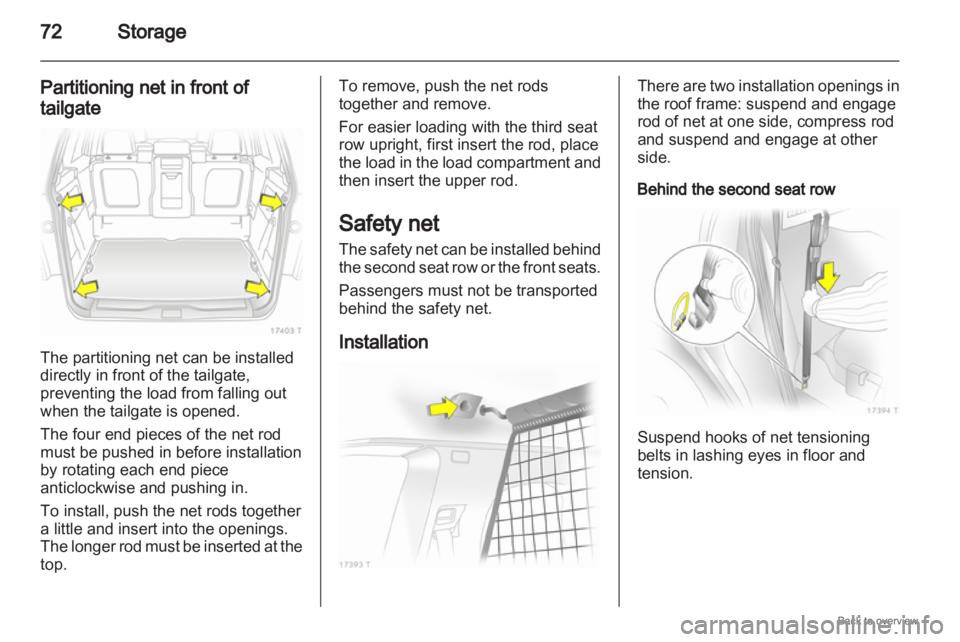
Partitioning net in front of
tailgate The partitioning net can be installed
directly in front of the tailgate,
preventing the load from falling out
when the tailgate is opened.
The four end pieces of the net rod
must be pushed in before installation
by rotating each end piece
anticlockwise and pushing in.
To install, push the net rods together
a little and insert into the openings.
The
longer rod must be inserted at the
top. To remove, push the net rods
together and remove.
For easier loading with the third seat
row upright, first insert the rod, place
the
load in the load compartment and
then insert the upper rod.
Safety net
The safety net can be installed behind
the second seat row or the front seats.
Passengers must not be transported
behind the safety net.
Installation There are two installation openings in
the roof frame: suspend and engage
rod of net at one side, compress rod
and suspend and engage at other
side.
Behind the second seat row
Suspend hooks of net tensioning
belts in lashing eyes in floor and
tension.
Page 73 of 228
Storage
73
Behind front seats Suspend hooks of net tensioning
belts in slots and tension.
Removal
Tilt length adjuster of the net
tensioning belt upwards and detach
the belt. Disengage the upper rod on
one
side, compress, disengage other
side and remove from the openings. Stowage
Place tensioning straps as shown in
figure and align to net. Roll the upper net rod down to
approximately over the middle.
Place the upper net rod over the
tensioning
straps next to the lower net
rod. The hooks on the upper net rod
must point away from the lower net
rod. Fasten Velcro tape tightly about the
net next to the length adjusters. The
length
adjusters and net rods must lie
flat next to each other.
Page 87 of 228

Instruments and controls
87
Turn signal
O illuminates or flashes green.
Illuminated
The control indicator illuminates
briefly when the parking lamps are
switched on.
Flashes
The control indicator flashes if a turn
signal or the hazard warning flashers
are activated.
Fast flashing: failure of a direction
indicator lamp or associated fuse,
failure of direction indicator lamp on
trailer.
Bulb replacement 3 160. Fuses
3 167.
Turn signals 3 111.
Seat belt reminder
X illuminates or flashes red.
Illuminated
After the ignition is switched on until
the seat belt is fastened. Flashes
After starting off until the seat belt is
fastened.
Fastening the seat belt
3 55.
Airbag and belt tensioners
v illuminates red.
When the ignition is switched on, the
control indicator illuminates for about
4 seconds. If it does not illuminate,
does not go out after 4 seconds or
illuminates whilst driving, there is
a fault in the belt tensioner, the
airbags or the seat occupancy
recognition
system. The systems may
fail to trigger in the event of an
accident.
Deployment of the belt tensioners or
airbags is indicated by continuous
illumination of v. 9
Warning Have the cause of the fault
eliminated immediately by
a workshop. Airbag system, belt tensioners
3 57,
3 54.
Seat occupancy
recognition
y illuminates or flashes yellow.
Illuminated
If the vehicle is equipped with seat
occupancy
recognition, y illuminates
for about 4 seconds after the ignition
is switched on.
If a child restraint system with
transponders is detected, y remains
illuminated. Only then may a child
restraint system with transponders be
used on the front passenger seat as
the front passenger airbag systems
are deactivated 3 61.
Page 100 of 228

100
Instruments and controls
Always day design: black or coloured
text on light background.
Always night design: white or
coloured text on dark background.
Selection is indicated by a o in front
of the menu item.
Ignition logic
See infotainment system manual. Vehicle messages
Messages are given via the
instrument panel display or as
warning and signal buzzers. Check
control messages appear on the
Info-Display. Some appear in an
abbreviated form. Confirm warning
messages 3 93, 3 96.
Warning chimes
When starting the engine or
whilst driving
■
If the electronic key is not presentor is not recognised.
■ If seat belt is not fastened.
■ If a door or the tailgate is not fully closed when starting off.
■ If a certain speed is exceeded with the hand brake applied.
■ If the speed programmed at the factory is exceeded.
■ If the vehicle has automated manual transmission and the
driver's door is opened when the engine is running, a gear is
engaged and the foot brake is not
depressed.
When the vehicle is parked and
the driver's door is opened ■
When the key is in the ignition switch.
■ With exterior lights on.
■ With Open&Start system and automatic transmission, if the
selector lever is not in P.
■ For automated manual transmission, if the hand brake is
not applied and no gear is engaged
when the engine is switched off.
Battery voltage
Low battery voltage in remote control
or electronic key. On vehicles without
check control, the message InSP3
appears in the instrument panel
display. Replace the battery 3 28,
3 29.
Page 126 of 228
126
Climate control
Air conditioning regular
operation
In order to ensure continuously
efficient performance, cooling must
be operated for a few minutes once
a month, irrespective of the weather
and time of year. Operation with
cooling is not possible when outside
temperature is low.
Service
For
optimal cooling performance, it is
recommended that the climate control
system be checked annually, starting
three years after initial vehicle
registration.
■ Functionality and pressure test
■ Heating functionality
■ Leakage check
■ Check of drive belts
■ Cleaning of condenser and evaporator drainage
■ Performance check


